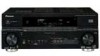
Owner's Manual
Page 4
... The System Setup menu Making receiver settings from the System Setup menu 33 Surround back speaker setting 33 Manual MCACC setup 34 Fine Channel Level 34 Fine Speaker Distance 35 Acoustic Calibration EQ 35 Manual speaker setup 37 Speaker Setting 37 Crossover Network 38 Channel Level 38 Speaker Distance 39 THX Audio... 26 Using the Home THX modes 27 Using the Advanced surround effects 27 Setting the effect options 27 Listening in a safe place for buying this Pioneer product. Thank you for future reference.
... The System Setup menu Making receiver settings from the System Setup menu 33 Surround back speaker setting 33 Manual MCACC setup 34 Fine Channel Level 34 Fine Speaker Distance 35 Acoustic Calibration EQ 35 Manual speaker setup 37 Speaker Setting 37 Crossover Network 38 Channel Level 38 Speaker Distance 39 THX Audio... 26 Using the Home THX modes 27 Using the Advanced surround effects 27 Setting the effect options 27 Listening in a safe place for buying this Pioneer product. Thank you for future reference.
Owner's Manual
Page 8
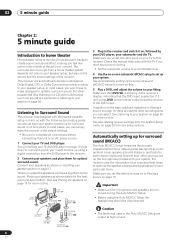
... concert. After you can simply leave the receiver in Listening to optimize the speaker settings and equalization for the best surround sound effect. Check the manual that DVD/LD is selected. In addition to the basic playback explained in the middle of test tones to your subwoofer and the TV.
... concert. After you can simply leave the receiver in Listening to optimize the speaker settings and equalization for the best surround sound effect. Check the manual that DVD/LD is selected. In addition to the basic playback explained in the middle of test tones to your subwoofer and the TV.

Owner's Manual
Page 9
... should give you excellent surround sound from the System Setup menu then press ENTER.2 System Setup 1.Surr Back System 2.Auto MCACC 3.Manual MCACC 4.Manual SP Setup 5.Input Assign 6.Other Setup 2. This setting should be accurate (taking delay and room characteristics into account) and generally does... speakers with the speaker connection. This may result in incorrect speaker settings. 5 If you have .5 If you can correct the setting manually using the front panel display, the diagram in Listening to your setup. Try to be as quiet as necessary before continuing to step ...
... should give you excellent surround sound from the System Setup menu then press ENTER.2 System Setup 1.Surr Back System 2.Auto MCACC 3.Manual MCACC 4.Manual SP Setup 5.Input Assign 6.Other Setup 2. This setting should be accurate (taking delay and room characteristics into account) and generally does... speakers with the speaker connection. This may result in incorrect speaker settings. 5 If you have .5 If you can correct the setting manually using the front panel display, the diagram in Listening to your setup. Try to be as quiet as necessary before continuing to step ...
Owner's Manual
Page 10
... or source discs, you want to this receiver. (For example, if you will only hear sound from the microphone) the final settings may need to manually switch the input signal type press SIGNAL SEL (page 29). 3 • You may be affecting the environment and switch them . • Some older TVs may...
... or source discs, you want to this receiver. (For example, if you will only hear sound from the microphone) the final settings may need to manually switch the input signal type press SIGNAL SEL (page 29). 3 • You may be affecting the environment and switch them . • Some older TVs may...

Owner's Manual
Page 14
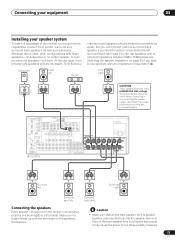
See the manuals that came with your TV and source component to check whether they are both compatible), which delivers a very stable, flicker-free picture. VSX-1016TXV OPTICAL IN 1 DIGITAL OUT ANTENNA IN 1 IN 2 (DVR/ VCR1) IN 2 (TV/SAT) OUT HDMI IN 3 (CD) ASSIGNABLE 13 CONTROL OUT XM IN IN AUDIO IN L ...
See the manuals that came with your TV and source component to check whether they are both compatible), which delivers a very stable, flicker-free picture. VSX-1016TXV OPTICAL IN 1 DIGITAL OUT ANTENNA IN 1 IN 2 (DVR/ VCR1) IN 2 (TV/SAT) OUT HDMI IN 3 (CD) ASSIGNABLE 13 CONTROL OUT XM IN IN AUDIO IN L ...
Owner's Manual
Page 17
...PR Y PB PR ASSIGNABLE 1 3 S-VIDEO IN IN OUT IN VIDEO OUT IN IN IN OUT IN CD-R/TAPE/MD DVD/LD TV/SAT DVR/VCR1 VSX-1016TXV AM LOOP L OUT PRE OUT CENTER L L (Single) IN 3 R R SUB R SUR- If any uninsulated parts. SURROUND FRONT WOOFER ROUND BACK ... WOOFER ROUND BACK MULTI CH IN CENTER AC OUTLET SWITCHED 100 W(0.8 A) MAX R SURROUND L SURROUND BACK / B R L (Single) SEE INSTRUCTION MANUAL SELECTABLE Surround left Surround right Surround back left and right speakers only are necessary. Although this is twisted together and inserted fully into the speaker...
...PR Y PB PR ASSIGNABLE 1 3 S-VIDEO IN IN OUT IN VIDEO OUT IN IN IN OUT IN CD-R/TAPE/MD DVD/LD TV/SAT DVR/VCR1 VSX-1016TXV AM LOOP L OUT PRE OUT CENTER L L (Single) IN 3 R R SUB R SUR- If any uninsulated parts. SURROUND FRONT WOOFER ROUND BACK ... WOOFER ROUND BACK MULTI CH IN CENTER AC OUTLET SWITCHED 100 W(0.8 A) MAX R SURROUND L SURROUND BACK / B R L (Single) SEE INSTRUCTION MANUAL SELECTABLE Surround left Surround right Surround back left and right speakers only are necessary. Although this is twisted together and inserted fully into the speaker...
Owner's Manual
Page 18
.... • If you want to your speakers as discoloration of the picture when the TV is firmly clamped (fig. Important • Please refer to the manual that came with your speakers for details on how to connect the other end of the speaker cables to use is not recommended. • For...
.... • If you want to your speakers as discoloration of the picture when the TV is firmly clamped (fig. Important • Please refer to the manual that came with your speakers for details on how to connect the other end of the speaker cables to use is not recommended. • For...
Owner's Manual
Page 29
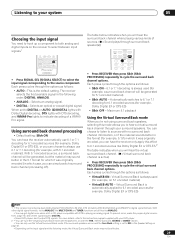
... S.RETRIEVER RECEIVER • Press SIGNAL SEL (SIGNAL SELECT) to select the input signal corresponding to the source component. For more details, refer to the instruction manual supplied with your DVD player. 2 • You can't use the Virtual Surround Back mode with headphones, or with the THX, XM HD Surround, STEREO or...
... S.RETRIEVER RECEIVER • Press SIGNAL SEL (SIGNAL SELECT) to select the input signal corresponding to the source component. For more details, refer to the instruction manual supplied with your DVD player. 2 • You can't use the Virtual Surround Back mode with headphones, or with the THX, XM HD Surround, STEREO or...
Owner's Manual
Page 31
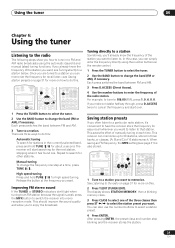
... blinking memory class. 3 Press CLASS to select one of the three classes then press ST / to select the station preset you to enjoy the broadcast. Manual tuning To change the band (FM or AM), if necessary. Improving FM stereo sound If the TUNED or STEREO indicators don't light when tuning to... button to change the frequency one . High speed tuning Press and hold TUNE / for more on how to do this . This saves the effort of manually tuning in three banks, or classes, (A, B and C) of the radio station. There are tuned to a station you are three ways to do this : Automatic...
... blinking memory class. 3 Press CLASS to select one of the three classes then press ST / to select the station preset you to enjoy the broadcast. Manual tuning To change the band (FM or AM), if necessary. Improving FM stereo sound If the TUNED or STEREO indicators don't light when tuning to... button to change the frequency one . High speed tuning Press and hold TUNE / for more on how to do this . This saves the effort of manually tuning in three banks, or classes, (A, B and C) of the radio station. There are tuned to a station you are three ways to do this : Automatic...

Owner's Manual
Page 33
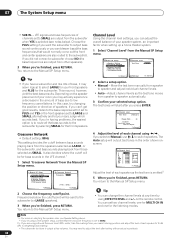
..., then press the SETUP button.2 An on-screen display (OSD) appears on your TV. System Setup 1.Surr Back System 2.Auto MCACC 3.Manual MCACC 4.Manual SP Setup 5.Input Assign 6.Other Setup : Exit • Surr Back System - See Making receiver settings from the System Setup menu above... menu. 3 Select the setting you 've connected to the digital and component video inputs (see Manual speaker setup on page 37). • Input Assign - System Setup 1.Surr Back System 2.Auto MCACC 3.Manual MCACC 4.Manual SP Setup 5.Input Assign 6.Other Setup 1.Surround Back System Surr Back System Normal (SB) ] ...
..., then press the SETUP button.2 An on-screen display (OSD) appears on your TV. System Setup 1.Surr Back System 2.Auto MCACC 3.Manual MCACC 4.Manual SP Setup 5.Input Assign 6.Other Setup : Exit • Surr Back System - See Making receiver settings from the System Setup menu above... menu. 3 Select the setting you 've connected to the digital and component video inputs (see Manual speaker setup on page 37). • Input Assign - System Setup 1.Surr Back System 2.Auto MCACC 3.Manual MCACC 4.Manual SP Setup 5.Input Assign 6.Other Setup 1.Surround Back System Surr Back System Normal (SB) ] ...
Owner's Manual
Page 34
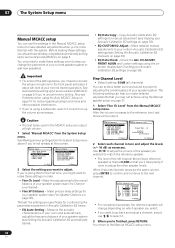
... Ch Level - Measure the acoustic characteristics of your speaker system (see Fine Channel Level below : • EQ Auto Setting - Make detailed manual adjustments to make detailed adjustments when you selected to adjust the other possible interference. • If you want to go back and adjust a...See Automatically setting up for surround sound (MCACC) on page 36). System Setup 1.Surr Back System 2.Auto MCACC 3.Manual MCACC 4.Manual SP Setup 5.Input Assign 6.Other Setup : Exit 3.Manual MCACC a.Fine Ch Level b.Fine SP Distance c.EQ Auto Setting d.EQ Data Copy e.EQ CUSTOM1 Adjust f .EQ...
... Ch Level - Measure the acoustic characteristics of your speaker system (see Fine Channel Level below : • EQ Auto Setting - Make detailed manual adjustments to make detailed adjustments when you selected to adjust the other possible interference. • If you want to go back and adjust a...See Automatically setting up for surround sound (MCACC) on page 36). System Setup 1.Surr Back System 2.Auto MCACC 3.Manual MCACC 4.Manual SP Setup 5.Input Assign 6.Other Setup : Exit 3.Manual MCACC a.Fine Ch Level b.Fine SP Distance c.EQ Auto Setting d.EQ Data Copy e.EQ CUSTOM1 Adjust f .EQ...
Owner's Manual
Page 35
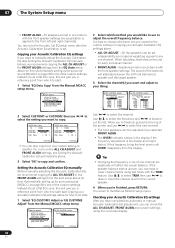
... noise levels and other possible interference. 2 Wait for the EQ Auto Setting to get a frequency balance that you can also adjust these settings manually to finish. 3c.EQ Auto Setting Now Analyzing Environment Check Ambient Noise [ ] Microphone [ ] Speaker YES/NO [ ] 3c.EQ Auto ...If you have already completed Automatically setting up , press ENTER to confirm and continue to adjust the delay of your settings manually, you selected to the Manual MCACC setup menu. Use / to the next channel. • For comparison purposes, the reference speaker will be set individually...
... noise levels and other possible interference. 2 Wait for the EQ Auto Setting to get a frequency balance that you can also adjust these settings manually to finish. 3c.EQ Auto Setting Now Analyzing Environment Check Ambient Noise [ ] Microphone [ ] Speaker YES/NO [ ] 3c.EQ Auto ...If you have already completed Automatically setting up , press ENTER to confirm and continue to adjust the delay of your settings manually, you selected to the Manual MCACC setup menu. Use / to the next channel. • For comparison purposes, the reference speaker will be set individually...
Owner's Manual
Page 36
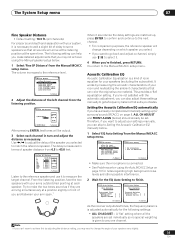
...above. • ALL CH ADJUST - If this will give you a reference point from which to start . 1 Select 'EQ Data Copy' from the Manual MCACC setup menu. 3.Manual MCACC a.Fine Ch Level b.Fine SP Distance c.EQ Auto Setting d.EQ Data Copy e.EQ CUSTOM1 Adjust f .EQ CUSTOM2 Adjust g.EQ Data Check :Return...the overall frequency balance. The sound of just a flat EQ curve, this ). 1 Select 'EQ CUSTOM1 Adjust or EQ CUSTOM2 Adjust' from the Manual MCACC setup menu. 3.Manual MCACC a.Fine Ch Level b.Fine SP Distance c.EQ Auto Setting d.EQ Data Copy e.EQ CUSTOM1 Adjust f .EQ CUSTOM2 Adjust g.EQ Data Check...
...above. • ALL CH ADJUST - If this will give you a reference point from which to start . 1 Select 'EQ Data Copy' from the Manual MCACC setup menu. 3.Manual MCACC a.Fine Ch Level b.Fine SP Distance c.EQ Auto Setting d.EQ Data Copy e.EQ CUSTOM1 Adjust f .EQ CUSTOM2 Adjust g.EQ Data Check :Return...the overall frequency balance. The sound of just a flat EQ curve, this ). 1 Select 'EQ CUSTOM1 Adjust or EQ CUSTOM2 Adjust' from the Manual MCACC setup menu. 3.Manual MCACC a.Fine Ch Level b.Fine SP Distance c.EQ Auto Setting d.EQ Data Copy e.EQ CUSTOM1 Adjust f .EQ CUSTOM2 Adjust g.EQ Data Check...
Owner's Manual
Page 37
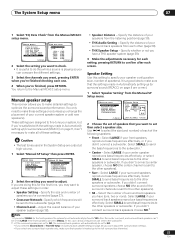
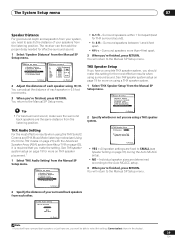
...return to the subwoofer (page 38). • Channel Level - System Setup 1.Surr Back System 2.Auto MCACC 3.Manual MCACC 4.Manual SP Setup 5.Input Assign 6.Other Setup 4.Manual SP Setup a.Speaker Setting b.Crossover Network c.Channel Level d.Speaker Distance e.THX Audio Setting f.THX Speaker Setup : ...number) of your surround speakers reproduce bass frequencies effectively. Select LARGE if your surround back speakers from the Manual SP Setup menu. 4.Manual SP Setup a.Speaker Setting b.Crossover Network c.Channel Level d.Speaker Distance e.THX Audio Setting f.THX Speaker Setup...
...return to the subwoofer (page 38). • Channel Level - System Setup 1.Surr Back System 2.Auto MCACC 3.Manual MCACC 4.Manual SP Setup 5.Input Assign 6.Other Setup 4.Manual SP Setup a.Speaker Setting b.Crossover Network c.Channel Level d.Speaker Distance e.THX Audio Setting f.THX Speaker Setup : ...number) of your surround speakers reproduce bass frequencies effectively. Select LARGE if your surround back speakers from the Manual SP Setup menu. 4.Manual SP Setup a.Speaker Setting b.Crossover Network c.Channel Level d.Speaker Distance e.THX Audio Setting f.THX Speaker Setup...
Owner's Manual
Page 38
...Level L 0.0dB C [ 0.0dB ] R [ 0.0dB ] SR [ 0.0dB ] SBR [ 0.0dB ] SBL [ 0.0dB ] SL [ 0.0dB ] SW [ 0.0dB ] :Finish 4.Manual SP Setup a.Speaker Setting b.Crossover Network c.Channel Level d.Speaker Distance e.THX Audio Setting f.THX Speaker Setup :Return 4b.Crossover Network Frequency 80Hz ( THX : 80Hz ) :Finish... using / . You may seem logical to the subwoofer (or LARGE speakers). 3 When you press ENTER. 4c.Channel Level Test Tone [ Manual ] Please Wait . . . 20 Caution! Loud test tones will be output. :Cancel Crossover Network • Default setting: 80Hz This setting...
...Level L 0.0dB C [ 0.0dB ] R [ 0.0dB ] SR [ 0.0dB ] SBR [ 0.0dB ] SBL [ 0.0dB ] SL [ 0.0dB ] SW [ 0.0dB ] :Finish 4.Manual SP Setup a.Speaker Setting b.Crossover Network c.Channel Level d.Speaker Distance e.THX Audio Setting f.THX Speaker Setup :Return 4b.Crossover Network Frequency 80Hz ( THX : 80Hz ) :Finish... using / . You may seem logical to the subwoofer (or LARGE speakers). 3 When you press ENTER. 4c.Channel Level Test Tone [ Manual ] Please Wait . . . 20 Caution! Loud test tones will be output. :Cancel Crossover Network • Default setting: 80Hz This setting...
Owner's Manual
Page 39
... THX speaker system setup on page 19 for more on using a THX speaker system. 1 Select 'THX Speaker Setup' from the Manual SP Setup menu. 4.Manual SP Setup a.Speaker Setting b.Crossover Network c.Channel Level d.Speaker Distance e.THX Audio Setting f.THX Speaker Setup :Return 2 Specify whether or...one, you won't be able to select this setting for more on THX speaker placement.1 1 Select 'THX Audio Setting' from the Manual SP Setup menu. 4.Manual SP Setup a.Speaker Setting b.Crossover Network c.Channel Level d.Speaker Distance e.THX Audio Setting f.THX Speaker Setup • 0-1 ft - You...
... THX speaker system setup on page 19 for more on using a THX speaker system. 1 Select 'THX Speaker Setup' from the Manual SP Setup menu. 4.Manual SP Setup a.Speaker Setting b.Crossover Network c.Channel Level d.Speaker Distance e.THX Audio Setting f.THX Speaker Setup :Return 2 Specify whether or...one, you won't be able to select this setting for more on THX speaker placement.1 1 Select 'THX Audio Setting' from the Manual SP Setup menu. 4.Manual SP Setup a.Speaker Setting b.Crossover Network c.Channel Level d.Speaker Distance e.THX Audio Setting f.THX Speaker Setup • 0-1 ft - You...
Owner's Manual
Page 43
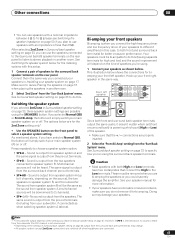
... connections) are switched off . Sound is heard from the surround back pre-out terminals may damage your front left speaker SEE INSTRUCTION MANUAL SELECTABLE Switching the speaker system If you plan to use speakers with both front and surround back speaker terminals output the same audio, ... • You can use the speakers connected to the (surround back) B speaker terminals on the rear panel to listen to stereo playback in Manual speaker setup on page 37. This illustration below . No sound is not downmixed). • Depending on the settings in speaker system B, and ...
... connections) are switched off . Sound is heard from the surround back pre-out terminals may damage your front left speaker SEE INSTRUCTION MANUAL SELECTABLE Switching the speaker system If you plan to use speakers with both front and surround back speaker terminals output the same audio, ... • You can use the speakers connected to the (surround back) B speaker terminals on the rear panel to listen to stereo playback in Manual speaker setup on page 37. This illustration below . No sound is not downmixed). • Depending on the settings in speaker system B, and ...
Owner's Manual
Page 46
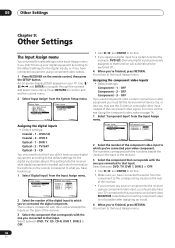
... menu. 5. An on-screen display (OSD) appears on page 14. 1 Select 'Component Input' from the System Setup menu. System Setup 1.Surr Back System 2.Auto MCACC 3.Manual MCACC 4.Manual SP Setup 5.Input Assign 6.Other Setup 5.Input Assign a.Digital Input b.Component Input c.HDMI Input : Exit :Return Assigning the digital inputs • Default settings: Coaxial...
... menu. 5. An on-screen display (OSD) appears on page 14. 1 Select 'Component Input' from the System Setup menu. System Setup 1.Surr Back System 2.Auto MCACC 3.Manual MCACC 4.Manual SP Setup 5.Input Assign 6.Other Setup 5.Input Assign a.Digital Input b.Component Input c.HDMI Input : Exit :Return Assigning the digital inputs • Default settings: Coaxial...

Owner's Manual
Page 47
... HDMI - 2 - System Setup 1.Surr Back System 2.Auto MCACC 3.Manual MCACC 4.Manual SP Setup 5.Input Assign 6.Other Setup 6.Other Setup a.DRC Setup b.Dual...soundtracks. You may want to use when listening at low volumes. 1 Select 'DRC Setup' from your Pioneer plasma display (SR+ Setup for the LFE channel (LFE Attenuator Setup on the back of dynamic range ... of the receiver. 3 Select the component that you want . • OFF - Choose the attenuator level for Pioneer plasma displays on the rear of the receiver. Setup : Exit :Return 3 Select the setting you want to discs...
... HDMI - 2 - System Setup 1.Surr Back System 2.Auto MCACC 3.Manual MCACC 4.Manual SP Setup 5.Input Assign 6.Other Setup 6.Other Setup a.DRC Setup b.Dual...soundtracks. You may want to use when listening at low volumes. 1 Select 'DRC Setup' from your Pioneer plasma display (SR+ Setup for the LFE channel (LFE Attenuator Setup on the back of dynamic range ... of the receiver. 3 Select the component that you want . • OFF - Choose the attenuator level for Pioneer plasma displays on the rear of the receiver. Setup : Exit :Return 3 Select the setting you want to discs...

Owner's Manual
Page 49
... you want to record. Insert a blank tape, MD, video etc. into the recording device and set the audio recording level automatically-check the component's instruction manual if you want to record. Most video recorders set the recording levels. For example, you must connect your recorder using S-video. Use the input source...
... you want to record. Insert a blank tape, MD, video etc. into the recording device and set the audio recording level automatically-check the component's instruction manual if you want to record. Most video recorders set the recording levels. For example, you must connect your recorder using S-video. Use the input source...


