Owner's Manual
Page 4
... AM/FM antennas 31 Connecting external antennas 31 MULTI-ZONE setup 32 Making MULTI-ZONE connections 32 Connecting Optional Bluetooth ADAPTER . . . 33 Connecting a SiriusConnect™ Tuner 34 Connecting to the network through these operating instructions so you have finished reading the instructions, put them away... terminal 35 Connecting an iPod 36 Connecting a USB device 37 Connecting a USB device for Advanced MCACC output 37 Connecting an IR receiver 38 Operating other Pioneer components with this Pioneer product. After you will know how to station presets 53 4 En
... AM/FM antennas 31 Connecting external antennas 31 MULTI-ZONE setup 32 Making MULTI-ZONE connections 32 Connecting Optional Bluetooth ADAPTER . . . 33 Connecting a SiriusConnect™ Tuner 34 Connecting to the network through these operating instructions so you have finished reading the instructions, put them away... terminal 35 Connecting an iPod 36 Connecting a USB device 37 Connecting a USB device for Advanced MCACC output 37 Connecting an IR receiver 38 Operating other Pioneer components with this Pioneer product. After you will know how to station presets 53 4 En

Owner's Manual
Page 36
... the cable connection, also refer to the operating instructions for your iPod to the iPod/iPhone/USB terminal on the front panel of this case it is not possible to connect your iPod. VSX-31: iPod CONTROL ON / OFF MASTER VOLUME MCACC SETUP MIC iPod iPhone USB VIDEO CAMERA HDMI...
... the cable connection, also refer to the operating instructions for your iPod to the iPod/iPhone/USB terminal on the front panel of this case it is not possible to connect your iPod. VSX-31: iPod CONTROL ON / OFF MASTER VOLUME MCACC SETUP MIC iPod iPhone USB VIDEO CAMERA HDMI...
Owner's Manual
Page 37
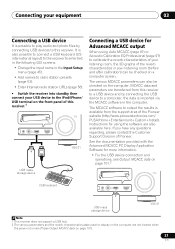
...on the front panel of the reverb characteristics in the computer. Instructions for using Auto MCACC (page 91) or Acoustic Calibration EQ Professional (page 97) to a computer, the data is imported via the MCACC software in your listening room (before and after calibration) can ...ON / OFF MASTER VOLUME MCACC SETUP MIC iPod iPhone USB VIDEO CAMERA HDMI 5 VSX-31 USB mass storage device Connecting a USB device for display on a computer screen. If you have any questions regarding, please contact the Customer Support Division of the Pioneer website (http://www.pioneerelectronics....
...on the front panel of the reverb characteristics in the computer. Instructions for using Auto MCACC (page 91) or Acoustic Calibration EQ Professional (page 97) to a computer, the data is imported via the MCACC software in your listening room (before and after calibration) can ...ON / OFF MASTER VOLUME MCACC SETUP MIC iPod iPhone USB VIDEO CAMERA HDMI 5 VSX-31 USB mass storage device Connecting a USB device for display on a computer screen. If you have any questions regarding, please contact the Customer Support Division of the Pioneer website (http://www.pioneerelectronics....

Owner's Manual
Page 41
... Basic Setup Changing the OSD display language (OSD Language) The language used in these operating instructions are not moved during the Auto MCACC Setup. • Using the Auto MCACC Setup will overwrite any existing settings for when English is completed and the System Setup menu ...menu items. Press RETURN to change the language. Manual SP Setup b. Input Setup c. Automatically conducting optimum sound tuning (Auto MCACC The Auto MCACC Setup measures the acoustic characteristics of test tones to Playing a source on the Graphical User Interface (GUI) screen can be changed...
... Basic Setup Changing the OSD display language (OSD Language) The language used in these operating instructions are not moved during the Auto MCACC Setup. • Using the Auto MCACC Setup will overwrite any existing settings for when English is completed and the System Setup menu ...menu items. Press RETURN to change the language. Manual SP Setup b. Input Setup c. Automatically conducting optimum sound tuning (Auto MCACC The Auto MCACC Setup measures the acoustic characteristics of test tones to Playing a source on the Graphical User Interface (GUI) screen can be changed...

Owner's Manual
Page 43
...while the speaker configuration check screen is happening. A progress report is switched on this is being displayed, the Auto MCACC Setup will resume automatically. It may take 3 to determine the speakers present in incorrect speaker settings. 2 If ...that affect the phase (dipole speakers, reflective speakers, etc.), Reverse Phase may result in your setup. See Checking MCACC Data on page 100 for more test tones to view the settings from this .1 If no operations are performed .... Basic Setup 04 4 Press RECEIVER and then select START. 5 Follow the instructions on-screen.
...while the speaker configuration check screen is happening. A progress report is switched on this is being displayed, the Auto MCACC Setup will resume automatically. It may take 3 to determine the speakers present in incorrect speaker settings. 2 If ...that affect the phase (dipole speakers, reflective speakers, etc.), Reverse Phase may result in your setup. See Checking MCACC Data on page 100 for more test tones to view the settings from this .1 If no operations are performed .... Basic Setup 04 4 Press RECEIVER and then select START. 5 Follow the instructions on-screen.

Owner's Manual
Page 44
... (too much background noise, echo off if necessary. In this seems to be changed. • If Auto MCACC Setup measurement results are any instructions showing in the front panel display, please follow them off the walls, obstacles blocking the speakers from the listening position. You ...can correct the setting manually using the Auto MCACC Setup If the room environment is hooked up to which you didn't ...
... (too much background noise, echo off if necessary. In this seems to be changed. • If Auto MCACC Setup measurement results are any instructions showing in the front panel display, please follow them off the walls, obstacles blocking the speakers from the listening position. You ...can correct the setting manually using the Auto MCACC Setup If the room environment is hooked up to which you didn't ...

Owner's Manual
Page 65
...playback of non-PCM sources. Selects an analog signal. • DIGITAL - Listening to your system 06 Selecting MCACC presets • Default setting: MEMORY 1 If you have calibrated your system for different listening positions1, you can...playing a video game close to the TV). • While listening to a source, press RECEIVER , then press MCACC. For more details, refer to the source component. Press repeatedly to check and manage your DVD player. 4 When... SEL to select the input signal corresponding to the instruction manual supplied with DTS is not assigned by default.
...playback of non-PCM sources. Selects an analog signal. • DIGITAL - Listening to your system 06 Selecting MCACC presets • Default setting: MEMORY 1 If you have calibrated your system for different listening positions1, you can...playing a video game close to the TV). • While listening to a source, press RECEIVER , then press MCACC. For more details, refer to the source component. Press repeatedly to check and manage your DVD player. 4 When... SEL to select the input signal corresponding to the instruction manual supplied with DTS is not assigned by default.

Owner's Manual
Page 79
...shows each of the front panel display. You can use this . Most video recorders set the audio recording level automatically-check the component's instruction manual if you can fall asleep without worrying about the receiver being left on or off. Use the remote control to set the sleep...time. 30 min 60 min Dimming the display You can choose between four brightness levels for three seconds each: Input Source ↓ Sampling Frequency ↓ MCACC preset ↓ ZONE 2 input 2 When you can hear distortion in the sound.1 • Press RECEIVER , then press A.ATT to switch the ...
...shows each of the front panel display. You can use this . Most video recorders set the audio recording level automatically-check the component's instruction manual if you can fall asleep without worrying about the receiver being left on or off. Use the remote control to set the sleep...time. 30 min 60 min Dimming the display You can choose between four brightness levels for three seconds each: Input Source ↓ Sampling Frequency ↓ MCACC preset ↓ ZONE 2 input 2 When you can hear distortion in the sound.1 • Press RECEIVER , then press A.ATT to switch the ...

Owner's Manual
Page 92
... 1 If you selected ALL or Keep SP System as tabletops and sofa tops. 92 En CONTROL ON / OFF MASTER VOLUME MCACC SETUP MIC iPod iPhone USB VIDEO CAMERA HDMI 5 VSX-31 Microphone Tripod If you have a tripod, use two more reference points for which test tones will be analyzed for standing waves... you can use some other object to install the microphone.3 4 When you're finished setting the options, select START then press ENTER. 5 Follow the instructions on-screen. • Make sure the microphone is connected. • If you're using a subwoofer, it is EQ Pro & S-Wave) - 10 The ...
... 1 If you selected ALL or Keep SP System as tabletops and sofa tops. 92 En CONTROL ON / OFF MASTER VOLUME MCACC SETUP MIC iPod iPhone USB VIDEO CAMERA HDMI 5 VSX-31 Microphone Tripod If you have a tripod, use two more reference points for which test tones will be analyzed for standing waves... you can use some other object to install the microphone.3 4 When you're finished setting the options, select START then press ENTER. 5 Follow the instructions on-screen. • Make sure the microphone is connected. • If you're using a subwoofer, it is EQ Pro & S-Wave) - 10 The ...

Owner's Manual
Page 132
.... (D)) Weight (without package) . . . 10.2 kg (22 lb 8 oz) Number of Furnished Parts MCACC Setup microphone 1 Remote control unit 1 AAA/IEC R03 dry cell batteries 2 AM loop antenna 1 FM wire antenna 1 iPod cable 1 Power cord 1 Warranty card 1 These operating instructions Note • Specifications and the design are subject to possible modifications without notice...
.... (D)) Weight (without package) . . . 10.2 kg (22 lb 8 oz) Number of Furnished Parts MCACC Setup microphone 1 Remote control unit 1 AAA/IEC R03 dry cell batteries 2 AM loop antenna 1 FM wire antenna 1 iPod cable 1 Power cord 1 Warranty card 1 These operating instructions Note • Specifications and the design are subject to possible modifications without notice...


