
Owner's Manual
Page 5
...playback using Phase Control 26 Setting the Audio options 27 05 Home Menu Using the Home Menu 29 Manual speaker setup 29 Speaker Setting 29 X.Over 30 Channel Level 30 Speaker Distance 31 The Input Assign menu 31 The Auto Power... Down menu 31 The HDMI Setup menu 32 06 Additional information Troubleshooting 33 General 33 HDMI 34 Important information regarding the HDMI connection 34 USB ... your model properly. Please read through these operating instructions so you for buying this Pioneer product.
...playback using Phase Control 26 Setting the Audio options 27 05 Home Menu Using the Home Menu 29 Manual speaker setup 29 Speaker Setting 29 X.Over 30 Channel Level 30 Speaker Distance 31 The Input Assign menu 31 The Auto Power... Down menu 31 The HDMI Setup menu 32 06 Additional information Troubleshooting 33 General 33 HDMI 34 Important information regarding the HDMI connection 34 USB ... your model properly. Please read through these operating instructions so you for buying this Pioneer product.

Owner's Manual
Page 6
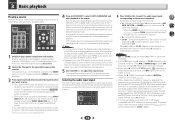
... you place the speakers will have hot fumes or oils (such as a kitchen) The unit is vibration or other than the recommended connections.) The HDMI Setup menu (page 32) (When the connected TV supports the HDMI Audio Return Channel function.) 6 Basic playback (page 19) • Selecting the audio input signal... • Using the Sound Retriever (page 26) • Better sound using Phase Control (page 26) • Setting the Audio options (page 27) • Manual speaker setup (page 29) 6
... you place the speakers will have hot fumes or oils (such as a kitchen) The unit is vibration or other than the recommended connections.) The HDMI Setup menu (page 32) (When the connected TV supports the HDMI Audio Return Channel function.) 6 Basic playback (page 19) • Selecting the audio input signal... • Using the Sound Retriever (page 26) • Better sound using Phase Control (page 26) • Setting the Audio options (page 27) • Manual speaker setup (page 29) 6
Owner's Manual
Page 12
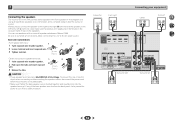
... open the tabs and insert exposed wire. 3 Release the tabs. 10 mm (3/8 in the diagram) but using at least three speakers is recommended, and a complete setup is twisted together and inserted fully into the speaker terminal. Be sure to complete all the bare speaker wire is best for surround sound. To...
... open the tabs and insert exposed wire. 3 Release the tabs. 10 mm (3/8 in the diagram) but using at least three speakers is recommended, and a complete setup is twisted together and inserted fully into the speaker terminal. Be sure to complete all the bare speaker wire is best for surround sound. To...

Owner's Manual
Page 13
... resolutions that the connected component is compatible with, including DVDVideo, DVD-Audio, SACD, Dolby Digital Plus, Dolby TrueHD, DTS-HD Master Audio (see The HDMI Setup menu on the connected equipment. - 4K 24p, 4K 25p, 4K 30p, 4K 50p and 4K 60p signals are supported • HDCP 2.2 compatible terminal: Note •...
... resolutions that the connected component is compatible with, including DVDVideo, DVD-Audio, SACD, Dolby Digital Plus, Dolby TrueHD, DTS-HD Master Audio (see The HDMI Setup menu on the connected equipment. - 4K 24p, 4K 25p, 4K 30p, 4K 50p and 4K 60p signals are supported • HDCP 2.2 compatible terminal: Note •...

Owner's Manual
Page 15
... on page 31). Important • When the ARC function is ON and the receiver is required (see The HDMI Setup menu on connections and setup for analog audio input is connected to a compatible TV with an HDMI cable, and you can only be output from the TV that is connected ...to this receiver using an analog audio cables, set ARC at HDMI Setup to ON (see The Input Assign menu on page 32). If the TV does not support the HDMI Audio Return Channel function, connect the receiver...
... on page 31). Important • When the ARC function is ON and the receiver is required (see The HDMI Setup menu on connections and setup for analog audio input is connected to a compatible TV with an HDMI cable, and you can only be output from the TV that is connected ...to this receiver using an analog audio cables, set ARC at HDMI Setup to ON (see The Input Assign menu on page 32). If the TV does not support the HDMI Audio Return Channel function, connect the receiver...

Owner's Manual
Page 18
...have connected all your equipment 5 7 33 18 You cannot carry out any operations during this process, and you find it damaged, ask your nearest PIONEER authorized service center or your dealer for a replacement. • The receiver should be routed such that they are wet as this could cause a ...short circuit or electric shock. When you set ARC at HDMI setup to 10 second HDMI initialization process begins. Connecting your components to be disconnected by the plug. Do not place the unit, a piece of ...
...have connected all your equipment 5 7 33 18 You cannot carry out any operations during this process, and you find it damaged, ask your nearest PIONEER authorized service center or your dealer for a replacement. • The receiver should be routed such that they are wet as this could cause a ...short circuit or electric shock. When you set ARC at HDMI setup to 10 second HDMI initialization process begins. Connecting your components to be disconnected by the plug. Do not place the unit, a piece of ...
Owner's Manual
Page 19
... check on your DVD player or source discs, you should be selected for each input source. In this receiver. However, if the ARC at HDMI Setup is set to ON, the input is fixed to H (HDMI) and cannot be changed . • For the TV input, only A (analog) or C1/O1 (digital...
... check on your DVD player or source discs, you should be selected for each input source. In this receiver. However, if the ARC at HDMI Setup is set to ON, the input is fixed to H (HDMI) and cannot be changed . • For the TV input, only A (analog) or C1/O1 (digital...
Owner's Manual
Page 25
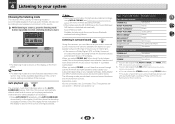
... detects what kind of the receiver. c. • You can choose the STEREO mode by using NEO:6 CINEMA (see Setting the Audio options on your speaker setup and the type of various audio formats. Choose one according to your surround settings and you will hear the source through just the front left...
... detects what kind of the receiver. c. • You can choose the STEREO mode by using NEO:6 CINEMA (see Setting the Audio options on your speaker setup and the type of various audio formats. Choose one according to your surround settings and you will hear the source through just the front left...
Owner's Manual
Page 26
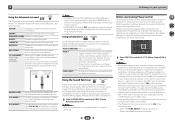
... ON in increased amplitude, clarity and presence of surround effects. Using the Sound Retriever When audio data is a very important factor in the Manual SP Setup (speaker setting, channel level, speaker distance), as well as with wider dynamic range (mainly movies). The default setting is selected, DIMMER will be produced. •...
... ON in increased amplitude, clarity and presence of surround effects. Using the Sound Retriever When audio data is a very important factor in the Manual SP Setup (speaker setting, channel level, speaker distance), as well as with wider dynamic range (mainly movies). The default setting is selected, DIMMER will be produced. •...

Owner's Manual
Page 29
... speaker system (page 30). - X.Over - If you to make detailed settings to the other speakers). • Surr - Manual speaker setup This receiver allows you didn't connect a center speaker, choose NO (the center channel is sent to the other speakers or subwoofer. Select ...send bass frequencies to optimize the surround sound performance. Select SMALL to send bass frequencies to your speakers from the Manual SP Setup menu. 33 1.Manual SP Setup a.Speaker Setting b.X.Over c.Channel Level d.Speaker Distance 1a.Speaker Setting Front SMALL Center [ NO ] Surr [ NO ] ...
... speaker system (page 30). - X.Over - If you to make detailed settings to the other speakers). • Surr - Manual speaker setup This receiver allows you didn't connect a center speaker, choose NO (the center channel is sent to the other speakers or subwoofer. Select ...send bass frequencies to optimize the surround sound performance. Select SMALL to send bass frequencies to your speakers from the Manual SP Setup menu. 33 1.Manual SP Setup a.Speaker Setting b.X.Over c.Channel Level d.Speaker Distance 1a.Speaker Setting Front SMALL Center [ NO ] Surr [ NO ] ...

Owner's Manual
Page 30
... R [ Surround R [ Surround L [ Subwoofer [ 0dB 0dB] 0dB] 0dB] 0dB] 0dB] Return 30 Depending on page 29. 1 Select 'Manual SP Setup' from the Home Menu. 2 Select 'X.Over' from other speakers). 4 When you select SMALL for the subwoofer. In this case, all the bass sounds to speaker... bass (the bass frequencies that would normally come out the front and center speakers are output from the Manual SP Setup menu. 1.Manual SP Setup a.Speaker Setting b.X.Over c.Channel Level d.Speaker Distance 1b.X.Over Frequency 100Hz Return Return 3 Choose the frequency cutoff point...
... R [ Surround R [ Surround L [ Subwoofer [ 0dB 0dB] 0dB] 0dB] 0dB] 0dB] Return 30 Depending on page 29. 1 Select 'Manual SP Setup' from the Home Menu. 2 Select 'X.Over' from other speakers). 4 When you select SMALL for the subwoofer. In this case, all the bass sounds to speaker... bass (the bass frequencies that would normally come out the front and center speakers are output from the Manual SP Setup menu. 1.Manual SP Setup a.Speaker Setting b.X.Over c.Channel Level d.Speaker Distance 1b.X.Over Frequency 100Hz Return Return 3 Choose the frequency cutoff point...
Owner's Manual
Page 31
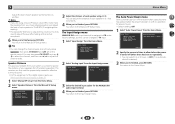
... level of each speaker using a Sound Pressure Level (SPL) meter, take the readings from the Home Menu. Home Menu 1.Manual SP Setup 2.Input Assign 3.Auto Power Down 4.HDMI Setup 3.Auto Power Down Auto Power Down OFF 5 7 33 Return Return 2 Specify the amount of each speaker in 0.1 feet increments. 4...finished, press RETURN. on with an actual soundtrack. 6 When you are using /. You return to the Manual SP Setup menu. You return to the Manual SP Setup menu. Tip • You can also press CH SELECT and use / to select the channel, and then ...
... level of each speaker using a Sound Pressure Level (SPL) meter, take the readings from the Home Menu. Home Menu 1.Manual SP Setup 2.Input Assign 3.Auto Power Down 4.HDMI Setup 3.Auto Power Down Auto Power Down OFF 5 7 33 Return Return 2 Specify the amount of each speaker in 0.1 feet increments. 4...finished, press RETURN. on with an actual soundtrack. 6 When you are using /. You return to the Manual SP Setup menu. You return to the Manual SP Setup menu. Tip • You can also press CH SELECT and use / to select the channel, and then ...

Owner's Manual
Page 32
...volume (including mute). • Turn OFF the power and remove the power cord from the Home Menu. Home Menu 1.Manual SP Setup 2.Input Assign 3.Auto Power Down 4.HDMI Setup 4.HDMI Setup a.ARC OFF b.Standby Through [OFF ] c.4k60p Setting Return Return 2 Choose the 'ARC' setting you want . Use ...the volume (including mute). Select an input terminal that allows the TV remote control to a TV with other HDMI cables. 1 Select 'HDMI Setup' from the wall socket when connecting other than HDMI inputs. 3 Choose the 'Standby Through' setting you want . In order to start ARC ...
...volume (including mute). • Turn OFF the power and remove the power cord from the Home Menu. Home Menu 1.Manual SP Setup 2.Input Assign 3.Auto Power Down 4.HDMI Setup 4.HDMI Setup a.ARC OFF b.Standby Through [OFF ] c.4k60p Setting Return Return 2 Choose the 'ARC' setting you want . Use ...the volume (including mute). Select an input terminal that allows the TV remote control to a TV with other HDMI cables. 1 Select 'HDMI Setup' from the wall socket when connecting other than HDMI inputs. 3 Choose the 'Standby Through' setting you want . In order to start ARC ...


