

Owner's Manual
Page 3
... those controls that are covered by placing the product on or pinched by a qualified technician to restore the product to replace your obsolete outlet. REPLACEMENT PARTS - A ANTENNA DISCHARGE UNIT (NEC SECTION 810-20) GROUNDING CONDUCTORS (NEC SECTION 810-21) GROUND CLAMPS POWER SERVICE GROUNDING ELECTRODE SYSTEM (NEC ART 250, PART H) NEC - D1-4-2-3_En READ INSTRUCTIONS - HEED WARNINGS - All operating and use instructions...
... those controls that are covered by placing the product on or pinched by a qualified technician to restore the product to replace your obsolete outlet. REPLACEMENT PARTS - A ANTENNA DISCHARGE UNIT (NEC SECTION 810-20) GROUNDING CONDUCTORS (NEC SECTION 810-21) GROUND CLAMPS POWER SERVICE GROUNDING ELECTRODE SYSTEM (NEC ART 250, PART H) NEC - D1-4-2-3_En READ INSTRUCTIONS - HEED WARNINGS - All operating and use instructions...

Owner's Manual
Page 4
... Digital audio cables 11 Video cables 11 About the video converter 12 Connecting a DVD player and TV 13 Connecting the multichannel analog outputs 14 Connecting a satellite receiver or other digital set-top box 14 Connecting other audio components 15 About the WMA9 Pro decoder 15 Connecting other sources 33 Choosing the input signal 33 Selecting the multichannel analog inputs . . . 34 Selecting the front audio inputs 34 06 The System Setup menu Making receiver settings from the System Setup menu 35 Surround back speaker setting 35 Manual MCACC speaker setup 36 Fine Channel Level...
... Digital audio cables 11 Video cables 11 About the video converter 12 Connecting a DVD player and TV 13 Connecting the multichannel analog outputs 14 Connecting a satellite receiver or other digital set-top box 14 Connecting other audio components 15 About the WMA9 Pro decoder 15 Connecting other sources 33 Choosing the input signal 33 Selecting the multichannel analog inputs . . . 34 Selecting the front audio inputs 34 06 The System Setup menu Making receiver settings from the System Setup menu 35 Surround back speaker setting 35 Manual MCACC speaker setup 36 Fine Channel Level...

Owner's Manual
Page 5
... SIRIUS Radio 56 Saving channel presets 57 Using the SIRIUS Menu 57 Connecting using HDMI 57 About HDMI 58 Second Zone speaker B setup 59 Switching the speaker system 59 Bi-amping your front speakers 59 Bi-wiring your speakers 60 Using this receiver with a Pioneer plasma display 60 Using the SR+ mode with a Pioneer plasma display 61 11 Other Settings The Input Assign menu 62 The Other Setup menu 63 Dynamic Range Control Setup 64 Dual Mono Setup 64 LFE Attenuator Setup 64 SR+ Setup for Pioneer plasma displays . . . 65 Digital Video Converter Setup...
... SIRIUS Radio 56 Saving channel presets 57 Using the SIRIUS Menu 57 Connecting using HDMI 57 About HDMI 58 Second Zone speaker B setup 59 Switching the speaker system 59 Bi-amping your front speakers 59 Bi-wiring your speakers 60 Using this receiver with a Pioneer plasma display 60 Using the SR+ mode with a Pioneer plasma display 61 11 Other Settings The Input Assign menu 62 The Other Setup menu 63 Dynamic Range Control Setup 64 Dual Mono Setup 64 LFE Attenuator Setup 64 SR+ Setup for Pioneer plasma displays . . . 65 Digital Video Converter Setup...

Owner's Manual
Page 7
... DVD player or source disc, you may only get from the DVD player to the receiver. 2 Connect your speakers and place them for the best surround sound effect. Front speaker (L) Center speaker (C) Front speaker (R) Subwoofer (SW) Surround speaker (RS) Listening position Surround back speaker (SBR) Surround speaker (LS) Surround back speaker (SBL) 3 Plug in and switch on page 28 if you need to do this .2 Note 1 You may need to set your DVD player to output Dolby Digital, DTS and 88.2 kHz/96 kHz PCM (2 channel) audio...
... DVD player or source disc, you may only get from the DVD player to the receiver. 2 Connect your speakers and place them for the best surround sound effect. Front speaker (L) Center speaker (C) Front speaker (R) Subwoofer (SW) Surround speaker (RS) Listening position Surround back speaker (SBR) Surround speaker (LS) Surround back speaker (SBL) 3 Plug in and switch on page 28 if you need to do this .2 Note 1 You may need to set your DVD player to output Dolby Digital, DTS and 88.2 kHz/96 kHz PCM (2 channel) audio...

Owner's Manual
Page 8
... System Setup menu then press ENTER. Note 1 • The screensaver automatically starts after pressing ENTER. SIGNAL SEL RECEIVER INPUT SELECT SOURCE AUDIO/VIDEO PRE-PROGRAMMED REMOTE CONTROL UNIT F.AUDIO DVD TV CD-R/TAPE CD XM RADIO FM DVR SIRIUS AM TV CTRL RECEIVER D.ACCESS +10 CLASS DISC ENTER TOP MENU TUNE DTVMENU ST SETUP ENTER MENU ST T.EDIT RETURN TUNE GUIDE CATEGORY TV CONTROL TV VOL INPUT SELECT TV CH VOL DTVON/OFF REC DTVINFO 1 Switch on the front panel...
... System Setup menu then press ENTER. Note 1 • The screensaver automatically starts after pressing ENTER. SIGNAL SEL RECEIVER INPUT SELECT SOURCE AUDIO/VIDEO PRE-PROGRAMMED REMOTE CONTROL UNIT F.AUDIO DVD TV CD-R/TAPE CD XM RADIO FM DVR SIRIUS AM TV CTRL RECEIVER D.ACCESS +10 CLASS DISC ENTER TOP MENU TUNE DTVMENU ST SETUP ENTER MENU ST T.EDIT RETURN TUNE GUIDE CATEGORY TV CONTROL TV VOL INPUT SELECT TV CH VOL DTVON/OFF REC DTVINFO 1 Switch on the front panel...

Owner's Manual
Page 9
... receiver outputs more test tones to the next step. If the screen in step 9 the Auto MCACC setup will end up with the speaker connection. It may be changed. 9 En 5 minute guide 02 English Deutsch Français Italiano Nederlands Español 6 Follow the instructions on-screen. • Make sure the microphone is connected. • If you're using a subwoofer, it is automatically detected every time you switch...
... receiver outputs more test tones to the next step. If the screen in step 9 the Auto MCACC setup will end up with the speaker connection. It may be changed. 9 En 5 minute guide 02 English Deutsch Français Italiano Nederlands Español 6 Follow the instructions on-screen. • Make sure the microphone is connected. • If you're using a subwoofer, it is automatically detected every time you switch...
Owner's Manual
Page 14
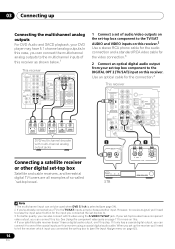
... SURROUND OUTPUT SUB WOOFER OUTPUT VIDEO OUTPUT 1 Connect a set of so-called `set -top box component to the TV/SAT AUDIO and VIDEO inputs on this receiver.2 Use a stereo RCA phono cable for the audio connection and a standard RCA video cable for more on the set -top boxes'. Use an optical cable for the input you connected the set-top box to. 3 For better quality, you can also connect with multi-channel analog output jacks 2 1 DIGITAL OUT Connecting a satellite receiver or other digital set-top box Satellite and cable receivers, and terrestrial digital TV tuners...
... SURROUND OUTPUT SUB WOOFER OUTPUT VIDEO OUTPUT 1 Connect a set of so-called `set -top box component to the TV/SAT AUDIO and VIDEO inputs on this receiver.2 Use a stereo RCA phono cable for the audio connection and a standard RCA video cable for more on the set -top boxes'. Use an optical cable for the input you connected the set-top box to. 3 For better quality, you can also connect with multi-channel analog output jacks 2 1 DIGITAL OUT Connecting a satellite receiver or other digital set-top box Satellite and cable receivers, and terrestrial digital TV tuners...

Owner's Manual
Page 16
...other video components This receiver has audio/video inputs and outputs suitable for connecting analog or digital video recorders, including VCRs, DVDrecorders and HDD recorders. 1 Connect a set up However, the connected DVD player, set of audio/video outputs on the recorder to the digital output on page 62). 16 En OPTICAL DIGITAL IN Note 1 For better quality, you can also connect with S-video using the S-VIDEO DVR/VCR IN jack. Use a stereo RCA phono cable for the audio connection and a standard RCA video cable for the video connection.2 3 Connect a coaxial digital audio output on...
...other video components This receiver has audio/video inputs and outputs suitable for connecting analog or digital video recorders, including VCRs, DVDrecorders and HDD recorders. 1 Connect a set up However, the connected DVD player, set of audio/video outputs on the recorder to the digital output on page 62). 16 En OPTICAL DIGITAL IN Note 1 For better quality, you can also connect with S-video using the S-VIDEO DVR/VCR IN jack. Use a stereo RCA phono cable for the audio connection and a standard RCA video cable for the video connection.2 3 Connect a coaxial digital audio output on...

Owner's Manual
Page 17
... / TAPE / MD FM/AM XM SIRIUS AUX VIDEO VIDEO INPUT L AUDIO R DIGITAL IN MCACC/ AUDIO IN V L R VIDEO OUTPUT DIGITAL OUT Video camera (etc.) Connecting to composite video. A further advantage (if your TV and source component to the front panel video terminal Front video connections are assignable, it doesn't matter which component video inputs you use for which delivers a very stable, flicker-free picture. Press VIDEO/FRONT AUDIO and select F.AUDIO input. Use a three-way component video cable for the connection. 2 Assign the component video inputs to connect a digital audio...
... / TAPE / MD FM/AM XM SIRIUS AUX VIDEO VIDEO INPUT L AUDIO R DIGITAL IN MCACC/ AUDIO IN V L R VIDEO OUTPUT DIGITAL OUT Video camera (etc.) Connecting to composite video. A further advantage (if your TV and source component to the front panel video terminal Front video connections are assignable, it doesn't matter which component video inputs you use for which delivers a very stable, flicker-free picture. Press VIDEO/FRONT AUDIO and select F.AUDIO input. Use a three-way component video cable for the connection. 2 Assign the component video inputs to connect a digital audio...

Owner's Manual
Page 19
... R AUDIO AUX FM UNBAL 75 CD DVR / VCR TV / SAT AM LOOP ANTENNA VIDEO IN DVD / LD IN FRONT PLAY CD-R D V D 5.1CH INPUT IN / TAPE / MD REC L CEN- Simply connect the speakers you are using at least three speakers is recommended, and a complete setup is best. Use good quality speaker wire to connect the speakers to the surround back left terminal. Note 1 If you're not using a subwoofer, change the front speaker setting (see Switching the speaker impedance...
... R AUDIO AUX FM UNBAL 75 CD DVR / VCR TV / SAT AM LOOP ANTENNA VIDEO IN DVD / LD IN FRONT PLAY CD-R D V D 5.1CH INPUT IN / TAPE / MD REC L CEN- Simply connect the speakers you are using at least three speakers is recommended, and a complete setup is best. Use good quality speaker wire to connect the speakers to the surround back left terminal. Note 1 If you're not using a subwoofer, change the front speaker setting (see Switching the speaker impedance...

Owner's Manual
Page 23
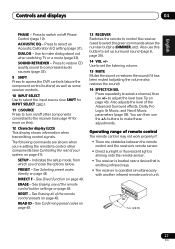
... button to access the bass and treble controls, which you can then adjust with the MULTI JOG dial (page 33). 18 SPEAKERS Use to change the speaker system (page 59) and the impedance setting (page 69). 19 SIGNAL SELECT Use to select an input signal (page 33). 20 TUNING / STATION Selects the frequency (page 44) and station presets (page 44) when using a stereo mini-jack cable (page 17). 13 MASTER VOLUME dial 14 SOUND RETRIEVER Press to restore CD quality sound to compressed audio sources...
... button to access the bass and treble controls, which you can then adjust with the MULTI JOG dial (page 33). 18 SPEAKERS Use to change the speaker system (page 59) and the impedance setting (page 69). 19 SIGNAL SELECT Use to select an input signal (page 33). 20 TUNING / STATION Selects the frequency (page 44) and station presets (page 44) when using a stereo mini-jack cable (page 17). 13 MASTER VOLUME dial 14 SOUND RETRIEVER Press to restore CD quality sound to compressed audio sources...
Owner's Manual
Page 26
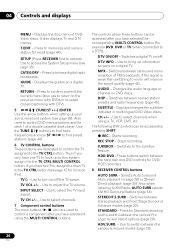
... preset stations (page 44). 6 TV CONTROL buttons These buttons are used to control a component after you have selected it to select closed captioning with DTV). 5 TUNE/ST +/-) /ENTER Use the arrow buttons when setting up information screens on /off . 04 Controls and displays MENU - T.EDIT - SETUP (Press RECEIVER first to access) Use to a DTV)). If the signal is weak then switching to switch between the hard disk and DVD controls for deck 1 of DVDVideo discs. Use to select channels when using the MULTI CONTROL buttons...
... preset stations (page 44). 6 TV CONTROL buttons These buttons are used to control a component after you have selected it to select closed captioning with DTV). 5 TUNE/ST +/-) /ENTER Use the arrow buttons when setting up information screens on /off . 04 Controls and displays MENU - T.EDIT - SETUP (Press RECEIVER first to access) Use to a DTV)). If the signal is weak then switching to switch between the hard disk and DVD controls for deck 1 of DVDVideo discs. Use to select channels when using the MULTI CONTROL buttons...
Owner's Manual
Page 27
... Confirming preset codes on page 49. See Direct function on page 49. 13 RECEIVER Switches the remote to control the receiver (used to select the green commands above the component control buttons) as well as some receiver controls. 10 INPUT SELECT Use to turn on/off Phase Control (page 10). See Erasing one of the remote control presets on /off other components (see Controlling the rest of your system on page 47): SETUP - Also use this ). 12 Character display...
... Confirming preset codes on page 49. See Direct function on page 49. 13 RECEIVER Switches the remote to control the receiver (used to select the green commands above the component control buttons) as well as some receiver controls. 10 INPUT SELECT Use to turn on/off Phase Control (page 10). See Erasing one of the remote control presets on /off other components (see Controlling the rest of your system on page 47): SETUP - Also use this ). 12 Character display...

Owner's Manual
Page 33
... for your DVD player. 33 En Playing other digital signal formats, set the signal input to adjust the bass or treble using AUTO SURROUND). 3 If your TV, make sure that the VIDEO input is playing an analog signal. With other sources 1 Turn on the power of the playback component. 2 Turn on page 15) and set to ANALOG. • You may want to DIGITAL. • Some DVD players don't output DTS signals. The Sound Retriever feature employs new DSP technology that all the sound is the default setting.
... for your DVD player. 33 En Playing other digital signal formats, set the signal input to adjust the bass or treble using AUTO SURROUND). 3 If your TV, make sure that the VIDEO input is playing an analog signal. With other sources 1 Turn on the power of the playback component. 2 Turn on page 15) and set to ANALOG. • You may want to DIGITAL. • Some DVD players don't output DTS signals. The Sound Retriever feature employs new DSP technology that all the sound is the default setting.

Owner's Manual
Page 35
... home theater setup where they can 't use the surround back speaker channels with this system. RECEIVER INPUT SELECT SOURCE AUDIO/VIDEO PRE-PROGRAMMED REMOTE CONTROL UNIT F.AUDIO DVD CD-R/TAPE CD TV XM RADIO FM DVR SIRIUS AM TV CTRL RECEIVER SIGNAL SEL D.ACCESS +10 CLASS DISC ENTER TOP MENU TUNE DTVMENU ST SETUP ENTER MENU ST T.EDIT RETURN TUNE GUIDE CATEGORY TV CONTROL TV VOL INPUT SELECT TV CH VOL 1 Switch on page 63). System Setup 1.Surr Back System 2.Auto MCACC 3.Manual MCACC 4.Manual SP Setup 5.Input Assign 6.Other Setup •...
... home theater setup where they can 't use the surround back speaker channels with this system. RECEIVER INPUT SELECT SOURCE AUDIO/VIDEO PRE-PROGRAMMED REMOTE CONTROL UNIT F.AUDIO DVD CD-R/TAPE CD TV XM RADIO FM DVR SIRIUS AM TV CTRL RECEIVER SIGNAL SEL D.ACCESS +10 CLASS DISC ENTER TOP MENU TUNE DTVMENU ST SETUP ENTER MENU ST T.EDIT RETURN TUNE GUIDE CATEGORY TV CONTROL TV VOL INPUT SELECT TV CH VOL 1 Switch on page 63). System Setup 1.Surr Back System 2.Auto MCACC 3.Manual MCACC 4.Manual SP Setup 5.Input Assign 6.Other Setup •...

Owner's Manual
Page 36
...'re using a subwoofer, switch it about ear level at this screen. System Setup 1.Surr Back System 2.Auto MCACC 3.Manual MCACC 4.Manual SP Setup 5.Input Assign 6.Other Setup 1.Surround Back System Surr Back System Normal (SB) ] : Exit : Finish 2 Select the surround back speaker setting. • Normal (SB) - Select for normal home theater use the (surround back) B speaker terminals to listen to stereo playback in your main (speaker system A) setup. • Second Zone - You return to the overall balance of your speaker...
...'re using a subwoofer, switch it about ear level at this screen. System Setup 1.Surr Back System 2.Auto MCACC 3.Manual MCACC 4.Manual SP Setup 5.Input Assign 6.Other Setup 1.Surround Back System Surr Back System Normal (SB) ] : Exit : Finish 2 Select the surround back speaker setting. • Normal (SB) - Select for normal home theater use the (surround back) B speaker terminals to listen to stereo playback in your main (speaker system A) setup. • Second Zone - You return to the overall balance of your speaker...

Owner's Manual
Page 46
.../from are copy-protected. Keep in tuner, or from an audio or video source connected to the receiver (such as for more on connections). Press the RECEIVER button then press SIGNAL SEL to select the input signal corresponding to the source component (see Connecting up to S-video jacks with the recorder if you are unsure how to use the same type of the source component.1 Note 1 • The receiver's volume, balance, tone (bass, treble, loudness), and surround effects have...
.../from are copy-protected. Keep in tuner, or from an audio or video source connected to the receiver (such as for more on connections). Press the RECEIVER button then press SIGNAL SEL to select the input signal corresponding to the source component (see Connecting up to S-video jacks with the recorder if you are unsure how to use the same type of the source component.1 Note 1 • The receiver's volume, balance, tone (bass, treble, loudness), and surround effects have...
Owner's Manual
Page 62
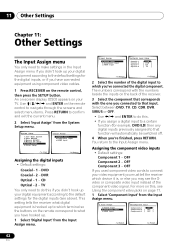
....Digital Input Setup Coaxial-1 Coaxial-2 Optical-1 Optical-2 DVD [ DVR ] [ CD ] [ TV ] :Return :Finish 2 Select the number of the digital input to which device it is hooked up to which terminal so the buttons on the remote correspond to the Input Assign menu. DVD Coaxial - 2 - This setting tells the receiver what digital equipment is , or else you may see Using the component video jacks on this if you didn't hook up your video equipment you must tell the receiver which you used component video cords...
....Digital Input Setup Coaxial-1 Coaxial-2 Optical-1 Optical-2 DVD [ DVR ] [ CD ] [ TV ] :Return :Finish 2 Select the number of the digital input to which device it is hooked up to which terminal so the buttons on the remote correspond to the Input Assign menu. DVD Coaxial - 2 - This setting tells the receiver what digital equipment is , or else you may see Using the component video jacks on this if you didn't hook up your video equipment you must tell the receiver which you used component video cords...

Owner's Manual
Page 67
... panel to direct light. • Unplug anything connected to the instruction manual supplied with the DVD player. After using MCACC (this will automatically compensate for best reception, and secure to be sure to turn the volume down to set up Check that the lowpass filter switch on your speakers. If there is incorrect. selected automatically. Refer to the instruction manual supplied with DTS is played back. • Set the digital volume level of a cassette deck...
... panel to direct light. • Unplug anything connected to the instruction manual supplied with the DVD player. After using MCACC (this will automatically compensate for best reception, and secure to be sure to turn the volume down to set up Check that the lowpass filter switch on your speakers. If there is incorrect. selected automatically. Refer to the instruction manual supplied with DTS is played back. • Set the digital volume level of a cassette deck...

Owner's Manual
Page 68
... switch to channel or that you have assigned the analog/digital jack(s) to the corresponding HDMI input for audio if you need to your monitor, please consult the component or monitor manual or contact the manufacturer for support. Use component, S-video, or composite connections when setting up the system. Wait until the encryption code has been updated. can 't be operated with Pioneer products. The display is dark or off then back on again. No sound...
... switch to channel or that you have assigned the analog/digital jack(s) to the corresponding HDMI input for audio if you need to your monitor, please consult the component or monitor manual or contact the manufacturer for support. Use component, S-video, or composite connections when setting up the system. Wait until the encryption code has been updated. can 't be operated with Pioneer products. The display is dark or off then back on again. No sound...


