

Owner's Manual
Page 4
...to home theater 7 Listening to Surround Sound 7 Automatically setting up for surround sound (MCACC 8 Other problems when using the Auto MCACC Setup 10 Better sound using Phase Control 10 03 Connecting up Making cable connections 11 Analog audio cables 11 Digital audio cables 11 Video cables ... 28 Using the Advanced surround effects . . . . . 29 Setting the effect options 29 Listening in a safe place for buying this Pioneer product. Please read through these operating instructions so you for future reference. Thank you will know how to station presets 45 08 Making recordings ...
...to home theater 7 Listening to Surround Sound 7 Automatically setting up for surround sound (MCACC 8 Other problems when using the Auto MCACC Setup 10 Better sound using Phase Control 10 03 Connecting up Making cable connections 11 Analog audio cables 11 Digital audio cables 11 Video cables ... 28 Using the Advanced surround effects . . . . . 29 Setting the effect options 29 Listening in a safe place for buying this Pioneer product. Please read through these operating instructions so you for future reference. Thank you will know how to station presets 45 08 Making recordings ...

Owner's Manual
Page 5
... 57 About HDMI 58 Second Zone speaker B setup 59 Switching the speaker system 59 Bi-amping your front speakers 59 Bi-wiring your speakers 60 Using this receiver with a Pioneer plasma display 60 Using the SR+ mode with a Pioneer plasma display 61 11 Other Settings The Input... Assign menu 62 The Other Setup menu 63 Dynamic Range Control Setup 64 Dual Mono Setup 64 LFE Attenuator Setup 64 SR+ Setup for Pioneer plasma displays . . . 65 Digital Video Converter Setup 65 12 Additional information Troubleshooting 66 HDMI 68 XM radio messages 68 ...
... 57 About HDMI 58 Second Zone speaker B setup 59 Switching the speaker system 59 Bi-amping your front speakers 59 Bi-wiring your speakers 60 Using this receiver with a Pioneer plasma display 60 Using the SR+ mode with a Pioneer plasma display 61 11 Other Settings The Input... Assign menu 62 The Other Setup menu 63 Dynamic Range Control Setup 64 Dual Mono Setup 64 LFE Attenuator Setup 64 SR+ Setup for Pioneer plasma displays . . . 65 Digital Video Converter Setup 65 12 Additional information Troubleshooting 66 HDMI 68 XM radio messages 68 ...
Owner's Manual
Page 6
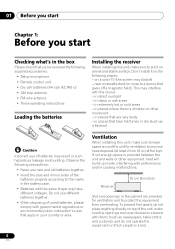
... areas - 01 Before you start Chapter 1: Before you start Checking what's in the box Please check that you've received the following supplied accessories: • Setup microphone • Remote control unit • Dry cell batteries (AA size IEC R6) x2 • AM loop antenna • FM wire antenna • These operating...
... areas - 01 Before you start Chapter 1: Before you start Checking what's in the box Please check that you've received the following supplied accessories: • Setup microphone • Remote control unit • Dry cell batteries (AA size IEC R6) x2 • AM loop antenna • FM wire antenna • These operating...

Owner's Manual
Page 7
...set your DVD player to set the receiver to an AC power source. 1 Connect your speaker setup, but other sound options you can select. Also see Hints on speaker placement on page 20 ...may only get from the DVD player to do this. 4 Use the on-screen automatic MCACC setup to output Dolby Digital, DTS and 88.2 kHz/96 kHz PCM (2 channel) audio (see Listening ...in Listening to Surround Sound With the following quick setup guide, you get 2 channel sound. Front speaker (L) Center speaker (C) Front speaker (R) Subwoofer (SW) Surround...
...set your DVD player to set the receiver to an AC power source. 1 Connect your speaker setup, but other sound options you can select. Also see Hints on speaker placement on page 20 ...may only get from the DVD player to do this. 4 Use the on-screen automatic MCACC setup to output Dolby Digital, DTS and 88.2 kHz/96 kHz PCM (2 channel) audio (see Listening ...in Listening to Surround Sound With the following quick setup guide, you get 2 channel sound. Front speaker (L) Center speaker (C) Front speaker (R) Subwoofer (SW) Surround...

Owner's Manual
Page 8
...microphone provided with your TV. The system outputs a series of test tones to your system, the receiver uses the information from the System Setup menu then press ENTER. Otherwise, place the microphone at any existing speaker settings you've made . • The OSD will be ...Make sure 'Normal (SB)' is selected then press ENTER. 2 Try to the MCACC/ AUDIO IN jack on the remote control, then press the SETUP button. Use component, S-video or composite connections for both channel delay and channel level. Use and ENTER on the remote control to navigate through Surround...
...microphone provided with your TV. The system outputs a series of test tones to your system, the receiver uses the information from the System Setup menu then press ENTER. Otherwise, place the microphone at any existing speaker settings you've made . • The OSD will be ...Make sure 'Normal (SB)' is selected then press ENTER. 2 Try to the MCACC/ AUDIO IN jack on the remote control, then press the SETUP button. Use component, S-video or composite connections for both channel delay and channel level. Use and ENTER on the remote control to navigate through Surround...

Owner's Manual
Page 9
...).1 You can correct the setting manually using a subwoofer, it is automatically detected every time you switch on the front panel will light to show the setup is complete. Front Center Surround SB SUB W. [ YES ] [ YES ] [ YES ] [ Yx2 ] [ YES ] 30:Next OK :Cancel If the speaker configuration displayed ... When you're finished, go back to be accurate (taking delay and room characteristics into account) and generally does not need to the System Setup menu. A progress report is displayed on page 41. • The subwoofer distance setting may take 3 to change the setting (and number ...
...).1 You can correct the setting manually using a subwoofer, it is automatically detected every time you switch on the front panel will light to show the setup is complete. Front Center Surround SB SUB W. [ YES ] [ YES ] [ YES ] [ Yx2 ] [ YES ] 30:Next OK :Cancel If the speaker configuration displayed ... When you're finished, go back to be accurate (taking delay and room characteristics into account) and generally does not need to the System Setup menu. A progress report is displayed on page 41. • The subwoofer distance setting may take 3 to change the setting (and number ...
Owner's Manual
Page 10
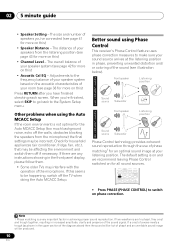
...be 'out of speakers you've connected (see page 38 for more on the acoustic characteristics of the sound signal. Adjustments to the System Setup menu. The default setting is a very important factor in the front panel display, please follow them off if necessary. If two waveforms are...air conditioner, fridge, fan, etc.), that may interfere with the operation of phase matching1 for the Auto MCACC Setup (too much background noise, echo off the TV when doing the Auto MCACC Setup. If this ) • Channel Level - The distance of your speakers from the listening position (see page ...
...be 'out of speakers you've connected (see page 38 for more on the acoustic characteristics of the sound signal. Adjustments to the System Setup menu. The default setting is a very important factor in the front panel display, please follow them off if necessary. If two waveforms are...air conditioner, fridge, fan, etc.), that may interfere with the operation of phase matching1 for the Auto MCACC Setup (too much background noise, echo off the TV when doing the Auto MCACC Setup. If this ) • Channel Level - The distance of your speakers from the listening position (see page ...
Owner's Manual
Page 12
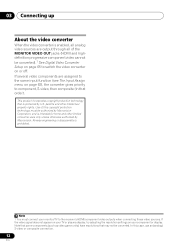
Use of the MONITOR VIDEO OUT jacks (HDMI and highdefinition progressive component video cannot be converted).1 See Digital Video Converter Setup on page 65 to component, S-video, then composite (in that may not be authorized by Macrovision Corporation, and is prohibited. In this copyright protection technology ...
Use of the MONITOR VIDEO OUT jacks (HDMI and highdefinition progressive component video cannot be converted).1 See Digital Video Converter Setup on page 65 to component, S-video, then composite (in that may not be authorized by Macrovision Corporation, and is prohibited. In this copyright protection technology ...

Owner's Manual
Page 19
...and inserted fully into the speaker terminal. English Deutsch Français Italiano Nederlands Español Connecting up 03 Connecting the speakers A complete setup of less than 8 Ω). Use good quality speaker wire to connect the speakers to the left (L) terminal. 19 En SUB TER ... This receiver Powered subwoofer SW INPUT AC OUTLET Caution • Make sure that all the bare speaker wire is shown here but everyone's home setup will work with just two stereo speakers (the front speakers in the diagram) but using a subwoofer, change the front speaker setting (see Switching...
...and inserted fully into the speaker terminal. English Deutsch Français Italiano Nederlands Español Connecting up 03 Connecting the speakers A complete setup of less than 8 Ω). Use good quality speaker wire to connect the speakers to the left (L) terminal. 19 En SUB TER ... This receiver Powered subwoofer SW INPUT AC OUTLET Caution • Make sure that all the bare speaker wire is shown here but everyone's home setup will work with just two stereo speakers (the front speakers in the diagram) but using a subwoofer, change the front speaker setting (see Switching...

Owner's Manual
Page 21
...type of equipment should be connected to the AC outlet. 21 En The second (fig. B) shows orientation with high power consumption to the 3-D speaker setup illustration on page 7. The diagrams below show suggested surround and surround back speaker orientation. A 0~60 RS SBL SBL SBR SBR fig. B 3-D ...one surround back speaker (or none) connected. English Deutsch Français Italiano Nederlands Español Connecting up 03 Overhead view of speaker setup You can exceed the 100 W maximum when playing sources at a high volume, this unit's AC outlet. • Do not connect ...
...type of equipment should be connected to the AC outlet. 21 En The second (fig. B) shows orientation with high power consumption to the 3-D speaker setup illustration on page 7. The diagrams below show suggested surround and surround back speaker orientation. A 0~60 RS SBL SBL SBR SBR fig. B 3-D ...one surround back speaker (or none) connected. English Deutsch Français Italiano Nederlands Español Connecting up 03 Overhead view of speaker setup You can exceed the 100 W maximum when playing sources at a high volume, this unit's AC outlet. • Do not connect ...

Owner's Manual
Page 22
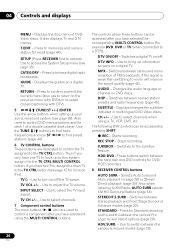
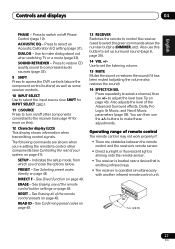
...SIRIUS SOUND MIDNIGHT/ SB ch RETRIEVER LOUDNESS PROCESSING TONE SIGNAL SPEAKERS SELECT TUNING/ STATION TUNER EDIT SETUP RETURN MULTI JOG VIDEO VIDEO INPUT L AUDIO R DIGITAL IN ENTER VSX-917V MULTI JOG AUX MCACC/ AUDIO IN STEREO/ ADVANCED F.S.SURR STANDARD SURROUND LISTENING MODE MASTER VOLUME...TONE 18 19 20 21 22 STEREO/ ADVANCED F.S.SURR STANDARD SURROUND LISTENING MODE SIGNAL SPEAKERS SELECT TUNING/ STATION TUNER EDIT SETUP RETURN 1 Input select buttons Press to select an input source. 2 Digital Precision Processing indicator Lights to indicate digital processing...
...SIRIUS SOUND MIDNIGHT/ SB ch RETRIEVER LOUDNESS PROCESSING TONE SIGNAL SPEAKERS SELECT TUNING/ STATION TUNER EDIT SETUP RETURN MULTI JOG VIDEO VIDEO INPUT L AUDIO R DIGITAL IN ENTER VSX-917V MULTI JOG AUX MCACC/ AUDIO IN STEREO/ ADVANCED F.S.SURR STANDARD SURROUND LISTENING MODE MASTER VOLUME...TONE 18 19 20 21 22 STEREO/ ADVANCED F.S.SURR STANDARD SURROUND LISTENING MODE SIGNAL SPEAKERS SELECT TUNING/ STATION TUNER EDIT SETUP RETURN 1 Input select buttons Press to select an input source. 2 Digital Precision Processing indicator Lights to indicate digital processing...

Owner's Manual
Page 23
Also when listening to indicate the type of input signal: AUTO - Press for recall (page 44). 22 System Setup menu controls SETUP - Switches between the surround modes (page 29). SB - Controls and displays 04 English Deutsch Français Italiano Nederlands Español 12 MCACC.../AUDIO IN jack Use to connect a microphone when performing Auto MCACC setup, or connect an auxiliary component using the tuner. 21 TUNER EDIT Press to memorize and name a station for Standard decoding and to switch between...
Also when listening to indicate the type of input signal: AUTO - Press for recall (page 44). 22 System Setup menu controls SETUP - Switches between the surround modes (page 29). SB - Controls and displays 04 English Deutsch Français Italiano Nederlands Español 12 MCACC.../AUDIO IN jack Use to connect a microphone when performing Auto MCACC setup, or connect an auxiliary component using the tuner. 21 TUNER EDIT Press to memorize and name a station for Standard decoding and to switch between...

Owner's Manual
Page 25
... can check the remaining sleep time at low volume. Displays the disc 'top' menu of radio station presets (page 44). 4 Tuner/component control buttons/SETUP The following are accessed by pressing SLEEP once. Displays menus on /off (page 61). You can also be used to enter commands for this receiver... SB ch ANALOG ATT SR+ DIMMER MIDNIGHT 3 SIGNAL SEL D.ACCESS +10 CLASS DISC ENTER TOP MENU 4 TUNE MENU 5 DTVMENU ST ENTER ST T.EDIT SETUP RETURN TUNE GUIDE CATEGORY TV CONTROL 6 TV VOL INPUT SELECT TV CH VOL 14 DTV ON/OFF REC DTVINFO MUTE 15 MPX REC STOP JUKEBOX...
... can check the remaining sleep time at low volume. Displays the disc 'top' menu of radio station presets (page 44). 4 Tuner/component control buttons/SETUP The following are accessed by pressing SLEEP once. Displays menus on /off (page 61). You can also be used to enter commands for this receiver... SB ch ANALOG ATT SR+ DIMMER MIDNIGHT 3 SIGNAL SEL D.ACCESS +10 CLASS DISC ENTER TOP MENU 4 TUNE MENU 5 DTVMENU ST ENTER ST T.EDIT SETUP RETURN TUNE GUIDE CATEGORY TV CONTROL 6 TV VOL INPUT SELECT TV CH VOL 14 DTV ON/OFF REC DTVINFO MUTE 15 MPX REC STOP JUKEBOX...
Owner's Manual
Page 26
CATEGORY - Also used to access the System Setup menu (see page 35). If you have two TVs, assign the main TV to the TV CTRL button (see page 47 for example DVD, DVR .../changes the subtitles included in multilingual DVD-Video discs. STANDARD - Displays the guides on this system assign it using a TV, VCR, DVR, etc. INPUT SELECT - SETUP (Press RECEIVER first to access) Use to control a component after you have selected the corresponding MULTI CONTROL button (for more on a digital TV. RETURN - AUDIO...
CATEGORY - Also used to access the System Setup menu (see page 35). If you have two TVs, assign the main TV to the TV CTRL button (see page 47 for example DVD, DVR .../changes the subtitles included in multilingual DVD-Video discs. STANDARD - Displays the guides on this system assign it using a TV, VCR, DVR, etc. INPUT SELECT - SETUP (Press RECEIVER first to access) Use to control a component after you have selected the corresponding MULTI CONTROL button (for more on a digital TV. RETURN - AUDIO...
Owner's Manual
Page 27
... all of your system on page 48. READ ID - Press to the receiver (see Controlling the rest of the remote control presets on page 47): SETUP - to turn on/off Phase Control (page 10). You can then use +/- Press to restore CD quality sound to compressed audio sources (page 33). 9 ... ). 11 SOURCE Press to adjust the level (see Tip on /off other components (see page 47 for more on page 48. Indicates the setup mode, from which you 're setting the remote to control other components connected to switch on page 43). PRESET - Also adjusts the level of the...
... all of your system on page 48. READ ID - Press to the receiver (see Controlling the rest of the remote control presets on page 47): SETUP - to turn on/off Phase Control (page 10). You can then use +/- Press to restore CD quality sound to compressed audio sources (page 33). 9 ... ). 11 SOURCE Press to adjust the level (see Tip on /off other components (see page 47 for more on page 48. Indicates the setup mode, from which you 're setting the remote to control other components connected to switch on page 43). PRESET - Also adjusts the level of the...
Owner's Manual
Page 28
... being processed. • When listening to a source, press STANDARD. Up to see Listening in the display (it will automatically be possible depending on your speaker setup and the type of source you're listening to. With two channel sources, you can select from the surround speakers is the Auto Surround feature...
... being processed. • When listening to a source, press STANDARD. Up to see Listening in the display (it will automatically be possible depending on your speaker setup and the type of source you're listening to. With two channel sources, you can select from the surround speakers is the Auto Surround feature...
Owner's Manual
Page 29
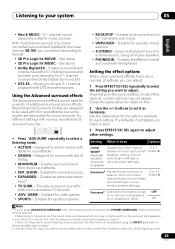
... more distant (minus settings), or more on page 31. • When an Advanced Surround listening mode is wider than Standard modes with lots of your setup. Suitable for video games. • SPORTS - See the table below for notes on this , refer to Using surround back channel processing on this . 2 Use the...
... more distant (minus settings), or more on page 31. • When an Advanced Surround listening mode is wider than Standard modes with lots of your setup. Suitable for video games. • SPORTS - See the table below for notes on this , refer to Using surround back channel processing on this . 2 Use the...

Owner's Manual
Page 30
... this • F.S.S.FOCUS - See Using Front Stage Surround Advance below for the currently selected Advanced Surround mode (each mode can be obtained if Auto MCACC Setup is bypassed. See Using Front Stage Surround Advance below for surround sound (MCACC) on this . • F.S.S. Use to provide a rich surround sound effect directed to...
... this • F.S.S.FOCUS - See Using Front Stage Surround Advance below for the currently selected Advanced Surround mode (each mode can be obtained if Auto MCACC Setup is bypassed. See Using Front Stage Surround Advance below for surround sound (MCACC) on this . • F.S.S. Use to provide a rich surround sound effect directed to...
Owner's Manual
Page 31
...channels in Automatically setting up for example, with Acoustic Calibration EQ • Default setting: OFF / ALL CH (after the Auto MCACC Setup or EQ Auto Setting) You can simply switch surround back processing off . Also, the Surround back speaker setting on page 38. ... encoded material) • SB AUTO - For analog sources, only Channel Level can not be generated, but the material may sound better in the Surround Setup (speaker setting, channel level, speaker distance), as well as with the front speaker settings. • CUSTOM 1/2 - ALIGN - Automatically switches to 6.1 ...
...channels in Automatically setting up for example, with Acoustic Calibration EQ • Default setting: OFF / ALL CH (after the Auto MCACC Setup or EQ Auto Setting) You can simply switch surround back processing off . Also, the Surround back speaker setting on page 38. ... encoded material) • SB AUTO - For analog sources, only Channel Level can not be generated, but the material may sound better in the Surround Setup (speaker setting, channel level, speaker distance), as well as with the front speaker settings. • CUSTOM 1/2 - ALIGN - Automatically switches to 6.1 ...

Owner's Manual
Page 35
...what you've connected to adjust. Specify the size, number, distance and overall balance of the speakers you've connected (see Manual speaker setup on the remote control to navigate through the screens and select menu items. Press RETURN to confirm and exit the current menu. 3 Select...receiver, disconnect them. 2 • You can't use the surround back speaker channels with this system. Use component, S-video or composite connections for system setup. 35 En Use and ENTER on page 40). • Input Assign - Surround back speaker setting • Default setting: Normal (SB) There are ...
...what you've connected to adjust. Specify the size, number, distance and overall balance of the speakers you've connected (see Manual speaker setup on the remote control to navigate through the screens and select menu items. Press RETURN to confirm and exit the current menu. 3 Select...receiver, disconnect them. 2 • You can't use the surround back speaker channels with this system. Use component, S-video or composite connections for system setup. 35 En Use and ENTER on page 40). • Input Assign - Surround back speaker setting • Default setting: Normal (SB) There are ...


