
Operating Instructions
Page 4
... Connecting up Rear panel 8 Front panel 8 Making cable connections 8 Connecting audio components 9 Connecting the AM and FM antennas 10 Connecting external antennas 10 Connecting the speakers 11 Bare wire connections 11 Plugging in 11 03 Controls and displays Front / top panel 12 Front panel 12 Top panel 13 Remote control 14... Connect 22 Windows Media DRM 22 DLNA 22 FLAC 23 aacPlus 23 Content playable over a network 23 About playback behavior over a network 23 Authorizing this Pioneer product.
... Connecting up Rear panel 8 Front panel 8 Making cable connections 8 Connecting audio components 9 Connecting the AM and FM antennas 10 Connecting external antennas 10 Connecting the speakers 11 Bare wire connections 11 Plugging in 11 03 Controls and displays Front / top panel 12 Front panel 12 Top panel 13 Remote control 14... Connect 22 Windows Media DRM 22 DLNA 22 FLAC 23 aacPlus 23 Content playable over a network 23 About playback behavior over a network 23 Authorizing this Pioneer product.
Operating Instructions
Page 8
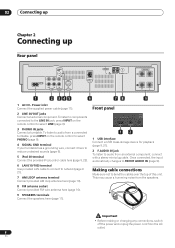
... Chapter 2 Connecting up Rear panel SIGNAL GND L AC IN R OUT IN IN IN LINE PHONO iPod LAN (10/100) ANTENNA AM LOOP FM UNBAL 75 SPEAKERS R L 1 2 345 6 78 9 1 AC IN - This may cause a humming noise from an external component, connect with a stereo mini-plug cable. Power inlet ... for playback (page 9, 21). 2 F.AUDIO IN jack To listen to audio from the AC outlet. 8 En To listen to audio from the speakers. Important • Before making or changing any connections, switch off the power and unplug the power cord from a connected turntable, press INPUT on the...
... Chapter 2 Connecting up Rear panel SIGNAL GND L AC IN R OUT IN IN IN LINE PHONO iPod LAN (10/100) ANTENNA AM LOOP FM UNBAL 75 SPEAKERS R L 1 2 345 6 78 9 1 AC IN - This may cause a humming noise from an external component, connect with a stereo mini-plug cable. Power inlet ... for playback (page 9, 21). 2 F.AUDIO IN jack To listen to audio from the AC outlet. 8 En To listen to audio from the speakers. Important • Before making or changing any connections, switch off the power and unplug the power cord from a connected turntable, press INPUT on the...

Operating Instructions
Page 11
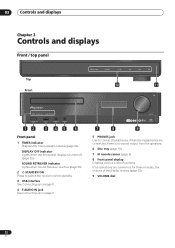
...and the exposed wire strands twisted together (fig. B). A 10 mm fig. You can be under HAZARDOUS VOLTAGE. A). fig. R L • Connect the speakers to 8 Ω. To connect a terminal, unscrew the terminal a few turns until the wire is properly prepared with a nominal impedance between 4 Ω to the... inserted fully into a power outlet. Also make sure the positive and negative (+/-) terminals on the receiver match those on the speakers. Once the wire is in Make sure to complete all connections before disconnecting the power cord. • Make sure that came with your...
...and the exposed wire strands twisted together (fig. B). A 10 mm fig. You can be under HAZARDOUS VOLTAGE. A). fig. R L • Connect the speakers to 8 Ω. To connect a terminal, unscrew the terminal a few turns until the wire is properly prepared with a nominal impedance between 4 Ω to the... inserted fully into a power outlet. Also make sure the positive and negative (+/-) terminals on the receiver match those on the speakers. Once the wire is in Make sure to complete all connections before disconnecting the power cord. • Make sure that came with your...
Operating Instructions
Page 12
... headphones are carried out for three minutes, the colours of the display reverse (page 35). 9 VOLUME dial 12 En If no sound output from the speakers. 6 Disc tray (page 16) 7 IR remote sensor (page 6) 8 Front panel display Displays various control functions. AUDIO IN PHONES 12 3 45 6 Front panel ...(page 34). 03 Controls and displays Chapter 3 Controls and displays Front / top panel SOUND RETRIEVER Top Front 0 OPEN / CLOSE FUNCTION 10 11 Z9 TIMER DISPLAY OFF SOUND RETRIEVER STANDBY/ON USB F. DISPLAY OFF indicator Lights when the front panel display is turned off (page 35).
... headphones are carried out for three minutes, the colours of the display reverse (page 35). 9 VOLUME dial 12 En If no sound output from the speakers. 6 Disc tray (page 16) 7 IR remote sensor (page 6) 8 Front panel display Displays various control functions. AUDIO IN PHONES 12 3 45 6 Front panel ...(page 34). 03 Controls and displays Chapter 3 Controls and displays Front / top panel SOUND RETRIEVER Top Front 0 OPEN / CLOSE FUNCTION 10 11 Z9 TIMER DISPLAY OFF SOUND RETRIEVER STANDBY/ON USB F. DISPLAY OFF indicator Lights when the front panel display is turned off (page 35).
Operating Instructions
Page 38
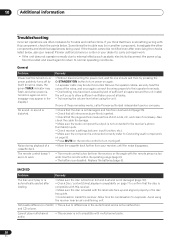
...64258;ash, and when power is turned on again an error message may have been caused by lack of these remedies works, call a Pioneer-authorized independent service company. • Check that the disc is not compatible with multichannel audio. 38 En SACD/CD Problem Remedy The ...and clean if necessary. Cannot play or is automatically ejected after exercising the checks listed below . The remote control doesn't seem to their speaker terminals. • Overheating may appear in the audio format and is distorted. Also check the cable for trouble and malfunctions. Avoid using the...
...64258;ash, and when power is turned on again an error message may have been caused by lack of these remedies works, call a Pioneer-authorized independent service company. • Check that the disc is not compatible with multichannel audio. 38 En SACD/CD Problem Remedy The ...and clean if necessary. Cannot play or is automatically ejected after exercising the checks listed below . The remote control doesn't seem to their speaker terminals. • Overheating may appear in the audio format and is distorted. Also check the cable for trouble and malfunctions. Avoid using the...


