

User Manual
Page 1
ENGLISH EN DATA PROJECTOR MODEL XD205U/XD205U-G/XD205R SD205U/SD205R User Manual This User Manual is important to you. Please read it before using your projector.
ENGLISH EN DATA PROJECTOR MODEL XD205U/XD205U-G/XD205R SD205U/SD205R User Manual This User Manual is important to you. Please read it before using your projector.

User Manual
Page 2
...EQUIPMENT AND SHALL BE EASILY ACCESSIBLE. CAUTION Not for use them for users and Annex IV. Please follow WARNING instructions. Your MITSUBISHI ELECTRIC product is for the Protection of important operating and maintenance (servicing) instructions in ! The exclamation point within an equilateral ... In the European Union there are to conserve the environment we live in the literature accompanying the appliance. When using the projector in the Standard for EU countries only. WARNING Use the attached specified power supply cord. WARNING: TO PREVENT FIRE OR SHOCK...
...EQUIPMENT AND SHALL BE EASILY ACCESSIBLE. CAUTION Not for use them for users and Annex IV. Please follow WARNING instructions. Your MITSUBISHI ELECTRIC product is for the Protection of important operating and maintenance (servicing) instructions in ! The exclamation point within an equilateral ... In the European Union there are to conserve the environment we live in the literature accompanying the appliance. When using the projector in the Standard for EU countries only. WARNING Use the attached specified power supply cord. WARNING: TO PREVENT FIRE OR SHOCK...

User Manual
Page 4
... the marking label. Warnings All warnings on an unstable cart, stand, tripod, bracket or table. Water and moisture Do not use this projector yourself. Never spill liquid of any kind through openings of the manufacturer as they may result in a fire or electric shock. 13....provided for future reference. 3. Unauthorized substitutions may often require extensive work by the manufacturer or parts having the same characteristics as this projector from the type of other hazards. 17. An appliance and cart combination should be operated only from the wall outlet before the ...
... the marking label. Warnings All warnings on an unstable cart, stand, tripod, bracket or table. Water and moisture Do not use this projector yourself. Never spill liquid of any kind through openings of the manufacturer as they may result in a fire or electric shock. 13....provided for future reference. 3. Unauthorized substitutions may often require extensive work by the manufacturer or parts having the same characteristics as this projector from the type of other hazards. 17. An appliance and cart combination should be operated only from the wall outlet before the ...
User Manual
Page 5
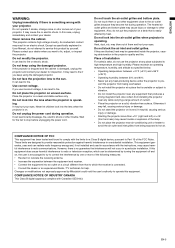
...equipment and receiver. • Connect the equipment into the lens when the projector is operating. Please contact your projector. Never let children look into the lens when the projector is easily affected by Mitsubishi could void the user's authority to operate this equipment does cause harmful interference...shock or other equipment. Do not unplug the power cord during operation. Place of the lamp. • Do not place the projector near air-conditioning unit or heater to stop before unplugging the power cord. However, there is no guarantee that is operating. ...
...equipment and receiver. • Connect the equipment into the lens when the projector is operating. Please contact your projector. Never let children look into the lens when the projector is easily affected by Mitsubishi could void the user's authority to operate this equipment does cause harmful interference...shock or other equipment. Do not unplug the power cord during operation. Place of the lamp. • Do not place the projector near air-conditioning unit or heater to stop before unplugging the power cord. However, there is no guarantee that is operating. ...
User Manual
Page 7
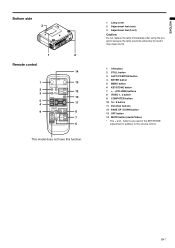
... 9 8 7 6 This model does not have this function. 1 Lamp cover 2 Adjustment feet (rear) 3 Adjustment feet (front) Caution: Do not replace the lamp immediately after using the projector because the lamp would be extremely hot and it may cause burns. 1 ON button 2 STILL button 3 AUTO POSITION button 4 ENTER button 5 MENU button 6 KEYSTONE button...
... 9 8 7 6 This model does not have this function. 1 Lamp cover 2 Adjustment feet (rear) 3 Adjustment feet (front) Caution: Do not replace the lamp immediately after using the projector because the lamp would be extremely hot and it may cause burns. 1 ON button 2 STILL button 3 AUTO POSITION button 4 ENTER button 5 MENU button 6 KEYSTONE button...

User Manual
Page 8
... with its positive (+) and negative (-) sides correctly oriented as indicated on the type of the screen used batteries according to the projector via the screen should be 5 m or less. Load the batteries making sure that they are positioned correctly (+ to direct sunlight...Zinc or Alkaline-Manganese Dioxide type batteries should be used. • Dispose of the projector. Remote control Battery installation Use two AAA size batteries. 1. Inverted fluorescent light, if located near the projector, may not work correctly. Replace the back cover. When the remote control is pointed...
... with its positive (+) and negative (-) sides correctly oriented as indicated on the type of the screen used batteries according to the projector via the screen should be 5 m or less. Load the batteries making sure that they are positioned correctly (+ to direct sunlight...Zinc or Alkaline-Manganese Dioxide type batteries should be used. • Dispose of the projector. Remote control Battery installation Use two AAA size batteries. 1. Inverted fluorescent light, if located near the projector, may not work correctly. Replace the back cover. When the remote control is pointed...
User Manual
Page 9
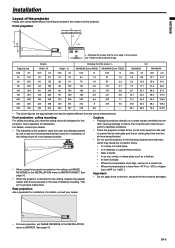
...; In direct sunlight. • Where the temperature rises high, such as in a closed car. • When using the projector mounted on this projector. For details, consult your dealer. • The warranty on the ceiling, set IMAGE REVERSE in the INSTALLATION menu to MIRROR.... 76 1.9 91 2.3 101 2.6 121 3.1 126 3.2 151 3.8 189 4.8 227 5.8 252 6.4 302 7.7 315 8 378 9.6 378 9.6 - - See page 16. • When the projector is lower than +41ºF (or +5ºC) or higher than those projected in the case of the ceiling mount kit in an improper location. •...
...; In direct sunlight. • Where the temperature rises high, such as in a closed car. • When using the projector mounted on this projector. For details, consult your dealer. • The warranty on the ceiling, set IMAGE REVERSE in the INSTALLATION menu to MIRROR.... 76 1.9 91 2.3 101 2.6 121 3.1 126 3.2 151 3.8 189 4.8 227 5.8 252 6.4 302 7.7 315 8 378 9.6 378 9.6 - - See page 16. • When the projector is lower than +41ºF (or +5ºC) or higher than those projected in the case of the ceiling mount kit in an improper location. •...
User Manual
Page 10
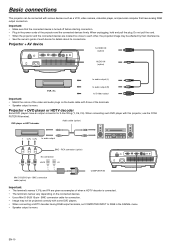
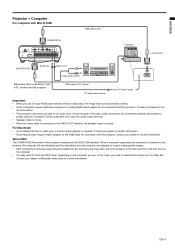
...devices such as examples of when a HDTV decoder is connected. • The terminal's names vary depending on the Audio cable with this projector, use the COM- When connecting such DVD player with those of the terminals. • Speaker output is mono. BNC conversion cable ... to audio output (L) VCR, etc. RCA connector (option) No connection HD/CS VD COMPUTER IN Mini D-SUB 15-pin - Basic connections This projector can be projected correctly with some DVD players. • When connecting a HDTV decoder having RGB output terminals, set COMPUTER INPUT to S-video output...
...devices such as examples of when a HDTV decoder is connected. • The terminal's names vary depending on the Audio cable with this projector, use the COM- When connecting such DVD player with those of the terminals. • Speaker output is mono. BNC conversion cable ... to audio output (L) VCR, etc. RCA connector (option) No connection HD/CS VD COMPUTER IN Mini D-SUB 15-pin - Basic connections This projector can be projected correctly with some DVD players. • When connecting a HDTV decoder having RGB output terminals, set COMPUTER INPUT to S-video output...
User Manual
Page 11
... with this terminal, plug the power cord of the provided cable, the image may need to both a PC monitor and the projector. In this projector. RGB cable for connection with this case, you need to install the DDC driver, depending on the computer you use . ther... AUDIO OUT terminal, the speaker output is required. Contact your dealer for further information. For Macintosh • If your dealer or Mitsubishi sales office for further information. When a computer supporting this standard is connected to this terminal, the computer will automatically load the information...
... with this terminal, plug the power cord of the provided cable, the image may need to both a PC monitor and the projector. In this projector. RGB cable for connection with this case, you need to install the DDC driver, depending on the computer you use . ther... AUDIO OUT terminal, the speaker output is required. Contact your dealer for further information. For Macintosh • If your dealer or Mitsubishi sales office for further information. When a computer supporting this standard is connected to this terminal, the computer will automatically load the information...

User Manual
Page 12
...want to any objects on the projector or the remote control to change the wall outlet. • The provided power cord for fine adjustment. • Install the screen on the installation conditions. • When the keystone adjustment takes effect, the resolution decreases. If you leave the ...lens cap on the lens with the projector turned on a flat screen installed at 120 V. Adjustment of heat build-up the project to the adjustment ...
...want to any objects on the projector or the remote control to change the wall outlet. • The provided power cord for fine adjustment. • Install the screen on the installation conditions. • When the keystone adjustment takes effect, the resolution decreases. If you leave the ...lens cap on the lens with the projector turned on a flat screen installed at 120 V. Adjustment of heat build-up the project to the adjustment ...

User Manual
Page 13
... to light the indicator. 3. The selected signal format is cooled down completely after turn-on . Condition Stand-by default whenever the projector is pressed. Replace the lamp when the STATUS indicator blinks red. (See page 23 and 26.) • Images may flicker. ...button on the remote control. • It may not function. ENGLISH Basic operation 4 6 5 3 1, 2 5 5 3, 1, 2 Power-on the control panel. • The projector automatically selects the appropriate signal format. Press the POWER button on the control panel or the ON button on the remote control to reduce flicker...
... to light the indicator. 3. The selected signal format is cooled down completely after turn-on . Condition Stand-by default whenever the projector is pressed. Replace the lamp when the STATUS indicator blinks red. (See page 23 and 26.) • Images may flicker. ...button on the remote control. • It may not function. ENGLISH Basic operation 4 6 5 3 1, 2 5 5 3, 1, 2 Power-on the control panel. • The projector automatically selects the appropriate signal format. Press the POWER button on the control panel or the ON button on the remote control to reduce flicker...

User Manual
Page 14
...OFF button). If the screen saver is pressed. Then unplug the power cord from the speaker Press the VOLUME + or -button to turn off the projector by pressing the 16:9 button again. blinks red on the remote control. • The message "POWER OFF? Important: • Do not display ...second press of letterboxed image, press the 16:9 button. Unplugging while the lamp is on degrades the lamp's performance and causes failure in the projector. 1. The STATUS indicator will disappear about 10 seconds after turned off . Exit the ANAMORPHIC mode, by unplugging the power cord while the ...
...OFF button). If the screen saver is pressed. Then unplug the power cord from the speaker Press the VOLUME + or -button to turn off the projector by pressing the 16:9 button again. blinks red on the remote control. • The message "POWER OFF? Important: • Do not display ...second press of letterboxed image, press the 16:9 button. Unplugging while the lamp is on degrades the lamp's performance and causes failure in the projector. 1. The STATUS indicator will disappear about 10 seconds after turned off . Exit the ANAMORPHIC mode, by unplugging the power cord while the ...

User Manual
Page 16
... (Available only when SHARPNESS 0 VIDEO or S-VIDEO is chosen as the value increases. When LOW is chosen, the lamp brightness is kept low and the projector operating noise is reduced, resulting in the wall outlet. Select AUTO for film sources. 2 INSTALLATION AUTO POWER ON When ON is chosen, the lamp is... SCREEN Choose ON to adjust the white level of LAMP MODE frequently. • When LAMP MODE has been set the time elapsed before the projector enters the stand-by mode when the lamp AUTO POWER ON OFF is no signal input from the source. WHITE ENHANCE Use to display the...
... (Available only when SHARPNESS 0 VIDEO or S-VIDEO is chosen as the value increases. When LOW is chosen, the lamp brightness is kept low and the projector operating noise is reduced, resulting in the wall outlet. Select AUTO for film sources. 2 INSTALLATION AUTO POWER ON When ON is chosen, the lamp is... SCREEN Choose ON to adjust the white level of LAMP MODE frequently. • When LAMP MODE has been set the time elapsed before the projector enters the stand-by mode when the lamp AUTO POWER ON OFF is no signal input from the source. WHITE ENHANCE Use to display the...

User Manual
Page 17
...). • CINEMA MODE can not be projected with a component video output (Y, CB, CR). ing on the input signal. When the projector is connected with the PC input signal SIGNAL so that the image is not blurred. POSITION FINE SYNC. VIDEO SIGNAL When AUTO is selected,.... • When VIDEO SIGNAL is set the IMAGE, SIGNAL, and SIGNAL-USER menus only when the signal is inputted. COMPUTER INPUT The projector adjusts its settings automatically when connected to a DVD player equipped with correct colors. CLAMP POSITION 0 CLAMP WIDTH 1 Important: • You can...
...). • CINEMA MODE can not be projected with a component video output (Y, CB, CR). ing on the input signal. When the projector is connected with the PC input signal SIGNAL so that the image is not blurred. POSITION FINE SYNC. VIDEO SIGNAL When AUTO is selected,.... • When VIDEO SIGNAL is set the IMAGE, SIGNAL, and SIGNAL-USER menus only when the signal is inputted. COMPUTER INPUT The projector adjusts its settings automatically when connected to a DVD player equipped with correct colors. CLAMP POSITION 0 CLAMP WIDTH 1 Important: • You can...

User Manual
Page 18
... B 0 4. Press the W or X button to select USER . 3. Exit the menu by changing the values of color in the IMAGE menu. White of white color. This projector adjusts this color temperature by pressing the MENU button several times. To reduce the color temperature: Decrease the CONTRAST B (blue) and increase the CONTRAST R (red).
... B 0 4. Press the W or X button to select USER . 3. Exit the menu by changing the values of color in the IMAGE menu. White of white color. This projector adjusts this color temperature by pressing the MENU button several times. To reduce the color temperature: Decrease the CONTRAST B (blue) and increase the CONTRAST R (red).
User Manual
Page 19
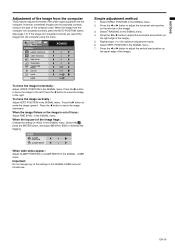
...: Do not change any of the settings in the SIGNAL-USER menu for optimum adjustment results. 6. ENGLISH Adjustment of the image from the computer This projector adjusts the format of the video signal supplied from the computer using the menu. POSITION VERT. USER menu. However, sometimes images are not projected correctly...
...: Do not change any of the settings in the SIGNAL-USER menu for optimum adjustment results. 6. ENGLISH Adjustment of the image from the computer This projector adjusts the format of the video signal supplied from the computer using the menu. POSITION VERT. USER menu. However, sometimes images are not projected correctly...
User Manual
Page 20
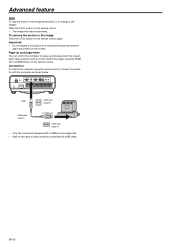
...-down You can control the computer to page-up before connecting the USB cable. Connection To control the computer using the remote control, connect the projector with a USB port are supported. • Wait for a long time because the afterimages may persist on the remote control. Switch the pages using the remote...
...-down You can control the computer to page-up before connecting the USB cable. Connection To control the computer using the remote control, connect the projector with a USB port are supported. • Wait for a long time because the afterimages may persist on the remote control. Switch the pages using the remote...
User Manual
Page 21
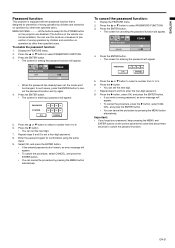
... the procedure, select CANCEL, and press the ENTER button. • You can set the next digit. 7. ENGLISH Password function This projector is equipped with the password function that is designed for prevention of wrong operation by children and restriction on operation by other than specified ...to enter the four-digit password. 8. To cancel the password function: 1. Press the ENTER button. • The screen for the POWER button on the projector are disabled. (The buttons on the control panel at the some time about three seconds to 9. 6. to 9. 6. Press the ENTER button. •...
... the procedure, select CANCEL, and press the ENTER button. • You can set the next digit. 7. ENGLISH Password function This projector is equipped with the password function that is designed for prevention of wrong operation by children and restriction on operation by other than specified ...to enter the four-digit password. 8. To cancel the password function: 1. Press the ENTER button. • The screen for the POWER button on the projector are disabled. (The buttons on the control panel at the some time about three seconds to 9. 6. to 9. 6. Press the ENTER button. •...
User Manual
Page 22
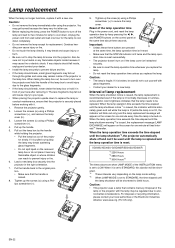
...for a new lamp. Important: (b) • Unless these three buttons are when LAMP MODE of your eyes. • When placing the projector upside down . For disposal or recycling information, please contact your dealer for one . Also be used until the lamp shutdown notice*1 is... the lamp to the original position. • Make sure that contains mercury. Pull up the screws (c) using a Phillips screwdriver (+). 4. XD205U/XD205U-G/XD205R/SD205U/SD205R *1 2250 Hours *2 2850 Hours *3 3000 Hours*5 The times above are pressed at the same time about three seconds. ...
...for a new lamp. Important: (b) • Unless these three buttons are when LAMP MODE of your eyes. • When placing the projector upside down . For disposal or recycling information, please contact your dealer for one . Also be used until the lamp shutdown notice*1 is... the lamp to the original position. • Make sure that contains mercury. Pull up the screws (c) using a Phillips screwdriver (+). 4. XD205U/XD205U-G/XD205R/SD205U/SD205R *1 2250 Hours *2 2850 Hours *3 3000 Hours*5 The times above are pressed at the same time about three seconds. ...
User Manual
Page 23
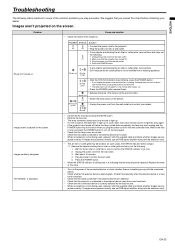
...external device is a notebook computer.) • Check that the cable connected to the external device isn't defective. • Check that the projector is connected to the external device using the correct terminals. • Check that the connected device is correctly selected as the input source. ... outlet next time. jected correctly. POWER STATUS Off Off Off Solution Connect the power cord to light the lamp again. • If the projector was turned off . 3. Press the POWER button. Cause and solution Power isn't turned on the screen. "NO SIGNAL" is rotating, the...
...external device is a notebook computer.) • Check that the cable connected to the external device isn't defective. • Check that the projector is connected to the external device using the correct terminals. • Check that the connected device is correctly selected as the input source. ... outlet next time. jected correctly. POWER STATUS Off Off Off Solution Connect the power cord to light the lamp again. • If the projector was turned off . 3. Press the POWER button. Cause and solution Power isn't turned on the screen. "NO SIGNAL" is rotating, the...