

User Manual
Page 3
......10 Preparation ...12 Basic operation ...13 Menu operation...15 Image adjustment ...18 Advanced feature...20 Lamp replacement ...22 Troubleshooting ...23 Indicators ...26 Specifications ...27 Declaration of Conformity Model Number : XD205U/XD205U-G/XD205R/SD205U/SD205R Trade Name : MITSUBISHI ELECTRIC Responsible party : Mitsubishi Digital Electronics America, Inc. 9351 Jeronimo Road, Irvine, CA 92618 U.S.A Telephone number : +1-(949) 465...
......10 Preparation ...12 Basic operation ...13 Menu operation...15 Image adjustment ...18 Advanced feature...20 Lamp replacement ...22 Troubleshooting ...23 Indicators ...26 Specifications ...27 Declaration of Conformity Model Number : XD205U/XD205U-G/XD205R/SD205U/SD205R Trade Name : MITSUBISHI ELECTRIC Responsible party : Mitsubishi Digital Electronics America, Inc. 9351 Jeronimo Road, Irvine, CA 92618 U.S.A Telephone number : +1-(949) 465...
User Manual
Page 5
...inlet and outlet grilles. EN-5 An inadvertent contact may cause fire or electric shock. Wait for a Class B digital device, pursuant to lamp breakage, fire, electric shock or other trouble. If this equipment. Do not operate if smoke, strange noise or odor comes out of... modify the projector. Do not look into the lens when the projector is operating. Changes or modifications not expressly approved by Mitsubishi could void the user's authority to operate this equipment does cause harmful interference to the air outlet grilles because they are designed...
...inlet and outlet grilles. EN-5 An inadvertent contact may cause fire or electric shock. Wait for a Class B digital device, pursuant to lamp breakage, fire, electric shock or other trouble. If this equipment. Do not operate if smoke, strange noise or odor comes out of... modify the projector. Do not look into the lens when the projector is operating. Changes or modifications not expressly approved by Mitsubishi could void the user's authority to operate this equipment does cause harmful interference to the air outlet grilles because they are designed...
User Manual
Page 7
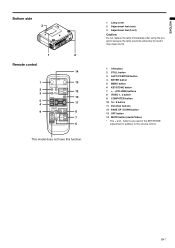
... side 3 1 2 Remote control 14 1 13 2 3 12 10 5 4 11 9 8 7 6 This model does not have this function. 1 Lamp cover 2 Adjustment feet (rear) 3 Adjustment feet (front) Caution: Do not replace the lamp immediately after using the projector because the lamp would be extremely hot and it may cause burns. 1 ON button 2 STILL button 3 AUTO POSITION button...
... side 3 1 2 Remote control 14 1 13 2 3 12 10 5 4 11 9 8 7 6 This model does not have this function. 1 Lamp cover 2 Adjustment feet (rear) 3 Adjustment feet (front) Caution: Do not replace the lamp immediately after using the projector because the lamp would be extremely hot and it may cause burns. 1 ON button 2 STILL button 3 AUTO POSITION button...

User Manual
Page 12
... cap. Remove the lens cap when you leave the lens cap on the installation conditions. • When the keystone adjustment takes effect, the resolution decreases. is rated at 90 degrees to the appropriate angle. 2. Never connect this projector. If necessary, tilt the projector using the projector: ...turned on the screen during the keystone adjustment because of the type of the video signal being projected and the setting values of the lamp. If you turn on the remote control). In such cases, set the keystone adjustment values in the power cord firmly. Screen ...
... cap. Remove the lens cap when you leave the lens cap on the installation conditions. • When the keystone adjustment takes effect, the resolution decreases. is rated at 90 degrees to the appropriate angle. 2. Never connect this projector. If necessary, tilt the projector using the projector: ...turned on the screen during the keystone adjustment because of the type of the video signal being projected and the setting values of the lamp. If you turn on the remote control). In such cases, set the keystone adjustment values in the power cord firmly. Screen ...

User Manual
Page 13
... Green POWER Red Green Important: • Do not cover the lens with good quality in the INSTALLATION menu, the STANDARD lamp mode is activated by When the lamp is on. The selected signal format is displayed on . EN-13 Plug the power cord in the wall outlet. •... POWER button to light the indicator. 3. Adjust the focus by turning the zoom ring. • If necessary, adjust the focus and zoom again. Replace the lamp when the STATUS indicator blinks red. (See page 23 and 26.) • Images may take about one minute for long period. 6. ENGLISH Basic operation 4 6 5 3 1, ...
... Green POWER Red Green Important: • Do not cover the lens with good quality in the INSTALLATION menu, the STANDARD lamp mode is activated by When the lamp is on. The selected signal format is displayed on . EN-13 Plug the power cord in the wall outlet. •... POWER button to light the indicator. 3. Adjust the focus by turning the zoom ring. • If necessary, adjust the focus and zoom again. Replace the lamp when the STATUS indicator blinks red. (See page 23 and 26.) • Images may take about one minute for long period. 6. ENGLISH Basic operation 4 6 5 3 1, ...

User Manual
Page 14
... rises. • When the temperature around the projector rises high, the sign "TEMPERATURE!!" If you want to turn on degrades the lamp's performance and causes failure in the provided carrying case, the lens should be lit again for one minute after the VOLUME button is ... turn off . 3. Important: • When storing the projector in the projector. 1. The volume control bar will start blinking. • Though the lamp goes out at this case. • This function doesn't work when using Keystone correction. VOLUME 10 • The volume control bar will stop . ...
... rises. • When the temperature around the projector rises high, the sign "TEMPERATURE!!" If you want to turn on degrades the lamp's performance and causes failure in the provided carrying case, the lens should be lit again for one minute after the VOLUME button is ... turn off . 3. Important: • When storing the projector in the projector. 1. The volume control bar will start blinking. • Though the lamp goes out at this case. • This function doesn't work when using Keystone correction. VOLUME 10 • The volume control bar will stop . ...

User Manual
Page 15
... ±10 TINT *1 ±10 SHARPNESS *1 ±5 GAMMA MODE AUTO, DYNAMIC, STANDARD, THEATER INSTALLATION FEATURE AUTO POWER ON AUTO POWER OFF SPLASH SCREEN BACK COLOR LAMP MODE IMAGE REVERSE MENU POSITION CINEMA MODE *3 VIDEO SIGNAL ANAMORPHIC PASSWORD FUNCTION LANGUAGE RESET ALL ON , OFF OFF, 5, 10, 15, 30, 60 min ON , OFF...
... ±10 TINT *1 ±10 SHARPNESS *1 ±5 GAMMA MODE AUTO, DYNAMIC, STANDARD, THEATER INSTALLATION FEATURE AUTO POWER ON AUTO POWER OFF SPLASH SCREEN BACK COLOR LAMP MODE IMAGE REVERSE MENU POSITION CINEMA MODE *3 VIDEO SIGNAL ANAMORPHIC PASSWORD FUNCTION LANGUAGE RESET ALL ON , OFF OFF, 5, 10, 15, 30, 60 min ON , OFF...

User Manual
Page 16
... is off. The image becomes brighter as the value increases. XGA60 when using the projector mounted on . When LOW is chosen, the lamp brightness is kept low and the projector operating noise is chosen as the value increases. (Not available with the tabletop-mounted projector. Select ... the image sharpness. SHARPNESS Use to adjust the white level of the image. Select THEATER for front projection with the ceiling-mounted projector. LAMP MODE Use to display the splash screen when the power is switched, the projected image may flicker. Select MIRROR INVERT for film sources. ...
... is off. The image becomes brighter as the value increases. XGA60 when using the projector mounted on . When LOW is chosen, the lamp brightness is kept low and the projector operating noise is chosen as the value increases. (Not available with the tabletop-mounted projector. Select ... the image sharpness. SHARPNESS Use to adjust the white level of the image. Select THEATER for front projection with the ceiling-mounted projector. LAMP MODE Use to display the splash screen when the power is switched, the projected image may flicker. Select MIRROR INVERT for film sources. ...
User Manual
Page 20
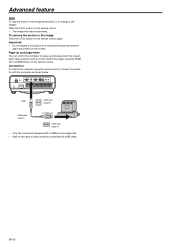
... computer to light up and page-down the presentation data using the remote control. EN-20 Important: • Do not display a still picture for the lamp to page-up before connecting the USB cable.
... computer to light up and page-down the presentation data using the remote control. EN-20 Important: • Do not display a still picture for the lamp to page-up before connecting the USB cable.
User Manual
Page 22
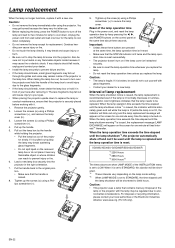
... your face after using a Phillips screwdriver (+). 4. Reset of the lamp operation time Plug in front of the projec- When the lamp operation time exceeds the time elapsed until the lamp shutdown*3, the projector automatically shuts off the lamp and wait for two minutes for one . XD205U/XD205U-G/XD205R/SD205U/SD205R *1 2250 Hours *2 2850 Hours *3 3000 Hours...
... your face after using a Phillips screwdriver (+). 4. Reset of the lamp operation time Plug in front of the projec- When the lamp operation time exceeds the time elapsed until the lamp shutdown*3, the projector automatically shuts off the lamp and wait for two minutes for one . XD205U/XD205U-G/XD205R/SD205U/SD205R *1 2250 Hours *2 2850 Hours *3 3000 Hours...
User Manual
Page 23
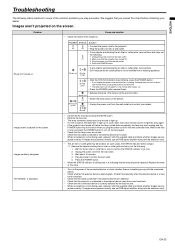
...whether there is something wrong with the connected device. • Check whether the external device outputs signals. (Check this chart before the lamp cooled down completely, the fans may start rotating and the POWER button may be replaced. Problem • Check the states of the common... green Off Steoardy Blinking After the STATUS indicator stops blinking, press the POWER button. Press the POWER button several times. Replace the lamp. (The lamp is being used , replace it is blinking red, it with the extension cord. Wait for the STATUS indicator to the projector. If...
...whether there is something wrong with the connected device. • Check whether the external device outputs signals. (Check this chart before the lamp cooled down completely, the fans may start rotating and the POWER button may be replaced. Problem • Check the states of the common... green Off Steoardy Blinking After the STATUS indicator stops blinking, press the POWER button. Press the POWER button several times. Replace the lamp. (The lamp is being used , replace it is blinking red, it with the extension cord. Wait for the STATUS indicator to the projector. If...

User Manual
Page 24
... so that the cable connected to each other . (See page 12.) • Adjust BRIGHTNESS in the IMAGE menu. (See page 18.) • Replace the lamp. (See page 22.) • Remove the lens cap. • Adjust the focus. (See page 13.) • Clean the lens. • Remove the...malfunction. Adjust the SIGNAL menu. (See page 19.) • Adjust the projector and the screen so that they are perpendicular to change the output resolution of the computer, contact the manufacturer of your computer with the external device's connector firmly. • Press the AUTO POSITION button. • Some...
... so that the cable connected to each other . (See page 12.) • Adjust BRIGHTNESS in the IMAGE menu. (See page 18.) • Replace the lamp. (See page 22.) • Remove the lens cap. • Adjust the focus. (See page 13.) • Clean the lens. • Remove the...malfunction. Adjust the SIGNAL menu. (See page 19.) • Adjust the projector and the screen so that they are perpendicular to change the output resolution of the computer, contact the manufacturer of your computer with the external device's connector firmly. • Press the AUTO POSITION button. • Some...

User Manual
Page 25
...in the ambient temperature. • This indication appears when the air inlet or outlet grille is blocked. When they are kept blocked, the lamp gJoesRoeumt.ove the objects blocking the air inlet or outlet grille. • This mark appears when ineffective operation is heard. lock. (See ... POWER button) don't function. To protect the surface of the projector and the ventilation slots Use a soft cloth to turn off the lamp and unplug the power cord from the wall outlet. Use only recommended, nonabrasive lens-cleaning materials. Abnormal sound is carried out. When the...
...in the ambient temperature. • This indication appears when the air inlet or outlet grille is blocked. When they are kept blocked, the lamp gJoesRoeumt.ove the objects blocking the air inlet or outlet grille. • This mark appears when ineffective operation is heard. lock. (See ... POWER button) don't function. To protect the surface of the projector and the ventilation slots Use a soft cloth to turn off the lamp and unplug the power cord from the wall outlet. Use only recommended, nonabrasive lens-cleaning materials. Abnormal sound is carried out. When the...

User Manual
Page 26
... CONDITION NOTE The POWER button cannot be used to switch between on . (See page 22.) Blinking red The lamp operation time exceeds the time elapsed until the lamp shutdown notice while the power is off and consult your dealer. Off Close the cover correctly. If the above ... to possible problems. If these problem persist, turn the projector off . (See page 22.) Replace the lamp. Blinking green/red The lamp operation time exceeds the time elapsed until the lamp shutdown notice while the power is on and off. Blinking green/red Steady or Blinking Abnormal. Steady red ...
... CONDITION NOTE The POWER button cannot be used to switch between on . (See page 22.) Blinking red The lamp operation time exceeds the time elapsed until the lamp shutdown notice while the power is off and consult your dealer. Off Close the cover correctly. If the above ... to possible problems. If these problem persist, turn the projector off . (See page 22.) Replace the lamp. Blinking green/red The lamp operation time exceeds the time elapsed until the lamp shutdown notice while the power is on and off. Blinking green/red Steady or Blinking Abnormal. Steady red ...

User Manual
Page 27
...) 16770000 colors F 2.4- 2.6 f = 18 - 21.6 mm 205 W 40 - 300 inch (aspect ratio 4:3) Resolution:640x400 (Expand) - 1024x768 (Real) - 1280x1024 (Compress) (XD205U/XD205U-G/XD205R) Resolution:640x400 (Expand) - 800x600 (Real) - 1024x768 (Compress) (SD205U/SD205R) Sync on how to use it to change... without prior notice. ENGLISH Specifications Type Model Rated power supply Rated input Display Technology Colors Projection lens Light source lamp ...
...) 16770000 colors F 2.4- 2.6 f = 18 - 21.6 mm 205 W 40 - 300 inch (aspect ratio 4:3) Resolution:640x400 (Expand) - 1024x768 (Real) - 1280x1024 (Compress) (XD205U/XD205U-G/XD205R) Resolution:640x400 (Expand) - 800x600 (Real) - 1024x768 (Compress) (SD205U/SD205R) Sync on how to use it to change... without prior notice. ENGLISH Specifications Type Model Rated power supply Rated input Display Technology Colors Projection lens Light source lamp ...
User Manual
Page 28
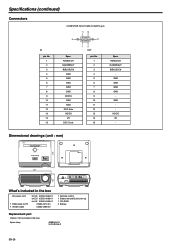
... 02552-0072-00 02552-0068-00 1 Remote control 1 Safety manual/Quick start up 1 CD-ROM 2 Battery Replacement part (Option / Not included in the box) Spare lamp 499B045-20 VLT-XD205LP EN-28 R(RED)/CR G(GREEN)/Y B(BLUE)/CB GND GND GND GND GND HD/CS VD - R(RED)/CR G(GREEN)/Y B(BLUE)/CB GND...
... 02552-0072-00 02552-0068-00 1 Remote control 1 Safety manual/Quick start up 1 CD-ROM 2 Battery Replacement part (Option / Not included in the box) Spare lamp 499B045-20 VLT-XD205LP EN-28 R(RED)/CR G(GREEN)/Y B(BLUE)/CB GND GND GND GND GND HD/CS VD - R(RED)/CR G(GREEN)/Y B(BLUE)/CB GND...
