

User Manual
Page 1
Please read it before using your projector. ENGLISH EN DATA PROJECTOR MODEL XD205U/XD205U-G/XD205R SD205U/SD205R User Manual This User Manual is important to you.
Please read it before using your projector. ENGLISH EN DATA PROJECTOR MODEL XD205U/XD205U-G/XD205R SD205U/SD205R User Manual This User Manual is important to you.

User Manual
Page 2
... the attached RGB cable with high quality materials and components which can be disposed of -life, should be recycled and reused. Your MITSUBISHI ELECTRIC product is for users and Annex IV. The exclamation point within an equilateral triangle is intended to alert the user to keep interference...PLUG WITH AN EXTENSION CORD, RECEPTACLE OR OTHER OUTLET UNLESS THE BLADES CAN BE FULLY INSERTED TO PREVENT BLADE EXPOSURE. NOTE: SINCE THIS PROJECTOR IS PLUGGABLE EQUIPMENT, THE SOCKET-OUTLET SHALL BE INSTALLED NEAR THE EQUIPMENT AND SHALL BE EASILY ACCESSIBLE. Use the attached RGB cable with ...
... the attached RGB cable with high quality materials and components which can be disposed of -life, should be recycled and reused. Your MITSUBISHI ELECTRIC product is for users and Annex IV. The exclamation point within an equilateral triangle is intended to alert the user to keep interference...PLUG WITH AN EXTENSION CORD, RECEPTACLE OR OTHER OUTLET UNLESS THE BLADES CAN BE FULLY INSERTED TO PREVENT BLADE EXPOSURE. NOTE: SINCE THIS PROJECTOR IS PLUGGABLE EQUIPMENT, THE SOCKET-OUTLET SHALL BE INSTALLED NEAR THE EQUIPMENT AND SHALL BE EASILY ACCESSIBLE. Use the attached RGB cable with ...

User Manual
Page 4
... be routed so that they may touch dangerous voltage points or short-out parts that the manufacturer's instructions have fallen into the projector. (c) If the projector does not operate normally after you are not likely to be blocked by items placed upon or against them. Cleaning Unplug this ... (a) If the power-supply cord or plug is in the cabinet are covered by the manufacturer. 12. Accessories Do not place this projector as this projector from the wall outlet before the appliance is adequate ventilation and that could result in a fire or electric shock. 13. Any mounting of...
... be routed so that they may touch dangerous voltage points or short-out parts that the manufacturer's instructions have fallen into the projector. (c) If the projector does not operate normally after you are not likely to be blocked by items placed upon or against them. Cleaning Unplug this ... (a) If the power-supply cord or plug is in the cabinet are covered by the manufacturer. 12. Accessories Do not place this projector as this projector from the wall outlet before the appliance is adequate ventilation and that could result in a fire or electric shock. 13. Any mounting of...
User Manual
Page 5
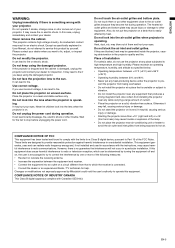
... the FCC Rules. Please maintain an operating temperature, humidity, and altitude as specifically explained in User Manual, do not put the projector on a desk that interference will not occur in an electric shock. Otherwise it can lead to stop before unplugging the power cord... a level and stable surface only. In this product by Mitsubishi could void the user's authority to pre- Do not place the projector on . Never let children look into the lens when the projector is operating. vent the projector from that produces a strong magnetic field. ENGLISH WARNING: Unplug...
... the FCC Rules. Please maintain an operating temperature, humidity, and altitude as specifically explained in User Manual, do not put the projector on a desk that interference will not occur in an electric shock. Otherwise it can lead to stop before unplugging the power cord... a level and stable surface only. In this product by Mitsubishi could void the user's authority to pre- Do not place the projector on . Never let children look into the lens when the projector is operating. vent the projector from that produces a strong magnetic field. ENGLISH WARNING: Unplug...
User Manual
Page 7
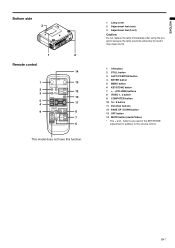
... 9 8 7 6 This model does not have this function. 1 Lamp cover 2 Adjustment feet (rear) 3 Adjustment feet (front) Caution: Do not replace the lamp immediately after using the projector because the lamp would be extremely hot and it may cause burns. 1 ON button 2 STILL button 3 AUTO POSITION button 4 ENTER button 5 MENU button 6 KEYSTONE button...
... 9 8 7 6 This model does not have this function. 1 Lamp cover 2 Adjustment feet (rear) 3 Adjustment feet (front) Caution: Do not replace the lamp immediately after using the projector because the lamp would be extremely hot and it may cause burns. 1 ON button 2 STILL button 3 AUTO POSITION button 4 ENTER button 5 MENU button 6 KEYSTONE button...

User Manual
Page 8
...Keep a distance at the remote control sensor of the arrow. 2. Replace the back cover. If the solution comes in the direction of the projector. Remote control Battery installation Use two AAA size batteries. 1. However, the operation distance varies depending on the remote control. • Keep batteries... remote control. • When you use the remote control too close to +, and - Inverted fluorescent light, if located near the projector, may not work correctly. Remove the back cover of the remote control by pushing the battery compartment door in contact with your doctor...
...Keep a distance at the remote control sensor of the arrow. 2. Replace the back cover. If the solution comes in the direction of the projector. Remote control Battery installation Use two AAA size batteries. 1. However, the operation distance varies depending on the remote control. • Keep batteries... remote control. • When you use the remote control too close to +, and - Inverted fluorescent light, if located near the projector, may not work correctly. Remove the back cover of the remote control by pushing the battery compartment door in contact with your doctor...
User Manual
Page 9
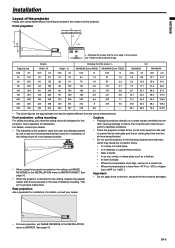
..., ceiling mounting Caution: For ceiling mounting, you need the ceiling mount kit designed for installation. See page 16. • When the projector is lower than +41ºF (or +5ºC) or higher than those projected in the INSTALLATION menu to MIRROR. Important: • Do... place such as a kitchen. • In direct sunlight. • Where the temperature rises high, such as in a closed car. • When using the projector mounted on the ceiling, images may be slightly different from the screen : L MINIMUM Zoom (WIDE) MAXIMUM Zoom (TELE) inch m inch m 50 1.3 61 ...
..., ceiling mounting Caution: For ceiling mounting, you need the ceiling mount kit designed for installation. See page 16. • When the projector is lower than +41ºF (or +5ºC) or higher than those projected in the INSTALLATION menu to MIRROR. Important: • Do... place such as a kitchen. • In direct sunlight. • Where the temperature rises high, such as in a closed car. • When using the projector mounted on the ceiling, images may be slightly different from the screen : L MINIMUM Zoom (WIDE) MAXIMUM Zoom (TELE) inch m inch m 50 1.3 61 ...
User Manual
Page 10
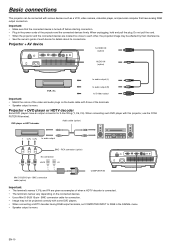
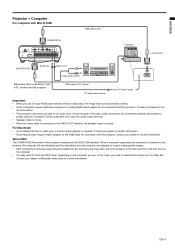
...on the connected devices. • Use a Mini D-SUB 15-pin - When connecting such DVD player with various devices such as examples of the projector and the connected devices firmly. Important: • Make sure that have an output connector for 3-line fitting (Y, CB, CR). Do not pull the... cord. • When the projector and the connected devices are given as a VCR, video camera, videodisc player, and personal computer that the connected device is mono. PUTER IN terminal....
...on the connected devices. • Use a Mini D-SUB 15-pin - When connecting such DVD player with various devices such as examples of the projector and the connected devices firmly. Important: • Make sure that have an output connector for 3-line fitting (Y, CB, CR). Do not pull the... cord. • When the projector and the connected devices are given as a VCR, video camera, videodisc player, and personal computer that the connected device is mono. PUTER IN terminal....
User Manual
Page 11
...8226; Speaker output is mono. • When the audio cable is connected to both a PC monitor and the projector. For Macintosh • If your dealer or Mitsubishi sales office for further information. Contact your dealer for further information. • Some Macintoshes require a MAC adapter for... computers require additional connectors or analog RGB output adapters to download the driver from our Web site. ther information. • This projector uses stereo pin jack for fur- When a computer supporting this standard is connected to this terminal, the computer will automatically load the...
...8226; Speaker output is mono. • When the audio cable is connected to both a PC monitor and the projector. For Macintosh • If your dealer or Mitsubishi sales office for further information. Contact your dealer for further information. • Some Macintoshes require a MAC adapter for... computers require additional connectors or analog RGB output adapters to download the driver from our Web site. ther information. • This projector uses stereo pin jack for fur- When a computer supporting this standard is connected to this terminal, the computer will automatically load the...

User Manual
Page 12
... from the power plug. If you turn on the projector. • The power cords for fine adjustment. • Install the screen on the installation conditions. • When the keystone adjustment takes effect, the resolution decreases. Tilt up the project to product malfunctions. •...keystone adjustment ranges are not due to the appropriate angle. 2. Adjustment of the lamp. Press the foot adjustment buttons next to the projector. 2. Note that position. 4. Preparation Preparation for fine adjustment. Attach the provided power cord to the adjustment feet (rear), and ...
... from the power plug. If you turn on the projector. • The power cords for fine adjustment. • Install the screen on the installation conditions. • When the keystone adjustment takes effect, the resolution decreases. Tilt up the project to product malfunctions. •...keystone adjustment ranges are not due to the appropriate angle. 2. Adjustment of the lamp. Press the foot adjustment buttons next to the projector. 2. Note that position. 4. Preparation Preparation for fine adjustment. Attach the provided power cord to the adjustment feet (rear), and ...

User Manual
Page 13
... the focus and zoom again. Wait a few minutes and try to light up process, images may flicker. Adjust the image size by default whenever the projector is not a product malfunction.) 4. ENGLISH Basic operation 4 6 5 3 1, 2 5 5 3, 1, 2 Power-on . When LAMP MODE has been set to LOW, ...the lamp mode changes from VIDEO to the projector first. 2. Choose your projector, please do not display the same stationary images for the fans to stop and press the POWER button to LOW about one minute after...
... the focus and zoom again. Wait a few minutes and try to light up process, images may flicker. Adjust the image size by default whenever the projector is not a product malfunction.) 4. ENGLISH Basic operation 4 6 5 3 1, 2 5 5 3, 1, 2 Power-on . When LAMP MODE has been set to LOW, ...the lamp mode changes from VIDEO to the projector first. 2. Choose your projector, please do not display the same stationary images for the fans to stop and press the POWER button to LOW about one minute after...

User Manual
Page 14
... the STATUS indicator will start blinking. • Though the lamp goes out at this case. • This function doesn't work when using the projector, wait one minute to cool down for a long time before displaying 4:3 image, the afterimages of the black bars may appear on the 4:3 image... unplugged accidentally while either the air inlet fan or the air outlet fans are temporarily muted when the MUTE button is still not in the projector. 1. ANAMORPHIC mode When playing DVD discs containing data of the POWER button (or OFF button), the air outlet fans continue operating for cancel.)...
... the STATUS indicator will start blinking. • Though the lamp goes out at this case. • This function doesn't work when using the projector, wait one minute to cool down for a long time before displaying 4:3 image, the afterimages of the black bars may appear on the 4:3 image... unplugged accidentally while either the air inlet fan or the air outlet fans are temporarily muted when the MUTE button is still not in the projector. 1. ANAMORPHIC mode When playing DVD discs containing data of the POWER button (or OFF button), the air outlet fans continue operating for cancel.)...

User Manual
Page 16
... switched, the projected image may flicker. Select MIRROR for normal use , select AUTO. opt. Select AUTO for rear projection with the ceiling-mounted projector. See page 18. Select THEATER for sport scenes and video sources. Choose ON opt. The contrast becomes higher as the value increases and shifts ...tion. • Do not change the brightness of LAMP MODE frequently. • When LAMP MODE has been set the time elapsed before the projector enters the stand-by mode when the lamp AUTO POWER ON OFF is no signal input from the AUTO POWER OFF SPLASH ON SCREEN OFF...
... switched, the projected image may flicker. Select MIRROR for normal use , select AUTO. opt. Select AUTO for rear projection with the ceiling-mounted projector. See page 18. Select THEATER for sport scenes and video sources. Choose ON opt. The contrast becomes higher as the value increases and shifts ...tion. • Do not change the brightness of LAMP MODE frequently. • When LAMP MODE has been set the time elapsed before the projector enters the stand-by mode when the lamp AUTO POWER ON OFF is no signal input from the AUTO POWER OFF SPLASH ON SCREEN OFF...

User Manual
Page 17
...the IMAGE, SIGNAL, and SIGNAL-USER menus only when the signal is selected, the black area USER becomes thicker. COMPUTER INPUT The projector adjusts its settings automatically when connected to select the language used in the projected image. When 3.5% or 7.5% is supplied. CLAMP .../ / / / PORTUGUÊS). VERT. ENGLISH 3 FEATURE MENU POSITION Use to select the position of the image. opt. When the projector is inputted. POSITION VERT. HOLD Use to adjust the horizontal position of the screen. VIDEO SIGNAL When AUTO is selected, the appropriate video...
...the IMAGE, SIGNAL, and SIGNAL-USER menus only when the signal is selected, the black area USER becomes thicker. COMPUTER INPUT The projector adjusts its settings automatically when connected to select the language used in the projected image. When 3.5% or 7.5% is supplied. CLAMP .../ / / / PORTUGUÊS). VERT. ENGLISH 3 FEATURE MENU POSITION Use to select the position of the image. opt. When the projector is inputted. POSITION VERT. HOLD Use to adjust the horizontal position of the screen. VIDEO SIGNAL When AUTO is selected, the appropriate video...

User Manual
Page 18
... USER . 3. Repeat steps 4 and 5 for optimum adjustment results. 7. About color temperature There are different kinds of the image : Adjust TINT in the IMAGE menu. This projector adjusts this color temperature by pressing the MENU button several times. To rise the color temperature: Increase the CONTRAST B (blue) and decrease the CONTRAST R (red...
... USER . 3. Repeat steps 4 and 5 for optimum adjustment results. 7. About color temperature There are different kinds of the image : Adjust TINT in the IMAGE menu. This projector adjusts this color temperature by pressing the MENU button several times. To rise the color temperature: Increase the CONTRAST B (blue) and decrease the CONTRAST R (red...
User Manual
Page 19
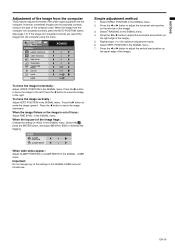
... the video signal supplied from the computer. Press the W or X button to move the image upward. ENGLISH Adjustment of the image from the computer This projector adjusts the format of the settings in the SIGNAL-USER menu for optimum adjustment results. 6. However, sometimes images are not projected correctly owing to the...
... the video signal supplied from the computer. Press the W or X button to move the image upward. ENGLISH Adjustment of the image from the computer This projector adjusts the format of the settings in the SIGNAL-USER menu for optimum adjustment results. 6. However, sometimes images are not projected correctly owing to the...
User Manual
Page 20
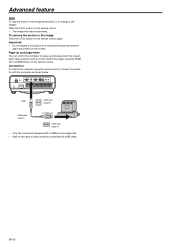
Connection To control the computer using the remote control, connect the projector with a USB port are supported. • Wait for a long time because the afterimages may persist on the screen. USB USB 4-pin (type B) USB cable (option) ...
Connection To control the computer using the remote control, connect the projector with a USB port are supported. • Wait for a long time because the afterimages may persist on the screen. USB USB 4-pin (type B) USB cable (option) ...
User Manual
Page 21
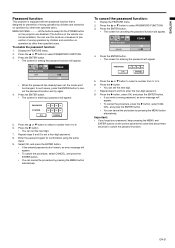
ENGLISH Password function This projector is equipped with the password function that is designed for prevention of wrong operation by children and restriction on operation by other than specified users. ... enabled.) You can cancel the procedure by pressing the MENU button alternatively. Press the ENTER button. • The screen for the POWER button on the projector are disabled. (The buttons on the control panel at the some time about three seconds to select PASSWORD FUNCTION. 3. Press the X button. • You can...
ENGLISH Password function This projector is equipped with the password function that is designed for prevention of wrong operation by children and restriction on operation by other than specified users. ... enabled.) You can cancel the procedure by pressing the MENU button alternatively. Press the ENTER button. • The screen for the POWER button on the projector are disabled. (The buttons on the control panel at the some time about three seconds to select PASSWORD FUNCTION. 3. Press the X button. • You can...
User Manual
Page 22
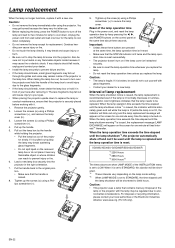
...time elapsed until the lamp is replaced and the lamp operation time is reset successfully. • The projector doesn't turn off the lamp and wait for two minutes for one . XD205U/XD205U-G/XD205R/SD205U/SD205R *1 2250 Hours *2 2850 Hours *3 3000 Hours*5 The times above are pressed at... the same time about three seconds. Reverse the projector gently. 2. For disposal or recycling information, please contact your local...
...time elapsed until the lamp is replaced and the lamp operation time is reset successfully. • The projector doesn't turn off the lamp and wait for two minutes for one . XD205U/XD205U-G/XD205R/SD205U/SD205R *1 2250 Hours *2 2850 Hours *3 3000 Hours*5 The times above are pressed at... the same time about three seconds. Reverse the projector gently. 2. For disposal or recycling information, please contact your local...
User Manual
Page 23
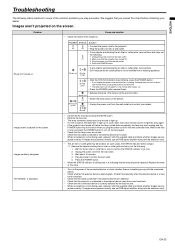
... • Turn on again for one minute when you plug the power cord next time. Replace the lamp. (The lamp is indicating that the projector has cooled off before contacting your dealer. • Cancel the AV mute by pressing the MUTE button. • Remove the lens cap. •...when the external device is a notebook computer.) • Check that the cable connected to the external device isn't defective. • Check that the projector is connected to the external device using the correct terminals. • Check that the cable connected to the external device isn't broken. • ...
... • Turn on again for one minute when you plug the power cord next time. Replace the lamp. (The lamp is indicating that the projector has cooled off before contacting your dealer. • Cancel the AV mute by pressing the MUTE button. • Remove the lens cap. •...when the external device is a notebook computer.) • Check that the cable connected to the external device isn't defective. • Check that the projector is connected to the external device using the correct terminals. • Check that the cable connected to the external device isn't broken. • ...