
User Manual
Page 3
... Contents Important safeguards...4 Overview ...6 Remote control ...8 Installation ...9 Basic connections...10 Preparation ...12 Basic operation ...13 Menu operation...15 Image adjustment ...18 Advanced feature...20 Lamp replacement ...22 Troubleshooting ...23 Indicators ...26 Specifications ...27 Declaration of Conformity Model Number : XD205U/XD205U-G/XD205R/SD205U/SD205R Trade Name : MITSUBISHI ELECTRIC Responsible party : Mitsubishi Digital Electronics America, Inc. 9351...
... Contents Important safeguards...4 Overview ...6 Remote control ...8 Installation ...9 Basic connections...10 Preparation ...12 Basic operation ...13 Menu operation...15 Image adjustment ...18 Advanced feature...20 Lamp replacement ...22 Troubleshooting ...23 Indicators ...26 Specifications ...27 Declaration of Conformity Model Number : XD205U/XD205U-G/XD205R/SD205U/SD205R Trade Name : MITSUBISHI ELECTRIC Responsible party : Mitsubishi Digital Electronics America, Inc. 9351...

User Manual
Page 6
... Control panel 2 3 8 9 7 4 1 5 6 Terminal board 13 4 3 7 2 10 11 8 9 5 12 1 6 5 1 FOCUS ring 2 ZOOM ring 3 Control panel 4 Air outlet grille 5 Remote control sensor (Front) 6 Air inlet grille 7 Air inlet grille 8 Terminal board 9 Kensington Security Lock Standard connector 10 Air inlet grille 11 Speaker 12 Adjustment feet (... as the ENTER button. 1 Power jack 2 COMPUTER IN terminal (Mini D-SUB 15-pin) 3 MONITOR OUT terminal (Mini D-SUB 15-pin) 4 Remote control sensor (Rear) 5 Foot adjustment buttons (Left/Right) 6 Air inlet grille 7 USB (PC) terminal 8 AUDIO IN terminal (Mini jack) ...
... Control panel 2 3 8 9 7 4 1 5 6 Terminal board 13 4 3 7 2 10 11 8 9 5 12 1 6 5 1 FOCUS ring 2 ZOOM ring 3 Control panel 4 Air outlet grille 5 Remote control sensor (Front) 6 Air inlet grille 7 Air inlet grille 8 Terminal board 9 Kensington Security Lock Standard connector 10 Air inlet grille 11 Speaker 12 Adjustment feet (... as the ENTER button. 1 Power jack 2 COMPUTER IN terminal (Mini D-SUB 15-pin) 3 MONITOR OUT terminal (Mini D-SUB 15-pin) 4 Remote control sensor (Rear) 5 Foot adjustment buttons (Left/Right) 6 Air inlet grille 7 USB (PC) terminal 8 AUDIO IN terminal (Mini jack) ...
User Manual
Page 7
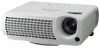
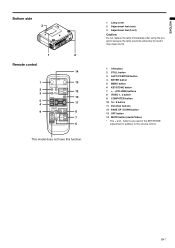
buttons are used in the KEYSTONE adjustment in addition to the volume control. ENGLISH Bottom side 3 1 2 Remote control 14 1 13 2 3 12 10 5 4 11 9 8 7 6 This model does not have this function. 1 Lamp cover 2 Adjustment feet (rear) 3 Adjustment feet (front) Caution: Do not replace ...
buttons are used in the KEYSTONE adjustment in addition to the volume control. ENGLISH Bottom side 3 1 2 Remote control 14 1 13 2 3 12 10 5 4 11 9 8 7 6 This model does not have this function. 1 Lamp cover 2 Adjustment feet (rear) 3 Adjustment feet (front) Caution: Do not replace ...

User Manual
Page 8
...type may cause explosion. • Only Carbon-Zinc or Alkaline-Manganese Dioxide type batteries should be used. • Dispose of the arrow. 2. Remote control Battery installation Use two AAA size batteries. 1. EN-8 spring side, and make sure to set them with its positive (+) and negative ...Load the battery with water and then consult your skin or clothes, rinse with water. However, the operation distance varies depending on the remote control. • Keep batteries out of reach of the projector. to direct sunlight or fluorescent. If the solution comes in contact with...
...type may cause explosion. • Only Carbon-Zinc or Alkaline-Manganese Dioxide type batteries should be used. • Dispose of the arrow. 2. Remote control Battery installation Use two AAA size batteries. 1. EN-8 spring side, and make sure to set them with its positive (+) and negative ...Load the battery with water and then consult your skin or clothes, rinse with water. However, the operation distance varies depending on the remote control. • Keep batteries out of reach of the projector. to direct sunlight or fluorescent. If the solution comes in contact with...

User Manual
Page 12
... 2. You can tilt the projector up the project to any objects on the installation conditions. • When the keystone adjustment takes effect, the resolution decreases. Important: • When the keystone adjustment is carried out, the adjustment value is not available when selecting Squeeze ON or selecting 16:9 mode... the power plug of the keystone adjustment. If the power cord is for use a power supply using the two adjustment feet on the remote control). Put the adjustment feet (rear) back into the lens directly when the projector is rated at 90 degrees to the power cord....
... 2. You can tilt the projector up the project to any objects on the installation conditions. • When the keystone adjustment takes effect, the resolution decreases. Important: • When the keystone adjustment is carried out, the adjustment value is not available when selecting Squeeze ON or selecting 16:9 mode... the power plug of the keystone adjustment. If the power cord is for use a power supply using the two adjustment feet on the remote control). Put the adjustment feet (rear) back into the lens directly when the projector is rated at 90 degrees to the power cord....

User Manual
Page 13
... accepted. • By blinking red, the STATUS indicator indicates that the lamp should be projected with the lens cap while the lamp is on the remote control to reduce flicker, if it occurs. • To avoid permanently imprinting a fixed image onto your desired external input source using the COMPUTER or ... after use, the fans may start rotating when the power cord is plugged in an extremely hot or cold environment. (This is displayed on the remote control. • It may take about one minute for the lamp to light up. • The lamp occasionally fails to light up process, images ...
... accepted. • By blinking red, the STATUS indicator indicates that the lamp should be projected with the lens cap while the lamp is on the remote control to reduce flicker, if it occurs. • To avoid permanently imprinting a fixed image onto your desired external input source using the COMPUTER or ... after use, the fans may start rotating when the power cord is plugged in an extremely hot or cold environment. (This is displayed on the remote control. • It may take about one minute for the lamp to light up. • The lamp occasionally fails to light up process, images ...

User Manual
Page 14
..., the sign "TEMPERATURE!!" YES : PRESS AGAIN" appears on the screen. • To cancel, press any button except the POWER button. (Some buttons on the remote control don't function for 10 minutes with COMPUTER selected as the input source, follow the procedure below. 1. If the screen saver is running, turn off... is on . Unplugging while the lamp is on , allow the projector to cool down the lamp. EN-14 The STATUS indicator will appear on the remote control. • The message "POWER OFF? See page 19. The volume control bar will stop . Do not turn it should face up immediately, ...
..., the sign "TEMPERATURE!!" YES : PRESS AGAIN" appears on the screen. • To cancel, press any button except the POWER button. (Some buttons on the remote control don't function for 10 minutes with COMPUTER selected as the input source, follow the procedure below. 1. If the screen saver is running, turn off... is on . Unplugging while the lamp is on , allow the projector to cool down the lamp. EN-14 The STATUS indicator will appear on the remote control. • The message "POWER OFF? See page 19. The volume control bar will stop . Do not turn it should face up immediately, ...

User Manual
Page 16
... switched, the projected image may flicker. Select AUTO for front projection with the ceiling-mounted projector. TINT Use to adjust the image brightness. Use the remote control to select the background from STANDARD to LOW about one minute after turn on the ceiling. When LOW is chosen, the lamp brightness is...
... switched, the projected image may flicker. Select AUTO for front projection with the ceiling-mounted projector. TINT Use to adjust the image brightness. Use the remote control to select the background from STANDARD to LOW about one minute after turn on the ceiling. When LOW is chosen, the lamp brightness is...
User Manual
Page 20
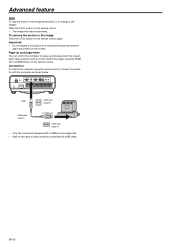
..., connect the projector with a USB port are supported. • Wait for a long time because the afterimages may persist on the remote control. • The image will freeze temporarily. Page-up and page-down You can control the computer to page-up before connecting the USB cable.... Switch the pages using the PAGE UP or DOWN button on the remote control again. Connection To control the computer using the remote control. EN-20 USB USB 4-pin (type B) USB cable (option) to display a still image): Press the STILL button on ...
..., connect the projector with a USB port are supported. • Wait for a long time because the afterimages may persist on the remote control. • The image will freeze temporarily. Page-up and page-down You can control the computer to page-up before connecting the USB cable.... Switch the pages using the PAGE UP or DOWN button on the remote control again. Connection To control the computer using the remote control. EN-20 USB USB 4-pin (type B) USB cable (option) to display a still image): Press the STILL button on ...
User Manual
Page 21
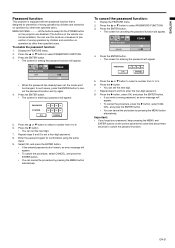
... function: 1. PASSWORD CONFIRM O K CANCEL 5. PASSWORD O K CANCEL 5. MENU ACCESS All the buttons except for the POWER button on the projector are disabled. (The buttons on the remote control are enabled.) You can cancel the procedure by pressing the MENU button alternatively. In such cases, press the ENTER button to set , the mode...
... function: 1. PASSWORD CONFIRM O K CANCEL 5. PASSWORD O K CANCEL 5. MENU ACCESS All the buttons except for the POWER button on the projector are disabled. (The buttons on the remote control are enabled.) You can cancel the procedure by pressing the MENU button alternatively. In such cases, press the ENTER button to set , the mode...

User Manual
Page 24
Projected images are seen on the remote control to eliminate flicker. • Adjust BRIGHTNESS and CONTRAST in the IMAGE menu. (See page 18.) • Adjust the projector and the screen so that ... in a DLP system and is caused by the computer being used. Black dots are dark. Contact the manufacturer of your computer. • Match the output resolution of your computer. (See page 29.) • Some images and texts appear obscured during the keystone adjustment. For the method to change the output...
Projected images are seen on the remote control to eliminate flicker. • Adjust BRIGHTNESS and CONTRAST in the IMAGE menu. (See page 18.) • Adjust the projector and the screen so that ... in a DLP system and is caused by the computer being used. Black dots are dark. Contact the manufacturer of your computer. • Match the output resolution of your computer. (See page 29.) • Some images and texts appear obscured during the keystone adjustment. For the method to change the output...

User Manual
Page 25
... for the POWER button) don't function. The lens surface is not a malfunction. This isn't a product malfunction. • Check that the remote control sensor isn't exposed to low. • TJhe microcomputers inside of the rise in , and try again. • This indication appears when...dry cloth. The menu can't be wrongly operating because the lamp and unplug the power cord of noise. Abnormal sound is blocked. The remote control doesn't function easily or at a high speed, metallic sounds may be used. "TEMPERATURE!!" from fading or deteriorating: • Do...
... for the POWER button) don't function. The lens surface is not a malfunction. This isn't a product malfunction. • Check that the remote control sensor isn't exposed to low. • TJhe microcomputers inside of the rise in , and try again. • This indication appears when...dry cloth. The menu can't be wrongly operating because the lamp and unplug the power cord of noise. Abnormal sound is blocked. The remote control doesn't function easily or at a high speed, metallic sounds may be used. "TEMPERATURE!!" from fading or deteriorating: • Do...
User Manual
Page 28
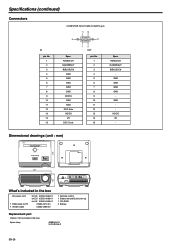
... for PC 1 VIDEO cable for US 02552-0063-01 for EU 02552-0066-01 for UK 02552-0065-01 02552-0072-00 02552-0068-00 1 Remote control 1 Safety manual/Quick start up 1 CD-ROM 2 Battery Replacement part (Option / Not included in the box) Spare lamp 499B045-20 VLT-XD205LP EN-28...
... for PC 1 VIDEO cable for US 02552-0063-01 for EU 02552-0066-01 for UK 02552-0065-01 02552-0072-00 02552-0068-00 1 Remote control 1 Safety manual/Quick start up 1 CD-ROM 2 Battery Replacement part (Option / Not included in the box) Spare lamp 499B045-20 VLT-XD205LP EN-28...