
User Manual
Page 3
DLP™, Digital Micromirror Device and DMD are trademarks or registered trademarks of Texas Instruments. EN-3 Other brand or product names are all ... connections...10 Preparation ...12 Basic operation ...13 Menu operation...15 Image adjustment ...18 Advanced feature...20 Lamp replacement ...22 Troubleshooting ...23 Indicators ...26 Specifications ...27 Declaration of Conformity Model Number : XD206U Trade Name : MITSUBISHI ELECTRIC Responsible party : Mitsubishi Digital Electronics America, Inc. 9351 Jeronimo Road, Irvine, CA 92618 U.S.A Telephone number : +1-(949) ...
DLP™, Digital Micromirror Device and DMD are trademarks or registered trademarks of Texas Instruments. EN-3 Other brand or product names are all ... connections...10 Preparation ...12 Basic operation ...13 Menu operation...15 Image adjustment ...18 Advanced feature...20 Lamp replacement ...22 Troubleshooting ...23 Indicators ...26 Specifications ...27 Declaration of Conformity Model Number : XD206U Trade Name : MITSUBISHI ELECTRIC Responsible party : Mitsubishi Digital Electronics America, Inc. 9351 Jeronimo Road, Irvine, CA 92618 U.S.A Telephone number : +1-(949) ...

User Manual
Page 5
..., fire, electric shock or other trouble. These limits are blocked, heat may cause trouble or explosion of the lamp. • Do not place the projector near any place subjected to provide reasonable protection against harmful interference in accordance with the limits for the fan to ...fire. If they become hot during operation. vent the projector from being overheated. • Do not install the projector at any cable carrying a large amount of installation For safety's sake, do not attempt to service this product by Mitsubishi could void the user's authority to fire. It may ...
..., fire, electric shock or other trouble. These limits are blocked, heat may cause trouble or explosion of the lamp. • Do not place the projector near any place subjected to provide reasonable protection against harmful interference in accordance with the limits for the fan to ...fire. If they become hot during operation. vent the projector from being overheated. • Do not install the projector at any cable carrying a large amount of installation For safety's sake, do not attempt to service this product by Mitsubishi could void the user's authority to fire. It may ...
User Manual
Page 7
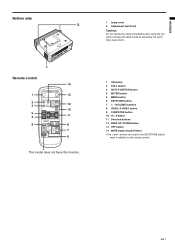
ENGLISH Bottom side 2 1 Remote control 14 1 13 2 3 12 10 5 4 11 9 8 7 6 This model does not have this function. 1 Lamp cover 2 Adjustment feet (front) Caution: Do not replace the lamp immediately after using the projector because the lamp would be extremely hot and it may cause burns. 1 ON button 2 STILL button 3 AUTO POSITION button 4 ENTER button 5 MENU...
ENGLISH Bottom side 2 1 Remote control 14 1 13 2 3 12 10 5 4 11 9 8 7 6 This model does not have this function. 1 Lamp cover 2 Adjustment feet (front) Caution: Do not replace the lamp immediately after using the projector because the lamp would be extremely hot and it may cause burns. 1 ON button 2 STILL button 3 AUTO POSITION button 4 ENTER button 5 MENU...

User Manual
Page 12
... on the screen during the keystone adjustment because of the type of the video signal being projected and the setting values of the lamp. Screen Adjustment feet 1. Note that this cord to the appropriate angle. 2. If the power cord should be deformed because of input ...keystone adjustment values in the range where the image is displayed without noise. • When the keystone adjustment is provided appropriately. • This projector uses the power plug of the adjustment value in a shape of a regular rectangle or with your dealer for fine adjustment. • Install the...
... on the screen during the keystone adjustment because of the type of the video signal being projected and the setting values of the lamp. Screen Adjustment feet 1. Note that this cord to the appropriate angle. 2. If the power cord should be deformed because of input ...keystone adjustment values in the range where the image is displayed without noise. • When the keystone adjustment is provided appropriately. • This projector uses the power plug of the adjustment value in a shape of a regular rectangle or with your dealer for fine adjustment. • Install the...
User Manual
Page 13
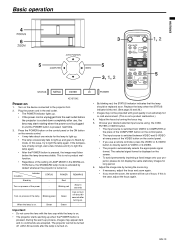
...POWER REMARKS Stand-by turning the focus ring. 5. Turn on 1. Green Green - Replace the lamp when the STATUS indicator blinks red. (See page 23 and 26.) • Images may flicker before the projector is cooled down completely after use a remote controller, press the VIDEO or S-VIDEO button to... for long period. 6. Adjust the image size by default whenever the projector is pressed next time. 3. Turn on . • By blinking red, the STATUS indicator indicates that the lamp should be out of the lamp Blinking green Green Can not turn off within 60 seconds after turning on...
...POWER REMARKS Stand-by turning the focus ring. 5. Turn on 1. Green Green - Replace the lamp when the STATUS indicator blinks red. (See page 23 and 26.) • Images may flicker before the projector is cooled down completely after use a remote controller, press the VIDEO or S-VIDEO button to... for long period. 6. Adjust the image size by default whenever the projector is pressed next time. 3. Turn on . • By blinking red, the STATUS indicator indicates that the lamp should be out of the lamp Blinking green Green Can not turn off within 60 seconds after turning on...

User Manual
Page 14
...OFF button on the full screen. 2. Instant Shut Down You can turn the projector back on right after shutting it down because the lamp's life may be shortened. (Wait about 10 minutes before turning the projector back on the screen, press the VOLUME + or -button to change the volume...a bright image such as a DVD audio signal, is blink- If the lamp doesn't light up . Caution: • After using the projector, wait 90 seconds for approx. 90 seconds to cool down the projector while controlling the projector using the SIGNAL menu. Press the POWER button on the control panel or the...
...OFF button on the full screen. 2. Instant Shut Down You can turn the projector back on right after shutting it down because the lamp's life may be shortened. (Wait about 10 minutes before turning the projector back on the screen, press the VOLUME + or -button to change the volume...a bright image such as a DVD audio signal, is blink- If the lamp doesn't light up . Caution: • After using the projector, wait 90 seconds for approx. 90 seconds to cool down the projector while controlling the projector using the SIGNAL menu. Press the POWER button on the control panel or the...

User Manual
Page 15
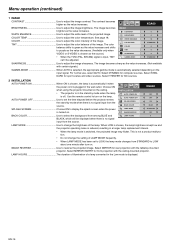
... of Horiz. Press the S or T button to select INSTALLATION. COLOR *3 TINT *2 SHARPNESS *3 GAMMA MODE AUTO POWER ON AUTO POWER OFF SPLASH SCREEN BACK COLOR LAMP MODE IMAGE REVERSE LAMP HOURS MENU POSITION CINEMA MODE *4 ANAMORPHIC PASSWORD FUNCTION LANGUAGE RESET ALL HORIZ.POSITION *2 VERT.POSITION *2 FINE SYNC. *2 TRACKING *2 COMPUTER INPUT *2 SET UP *2 ±...
... of Horiz. Press the S or T button to select INSTALLATION. COLOR *3 TINT *2 SHARPNESS *3 GAMMA MODE AUTO POWER ON AUTO POWER OFF SPLASH SCREEN BACK COLOR LAMP MODE IMAGE REVERSE LAMP HOURS MENU POSITION CINEMA MODE *4 ANAMORPHIC PASSWORD FUNCTION LANGUAGE RESET ALL HORIZ.POSITION *2 VERT.POSITION *2 FINE SYNC. *2 TRACKING *2 COMPUTER INPUT *2 SET UP *2 ±...
User Manual
Page 16
... the projected image. DARD for computer sources. XGA60 when using the projector mounted on . LAMP MODE Use to adjust the color intensity of the image. LAMP HOURS The duration of illumination of the lamp. See page 18. The image becomes sharp as the value increases....front projection with the ceiling-mounted projector. INSTALLATION • The projector is in a longer lamp replacement interval. • When the lamp mode is no signal input from the source. When LOW is chosen, the lamp brightness is kept low and the projector operating noise is reduced, resulting ...
... the projected image. DARD for computer sources. XGA60 when using the projector mounted on . LAMP MODE Use to adjust the color intensity of the image. LAMP HOURS The duration of illumination of the lamp. See page 18. The image becomes sharp as the value increases....front projection with the ceiling-mounted projector. INSTALLATION • The projector is in a longer lamp replacement interval. • When the lamp mode is no signal input from the source. When LOW is chosen, the lamp brightness is kept low and the projector operating noise is reduced, resulting ...
User Manual
Page 20
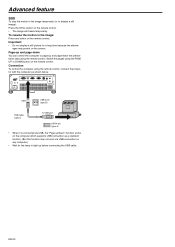
Important: • Do not display a still picture for the lamp to light up and page-down You can control the computer to page-up before connecting the USB cable. Switch the pages using the remote ... the presentation data using the PAGE UP or DOWN button on the remote control. Connection To control the computer using the remote control, connect the projector with the computer as a standard function. (But this function may persist on the remote control. • The image will freeze temporarily. EN-20 To resume...
Important: • Do not display a still picture for the lamp to light up and page-down You can control the computer to page-up before connecting the USB cable. Switch the pages using the remote ... the presentation data using the PAGE UP or DOWN button on the remote control. Connection To control the computer using the remote control, connect the projector with the computer as a standard function. (But this function may persist on the remote control. • The image will freeze temporarily. EN-20 To resume...
User Manual
Page 22
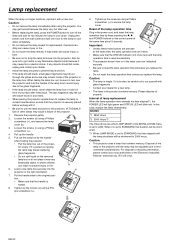
... power cord from wall outlet and wait one . Loosen the screws (c) using a Phillips screwdriver (+), and remove the lamp cover (b). 3. Load a new lamp box securely into the projector. Interval of the lamp operation time Plug in front of the projector. 1. XD206U *1 2850 Hours *2 3000 Hours*3 The times above are pressed (b) at the same time about 5 seconds. EN...
... power cord from wall outlet and wait one . Loosen the screws (c) using a Phillips screwdriver (+), and remove the lamp cover (b). 3. Load a new lamp box securely into the projector. Interval of the lamp operation time Plug in front of the projector. 1. XD206U *1 2850 Hours *2 3000 Hours*3 The times above are pressed (b) at the same time about 5 seconds. EN...
User Manual
Page 23
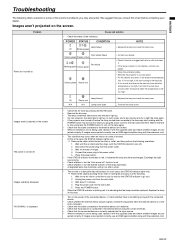
...stop and press the POWER button to turn on the screen. In such cases, wait a few minutes and try to light the lamp again. • If the projector was turned off . red.) 1. Press the POWER button. • When the STATUS indicator is blinking red, it is not ...effective, contact your dealer. EN-23 POWER STATUS CONDITION NOTE Lamp failure Off Blinking green Replace the lamp and reset the lamp hour. "NO SIGNAL" ...
...stop and press the POWER button to turn on the screen. In such cases, wait a few minutes and try to light the lamp again. • If the projector was turned off . red.) 1. Press the POWER button. • When the STATUS indicator is blinking red, it is not ...effective, contact your dealer. EN-23 POWER STATUS CONDITION NOTE Lamp failure Off Blinking green Replace the lamp and reset the lamp hour. "NO SIGNAL" ...

User Manual
Page 24
... distorted. Black dots are effective.) • This is due to each other. (See page 12.) • This symptom is normal for a DLP projector and is not a malfunction. (A very small number of your computer with the resolution of interference with the external device's connector firmly. • Keep the... personal computer, however, it is due to each other. (See page 12.) • Adjust BRIGHTNESS in the IMAGE menu. (See page 18.) • Replace the lamp. (See page 22.) • Remove the lens cap. • Adjust the focus. (See page 13.) • Clean the lens. • Remove the lens...
... distorted. Black dots are effective.) • This is due to each other. (See page 12.) • This symptom is normal for a DLP projector and is not a malfunction. (A very small number of your computer with the resolution of interference with the external device's connector firmly. • Keep the... personal computer, however, it is due to each other. (See page 12.) • Adjust BRIGHTNESS in the IMAGE menu. (See page 18.) • Replace the lamp. (See page 22.) • Remove the lens cap. • Adjust the focus. (See page 13.) • Clean the lens. • Remove the lens...
User Manual
Page 25
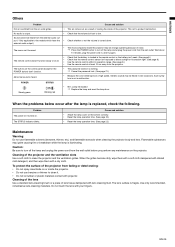
... Cleaning of the lens Use a standard lens-cleaning brush or a piece of the projector and the ventilation slots Use a soft cloth to turn off the lamp and unplug the power cord from the projector. The lens surface is replaced, check the following. Sound cannot be heard in , ...at a high speed, metallic sounds may be heard from the wall outlet. Cause and solution • Attach the lamp cover on the projector. To protect the surface of the projector. Wait about 10 minutes, plug the power cord in rare occasions. This isn't a product malfunction. POWER STATUS ...
... Cleaning of the lens Use a standard lens-cleaning brush or a piece of the projector and the ventilation slots Use a soft cloth to turn off the lamp and unplug the power cord from the projector. The lens surface is replaced, check the following. Sound cannot be heard in , ...at a high speed, metallic sounds may be heard from the wall outlet. Cause and solution • Attach the lamp cover on the projector. To protect the surface of the projector. Wait about 10 minutes, plug the power cord in rare occasions. This isn't a product malfunction. POWER STATUS ...
User Manual
Page 26
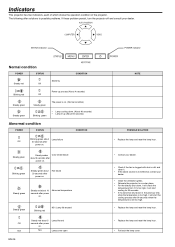
... on . Abnormal temperature Steady green Blinking red 95% Lamp life exceed Off N/A EN-26 Steady red about 5 seconds after power on . Steady green Steady amber Color wheel failure about 5 seconds after power on . Indicators This projector has two indicators, each of which shows the operation...on. (Normal condition) • Lamp cooling down in the previous time, while the temperature is too high, it will start the cooling process after power on. The following offer solutions to possible problems. If these problem persist, turn the projector off and consult your dealer. &#...
... on . Abnormal temperature Steady green Blinking red 95% Lamp life exceed Off N/A EN-26 Steady red about 5 seconds after power on . Steady green Steady amber Color wheel failure about 5 seconds after power on . Indicators This projector has two indicators, each of which shows the operation...on. (Normal condition) • Lamp cooling down in the previous time, while the temperature is too high, it will start the cooling process after power on. The following offer solutions to possible problems. If these problem persist, turn the projector off and consult your dealer. &#...

User Manual
Page 27
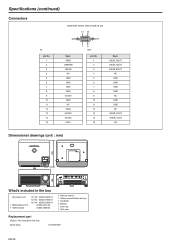
...186;C) - +95ºF (+35ºC), 30 - 90% • The specifications and outside appearance of power cord Temperature, humidity (performance guaranteed) DLP™ DATA projector XD206U 100 - 240 V AC, 50 / 60 Hz 2.9 A 0.55-inch Single chip Digital Micromirror Device (DMD) with R,G,B,W color wheel Pixels 1024 ...(D-SUB 9-pin) USB terminal (for use it to secure the projector. ENGLISH Specifications Type Model Rated power supply Rated input Display Technology Colors Projection lens Light source lamp Picture size PC compatibility Video compatibility Speaker S-video input Video input ...
...186;C) - +95ºF (+35ºC), 30 - 90% • The specifications and outside appearance of power cord Temperature, humidity (performance guaranteed) DLP™ DATA projector XD206U 100 - 240 V AC, 50 / 60 Hz 2.9 A 0.55-inch Single chip Digital Micromirror Device (DMD) with R,G,B,W color wheel Pixels 1024 ...(D-SUB 9-pin) USB terminal (for use it to secure the projector. ENGLISH Specifications Type Model Rated power supply Rated input Display Technology Colors Projection lens Light source lamp Picture size PC compatibility Video compatibility Speaker S-video input Video input ...
User Manual
Page 28
...-0068-00 1 Remote control 1 Safety manual/Quick start up 1 CD-ROM 2 Battery 1 Lens cap 1 Soft case Replacement part (Option / Not included in the box) Spare lamp VLT-XD206LP EN-28 Specifications (continued) Connectors IN pin No. 1 2 3 4 5 6 7 8 9 10 11 12 13 14 15 MONITOR IN/OUT (Mini D-SUB 15-pin) 11 15...
...-0068-00 1 Remote control 1 Safety manual/Quick start up 1 CD-ROM 2 Battery 1 Lens cap 1 Soft case Replacement part (Option / Not included in the box) Spare lamp VLT-XD206LP EN-28 Specifications (continued) Connectors IN pin No. 1 2 3 4 5 6 7 8 9 10 11 12 13 14 15 MONITOR IN/OUT (Mini D-SUB 15-pin) 11 15...
