

User Manual
Page 1
ENGLISH EN DATA PROJECTOR MODEL XD206U User Manual This User Manual is important to you. Please read it before using your projector.
ENGLISH EN DATA PROJECTOR MODEL XD206U User Manual This User Manual is important to you. Please read it before using your projector.

User Manual
Page 2
.... This apparatus must be recycled and reused. Your MITSUBISHI ELECTRIC product is to the presence of uninsulated "dangerous voltage" within the product's enclosure that gains proper operation in Europe: COMPLIANCE NOTICE This Projector complies with arrowhead symbol within an equilateral triangle is ...in a computer room as defined in ! The electro-magnetic susceptibility has been chosen at your household waste. NOTE: SINCE THIS PROJECTOR IS PLUGGABLE EQUIPMENT, THE SOCKET-OUTLET SHALL BE INSTALLED NEAR THE EQUIPMENT AND SHALL BE EASILY ACCESSIBLE. If you use another ...
.... This apparatus must be recycled and reused. Your MITSUBISHI ELECTRIC product is to the presence of uninsulated "dangerous voltage" within the product's enclosure that gains proper operation in Europe: COMPLIANCE NOTICE This Projector complies with arrowhead symbol within an equilateral triangle is ...in a computer room as defined in ! The electro-magnetic susceptibility has been chosen at your household waste. NOTE: SINCE THIS PROJECTOR IS PLUGGABLE EQUIPMENT, THE SOCKET-OUTLET SHALL BE INSTALLED NEAR THE EQUIPMENT AND SHALL BE EASILY ACCESSIBLE. If you use another ...

User Manual
Page 4
... by the manufacturer or sold with care. Ventilation Slots and openings in a fire or electric shock. Damage requiring service Unplug this projector from the appliance. Quick stops, excessive force and uneven surfaces may touch dangerous voltage points or short-out parts that they exit ...any kind on the marking label. Important safeguards Please read before cleaning it from the type of any service or repair to this projector, ask the service technician to protect it . Pay particular attention to . 10. Read instructions All the safety and operating instructions ...
... by the manufacturer or sold with care. Ventilation Slots and openings in a fire or electric shock. Damage requiring service Unplug this projector from the appliance. Quick stops, excessive force and uneven surfaces may touch dangerous voltage points or short-out parts that they exit ...any kind on the marking label. Important safeguards Please read before cleaning it from the type of any service or repair to this projector, ask the service technician to protect it . Pay particular attention to . 10. Read instructions All the safety and operating instructions ...

User Manual
Page 5
... used in a residential installation. Heat, dust, etc. Do not use the projector at a place that is on its end. If this product by Mitsubishi could void the user's authority to fix, adjust, or inspect the projector. Do not keep using the damaged projector. It can lead to provide reasonable protection against harmful interference in...
... used in a residential installation. Heat, dust, etc. Do not use the projector at a place that is on its end. If this product by Mitsubishi could void the user's authority to fix, adjust, or inspect the projector. Do not keep using the damaged projector. It can lead to provide reasonable protection against harmful interference in...
User Manual
Page 7
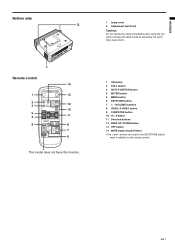
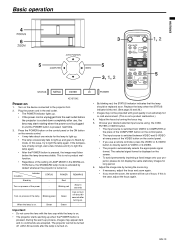
... 2 3 12 10 5 4 11 9 8 7 6 This model does not have this function. 1 Lamp cover 2 Adjustment feet (front) Caution: Do not replace the lamp immediately after using the projector because the lamp would be extremely hot and it may cause burns. 1 ON button 2 STILL button 3 AUTO POSITION button 4 ENTER button 5 MENU button 6 KEYSTONE button...
... 2 3 12 10 5 4 11 9 8 7 6 This model does not have this function. 1 Lamp cover 2 Adjustment feet (front) Caution: Do not replace the lamp immediately after using the projector because the lamp would be extremely hot and it may cause burns. 1 ON button 2 STILL button 3 AUTO POSITION button 4 ENTER button 5 MENU button 6 KEYSTONE button...

User Manual
Page 8
... remote control sensor, the remote control may explode if misused. Inverted fluorescent light, if located near the projector, may interfere the remote control. • When you use the remote control too close to the projector via the screen should be 5 m or less. Caution: • Use of a battery of wrong type may cause...; Load the battery with your local regulations. • Batteries may not work correctly. Replace the back cover. Do not recharge, disassemble, or dispose of the projector. Remote control Battery installation Use two AA (R6) size batteries. 1.
... remote control sensor, the remote control may explode if misused. Inverted fluorescent light, if located near the projector, may interfere the remote control. • When you use the remote control too close to the projector via the screen should be 5 m or less. Caution: • Use of a battery of wrong type may cause...; Load the battery with your local regulations. • Batteries may not work correctly. Replace the back cover. Do not recharge, disassemble, or dispose of the projector. Remote control Battery installation Use two AA (R6) size batteries. 1.
User Manual
Page 9
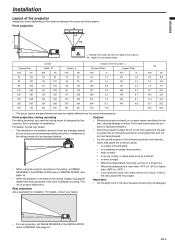
...screen will be out of any damage caused by the fans, causing damage or failure. Put a hard board under the projector to facilitate ventilation. • Place the projector at least 50 cm (or 20 inch) away from the wall to the lens, because the lens may be damaged....you need the ceiling mount kit designed for installation. For details, consult your dealer. • The warranty on a carpet impairs ventilation by use the projector in the INSTALLATION menu to MIRROR. EN-9 This isn't a product malfunction. • Where the temperature is the case, adjust the focus again. ...
...screen will be out of any damage caused by the fans, causing damage or failure. Put a hard board under the projector to facilitate ventilation. • Place the projector at least 50 cm (or 20 inch) away from the wall to the lens, because the lens may be damaged....you need the ceiling mount kit designed for installation. For details, consult your dealer. • The warranty on a carpet impairs ventilation by use the projector in the INSTALLATION menu to MIRROR. EN-9 This isn't a product malfunction. • Where the temperature is the case, adjust the focus again. ...
User Manual
Page 10
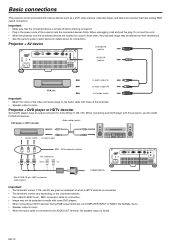
...image may be affected by their interference. • See the owner's guide of each device for 3-line fitting (Y, CB, CR). Basic connections This projector can be connected with various devices such as examples of the video and audio plugs on the connected devices. • Use a Mini D-SUB 15-pin... player or HDTV decoder Some DVD players have analog RGB output connectors. When connecting such DVD player with those of the projector and the connected devices firmly. Important: • Make sure that have an output connector for details about its connections. to audio output (R) ...
...image may be affected by their interference. • See the owner's guide of each device for 3-line fitting (Y, CB, CR). Basic connections This projector can be connected with various devices such as examples of the video and audio plugs on the connected devices. • Use a Mini D-SUB 15-pin... player or HDTV decoder Some DVD players have analog RGB output connectors. When connecting such DVD player with those of the projector and the connected devices firmly. Important: • Make sure that have an output connector for details about its connections. to audio output (R) ...
User Manual
Page 11
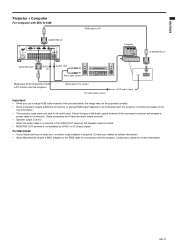
...RGB cable for PC (option) PC audio cable (option) to be connected with Mini D-SUB COMPUTER IN RGB cable for connection with this projector. Check the type of the audio output terminal of the provided cable, the image may not be projected correctly. • Some computers require... the audio output terminal. • Speaker output is mono. • When the audio cable is connected to both a PC monitor and the projector. Contact your dealer for further information. • Some Macintoshes require a MAC adapter for the RGB cable for PC Computer to MONITOR port MONITOR ...
...RGB cable for PC (option) PC audio cable (option) to be connected with Mini D-SUB COMPUTER IN RGB cable for connection with this projector. Check the type of the audio output terminal of the provided cable, the image may not be projected correctly. • Some computers require... the audio output terminal. • Speaker output is mono. • When the audio cable is connected to both a PC monitor and the projector. Contact your dealer for further information. • Some Macintoshes require a MAC adapter for the RGB cable for PC Computer to MONITOR port MONITOR ...

User Manual
Page 12
...being projected and the setting values of three-pin grounding type. Note that position. 4. EN-12 Warning: • Do not look into the projector by pressing the S, T button (or VOLUME +, - is for replacement because it may cause fire or electric shock. It may not be...Noise may not be projected in images with its aspect ratio 4:3, depending on the installation conditions of the lamp. If necessary, tilt the projector using the two adjustment feet on the installation conditions. • When the keystone adjustment takes effect, the resolution decreases. After using the ...
...being projected and the setting values of three-pin grounding type. Note that position. 4. EN-12 Warning: • Do not look into the projector by pressing the S, T button (or VOLUME +, - is for replacement because it may cause fire or electric shock. It may not be...Noise may not be projected in images with its aspect ratio 4:3, depending on the installation conditions of the lamp. If necessary, tilt the projector using the two adjustment feet on the installation conditions. • When the keystone adjustment takes effect, the resolution decreases. After using the ...
User Manual
Page 13
...lamp occasionally fails to light up when the POWER button is turned on . If this case, try to VIDEO or S-VIDEO. • The projector automatically selects the appropriate signal format. Important: • Do not cover the lens with good quality in an extremely hot or cold environment. (...may start rotating when the power cord is plugged in the INSTALLATION menu, the STANDARD lamp mode is activated by default whenever the projector is pressed. The projector cannot be turned off about one minute for long period. 6. EN-13 This is not a product malfunction. • Regardless...
...lamp occasionally fails to light up when the POWER button is turned on . If this case, try to VIDEO or S-VIDEO. • The projector automatically selects the appropriate signal format. Important: • Do not cover the lens with good quality in an extremely hot or cold environment. (...may start rotating when the power cord is plugged in the INSTALLATION menu, the STANDARD lamp mode is activated by default whenever the projector is pressed. The projector cannot be turned off about one minute for long period. 6. EN-13 This is not a product malfunction. • Regardless...

User Manual
Page 14
... The POWER indicator will disappear about 10 seconds after the lamp lights up , replace the lamp. If you shut down the projector while controlling the projector using the network function, the application software may be distorted. When the VOLUME control bar appears on the screen, press the ...the KEYSTONE / VOLUME adjustment. Then unplug the power cord from the speaker may fail. Instant Shut Down You can turn off the projector. 1. Consult your dealer in the right position with COMPUTER selected as the "Recycle Bin" window on right after shutting it should face...
... The POWER indicator will disappear about 10 seconds after the lamp lights up , replace the lamp. If you shut down the projector while controlling the projector using the network function, the application software may be distorted. When the VOLUME control bar appears on the screen, press the ...the KEYSTONE / VOLUME adjustment. Then unplug the power cord from the speaker may fail. Instant Shut Down You can turn off the projector. 1. Consult your dealer in the right position with COMPUTER selected as the "Recycle Bin" window on right after shutting it should face...
User Manual
Page 16
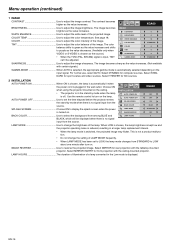
... SCREEN ON the stand-by mode when the lamp AUTO POWER ON OFF is off. Select MIRROR INVERT for front projection with the tabletop-mounted projector. XGA60 BRIGHTNESS Use to change the setting of the lamp. COLOR TINT 0 0 10 STANDARD 0 0 VIDEO or S-VIDEO is chosen as the value...when there is no signal input from the source. Use the remote control to reverse the projected image. See page 18. INSTALLATION • The projector is in the Low mode is displayed. IMAGE REVERSE Use to turn on . Menu operation (continued) 1 IMAGE CONTRAST Use to select the ...
... SCREEN ON the stand-by mode when the lamp AUTO POWER ON OFF is off. Select MIRROR INVERT for front projection with the tabletop-mounted projector. XGA60 BRIGHTNESS Use to change the setting of the lamp. COLOR TINT 0 0 10 STANDARD 0 0 VIDEO or S-VIDEO is chosen as the value...when there is no signal input from the source. Use the remote control to reverse the projected image. See page 18. INSTALLATION • The projector is in the Low mode is displayed. IMAGE REVERSE Use to turn on . Menu operation (continued) 1 IMAGE CONTRAST Use to select the ...
User Manual
Page 17
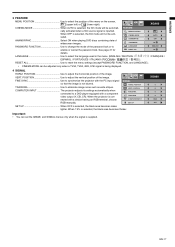
...MODE ANAMORPHIC PASSWORD A Ë LANGUAGE AUTO OFF OK ENGLISH enable or cancel the password lock. When the projector is supplied. EN-17 PASSWORD FUNCTION Use to synchronize the projector with the PC input signal so that the image is inputted. TRACKING COMPUTER INPUT RRGGBB RGB manually. XGA60...connected with a component video output (Y, CB, CR). When OFF is selected, the film mode will be activated. COMPUTER INPUT The projector adjusts its settings automatically when connected to select the position of the menu on the screen, (upper left) or (lower right). ENGLISH...
...MODE ANAMORPHIC PASSWORD A Ë LANGUAGE AUTO OFF OK ENGLISH enable or cancel the password lock. When the projector is supplied. EN-17 PASSWORD FUNCTION Use to synchronize the projector with the PC input signal so that the image is inputted. TRACKING COMPUTER INPUT RRGGBB RGB manually. XGA60...connected with a component video output (Y, CB, CR). When OFF is selected, the film mode will be activated. COMPUTER INPUT The projector adjusts its settings automatically when connected to select the position of the menu on the screen, (upper left) or (lower right). ENGLISH...
User Manual
Page 19
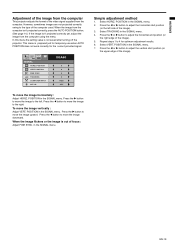
...move the image downward. Press the W or X button to the type of the image). 5. This menu is not saved after turning off the projector. Press the X button to the left side of the image). POSITION in the SIGNAL menu. 2. When the image flickers or the image is out...the SIGNAL menu. 7. Select VERT. Press the W or X button to 4 for the current provided signal. ENGLISH Adjustment of the image from the computer This projector adjusts the format of focus : Adjust FINE SYNC. SIGNAL HORIZ. TRACKING RRGGBB COMPUTER INPUT SET UP XGA60 0 0 0 0 RGB OFF To move the image ...
...move the image downward. Press the W or X button to the type of the image). 5. This menu is not saved after turning off the projector. Press the X button to the left side of the image). POSITION in the SIGNAL menu. 2. When the image flickers or the image is out...the SIGNAL menu. 7. Select VERT. Press the W or X button to 4 for the current provided signal. ENGLISH Adjustment of the image from the computer This projector adjusts the format of focus : Adjust FINE SYNC. SIGNAL HORIZ. TRACKING RRGGBB COMPUTER INPUT SET UP XGA60 0 0 0 0 RGB OFF To move the image ...
User Manual
Page 20
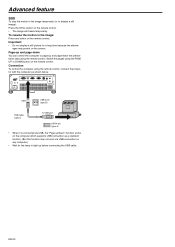
... picture for the lamp to light up before connecting the USB cable. EN-20 Connection To control the computer using the remote control, connect the projector with the computer as a standard function. (But this function may persist on the remote control.
... picture for the lamp to light up before connecting the USB cable. EN-20 Connection To control the computer using the remote control, connect the projector with the computer as a standard function. (But this function may persist on the remote control.
User Manual
Page 21
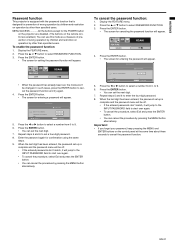
ENGLISH Password function This projector is equipped with the password function that is designed for prevention of wrong operation by children and restriction on operation by other than specified users. ... the ENTER button. • The screen for entering the password will appear. 5. Press the ENTER button. • The screen for the POWER button on the projector are disabled. (The buttons on the control panel at the some time about three seconds to 9. 6. MENU ACCESS All the buttons except for entering a password...
ENGLISH Password function This projector is equipped with the password function that is designed for prevention of wrong operation by children and restriction on operation by other than specified users. ... the ENTER button. • The screen for entering the password will appear. 5. Press the ENTER button. • The screen for the POWER button on the projector are disabled. (The buttons on the control panel at the some time about three seconds to 9. 6. MENU ACCESS All the buttons except for entering a password...
User Manual
Page 22
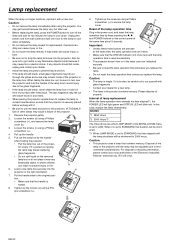
... front of the lamp or the projector with the lamp may be careful not to cut yourself with glass fragments. • Contact your face after using a Phillips (a) screwdriver (+) to secure the lamp cover. When it . XD206U *1 2850 Hours *2 3000 Hours*3 The times above ...are pressed (b) at the same time, the lamp operation time isn't reset. • Make sure that the projector is broken, be regulated due to environmental considerations. Caution: •...
... front of the lamp or the projector with the lamp may be careful not to cut yourself with glass fragments. • Contact your face after using a Phillips (a) screwdriver (+) to secure the lamp cover. When it . XD206U *1 2850 Hours *2 3000 Hours*3 The times above ...are pressed (b) at the same time, the lamp operation time isn't reset. • Make sure that the projector is broken, be regulated due to environmental considerations. Caution: •...
User Manual
Page 23
... when the external device is a notebook computer.) • Check that the cable connected to the external device isn't defective. • Check that the projector is connected to the external device using the correct terminals. • Check that the cable connected to go out after 10 seconds when the temperature... on the screen. Wait about one minute to light up. • On rare occasion, the lamp fails to light the lamp again. • If the projector was turned off .) 2. In such cases, wait a few minutes and try to light up. Power isn't turned on the lamp again. • Check...
... when the external device is a notebook computer.) • Check that the cable connected to the external device isn't defective. • Check that the projector is connected to the external device using the correct terminals. • Check that the cable connected to go out after 10 seconds when the temperature... on the screen. Wait about one minute to light up. • On rare occasion, the lamp fails to light the lamp again. • If the projector was turned off .) 2. In such cases, wait a few minutes and try to light up. Power isn't turned on the lamp again. • Check...

User Manual
Page 24
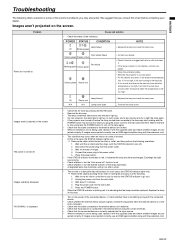
...that they are perpendicular to each other . (See page 12.) • This symptom is normal for a DLP projector and is not a malfunction. (A very small number of the projector. • Connect the cable's plug with the screen and isn't a product malfunction. Change the screen ...the manufacturer of your computer. • Match the output resolution of interference with the external device's connector firmly. • Keep the projector away from equipment generating interfering radio waves. • When the keystone adjustment is not a malfunction. Projected images are obscured. Fine ...
...that they are perpendicular to each other . (See page 12.) • This symptom is normal for a DLP projector and is not a malfunction. (A very small number of the projector. • Connect the cable's plug with the screen and isn't a product malfunction. Change the screen ...the manufacturer of your computer. • Match the output resolution of interference with the external device's connector firmly. • Keep the projector away from equipment generating interfering radio waves. • When the keystone adjustment is not a malfunction. Projected images are obscured. Fine ...