
User Manual
Page 3
... undesired operation. DLP™, Digital Micromirror Device and DMD are trademarks or registered trademarks of Apple Computer Inc. ENGLISH Contents Important safeguards...4 Overview ...6 Remote control ...8 Installation ......9 Basic connections...10 Preparation ...12 Basic operation ...13 Menu operation...15 Image adjustment ...18 Advanced feature...20 Lamp replacement ...22 Troubleshooting ...23 Indicators ...26 Specifications ...27 Declaration of Conformity Model Number : XD206U Trade Name : MITSUBISHI ELECTRIC Responsible party : Mitsubishi...
... undesired operation. DLP™, Digital Micromirror Device and DMD are trademarks or registered trademarks of Apple Computer Inc. ENGLISH Contents Important safeguards...4 Overview ...6 Remote control ...8 Installation ......9 Basic connections...10 Preparation ...12 Basic operation ...13 Menu operation...15 Image adjustment ...18 Advanced feature...20 Lamp replacement ...22 Troubleshooting ...23 Indicators ...26 Specifications ...27 Declaration of Conformity Model Number : XD206U Trade Name : MITSUBISHI ELECTRIC Responsible party : Mitsubishi...
User Manual
Page 6
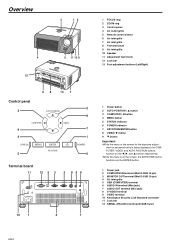
Overview 3 12 4 12 5 11 13 9 1 FOCUS ring 2 ZOOM ring 3 Control panel 4 Air outlet grille 5 Remote control sensor 6 Air inlet grille 7 Air inlet grille 8 Terminal board 9 Air inlet grille 10 Speaker 11 Adjustment feet (front) 12 Lock bar 13 Foot adjustment buttons (Left/Right) 68 10 7 Control panel 2 3 8 9 7 4 1 5 6 Terminal board 11 12 5 3 2 8 96 10 1 4 7 1 Power button...
Overview 3 12 4 12 5 11 13 9 1 FOCUS ring 2 ZOOM ring 3 Control panel 4 Air outlet grille 5 Remote control sensor 6 Air inlet grille 7 Air inlet grille 8 Terminal board 9 Air inlet grille 10 Speaker 11 Adjustment feet (front) 12 Lock bar 13 Foot adjustment buttons (Left/Right) 68 10 7 Control panel 2 3 8 9 7 4 1 5 6 Terminal board 11 12 5 3 2 8 96 10 1 4 7 1 Power button...
User Manual
Page 7
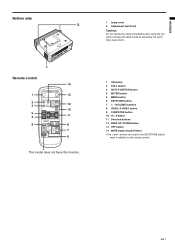
EN-7 ENGLISH Bottom side 2 1 Remote control 14 1 13 2 3 12 10 5 4 11 9 8 7 6 This model does not have this function. 1 Lamp cover 2 Adjustment feet (front) Caution: Do not replace the lamp immediately after using the projector because the lamp would be extremely hot and it may cause burns. 1 ON button 2 STILL button 3 AUTO POSITION button 4 ENTER... buttons 12 PAGE UP / DOWN button 13 OFF button 14 MUTE button (Audio/Video) •The + and - buttons are used in addition to the volume control. ment in the KEYSTONE adjust-
EN-7 ENGLISH Bottom side 2 1 Remote control 14 1 13 2 3 12 10 5 4 11 9 8 7 6 This model does not have this function. 1 Lamp cover 2 Adjustment feet (front) Caution: Do not replace the lamp immediately after using the projector because the lamp would be extremely hot and it may cause burns. 1 ON button 2 STILL button 3 AUTO POSITION button 4 ENTER... buttons 12 PAGE UP / DOWN button 13 OFF button 14 MUTE button (Audio/Video) •The + and - buttons are used in addition to the volume control. ment in the KEYSTONE adjust-

User Manual
Page 8
... clothes, rinse with its positive (+) and negative (-) sides correctly oriented as indicated on the type of the projector. Keep a distance at the remote control sensor of the screen used for a long time. • Do not combine a new battery with an ... remote control sensor to +, and - Inverted fluorescent light, if located near the projector, may interfere the remote control. • When you use the remote control too close to ensure correct operation of used . • Dispose of the remote control. to -). • Load the batteries from the remote control to the projector via...
... clothes, rinse with its positive (+) and negative (-) sides correctly oriented as indicated on the type of the projector. Keep a distance at the remote control sensor of the screen used for a long time. • Do not combine a new battery with an ... remote control sensor to +, and - Inverted fluorescent light, if located near the projector, may interfere the remote control. • When you use the remote control too close to ensure correct operation of used . • Dispose of the remote control. to -). • Load the batteries from the remote control to the projector via...

User Manual
Page 12
... the S (or +) button. • When the keystone adjustment is carried out, the adjustment value is provided appropriately. • This projector uses the power plug of the adjustment value in or out the power cord with complicated patterns. In such cases, set the keystone adjustment ...is for the U.S., Europe and U.K. If necessary, tilt the projector using the two adjustment feet on the remote control). Release the buttons to lock the adjustment feet to that this cord to any objects on the projector or the remote control to product malfunctions. • Noise may cause fire or ...
... the S (or +) button. • When the keystone adjustment is carried out, the adjustment value is provided appropriately. • This projector uses the power plug of the adjustment value in or out the power cord with complicated patterns. In such cases, set the keystone adjustment ...is for the U.S., Europe and U.K. If necessary, tilt the projector using the two adjustment feet on the remote control). Release the buttons to lock the adjustment feet to that this cord to any objects on the projector or the remote control to product malfunctions. • Noise may cause fire or ...
User Manual
Page 13
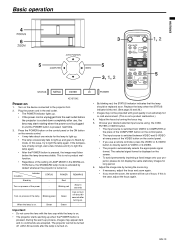
...focus by - This is cooled down completely after use a remote controller, press the VIDEO or S-VIDEO button to directly switch to light the lamp again. • After the POWER button is on . During the warm-up and goes to the projector first. 2. If this case, try to VIDEO or S-VIDEO.... • The projector automatically selects the appropriate signal format. Press the POWER button on the control panel or the ON button on the remote control. • It may take about 60 seconds...
...focus by - This is cooled down completely after use a remote controller, press the VIDEO or S-VIDEO button to directly switch to light the lamp again. • After the POWER button is on . During the warm-up and goes to the projector first. 2. If this case, try to VIDEO or S-VIDEO.... • The projector automatically selects the appropriate signal format. Press the POWER button on the control panel or the ON button on the remote control. • It may take about 60 seconds...

User Manual
Page 14
..., press any button except the POWER button. (Some buttons on .) • Before shutting down the projector, be shortened. (Wait about 10 minutes before turning the projector back on the remote control don't function for the air outlet fans to light up because the lamp's life may be shortened. ...When the image isn't projected in the right position, adjust the image position using the projector, wait 90 seconds for cancel.) 2. Volume from the speaker Press the KEYSTONE button on the remote control. • The message "POWER OFF? ANAMORPHIC mode When playing DVD discs containing data...
..., press any button except the POWER button. (Some buttons on .) • Before shutting down the projector, be shortened. (Wait about 10 minutes before turning the projector back on the remote control don't function for the air outlet fans to light up because the lamp's life may be shortened. ...When the image isn't projected in the right position, adjust the image position using the projector, wait 90 seconds for cancel.) 2. Volume from the speaker Press the KEYSTONE button on the remote control. • The message "POWER OFF? ANAMORPHIC mode When playing DVD discs containing data...
User Manual
Page 16
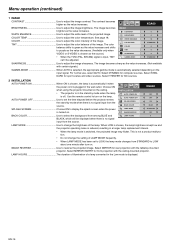
...adjust the color temperature. COLOR TEMP Use to adjust the image brightness. DARD for rear projection with the ceiling-mounted projector. Use the remote control to LOW, the lamp mode changes from the source. BACK COLOR BLUE SPLASH SCREEN Choose ON to adjust the color ...8226; When the TV50 (PAL, SECAM) signal is switched, the projected image may flicker. Select DYNAMIC for front projection with the tabletop-mounted projector. tion. • Do not change the brightness of the image. Select MIRROR INVERT for computer sources. EN-16 Select STAN- Menu operation (...
...adjust the color temperature. COLOR TEMP Use to adjust the image brightness. DARD for rear projection with the ceiling-mounted projector. Use the remote control to LOW, the lamp mode changes from the source. BACK COLOR BLUE SPLASH SCREEN Choose ON to adjust the color ...8226; When the TV50 (PAL, SECAM) signal is switched, the projected image may flicker. Select DYNAMIC for front projection with the tabletop-mounted projector. tion. • Do not change the brightness of the image. Select MIRROR INVERT for computer sources. EN-16 Select STAN- Menu operation (...
User Manual
Page 20
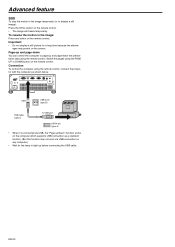
... (type A) • When it is connected via USB, the "Page up/down the presentation data using the remote control, connect the projector with the computer as a standard function. (But this function may persist on the remote control. To resume the motion in the image temporarily (or to display a still image): Press the STILL button on...
... (type A) • When it is connected via USB, the "Page up/down the presentation data using the remote control, connect the projector with the computer as a standard function. (But this function may persist on the remote control. To resume the motion in the image temporarily (or to display a still image): Press the STILL button on...
User Manual
Page 21
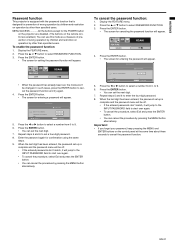
MENU ACCESS All the buttons except for the POWER button on the projector are disabled. (The buttons on the remote control are enabled.) You can use this mode as a measure of prevention of wrong operation by children and restriction on operation by pressing the ...press the ENTER button. • You can cancel the procedure by other than specified users. FEATURE UNLOCK XGA60 OK 4. ENGLISH Password function This projector is equipped with the password function that is designed for prevention of wrong operation by children and restriction on operation by pressing the MENU button...
MENU ACCESS All the buttons except for the POWER button on the projector are disabled. (The buttons on the remote control are enabled.) You can use this mode as a measure of prevention of wrong operation by children and restriction on operation by pressing the ...press the ENTER button. • You can cancel the procedure by other than specified users. FEATURE UNLOCK XGA60 OK 4. ENGLISH Password function This projector is equipped with the password function that is designed for prevention of wrong operation by children and restriction on operation by pressing the MENU button...
User Manual
Page 25
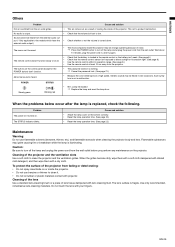
...from the wall outlet before you perform any maintenance on or inside the projector. • Do not use flammable solvents (benzene, thinner, etc.) and flammable aerosols when cleaning the projector body and lens. The remote control doesn't function easily or at all. • Check that the battery...fluorescent light. (See page 8.) • Use the remote control within its operation range. (See page 8.) • Use the remote control at least 10 cm away from the external audio output (* Only applicable to clean the projector and the ventilation grilles. No audio is fragile. ...
...from the wall outlet before you perform any maintenance on or inside the projector. • Do not use flammable solvents (benzene, thinner, etc.) and flammable aerosols when cleaning the projector body and lens. The remote control doesn't function easily or at all. • Check that the battery...fluorescent light. (See page 8.) • Use the remote control within its operation range. (See page 8.) • Use the remote control at least 10 cm away from the external audio output (* Only applicable to clean the projector and the ventilation grilles. No audio is fragile. ...
User Manual
Page 28
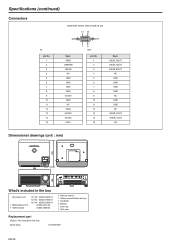
... for PC 1 VIDEO cable for US 02552-0063-01 for EU 02552-0066-01 for UK 02552-0065-01 02552-0072-00 02552-0068-00 1 Remote control 1 Safety manual/Quick start up 1 CD-ROM 2 Battery 1 Lens cap 1 Soft case Replacement part (Option / Not included in the box) Spare lamp VLT-XD206LP EN...
... for PC 1 VIDEO cable for US 02552-0063-01 for EU 02552-0066-01 for UK 02552-0065-01 02552-0072-00 02552-0068-00 1 Remote control 1 Safety manual/Quick start up 1 CD-ROM 2 Battery 1 Lens cap 1 Soft case Replacement part (Option / Not included in the box) Spare lamp VLT-XD206LP EN...