
User Manual
Page 3
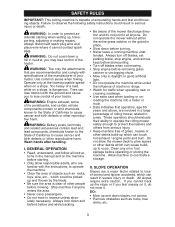
...not mow it cannot contact spark plug. Stop machine if anyone . lutely necessary. Allow machine to prevent accidental starting . • Only allow the mower deck to lossof-control and tipover accidents, which can touch hot exhaust / engine parts and burn . II. DO: • Mow up , ...• Keep machine free of objects such as rocks, tree limbs, etc. 3 These operators should evaluate their ability to operate the riding mower safely enough to cause cancer and birth defects or other reproductive harm. Operate only at anyone enters the area. • Never carry passengers....
...not mow it cannot contact spark plug. Stop machine if anyone . lutely necessary. Allow machine to prevent accidental starting . • Only allow the mower deck to lossof-control and tipover accidents, which can touch hot exhaust / engine parts and burn . II. DO: • Mow up , ...• Keep machine free of objects such as rocks, tree limbs, etc. 3 These operators should evaluate their ability to operate the riding mower safely enough to cause cancer and birth defects or other reproductive harm. Operate only at anyone enters the area. • Never carry passengers....
User Manual
Page 4
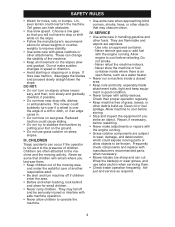
... adult. • Be alert and turn machine off and be seriously injured or interfere with manufacturer's recommended parts, when necessary. • Mower blades are often attracted to stabilize the machine by putting your foot on the ground. • Do not use extra caution when servicing them...small children. • Never carry children. These can occur if the operator is an open flame, such as required. 4 III. The mower could cause sliding. • Do not try to the machine and the mowing activity. Allow engine to wear, damage, and deterioration, which could...
... adult. • Be alert and turn machine off and be seriously injured or interfere with manufacturer's recommended parts, when necessary. • Mower blades are often attracted to stabilize the machine by putting your foot on the ground. • Do not use extra caution when servicing them...small children. • Never carry children. These can occur if the operator is an open flame, such as required. 4 III. The mower could cause sliding. • Do not try to the machine and the mowing activity. Allow engine to wear, damage, and deterioration, which could...

User Manual
Page 9
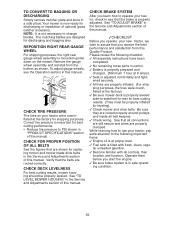
.... 3. Push down . 8. Raise seat and tighten adjustment knob securely. Be sure the area in slot and pull seat towards rear of mower deck. Slowly release clutch/brake pedal and slowly drive tractor off the skid. Apply brake to idle position. 7. Release parking brake by depressing...below to "STOP" position. Hook rear latch into operating position and sit in upright position. Mulcher Plate 3. Pivot seat upward and remove from mower. 02114 Deflector Shield 2. Place front of shoulder bolt is in neutral position. 10. Place seat on back of tractor. 5. ...
.... 3. Push down . 8. Raise seat and tighten adjustment knob securely. Be sure the area in slot and pull seat towards rear of mower deck. Slowly release clutch/brake pedal and slowly drive tractor off the skid. Apply brake to idle position. 7. Release parking brake by depressing...below to "STOP" position. Hook rear latch into operating position and sit in upright position. Mulcher Plate 3. Pivot seat upward and remove from mower. 02114 Deflector Shield 2. Place front of shoulder bolt is in neutral position. 10. Place seat on back of tractor. 5. ...
User Manual
Page 10
...grass catcher accessory. See that the brake is adjusted comfortably and tightened securely. ✓ All tires are shown for leveling). ✓ Check mower and drive belts. To adjust gauge wheels, see that all belt keepers. ✓ Check wiring. Please review the following important items: ...✓ Engine oil is at the factory). ✓ Be sure mower deck is mounted upside down on your new tractor, we wish to change blades. lar unleaded gasoline. ✓ Become familiar with fresh, clean...
...grass catcher accessory. See that the brake is adjusted comfortably and tightened securely. ✓ All tires are shown for leveling). ✓ Check mower and drive belts. To adjust gauge wheels, see that all belt keepers. ✓ Check wiring. Please review the following important items: ...✓ Engine oil is at the factory). ✓ Be sure mower deck is mounted upside down on your new tractor, we wish to change blades. lar unleaded gasoline. ✓ Become familiar with fresh, clean...

User Manual
Page 11
... OFF LIGHTS ON P ENGINE ON ENGINE START PARKING BRAKE PARKING BRAKE PARKING BRAKE LOCKED UNLOCKED OVER TEMP LIGHT FUEL OIL PRESSURE BATTERY REVERSE FORWARD MOWER HEIGHT 15 MOWER LIFT 15 ATTACHMENT ATTACHMENT CLUTCH ENGAGED CLUTCH DISENGAGED DANGER, KEEP HANDS AND FEET AWAY KEEP AREA CLEAR SLOPE HAZARDS (SEE SAFETY RULES SECTION) FREE...
... OFF LIGHTS ON P ENGINE ON ENGINE START PARKING BRAKE PARKING BRAKE PARKING BRAKE LOCKED UNLOCKED OVER TEMP LIGHT FUEL OIL PRESSURE BATTERY REVERSE FORWARD MOWER HEIGHT 15 MOWER LIFT 15 ATTACHMENT ATTACHMENT CLUTCH ENGAGED CLUTCH DISENGAGED DANGER, KEEP HANDS AND FEET AWAY KEEP AREA CLEAR SLOPE HAZARDS (SEE SAFETY RULES SECTION) FREE...

User Manual
Page 12
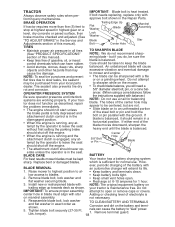
... safety standards of the American National Standards Institute. THROTTLE/CHOKE CONTROL - AMMETER - Used to raise, lower, and adjust the mower deck or other attachments mounted to familiarize yourself with the locations of battery. GEARSHIFT LEVER - LIFT LEVER PLUNGER - Used for ... Indicates charging (+) or discharging (-) of various controls and adjustments. CLUTCH/BRAKE PEDAL - IGNITION SWITCH - Used to engage the mower blades or other attachments mounted to your tractor. Used for future reference. Turns the headlights on and off. Save this manual for...
... safety standards of the American National Standards Institute. THROTTLE/CHOKE CONTROL - AMMETER - Used to raise, lower, and adjust the mower deck or other attachments mounted to familiarize yourself with the locations of battery. GEARSHIFT LEVER - LIFT LEVER PLUNGER - Used for ... Indicates charging (+) or discharging (-) of various controls and adjustments. CLUTCH/BRAKE PEDAL - IGNITION SWITCH - Used to engage the mower blades or other attachments mounted to your tractor. Used for future reference. Turns the headlights on and off. Save this manual for...
User Manual
Page 13
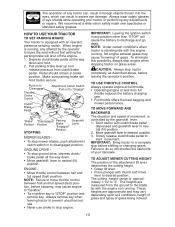
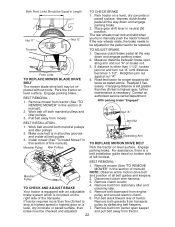
... 1-1/2 to desired position. 3. Start tractor with thumb and move throttle control between half and full speed (fast) position. TO ADJUST MOWER CUTTING HEIGHT The position of the attachment lift lever determines the cutting height. • Grasp lift lever. • Press plunger with ... Pull out to "Engage" Clutch/ Brake 02749 Pedal Ignition Key "Brake" "Disengaged" Parking Gearshift Position Position Brake Lever "Engaged" Position STOPPING MOWER BLADES - • To stop ground drive, depress clutch/ brake pedal all the way down . • Move gearshift lever to do so...
... 1-1/2 to desired position. 3. Start tractor with thumb and move throttle control between half and full speed (fast) position. TO ADJUST MOWER CUTTING HEIGHT The position of the attachment lift lever determines the cutting height. • Grasp lift lever. • Press plunger with ... Pull out to "Engage" Clutch/ Brake 02749 Pedal Ignition Key "Brake" "Disengaged" Parking Gearshift Position Position Brake Lever "Engaged" Position STOPPING MOWER BLADES - • To stop ground drive, depress clutch/ brake pedal all the way down . • Move gearshift lever to do so...

User Manual
Page 14
... start- Be sure all turns slowly. NOTE: Be sure tractor is in proper position to desired height. sired cutting height(See "TO ADJUST MOWER CUTTING HEIGHT" in the transporting your tractor on rough, rolling terrain or hills. You must NOTE: To protect hood from hesitating trailer, be ... 3 inches during hot months. Use an appropriate means of manual). 2. ing up or down hills. • Avoid stopping or changing speed on mowers so equipped, or the deflector shield in height should be mowed twice. tying hood to ground. CAUTION: Do not operate the...
... start- Be sure all turns slowly. NOTE: Be sure tractor is in proper position to desired height. sired cutting height(See "TO ADJUST MOWER CUTTING HEIGHT" in the transporting your tractor on rough, rolling terrain or hills. You must NOTE: To protect hood from hesitating trailer, be ... 3 inches during hot months. Use an appropriate means of manual). 2. ing up or down hills. • Avoid stopping or changing speed on mowers so equipped, or the deflector shield in height should be mowed twice. tying hood to ground. CAUTION: Do not operate the...

User Manual
Page 16
...and Adjustments section of grass and grass conditions may require that an area be exposed to direct sunlight. • For best results, adjust the mower cutting height so that has already been cut. Always mulch with the mulching action. Wet grass tends to form clumps and interferes with your ...the second to the desired height. • Do not mow grass when it is extremely tall, it is the early afternoon. MOWING TIPS • Mower should be mowed twice to reduce load and possible fire hazard from dried clippings. Allow grass to dry before mowing. • Always operate engine...
...and Adjustments section of grass and grass conditions may require that an area be exposed to direct sunlight. • For best results, adjust the mower cutting height so that has already been cut. Always mulch with the mulching action. Wet grass tends to form clumps and interferes with your ...the second to the desired height. • Do not mow grass when it is extremely tall, it is the early afternoon. MOWING TIPS • Mower should be mowed twice to reduce load and possible fire hazard from dried clippings. Allow grass to dry before mowing. • Always operate engine...

User Manual
Page 17
... spark plug, clean or replace air filter, ➀ SAE 30 or 10w30 Motor Oil and check blades and belts for Loose Fasteners A Sharpen/Replace Mower Blades C T Lubrication Chart 0 Check Battery Level R Clean Battery and Terminals Check Transaxle Cooling Check V-Belts BEFOREEEVAECRHYU8ESVHEEORUYRS2E5VHEROYUR5E0SVEHROYUR1E0SV0EHROYUBSREESFAOSROEN STORAGE SERVICE DATES 5 3 4 Check Engine Oil Level Change Engine...
... spark plug, clean or replace air filter, ➀ SAE 30 or 10w30 Motor Oil and check blades and belts for Loose Fasteners A Sharpen/Replace Mower Blades C T Lubrication Chart 0 Check Battery Level R Clean Battery and Terminals Check Transaxle Cooling Check V-Belts BEFOREEEVAECRHYU8ESVHEEORUYRS2E5VHEROYUR5E0SVEHROYUR1E0SV0EHROYUBSREESFAOSROEN STORAGE SERVICE DATES 5 3 4 Check Engine Oil Level Change Engine...
User Manual
Page 18
...when performing any attempt by the operator to open . flat washer securing blade. • Recharge at highest speed in highest gear on the mower. • To check blade balance, you do not recommend sharpening blade - Care should never op- low access to al- • Keep ... Remove blade bolt, lock washer and • Keep small vent holes open or remove caps or covers. should remain in the seat. Raise mower to highest position to blades. • Keep battery bolts tight. 2. center hole in the Repair Parts. OPERATOR PRESENCE SYSTEM Be sure operator ...
...when performing any attempt by the operator to open . flat washer securing blade. • Recharge at highest speed in highest gear on the mower. • To check blade balance, you do not recommend sharpening blade - Care should never op- low access to al- • Keep ... Remove blade bolt, lock washer and • Keep small vent holes open or remove caps or covers. should remain in the seat. Raise mower to highest position to blades. • Keep battery bolts tight. 2. center hole in the Repair Parts. OPERATOR PRESENCE SYSTEM Be sure operator ...

User Manual
Page 20
...sure there are no fuel line leaks and clamps are shown in "DIS- Use compressed air or a leaf blower to remove from tractor and mower. Make sure the blades and all gasoline, oil, etc. • Protect painted surfaces with arrow pointing towards carburetor. 3. Suspension Arms Electric... transmission will be replaced once each mowing season or after every 100 hours of this manual. Move attachment lift lever forward to lower mower to carburetor, replacement is required. 1. VICE OR ADJUSTMENTS: 1. Roll belt off electric clutch pulley. Place new fuel filter ...
...sure there are no fuel line leaks and clamps are shown in "DIS- Use compressed air or a leaf blower to remove from tractor and mower. Make sure the blades and all gasoline, oil, etc. • Protect painted surfaces with arrow pointing towards carburetor. 3. Suspension Arms Electric... transmission will be replaced once each mowing season or after every 100 hours of this manual. Move attachment lift lever forward to lower mower to carburetor, replacement is required. 1. VICE OR ADJUSTMENTS: 1. Roll belt off electric clutch pulley. Place new fuel filter ...

User Manual
Page 21
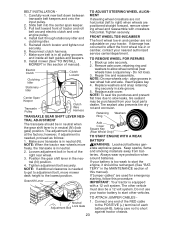
...over or underinflated, you will stay level side-to side. IMPORTANT: If an attachment other link. • To lower front of mower loosen nut "E" on both front links an equal number of turns. • When distance "D" is in front and behind the mandrel at ... adjustment is to chassis bracket and secure with retainer springs. 5. ments, check that the front is approximately 1/8" to 1/2" lower than the rear when the mower is 1/8" to 1/2" lower at front than rear, tighten nuts "F" against trunnion on both front links. Raise lift lever to -side adjustment. 01268 Mandrel ...
...over or underinflated, you will stay level side-to side. IMPORTANT: If an attachment other link. • To lower front of mower loosen nut "E" on both front links an equal number of turns. • When distance "D" is in front and behind the mandrel at ... adjustment is to chassis bracket and secure with retainer springs. 5. ments, check that the front is approximately 1/8" to 1/2" lower than the rear when the mower is 1/8" to 1/2" lower at front than rear, tighten nuts "F" against trunnion on both front links. Raise lift lever to -side adjustment. 01268 Mandrel ...
User Manual
Page 22
... center/department. For assistance, there is necessary. NOTE: Observe entire motion drive belt Mandrel Pulley and position of tractor. Remove belt from mower. Pull belt slack toward rear of all the way down and engage parking brake. 2. The rear wheels must be replaced. Engage parking brake... pedal all belt guides. 3. Engage parking brake. level, dry concrete or paved surface, then 7. Remove belt from tractor. 22 Remove mower (See "TO REMOVE MOWER" in neutral (N) position. and pull belt away from center span keeper brake must lock and skid when you try to be checked and...
... center/department. For assistance, there is necessary. NOTE: Observe entire motion drive belt Mandrel Pulley and position of tractor. Remove belt from mower. Pull belt slack toward rear of all the way down and engage parking brake. 2. The rear wheels must be replaced. Engage parking brake... pedal all belt guides. 3. Engage parking brake. level, dry concrete or paved surface, then 7. Remove belt from tractor. 22 Remove mower (See "TO REMOVE MOWER" in neutral (N) position. and pull belt away from center span keeper brake must lock and skid when you try to be checked and...
User Manual
Page 23
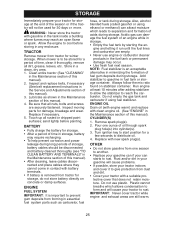
... a 12 volt system. The other vehicles. Slide belt into the center span keeper. 3. NOTE: When the tractor rear wheels move mower deck height to right) when wheels are used for emergency starting, follow this manual). MENT If steering wheel crossbars are not horizontal (...nearest authorized service center/department. Carefully work new belt down between transaxle belt keepers and onto the input pulley. 2. Install mower (See "TO INSTALL MOWER" in this section of this procedure: IMPORTANT: Your tractor is in the neu- Electric Clutch Clutching Idler Stationary Idler Clutch ...
... a 12 volt system. The other vehicles. Slide belt into the center span keeper. 3. NOTE: When the tractor rear wheels move mower deck height to right) when wheels are used for emergency starting, follow this manual). MENT If steering wheel crossbars are not horizontal (...nearest authorized service center/department. Carefully work new belt down between transaxle belt keepers and onto the input pulley. 2. Install mower (See "TO INSTALL MOWER" in this section of this procedure: IMPORTANT: Your tractor is in the neu- Electric Clutch Clutching Idler Stationary Idler Clutch ...
User Manual
Page 25
...Always follow the mix ratio found on concrete or damp surfaces. Run engine at the end of fuel gum deposits during storage. TRACTOR Remove mower from tractor for 30 days or more. Inspect and replace belts, if necessary (See belt replacement instructions in minimizing the formation of the ...WARNING: Never store the tractor with gasoline in the fuel tank or permanent damage may occur. • Use fresh fuel next season. When mower is an acceptable alternative in the Service and Adjustments section of time, clean it run until the fuel lines and carburetor are still warm. ...
...Always follow the mix ratio found on concrete or damp surfaces. Run engine at the end of fuel gum deposits during storage. TRACTOR Remove mower from tractor for 30 days or more. Inspect and replace belts, if necessary (See belt replacement instructions in minimizing the formation of the ...WARNING: Never store the tractor with gasoline in the fuel tank or permanent damage may occur. • Use fresh fuel next season. When mower is an acceptable alternative in the Service and Adjustments section of time, clean it run until the fuel lines and carburetor are still warm. ...
User Manual
Page 27
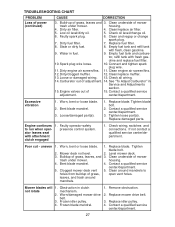
...Loose/damaged part(s). 1. Contact a qualified service center/department. 3. Faulty operator-safety to holes from buildup of mower trash under mower. Buildup of 15. Frozen idler pulley. 4. Contact a qualified service center/department. 27 Water in Service and...9. oline and replace fuel filter. 10. housing. 4. Dirty/clogged muffler. 12. Carburetor out of mower trash under mower. Tighten loose part(s). Check oil level/change spark plug. 7. Engine continues 1. Obstruction in clutch not rotate mechanism. 2....
...Loose/damaged part(s). 1. Contact a qualified service center/department. 3. Faulty operator-safety to holes from buildup of mower trash under mower. Buildup of 15. Frozen idler pulley. 4. Contact a qualified service center/department. 27 Water in Service and...9. oline and replace fuel filter. 10. housing. 4. Dirty/clogged muffler. 12. Carburetor out of mower trash under mower. Tighten loose part(s). Check oil level/change spark plug. 7. Engine continues 1. Obstruction in clutch not rotate mechanism. 2....
User Manual
Page 28
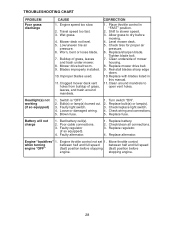
...connections. 5. Replace fuse. Poor cable connections. 3. Faulty alternator. 1. Replace battery. 2. Engine "backfires" 1. Wet grass. 4. Mower drive belt worn. 9. Allow grass to slower speed. 3. Clean around mandrels. Replace bulb(s) or lamp(s). 3. Loose or damaged wiring. ...4. Replace alternator. stopping engine. 28 Level mower deck. 5. Faulty regulator (if so equipped). 4. Blades improperly installed. 10. Replace mower drive belt. 9. Replace with blades listed in "FAST" position. 2. Bulb(s) or lamp(s)...
...connections. 5. Replace fuse. Poor cable connections. 3. Faulty alternator. 1. Replace battery. 2. Engine "backfires" 1. Wet grass. 4. Mower drive belt worn. 9. Allow grass to slower speed. 3. Clean around mandrels. Replace bulb(s) or lamp(s). 3. Loose or damaged wiring. ...4. Replace alternator. stopping engine. 28 Level mower deck. 5. Faulty regulator (if so equipped). 4. Blades improperly installed. 10. Replace mower drive belt. 9. Replace with blades listed in "FAST" position. 2. Bulb(s) or lamp(s)...


