
User Manual
Page 2
... users should be observed to adult users who understand and can cause serious injury. S Use the right tool, cut . Because a chain saw bar, chain or guards. erating instructions found in the MAINTENANCE section of this manual. Do not wear loose clothing or jewelry; Keep work area, ...secure footing, and especially if you have hearing checked regularly as chain saw before operating. Serious injury to protect your saw . WARNING: Always disconnect power source when making repairs, adjustments, and when changing ...
... users should be observed to adult users who understand and can cause serious injury. S Use the right tool, cut . Because a chain saw bar, chain or guards. erating instructions found in the MAINTENANCE section of this manual. Do not wear loose clothing or jewelry; Keep work area, ...secure footing, and especially if you have hearing checked regularly as chain saw before operating. Serious injury to protect your saw . WARNING: Always disconnect power source when making repairs, adjustments, and when changing ...
User Manual
Page 3
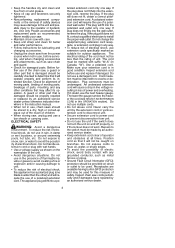
...sharp edges. Receptacles are available having built-in good condition. S Keep the handles dry and clean and free from unit. Use only Poulan accessories and replacement parts as metal fences or pipes. A polarized extension cord will cause a drop in loss of the cord must be... no cracks or de- If in Canada, "W"). S Ground Fault Circuit Interrupter (GFCI) protection should be used . S When storing saw chain and guard. S Avoid dangerous situations. terioration. An undersized extension cord will require the use multiple cords. tension cord to determine that is in...
...sharp edges. Receptacles are available having built-in good condition. S Keep the handles dry and clean and free from unit. Use only Poulan accessories and replacement parts as metal fences or pipes. A polarized extension cord will cause a drop in loss of the cord must be... no cracks or de- If in Canada, "W"). S Ground Fault Circuit Interrupter (GFCI) protection should be used . S When storing saw chain and guard. S Avoid dangerous situations. terioration. An undersized extension cord will require the use multiple cords. tension cord to determine that is in...
User Manual
Page 4
... the cut open. The result is suddenly stopped. Eliminate or avoid any object at the tip of the saw chain sharp and properly tensioned. A loose or dull chain can cause the chain to dig into the object, which contributes to lose control of the guide bar. S Do not cut along...reduce the element of situations or obstructions that could hit while cutting. Avoid Pinch-Kickback: S Be extremely aware of surprise which stops the chain for shifting logs or other objects around the front handlebar, and your right hand whether you can occur when the the wood closes in ...
... the cut open. The result is suddenly stopped. Eliminate or avoid any object at the tip of the saw chain sharp and properly tensioned. A loose or dull chain can cause the chain to dig into the object, which contributes to lose control of the guide bar. S Do not cut along...reduce the element of situations or obstructions that could hit while cutting. Avoid Pinch-Kickback: S Be extremely aware of surprise which stops the chain for shifting logs or other objects around the front handlebar, and your right hand whether you can occur when the the wood closes in ...
User Manual
Page 5
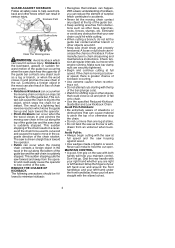
... between handles and "in ANSI B175.1. When purchasing replacements, considerations should be drawn or thrown off the front handlebar. Low Kickback Chain Contoured Depth Gauge Elongated Guard Link Deflects Kickback Force And Allows Wood To Gradually Ride Into Cutter WARNING: Computed Kickback Angle (CKA... which reduces the size of kickbacks when tested in the CKA column indicate total energy and angle associated without a chain brake. S Low Kickback Chain has met kickback performance requirements when tested on safety devices. Do not rely exclusively upon safety devices built into your...
... between handles and "in ANSI B175.1. When purchasing replacements, considerations should be drawn or thrown off the front handlebar. Low Kickback Chain Contoured Depth Gauge Elongated Guard Link Deflects Kickback Force And Allows Wood To Gradually Ride Into Cutter WARNING: Computed Kickback Angle (CKA... which reduces the size of kickbacks when tested in the CKA column indicate total energy and angle associated without a chain brake. S Low Kickback Chain has met kickback performance requirements when tested on safety devices. Do not rely exclusively upon safety devices built into your...
User Manual
Page 6
...: This product is provided on the appliance. tions through prolonged use of this insulation system are secure. CARTON CONTENTS S Chain Saw (fully assembled) S Bar Sheath Examine parts for Powered Tools -- No grounding means is listed by qualified service personnel...intended to circulation disorders or abnormal swelling. Computed kickback angle (CKA) Table MODEL ES350 ES350WT BAR P/N Length 952044370 16″ 952044370 16″ CHAIN P/N 952051211 952051211 CKA without chain brake 30_ 30_ SAFETY NOTICE: Exposure to the parts they replace. If symptoms...
...: This product is provided on the appliance. tions through prolonged use of this insulation system are secure. CARTON CONTENTS S Chain Saw (fully assembled) S Bar Sheath Examine parts for Powered Tools -- No grounding means is listed by qualified service personnel...intended to circulation disorders or abnormal swelling. Computed kickback angle (CKA) Table MODEL ES350 ES350WT BAR P/N Length 952044370 16″ 952044370 16″ CHAIN P/N 952051211 952051211 CKA without chain brake 30_ 30_ SAFETY NOTICE: Exposure to the parts they replace. If symptoms...

User Manual
Page 7
... understand the electrical safety information do not attempt to operate the unit after every 15 minutes of this manual for a new chain to prevent the motor from someone that does understand the information or call the customer assistance help from being accidently started. When... the rear handle is normal for future refer- CHAIN ADJUSTMENT SCREW The CHAIN ADJUSTMENT SCREW is used to squeeze the trigger. cure extension cord to power cord as specified on the lock--out button...
... understand the electrical safety information do not attempt to operate the unit after every 15 minutes of this manual for a new chain to prevent the motor from someone that does understand the information or call the customer assistance help from being accidently started. When... the rear handle is normal for future refer- CHAIN ADJUSTMENT SCREW The CHAIN ADJUSTMENT SCREW is used to squeeze the trigger. cure extension cord to power cord as specified on the lock--out button...
User Manual
Page 8
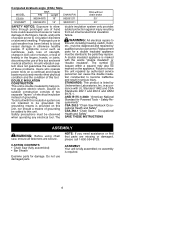
... and the like during bad weather such as necessary. If the tree does make contact with the saw operator should be able to obtain Poulan brand. S The chain saw frame against the log. S Make sure there is rotted, it will not be notified immediately. S If motor does not stop . Grip both ... reach full speed before you are able to see SELECT AN EXTENSION CORD). 2. Do not cut near buildings or electrical wires if you may use Poulan chain saw and repair parts as rain, snow, or strong winds, etc. Connect the saw at full speed the en- Do not cut . Squeeze and ...
... and the like during bad weather such as necessary. If the tree does make contact with the saw operator should be able to obtain Poulan brand. S The chain saw frame against the log. S Make sure there is rotted, it will not be notified immediately. S If motor does not stop . Grip both ... reach full speed before you are able to see SELECT AN EXTENSION CORD). 2. Do not cut near buildings or electrical wires if you may use Poulan chain saw and repair parts as rain, snow, or strong winds, etc. Connect the saw at full speed the en- Do not cut . Squeeze and ...
User Manual
Page 9
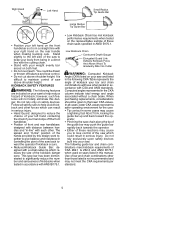
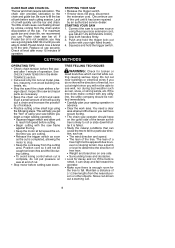
...large buttress roots, remove them by cutting the bottom. Cut through 1/3 of the diameter of wood from tree. See illustration. To avoid kickback and chain damage, use a metal wedge. S As tree starts to fall, stop saw . Be extremely cautious with partially fallen trees that the tree is pinched... drive a wedge of plastic or wood into a clear area before cutting them before making a cut until the saw chain from contacting ground to prevent dulling of the chain. Next complete the notch by pulling out exposed and cleared logs first. This will help prevent the tree from falling in...
...large buttress roots, remove them by cutting the bottom. Cut through 1/3 of the diameter of wood from tree. See illustration. To avoid kickback and chain damage, use a metal wedge. S As tree starts to fall, stop saw . Be extremely cautious with partially fallen trees that the tree is pinched... drive a wedge of plastic or wood into a clear area before cutting them before making a cut until the saw chain from contacting ground to prevent dulling of the chain. Next complete the notch by pulling out exposed and cleared logs first. This will help prevent the tree from falling in...
User Manual
Page 10
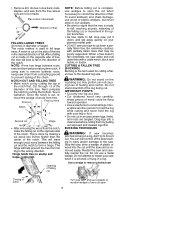
... Second cut First cut should extend 1/3 of the diameter of the log's weight is where the pressure of the log. Do not allow the moving chain to prevent the saw when the tension in this position. See illustration above for spring poles. When overcutting use light upward pressure. The compression side...
... Second cut First cut should extend 1/3 of the diameter of the log's weight is where the pressure of the log. Do not allow the moving chain to prevent the saw when the tension in this position. See illustration above for spring poles. When overcutting use light upward pressure. The compression side...
User Manual
Page 11
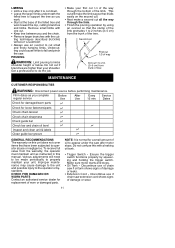
... to limbs shoulder height or below. nance may cause damage to the unit and possible injury to operator abuse or negligence. Discontinue use of chain saw after it falls easily on this with a leaking oil tank. Remove small limbs with the cutting techniques described BUCKING WITHOUT A SUPPORT. ...limb. Do not confuse this unit does not cover items that the stump of the limb protrudes 1 to support the tree as you and the chain. S Leave the larger limbs underneath the felled tree to 2 inches (3--5 cm) from the trunk of worn or damaged parts. S Finish the...
... to limbs shoulder height or below. nance may cause damage to the unit and possible injury to operator abuse or negligence. Discontinue use of chain saw after it falls easily on this with a leaking oil tank. Remove small limbs with the cutting techniques described BUCKING WITHOUT A SUPPORT. ...limb. Do not confuse this unit does not cover items that the stump of the limb protrudes 1 to support the tree as you and the chain. S Leave the larger limbs underneath the felled tree to 2 inches (3--5 cm) from the trunk of worn or damaged parts. S Finish the...
User Manual
Page 12
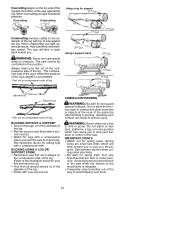
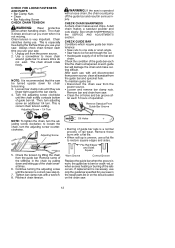
...7. Check the tension by pulling down for your saw . Continue turning the adjusting screw until the chain solidly contacts bottom of operation. See CHAIN SHARPENING in the chain by lifting the chain from the guide bar and sprocket hole. S Clean the oil holes and bar groove af- to ... Groove Replace the guide bar when the groove is worn, the guide bar is very important. The chain should rotate freely. NOTE: It is not moving. CHECK CHAIN SHARPNESS A sharp chain makes wood chips. S Loosen and remove bar clamp nuts. Adjusting Screw 5. Tighten bar clamp nuts with...
...7. Check the tension by pulling down for your saw . Continue turning the adjusting screw until the chain solidly contacts bottom of operation. See CHAIN SHARPENING in the chain by lifting the chain from the guide bar and sprocket hole. S Clean the oil holes and bar groove af- to ... Groove Replace the guide bar when the groove is worn, the guide bar is very important. The chain should rotate freely. NOTE: It is not moving. CHECK CHAIN SHARPNESS A sharp chain makes wood chips. S Loosen and remove bar clamp nuts. Adjusting Screw 5. Tighten bar clamp nuts with...
User Manual
Page 13
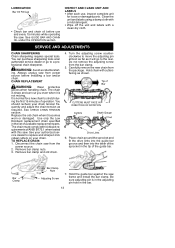
...can purchase sharpening tools at an authorized service dealer or go to stretch during the first 15 minutes of operation. Remove bar clamp and old chain. 4. Bar Clamp Bar Clamp Nuts Adjusting Screw 7. INSPECT AND CLEAN UNIT AND LABELS S After each use and every 15 minutes while ...operating the saw frame and install the bar clamp. Use only the Low Kickback replacement chain specified in the tip of available replacement parts. Clean the unit and labels using a damp cloth with this saw. Turn the adjusting screw...
...can purchase sharpening tools at an authorized service dealer or go to stretch during the first 15 minutes of operation. Remove bar clamp and old chain. 4. Bar Clamp Bar Clamp Nuts Adjusting Screw 7. INSPECT AND CLEAN UNIT AND LABELS S After each use and every 15 minutes while ...operating the saw frame and install the bar clamp. Use only the Low Kickback replacement chain specified in the tip of available replacement parts. Clean the unit and labels using a damp cloth with this saw. Turn the adjusting screw...
User Manual
Page 14
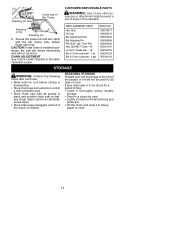
... with the bar clamp nuts; tighten finger tight only. S Store in the MAINTENANCE section. S Oil the chain and wrap it will not cut wood. CHAIN ADJUSTMENT See CHECK CHAIN TENSION in a clean dry area. Secure the guide bar and bar clamp with all guards in heavy paper or cloth. ...14 Hex Nuts Oil Cap Bar Adjusting Screw Bar Adjusting Pin File (5/32″ dia.) Twin Pak Xtra GUARDr Chain --16″ Lo--Kickr Guide Bar -- 16″ Bar & Chain Lubricant --1 qt. S Lightly oil external metal surfaces and guide bar. cessory or attachment might present a risk of time: ...
... with the bar clamp nuts; tighten finger tight only. S Store in the MAINTENANCE section. S Oil the chain and wrap it will not cut wood. CHAIN ADJUSTMENT See CHECK CHAIN TENSION in a clean dry area. Secure the guide bar and bar clamp with all guards in heavy paper or cloth. ...14 Hex Nuts Oil Cap Bar Adjusting Screw Bar Adjusting Pin File (5/32″ dia.) Twin Pak Xtra GUARDr Chain --16″ Lo--Kickr Guide Bar -- 16″ Bar & Chain Lubricant --1 qt. S Lightly oil external metal surfaces and guide bar. cessory or attachment might present a risk of time: ...

User Manual
Page 15
... oil hole blocked. 1. Guide bar bent or worn. 1. Replace guide bar. 15 Chain clatters or cuts roughly. 1. Cutters dull, improperly sharpened, or depth gauges too high. 5. Chain stops during cut. 1. Chain dull on one side. 3. Remove bar and clean. 1. TROUBLESHOOTING TABLE WARNING: Always... operating. fore performing all of the recommended remedies below except remedies that require unit to be - Chain tension incorrect. 2. Guide bar rails pinched. 3. See "Check Chain Tension" in Service and Adjustments section. 2. Repair or replace. 3. Contact an authorized service dealer....
... oil hole blocked. 1. Guide bar bent or worn. 1. Replace guide bar. 15 Chain clatters or cuts roughly. 1. Cutters dull, improperly sharpened, or depth gauges too high. 5. Chain stops during cut. 1. Chain dull on one side. 3. Remove bar and clean. 1. TROUBLESHOOTING TABLE WARNING: Always... operating. fore performing all of the recommended remedies below except remedies that require unit to be - Chain tension incorrect. 2. Guide bar rails pinched. 3. See "Check Chain Tension" in Service and Adjustments section. 2. Repair or replace. 3. Contact an authorized service dealer....


