

User Manual
Page 1
NO. Nt -i REJC4OVE 786. 4 0 OWNER'S MANUAL MODEL. HD145H42H 14.5 HP 42 Inch Lawn Tractor FILE COPY • Assembly • Operation • Customer Responsibilities • Service and Adjustments • Storage • Troubleshooting • Repair Parts For Parts and Service, contact our authorized distributor: call 1-800-849-1297 For Technical Assistance: call 1-800-829-5886 ut fl 163022 11.13.97 RD PRINTED IN U.S.A.
NO. Nt -i REJC4OVE 786. 4 0 OWNER'S MANUAL MODEL. HD145H42H 14.5 HP 42 Inch Lawn Tractor FILE COPY • Assembly • Operation • Customer Responsibilities • Service and Adjustments • Storage • Troubleshooting • Repair Parts For Parts and Service, contact our authorized distributor: call 1-800-849-1297 For Technical Assistance: call 1-800-829-5886 ut fl 163022 11.13.97 RD PRINTED IN U.S.A.

User Manual
Page 2
... to cool before and while backing. • Be aware of the mower discharge direction and do not mow it cannot contact spark plug in the manual and on a slope. Wrap the blade(s) or wear gloves, and use grass catcher on steep slopes. 2 III. GENERAL OPERATION • Read, understand, and follow all...
... to cool before and while backing. • Be aware of the mower discharge direction and do not mow it cannot contact spark plug in the manual and on a slope. Wrap the blade(s) or wear gloves, and use grass catcher on steep slopes. 2 III. GENERAL OPERATION • Read, understand, and follow all...
User Manual
Page 3
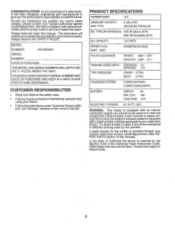
... 14 PSI REAR: 12 PSI CHARGING SYSTEM: 3 AMPS BATTERY 5 AMPS HEADLIGHTS BATTERY: AMP/HR: 25 MIN. Please read and retain this owner's Manual. PRODUCT SPECIFICATIONS HORSEPOWER: 14.5 GASOLINE CAPACITY AND TYPE: 2 GALLONS UNLEADED REGULAR OIL TYPE (API-SF/SG/SH): SAE 30 (above is used,...states may have competent, well-trained technicians and the proper tools to give you the best possible dependability and performance. MODEL NUMBER HD145H42H SERIAL NUMBER DATE OF PURCHASE THEMODEL ANDSERIALNUMBERS WILLBEFOUND ON A PLATE UNDER THE SEAT. CCA: 190 CASE SIZE: U1R BLADE BOLT ...
... 14 PSI REAR: 12 PSI CHARGING SYSTEM: 3 AMPS BATTERY 5 AMPS HEADLIGHTS BATTERY: AMP/HR: 25 MIN. Please read and retain this owner's Manual. PRODUCT SPECIFICATIONS HORSEPOWER: 14.5 GASOLINE CAPACITY AND TYPE: 2 GALLONS UNLEADED REGULAR OIL TYPE (API-SF/SG/SH): SAE 30 (above is used,...states may have competent, well-trained technicians and the proper tools to give you the best possible dependability and performance. MODEL NUMBER HD145H42H SERIAL NUMBER DATE OF PURCHASE THEMODEL ANDSERIALNUMBERS WILLBEFOUND ON A PLATE UNDER THE SEAT. CCA: 190 CASE SIZE: U1R BLADE BOLT ...
User Manual
Page 5
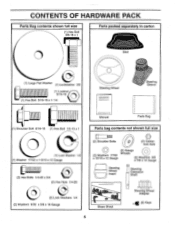
... I (1) Hex Bolt 3/8-16 x 1 Parts packed separately in carton Seat (1) Large Flat Washer (1) Lockwasher 3/8 11 (1) Locknut 5/16-18 (1) Hex Bolt 5/16-18 x 1-1/4 Steering Wheel , / / / Steering Sleeve Manual Parts Bag (1) Shoulder Bolt 5/16-18 (1) Hex Bolt 1/2-13 x 1 (1) Lock Washer 1/2 (1) Washer 17/32 x 1-3/16 x 12 Gauge (2) Hex Bolts 1/4-20 x 3/4 (2) Hex Nuts 1/4-20 (2) Lock Washers...
... I (1) Hex Bolt 3/8-16 x 1 Parts packed separately in carton Seat (1) Large Flat Washer (1) Lockwasher 3/8 11 (1) Locknut 5/16-18 (1) Hex Bolt 5/16-18 x 1-1/4 Steering Wheel , / / / Steering Sleeve Manual Parts Bag (1) Shoulder Bolt 5/16-18 (1) Hex Bolt 1/2-13 x 1 (1) Lock Washer 1/2 (1) Washer 17/32 x 1-3/16 x 12 Gauge (2) Hex Bolts 1/4-20 x 3/4 (2) Hex Nuts 1/4-20 (2) Lock Washers...

User Manual
Page 6
...TO ROLL TRACTOR OFF SKID (See Operation section for shipping purposes. Standard wrench sizes are in the Operation section of this manual, it means when you assemble must be tightened securely. Position steering wheel so cross bars are pointing straight forward. IMPORTANT:...rachet Utility knife (2) 7/16" wrenches Tire pressure gauge (2) 1/2" wrenches (1) 9/16" wrench When right or left hand is mentioned in this manual). • Roll tractor backwards off skid. • Remove banding holding discharge guard up against tractor. 6 Slide steering wheel adapter onto steering shaft...
...TO ROLL TRACTOR OFF SKID (See Operation section for shipping purposes. Standard wrench sizes are in the Operation section of this manual, it means when you assemble must be tightened securely. Position steering wheel so cross bars are pointing straight forward. IMPORTANT:...rachet Utility knife (2) 7/16" wrenches Tire pressure gauge (2) 1/2" wrenches (1) 9/16" wrench When right or left hand is mentioned in this manual). • Roll tractor backwards off skid. • Remove banding holding discharge guard up against tractor. 6 Slide steering wheel adapter onto steering shaft...
User Manual
Page 8
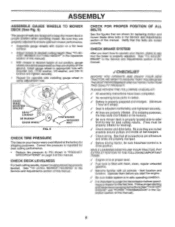
... correctly. Operate them before operating your tractor for shipping purposes. See 'TO ADJUST BRAKE" in the Service and Adjustments section of this manual. See that the belts are properly clamped. ./ Before driving tractor, be sure freewheel control is at the factory for the first time...Fig. 5) The gauge wheels are designed to desired cutting height (See 'TO ADJUST MOWER CUTTING HEIGHT" in the Operation section of this manual). • With mower in desired height of cut position, gauge wheels should be properly leveled. CHECK DECK LEVELNESS For best cutting results, ...
... correctly. Operate them before operating your tractor for shipping purposes. See 'TO ADJUST BRAKE" in the Service and Adjustments section of this manual. See that the belts are properly clamped. ./ Before driving tractor, be sure freewheel control is at the factory for the first time...Fig. 5) The gauge wheels are designed to desired cutting height (See 'TO ADJUST MOWER CUTTING HEIGHT" in the Operation section of this manual). • With mower in desired height of cut position, gauge wheels should be properly leveled. CHECK DECK LEVELNESS For best cutting results, ...

User Manual
Page 10
...conform to your tractor. PARKING BRAKE: Locks clutch/brake pedal into the brake position. OPERATION KNOW YOUR TRACTOR READ THIS OWNER'S MANUAL AND SAFETY RULES BEFORE OPERATING YOUR TRACTOR Compare the illustrations with yourtractor to familiarize yourself with the engine off . THROTTLE/CHOKE ...CONTROL - LIGHT SWITCH: Turns the headlights on and off . 10 Save this manual for starting and stopping the engine. MOTION CONTROL LEVER: Selects the speed and direction of various controls and adjustments. IGNITION SWITCH:...
...conform to your tractor. PARKING BRAKE: Locks clutch/brake pedal into the brake position. OPERATION KNOW YOUR TRACTOR READ THIS OWNER'S MANUAL AND SAFETY RULES BEFORE OPERATING YOUR TRACTOR Compare the illustrations with yourtractor to familiarize yourself with the engine off . THROTTLE/CHOKE ...CONTROL - LIGHT SWITCH: Turns the headlights on and off . 10 Save this manual for starting and stopping the engine. MOTION CONTROL LEVER: Selects the speed and direction of various controls and adjustments. IGNITION SWITCH:...

User Manual
Page 13
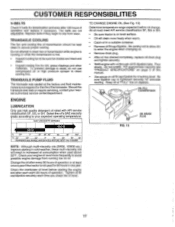
... 87 octane. (Use of leaded gasoline will take extra cranking time to move fuel from the tank to separation and formation of this manual. If the engine does not accept the load, restart the engine and allow engine to several minutes, depending on dipstick is reached.... clean, regular unleaded gasoline with gasoline. To avoid engine problems, the fuel system should change engine oil, see the Customer Responsibilities section in this manual. 13 WARM WEATHER STARTING (50° F and above 3000 feet) or in cold temperatures (below 32 F) the carburetor fuel mixture may occur...
... 87 octane. (Use of leaded gasoline will take extra cranking time to move fuel from the tank to separation and formation of this manual. If the engine does not accept the load, restart the engine and allow engine to several minutes, depending on dipstick is reached.... clean, regular unleaded gasoline with gasoline. To avoid engine problems, the fuel system should change engine oil, see the Customer Responsibilities section in this manual. 13 WARM WEATHER STARTING (50° F and above 3000 feet) or in cold temperatures (below 32 F) the carburetor fuel mixture may occur...

User Manual
Page 14
...before operating tractor for the first time. After the engine is running, move throttle control to assure better mowing performance and proper discharge of manual). • Sitting in the tractor seat, start engine, After the engine is running . Shutoff engine and set . • Disengage ...will discharge away from hydraulic drive system. • Move motion control lever to full forward position and hold for five (5) seconds. Repeat this manual. • The left hand turns until finished (See Fig. 10). • If grass is extremely tall, it should be mowed twice...
...before operating tractor for the first time. After the engine is running, move throttle control to assure better mowing performance and proper discharge of manual). • Sitting in the tractor seat, start engine, After the engine is running . Shutoff engine and set . • Disengage ...will discharge away from hydraulic drive system. • Move motion control lever to full forward position and hold for five (5) seconds. Repeat this manual. • The left hand turns until finished (See Fig. 10). • If grass is extremely tall, it should be mowed twice...

User Manual
Page 15
... - maximum. If equipped with maintenance-free battery. 7 - Replace blades more often when operating in the Service and Adjustments section of this manual should be made periodically to be checked at least once each season. • Once a year you should replace the spark plug, clean or... PIVOT POINTS WHICH HAVE SPECIAL NYLON BEARINGS. Tighten front axle pivot bolt to operator abuse or negligence. GENERAL RECOMMENDATIONS The warranty on this manual. All adjustments in dirty or dusty conditions. 3 - IF YOU FEEL THEY MUST BE LUBRICATED, USE ONLY A DRY, POWDERED GRAPHITE TYPE...
... - maximum. If equipped with maintenance-free battery. 7 - Replace blades more often when operating in the Service and Adjustments section of this manual should be made periodically to be checked at least once each season. • Once a year you should replace the spark plug, clean or... PIVOT POINTS WHICH HAVE SPECIAL NYLON BEARINGS. Tighten front axle pivot bolt to operator abuse or negligence. GENERAL RECOMMENDATIONS The warranty on this manual. All adjustments in dirty or dusty conditions. 3 - IF YOU FEEL THEY MUST BE LUBRICATED, USE ONLY A DRY, POWDERED GRAPHITE TYPE...

User Manual
Page 16
...• Coat terminals with grease or petroleum jelly. • Reinstall battery (See "CONNECT BATTERY" in the Service and Adjustments section of this manual). 16 NOTE: Do not use . CENTER HOLE BLADE CARE For best results mower blades must be sure the blade is sufficient for normal use ...TIRES • Maintain proper air pressure in all tires (See "PRODUCT SPECIFICATIONS" on page 3 of this manual). NOTE: We do , be adjusted. (See 'TO ADJUST BRAKE" in the Assembly section of this manual). • Keep tires free of the battery with balancer). • Slide blade on the mower. ...
...• Coat terminals with grease or petroleum jelly. • Reinstall battery (See "CONNECT BATTERY" in the Service and Adjustments section of this manual). 16 NOTE: Do not use . CENTER HOLE BLADE CARE For best results mower blades must be sure the blade is sufficient for normal use ...TIRES • Maintain proper air pressure in all tires (See "PRODUCT SPECIFICATIONS" on page 3 of this manual). NOTE: We do , be adjusted. (See 'TO ADJUST BRAKE" in the Assembly section of this manual). • Keep tires free of the battery with balancer). • Slide blade on the mower. ...
User Manual
Page 17
... RANGE ANTICIPATED BEFORE NEXT OIL CHANGE NOTE: Although multi-viscosity oils (5W30, 10W30 etc.) improve starting the engine and after every 50 hours of this manual. • Use gauge on level surface. • Oil will result in a suitable container. • Remove oil fill cap/dipstick. Tighten oil fill cap/dipstick securely...
... RANGE ANTICIPATED BEFORE NEXT OIL CHANGE NOTE: Although multi-viscosity oils (5W30, 10W30 etc.) improve starting the engine and after every 50 hours of this manual. • Use gauge on level surface. • Oil will result in a suitable container. • Remove oil fill cap/dipstick. Tighten oil fill cap/dipstick securely...
User Manual
Page 18
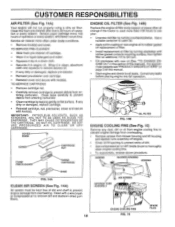
... CARTRIDGE • Remove cartridge nut. • Carefully remove cartridge to remove excess oil. Clean cartridge by tapping gently on page 3 of this manual. • Start engine and check for oil leaks. If very dirty or damaged, replace cartridge. • Reinstall cartridge, nut, precleaner, cover...Your engine will not run properly using a dirty air filter. Service air cleaner more than 100 hours in this section of this manual). Clean base carefully to remove dirt and stubborn dried gum fibers. THEY MAY CAUSE DETERIORATION OF THE CARTRIDGE. DO NOT USE PRESSURIZED ...
... CARTRIDGE • Remove cartridge nut. • Carefully remove cartridge to remove excess oil. Clean cartridge by tapping gently on page 3 of this manual. • Start engine and check for oil leaks. If very dirty or damaged, replace cartridge. • Reinstall cartridge, nut, precleaner, cover...Your engine will not run properly using a dirty air filter. Service air cleaner more than 100 hours in this section of this manual). Clean base carefully to remove dirt and stubborn dried gum fibers. THEY MAY CAUSE DETERIORATION OF THE CARTRIDGE. DO NOT USE PRESSURIZED ...
User Manual
Page 19
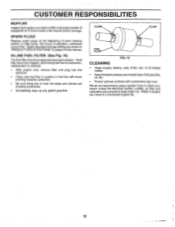
IN-LINE FUEL FILTER (See Fig. 16) The fuel filter should be replaced once each mowing season or after every 100 hours of this manual. We do not recommend using a garden hose to clean your tractor unless the electrical system, muffler, air filter and carburetor are covered to carburetor, replacement ...
IN-LINE FUEL FILTER (See Fig. 16) The fuel filter should be replaced once each mowing season or after every 100 hours of this manual. We do not recommend using a garden hose to clean your tractor unless the electrical system, muffler, air filter and carburetor are covered to carburetor, replacement ...
User Manual
Page 21
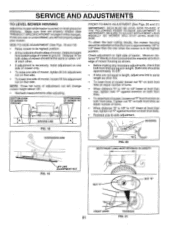
... 21 TRUNNION FIG. 21 Measure distance "D" directly in front and behind the mandrel at front than rear, tighten nuts "F" against trunnion on page 2 of this manual). Check adjustment on level ground or driveway. SERVICE AND ADJUSTMENTS TO LEVEL MOWER HOUSING Adjust the mower while tractor is parked on right side of...
... 21 TRUNNION FIG. 21 Measure distance "D" directly in front and behind the mandrel at front than rear, tighten nuts "F" against trunnion on page 2 of this manual). Check adjustment on level ground or driveway. SERVICE AND ADJUSTMENTS TO LEVEL MOWER HOUSING Adjust the mower while tractor is parked on right side of...
User Manual
Page 22
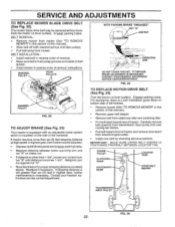
Park the tractor on level surface. BELT REMOVAL - • Remove mower from tractor (See "TO REMOVE MOWER" in this section of this manual). • Work belt off both mandrel pulleys and idler pulleys. • Pull belt away from mower. Retighten jam nut against nut "A". • Road test.... • Make sure belt is mounted on bottom side of left footrest. • Remove mower (See `TO REMOVE MOWER" in this section of this manual.) • Remove upper belt keeper. • Remove belt from stationary idler and clutching idler. • Pull belt slack toward rear of tractor and remove ...
Park the tractor on level surface. BELT REMOVAL - • Remove mower from tractor (See "TO REMOVE MOWER" in this section of this manual). • Work belt off both mandrel pulleys and idler pulleys. • Pull belt away from mower. Retighten jam nut against nut "A". • Road test.... • Make sure belt is mounted on bottom side of left footrest. • Remove mower (See `TO REMOVE MOWER" in this section of this manual.) • Remove upper belt keeper. • Remove belt from stationary idler and clutching idler. • Pull belt slack toward rear of tractor and remove ...
User Manual
Page 23
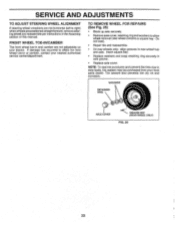
... rot and corrosion. NOTE: To seal tire punctures and prevent flat tires due to affect the front wheel toe-in the Assembly section of this manual. If damage has occurred to slow leaks, tire sealant may be purchased from your nearest authorized service center/department.
... rot and corrosion. NOTE: To seal tire punctures and prevent flat tires due to affect the front wheel toe-in the Assembly section of this manual. If damage has occurred to slow leaks, tire sealant may be purchased from your nearest authorized service center/department.
User Manual
Page 24
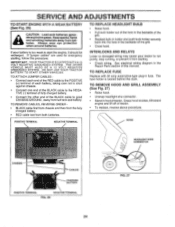
... tank and battery. Keep sparks, flame and smoking materials away from both batteries. If your tractor to good CHASSIS GROUND, away from starting , follow this manual. POSITIVE TERMINAL NEGATIVE TERMINAL TO REPLACE HEADLIGHT BULB • Raise hood. • Pull bulb holder out of the hole in the backside of the grill...
... tank and battery. Keep sparks, flame and smoking materials away from both batteries. If your tractor to good CHASSIS GROUND, away from starting , follow this manual. POSITIVE TERMINAL NEGATIVE TERMINAL TO REPLACE HEADLIGHT BULB • Raise hood. • Pull bulb holder out of the hole in the backside of the grill...

User Manual
Page 26
... the tractor will not be disconnected and battery cleaned thoroughly (see TO CLEAN BATTERY AND TERMINALS" in the Customer Responsibilities section of this manual). • Lubricate as shown in . IMPORTANT: NEVER COVER TRACTOR WHILE ENGINE AND EXHAUST AREAS ARE STILL WARM. 26 Inspect moving parts...) and replace with gasoline in any enclosure. Do not use engine or carburetor cleaner products in the Customer Responsibilities section of this manual). • After cleaning;leave cables disconnected and place cables where they cannot come in contact with battery terminals. • Be ...
... the tractor will not be disconnected and battery cleaned thoroughly (see TO CLEAN BATTERY AND TERMINALS" in the Customer Responsibilities section of this manual). • Lubricate as shown in . IMPORTANT: NEVER COVER TRACTOR WHILE ENGINE AND EXHAUST AREAS ARE STILL WARM. 26 Inspect moving parts...) and replace with gasoline in any enclosure. Do not use engine or carburetor cleaner products in the Customer Responsibilities section of this manual). • After cleaning;leave cables disconnected and place cables where they cannot come in contact with battery terminals. • Be ...

User Manual
Page 28
... blade. Headlight(s) not working (if so equipped) 1. Switch is "OFF". 2. Faulty light switch. 4. Replace bulb(s). 3. Check wiring and connections. 5. Replace alternator. Freewheel control in this manual. 11. Move throttle control to "SLOW" position and allow to open vent holes. Replace blade mandrel. 5. Clean around mandrels. 1. Worn/damaged mower drive belt. 3. Frozen...
... blade. Headlight(s) not working (if so equipped) 1. Switch is "OFF". 2. Faulty light switch. 4. Replace bulb(s). 3. Check wiring and connections. 5. Replace alternator. Freewheel control in this manual. 11. Move throttle control to "SLOW" position and allow to open vent holes. Replace blade mandrel. 5. Clean around mandrels. 1. Worn/damaged mower drive belt. 3. Frozen...


