

User Manual
Page 1
Failure to do so can result in U.S.A. Always Wear Eye Protection During Operation 421064 07.03.08 CL Printed in serious injury. IMPORTANT MANUAL Do Not Throw Away OWNER'S MANUAL MODEL NUMBER: PP10530ES SNOW THROWER WARNING: Read the Owner's Manual and follow all Warnings and Safety Instructions.
Failure to do so can result in U.S.A. Always Wear Eye Protection During Operation 421064 07.03.08 CL Printed in serious injury. IMPORTANT MANUAL Do Not Throw Away OWNER'S MANUAL MODEL NUMBER: PP10530ES SNOW THROWER WARNING: Read the Owner's Manual and follow all Warnings and Safety Instructions.

User Manual
Page 2
... a warning of amputating hands and feet and throwing objects. WARNING: Always disconnect spark plug wire and place it where it cannot contact plug in the manual(s) before filling. 4. Handle fuel with electric drive motors or electric starting when setting up spilled fuel. (h) If fuel is capable of trouble. from the machine...
... a warning of amputating hands and feet and throwing objects. WARNING: Always disconnect spark plug wire and place it where it cannot contact plug in the manual(s) before filling. 4. Handle fuel with electric drive motors or electric starting when setting up spilled fuel. (h) If fuel is capable of trouble. from the machine...
User Manual
Page 3
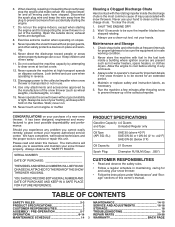
... Regular only Oil Type (API SG-SL): SAE 30 (above 40°F) SAE 5W-30 or 10W-30 (0° to service or repair this manual. TABLE OF CONTENTS SAFETY RULES 2-3 MAINTENANCE 14-15 PRODUCT SPECIFICATIONS 3 SERVICE AND ADJUSTMENTS 16-18 CUSTOMER RESPONSIBILITIES 3 STORAGE 18 ASSEMBLY / PRE-OPERATION ... thrower in the fuel tank inside the discharge chute is the most common cause of injury associated with fuel in or out of this owner's manual. Never use a clean-out tool, not your snow thrower. • Follow the instructions under "Maintenance" and "Storage" sections of the ...
... Regular only Oil Type (API SG-SL): SAE 30 (above 40°F) SAE 5W-30 or 10W-30 (0° to service or repair this manual. TABLE OF CONTENTS SAFETY RULES 2-3 MAINTENANCE 14-15 PRODUCT SPECIFICATIONS 3 SERVICE AND ADJUSTMENTS 16-18 CUSTOMER RESPONSIBILITIES 3 STORAGE 18 ASSEMBLY / PRE-OPERATION ... thrower in the fuel tank inside the discharge chute is the most common cause of injury associated with fuel in or out of this owner's manual. Never use a clean-out tool, not your snow thrower. • Follow the instructions under "Maintenance" and "Storage" sections of the ...

User Manual
Page 5
... 5 Remove snow thrower from carton. 2. Additional carriage bolts, washers and handle knobs are in bag of the belt cover. Reading the entire manual will familiarize you with the unit, which will assist you attempt to lower handle. 5. Use the correct tools as nuts, washers, bolts, etc...-wrench may be tightened securely. Remove plastic tie securing rod to lower handle. ASSEMBLY / PRE-OPERATION Read these instructions and this manual in its entirety before you in assembly, operation and maintenance of the product. Remove all parts and hardware you assemble must be ...
... 5 Remove snow thrower from carton. 2. Additional carriage bolts, washers and handle knobs are in bag of the belt cover. Reading the entire manual will familiarize you with the unit, which will assist you attempt to lower handle. 5. Use the correct tools as nuts, washers, bolts, etc...-wrench may be tightened securely. Remove plastic tie securing rod to lower handle. ASSEMBLY / PRE-OPERATION Read these instructions and this manual in its entirety before you in assembly, operation and maintenance of the product. Remove all parts and hardware you assemble must be ...

User Manual
Page 8
... REVERSE READ AND FOLLOW ALL SAFETY INFORMATION AND INSTRUCTIONS BEFORE USE OF THIS PRODUCT. INSERT TO START AND RUN, PULL OUT TO STOP. Save this manual for future reference. Learn and understand their meaning. IGNITION KEY. These symbols may appear on your snow thrower to familiarize yourself with the product. OPERATION...
... REVERSE READ AND FOLLOW ALL SAFETY INFORMATION AND INSTRUCTIONS BEFORE USE OF THIS PRODUCT. INSERT TO START AND RUN, PULL OUT TO STOP. Save this manual for future reference. Learn and understand their meaning. IGNITION KEY. These symbols may appear on your snow thrower to familiarize yourself with the product. OPERATION...

User Manual
Page 12
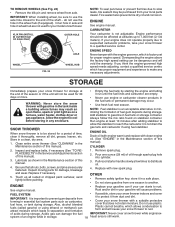
... to the edge of 30 days or longer. ACTUAL LOCATION MAY VARY WITH ENGINE ON YOUR UNIT. Adjust skid plates evenly to bottom of this manual. NOTE: It is reached. Objects such as a paved driveway or sidewalk, place skid plates in the Maintenance section of tank filler neck. Shut off any...
... to the edge of 30 days or longer. ACTUAL LOCATION MAY VARY WITH ENGINE ON YOUR UNIT. Adjust skid plates evenly to bottom of this manual. NOTE: It is reached. Objects such as a paved driveway or sidewalk, place skid plates in the Maintenance section of tank filler neck. Shut off any...

User Manual
Page 13
... to help air flow and extend engine life. • After snow-throwing is ready for next use and wipe dry so it clicks. At this manual. • For extremely heavy snow, reduce the width of snow removal by overlapping previous path and moving slowly. • Keep engine clean and clear of...
... to help air flow and extend engine life. • After snow-throwing is ready for next use and wipe dry so it clicks. At this manual. • For extremely heavy snow, reduce the width of snow removal by overlapping previous path and moving slowly. • Keep engine clean and clear of...
User Manual
Page 14
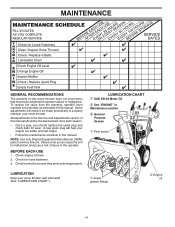
...level. 2. Check for wear. To receive full value from the warranty, operator must maintain snow thrower as instructed in this manual. All adjustments in Maintenance section General Purpose Grease Pivot points LUBRICATION Keep your snow thrower well lubricated (See "LUBRICATION CHART"). ...Some adjustments will help your engine run better and last longer. • Follow the maintenance schedule in this manual should be checked at least once each season. • Once a year, you should replace the spark plug and check belts for loose ...
...level. 2. Check for wear. To receive full value from the warranty, operator must maintain snow thrower as instructed in this manual. All adjustments in Maintenance section General Purpose Grease Pivot points LUBRICATION Keep your snow thrower well lubricated (See "LUBRICATION CHART"). ...Some adjustments will help your engine run better and last longer. • Follow the maintenance schedule in this manual should be checked at least once each season. • Once a year, you should replace the spark plug and check belts for loose ...

User Manual
Page 15
...drain plug and drain oil in the Service and Adjustments section of the above • 32°F. CAUTION: Any lubricating of this manual). SPARK PLUG Replace spark plug at the factory. MAINTENANCE SNOW THROWER Always observe safety rules when performing maintenance. NOTE: To seal tire ... on dipstick. 10. NOTE: Although multi-viscosity oils (5W30, 10W30 etc.) improve starting the engine and after every 25 hours of this manual). Tighten oil fill cap / dipstick securely each five (5) hours of any oil trapped inside the snow thrower. DO NOT lubricate the drive ...
...drain plug and drain oil in the Service and Adjustments section of the above • 32°F. CAUTION: Any lubricating of this manual). SPARK PLUG Replace spark plug at the factory. MAINTENANCE SNOW THROWER Always observe safety rules when performing maintenance. NOTE: To seal tire ... on dipstick. 10. NOTE: Although multi-viscosity oils (5W30, 10W30 etc.) improve starting the engine and after every 25 hours of this manual). Tighten oil fill cap / dipstick securely each five (5) hours of any oil trapped inside the snow thrower. DO NOT lubricate the drive ...

User Manual
Page 16
...3. CAUTION: Do not substitute. BELT COVER CAUTION: Do not substitute. Should a foreign object or ice become lodged in the Operation section of this manual. If impeller does not turn when auger control lever is provided to stop . 2. Place wire where it cannot come in impeller hub with your ...snow thrower. 4. If one or both of this manual. Be sure throttle is discharged, see if one or both augers do not turn when auger control lever is secured to any service or adjustments...
...3. CAUTION: Do not substitute. BELT COVER CAUTION: Do not substitute. Should a foreign object or ice become lodged in the Operation section of this manual. If impeller does not turn when auger control lever is provided to stop . 2. Place wire where it cannot come in impeller hub with your ...snow thrower. 4. If one or both of this manual. Be sure throttle is discharged, see if one or both augers do not turn when auger control lever is secured to any service or adjustments...

User Manual
Page 17
... crankshaft. 5. Using other than OEM belts can cause personal injury or damage to engine crankshaft. While your snow thrower are of this manual. 4. INSTALL DISCHARGE CHUTE - See "INSTALL DISCHARGE CHUTE / CHUTE ROTATER HEAD" in the operating position and hold the snow thrower handles... drive ratchet (in the "ON" position) into a suitable container, outdoors, away from your assistant standing in this section of this manual. Place auger belt around pulleys. 17 BELT KEEPER TRACTION DRIVE BELT ENGINE PULLEY FLAT WASHER LOCKWASHER IDLER ARM SQUARE HOLE BOLT AUGER BELT ...
... crankshaft. 5. Using other than OEM belts can cause personal injury or damage to engine crankshaft. While your snow thrower are of this manual. 4. INSTALL DISCHARGE CHUTE - See "INSTALL DISCHARGE CHUTE / CHUTE ROTATER HEAD" in the operating position and hold the snow thrower handles... drive ratchet (in the "ON" position) into a suitable container, outdoors, away from your assistant standing in this section of this manual. Place auger belt around pulleys. 17 BELT KEEPER TRACTION DRIVE BELT ENGINE PULLEY FLAT WASHER LOCKWASHER IDLER ARM SQUARE HOLE BOLT AUGER BELT ...
User Manual
Page 18
...nuts, bolts, screws, and pins are securely fastened. Allow the engine to 7,000 feet (2,134 meters). Run engine at the end of this manual). 3. Do not drain the gas tank and carburetor if using ethanol or methanol) can attract moisture which is to slow leaks, tire sealant ...season. CYLINDER 2. Replace if necessary. 5. Touch up to cool before painting. 1. store it thoroughly, remove all rusted or chipped paint surfaces; of this manual. 4. TO REMOVE WHEELS (See Fig. 24) • Remove the klik pin and remove wheel from dust and dirt. KLIK PIN (INSTALL IN OUTER HOLE...
...nuts, bolts, screws, and pins are securely fastened. Allow the engine to 7,000 feet (2,134 meters). Run engine at the end of this manual). 3. Do not drain the gas tank and carburetor if using ethanol or methanol) can attract moisture which is to slow leaks, tire sealant ...season. CYLINDER 2. Replace if necessary. 5. Touch up to cool before painting. 1. store it thoroughly, remove all rusted or chipped paint surfaces; of this manual. 4. TO REMOVE WHEELS (See Fig. 24) • Remove the klik pin and remove wheel from dust and dirt. KLIK PIN (INSTALL IN OUTER HOLE...
User Manual
Page 19
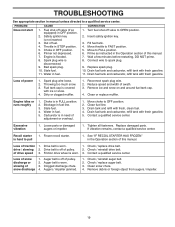
... 4. Safety ignition key is flooded. 8. Bad spark plug. 10. Water in fuel line. 3. Prime as instructed in the Operation section of this manual. Spark plug wire loose. 2. Choke is worn. 3. Water in OFF position. 6. Drain fuel tank and carburetor, refill tank with fresh, clean fuel... wheel is in FULL position. 2. Check / replace auger belt. 3. TROUBLESHOOTING See appropriate section in manual unless directed to FULL position. 6. Primer not depressed. 7. Turn fuel shut-off of this manual. 7. Loss of traction 1. Throwing too much snow. 3. Remove ice and snow on and around ...
... 4. Safety ignition key is flooded. 8. Bad spark plug. 10. Water in fuel line. 3. Prime as instructed in the Operation section of this manual. Spark plug wire loose. 2. Choke is worn. 3. Water in OFF position. 6. Drain fuel tank and carburetor, refill tank with fresh, clean fuel... wheel is in FULL position. 2. Check / replace auger belt. 3. TROUBLESHOOTING See appropriate section in manual unless directed to FULL position. 6. Primer not depressed. 7. Turn fuel shut-off of this manual. 7. Loss of traction 1. Throwing too much snow. 3. Remove ice and snow on and around ...

User Manual
Page 38
... 12 415398 - - 421064 - - 421065 DESCRIPTION DECAL, DANGER DECAL, POULAN, 11 HP / 30" DECAL, DANGER, DEFLECTOR DECAL, DANGER DECAL, POULAN DECAL, INSTRUCTION DECAL, SPEED CONTROL DECAL, REMOTE DEFLECTOR CONTROL DECAL, LH TRIGGER DECAL, RH TRIGGER OWNER'S MANUAL, ENGLISH OWNER'S MANUAL, FRENCH NOTE: All component dimensions given in U.S. MODEL PP10530ES (96192001802) 1 2 4 9 12 6 1 3 5 10 11 KEY PART NO...
... 12 415398 - - 421064 - - 421065 DESCRIPTION DECAL, DANGER DECAL, POULAN, 11 HP / 30" DECAL, DANGER, DEFLECTOR DECAL, DANGER DECAL, POULAN DECAL, INSTRUCTION DECAL, SPEED CONTROL DECAL, REMOTE DEFLECTOR CONTROL DECAL, LH TRIGGER DECAL, RH TRIGGER OWNER'S MANUAL, ENGLISH OWNER'S MANUAL, FRENCH NOTE: All component dimensions given in U.S. MODEL PP10530ES (96192001802) 1 2 4 9 12 6 1 3 5 10 11 KEY PART NO...


