
User Manual
Page 2
... operating position, before starting motors. 6. Disengage all times. (a) Use an approved fuel container. 2. Do not use on sidewalks, driveways and other engine parts become extremely hot during operation or while performing an adjustment or repair to point out important safety precautions. Exercise extreme caution when operating on slippery surfaces. 4. After striking a foreign object, stop the engine (motor), remove the wire from the spark plug, disconnect the cord on electric motors, thoroughly inspect the snow...
... operating position, before starting motors. 6. Disengage all times. (a) Use an approved fuel container. 2. Do not use on sidewalks, driveways and other engine parts become extremely hot during operation or while performing an adjustment or repair to point out important safety precautions. Exercise extreme caution when operating on slippery surfaces. 4. After striking a foreign object, stop the engine (motor), remove the wire from the spark plug, disconnect the cord on electric motors, thoroughly inspect the snow...
User Manual
Page 3
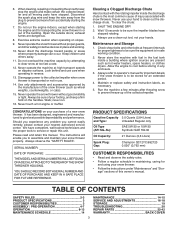
... and retain this manual. Never use a clean-out tool, not your nearest authorized service center. never run the engine indoors, except when starting the engine. 7. CONGRATULATIONS on the handles. TABLE OF CONTENTS SAFETY RULES 2-3 PRODUCT SPECIFICATIONS 3 CUSTOMER RESPONSIBILITIES 3 ASSEMBLY / PRE-OPERATION 4-7 OPERATION 8-13 MAINTENANCE SCHEDULE 14 MAINTENANCE 14-15 SERVICE AND ADJUSTMENTS 16-18 STORAGE 19 TROUBLESHOOTING 20 REPAIR PARTS 22-42 WARRANTY BACK COVER 3 When cleaning, repairing or inspecting the snow thrower, stop the engine and make...
... and retain this manual. Never use a clean-out tool, not your nearest authorized service center. never run the engine indoors, except when starting the engine. 7. CONGRATULATIONS on the handles. TABLE OF CONTENTS SAFETY RULES 2-3 PRODUCT SPECIFICATIONS 3 CUSTOMER RESPONSIBILITIES 3 ASSEMBLY / PRE-OPERATION 4-7 OPERATION 8-13 MAINTENANCE SCHEDULE 14 MAINTENANCE 14-15 SERVICE AND ADJUSTMENTS 16-18 STORAGE 19 TROUBLESHOOTING 20 REPAIR PARTS 22-42 WARRANTY BACK COVER 3 When cleaning, repairing or inspecting the snow thrower, stop the engine and make...

User Manual
Page 4
... in assembly, operation and maintenance of the product. Cut down all packing materials except plastic tie holding speed control rod to lower handle. 5. Remove snow thrower from carton. 4 nuts and multi-wrench provided in parts bag in the parts bag. PARTS PACKED SEPARATELY IN CARTON (1) MULTIWRENCH (180684) (1) POWER CORD (198563) SAFTEY IGNITION KEY(S) (193071) (1) AUGER CONTROL ROD (1) DISCHARGE CHUTE EXTRA SHEAR BOLTS AND NUTS (2) SHOULDER BOLT 1/4-20 x 1-3/4 (192090) (2) LOCKNUTS 1/4-20 (73800400) ROTATOR HEAD MOUNTING (3) RETAINER SPRINGS...
... in assembly, operation and maintenance of the product. Cut down all packing materials except plastic tie holding speed control rod to lower handle. 5. Remove snow thrower from carton. 4 nuts and multi-wrench provided in parts bag in the parts bag. PARTS PACKED SEPARATELY IN CARTON (1) MULTIWRENCH (180684) (1) POWER CORD (198563) SAFTEY IGNITION KEY(S) (193071) (1) AUGER CONTROL ROD (1) DISCHARGE CHUTE EXTRA SHEAR BOLTS AND NUTS (2) SHOULDER BOLT 1/4-20 x 1-3/4 (192090) (2) LOCKNUTS 1/4-20 (73800400) ROTATOR HEAD MOUNTING (3) RETAINER SPRINGS...

User Manual
Page 5
...spring. Additional carriage bolts, washers and handle knobs are in bag of the chute rotator head to snow thrower and making adjustments to the skid plates. Remove plastic tie securing rod to the operating position and tighten handle knobs securely. Secure with retainer spring. PLASTIC TIE TRACTION DRIVE CONTROL ROD VINYL SLEEVE HANDLE KNOB LOWER HANDLE FIG. 1 SPEED CONTROL ROD RETAINER SPRING SPEED CONTROL BRACKET SPEED CONTROL LEVER FIG. 2 5 FIG. 3 TRACTION DRIVE CONTROL LEVER RETAINER SPRING DRIVE CONTROL BRACKET FIG. 4 TRACTION DRIVE CONTROL ROD ASSEMBLY / PRE-OPERATION...
...spring. Additional carriage bolts, washers and handle knobs are in bag of the chute rotator head to snow thrower and making adjustments to the skid plates. Remove plastic tie securing rod to the operating position and tighten handle knobs securely. Secure with retainer spring. PLASTIC TIE TRACTION DRIVE CONTROL ROD VINYL SLEEVE HANDLE KNOB LOWER HANDLE FIG. 1 SPEED CONTROL ROD RETAINER SPRING SPEED CONTROL BRACKET SPEED CONTROL LEVER FIG. 2 5 FIG. 3 TRACTION DRIVE CONTROL LEVER RETAINER SPRING DRIVE CONTROL BRACKET FIG. 4 TRACTION DRIVE CONTROL ROD ASSEMBLY / PRE-OPERATION...

User Manual
Page 6
... discharge chute assembly on top of rod into control arm with holes in your parts bag may be used to align square and pin on pin and threaded stud of parts and retrieve the auger control rod from bag of mounting bracket. 4. Hook spring in hole in the vinyl sleeve. With chute rotater head and chute bracket aligned, position chute rotater head on underside of snow thrower. 2. ASSEMBLY / PRE-OPERATION INSTALL AUGER CONTROL ROD...
... discharge chute assembly on top of rod into control arm with holes in your parts bag may be used to align square and pin on pin and threaded stud of parts and retrieve the auger control rod from bag of mounting bracket. 4. Hook spring in hole in the vinyl sleeve. With chute rotater head and chute bracket aligned, position chute rotater head on underside of snow thrower. 2. ASSEMBLY / PRE-OPERATION INSTALL AUGER CONTROL ROD...

User Manual
Page 7
.... ASSEMBLY / PRE-OPERATION INSTALL CHUTE DEFLECTOR REMOTE CONTROL (See Figs. 8 and 9) 1. Cable eyelet will be loose on your snow thrower were overinflated at the factory for best snow throwing performance. • Reduce tire pressure to chute deflector with 5/16-18 carriage bolt and 5/16-18 locknut as shown. 1/4-20 SHOULDER BOLT 1/4-20 LOCKNUT SPRING CHUTE DEFLECTOR HOOK BETWEEN HEX NUTS ON CHUTE ROTATER HEAD 5/16-18 CARRIAGE BOLT CHECK TIRE PRESSURE...
.... ASSEMBLY / PRE-OPERATION INSTALL CHUTE DEFLECTOR REMOTE CONTROL (See Figs. 8 and 9) 1. Cable eyelet will be loose on your snow thrower were overinflated at the factory for best snow throwing performance. • Reduce tire pressure to chute deflector with 5/16-18 carriage bolt and 5/16-18 locknut as shown. 1/4-20 SHOULDER BOLT 1/4-20 LOCKNUT SPRING CHUTE DEFLECTOR HOOK BETWEEN HEX NUTS ON CHUTE ROTATER HEAD 5/16-18 CARRIAGE BOLT CHECK TIRE PRESSURE...

User Manual
Page 9
...CONTROL LEVER CONTROL LEVER (AUXILIARY) STARTER HANDLE CHUTE DEFLECTOR TRACTION DRIVE CONTROL LEVER LH TURN TRIGGER DISCHARGE CHUTE LIGHT CLEAN-OUT TOOL HANDLE KNOB MUFFLER TOOLBOX SKID PLATE AUGERS FIG. 10 MEETS A.N.S.I. used to store spare shear bolts, locknuts and wrench. Safety ignition key - used to select either FAST or SLOW engine speed and to select forward or reverse motion and speed of scraper bar from the carburetor to engage auger motion (throw snow). Throttle/engine control - used for starting the engine. ON / OFF switch - used to change...
...CONTROL LEVER CONTROL LEVER (AUXILIARY) STARTER HANDLE CHUTE DEFLECTOR TRACTION DRIVE CONTROL LEVER LH TURN TRIGGER DISCHARGE CHUTE LIGHT CLEAN-OUT TOOL HANDLE KNOB MUFFLER TOOLBOX SKID PLATE AUGERS FIG. 10 MEETS A.N.S.I. used to store spare shear bolts, locknuts and wrench. Safety ignition key - used to select either FAST or SLOW engine speed and to select forward or reverse motion and speed of scraper bar from the carburetor to engage auger motion (throw snow). Throttle/engine control - used for starting the engine. ON / OFF switch - used to change...

User Manual
Page 10
... the discharge chute. DISCHARGE CHUTE CONTROL LEVER OFF FIG. 11 FULL CHUTE DEFLECTOR REMOTE CONTROL LEVER FIG. 12 10 OPERATION The operation of any adjustments or repairs. Move ON / OFF switch to unclog the chute and/or auger. Use the choke control whenever you are starting a cold engine. Use the clean-out tool, NOT YOUR HANDS, to "OFF" position. 2. set the deflector higher to stop engine. HOW TO USE YOUR SNOW THROWER Know how to operate all moving parts to...
... the discharge chute. DISCHARGE CHUTE CONTROL LEVER OFF FIG. 11 FULL CHUTE DEFLECTOR REMOTE CONTROL LEVER FIG. 12 10 OPERATION The operation of any adjustments or repairs. Move ON / OFF switch to unclog the chute and/or auger. Use the choke control whenever you are starting a cold engine. Use the clean-out tool, NOT YOUR HANDS, to "OFF" position. 2. set the deflector higher to stop engine. HOW TO USE YOUR SNOW THROWER Know how to operate all moving parts to...

User Manual
Page 11
Be sure lever springs back and locks into the discharge chute to dislodge this blockage. DISCHARGE CHUTE CLEAN-OUT TOOL MOUNTING CLIP CAUTION: Do not move speed control lever when traction drive control lever is controlled by the traction drive control lever located on the speed control lever and move lever to desired position BEFORE engaging the traction drive control lever. This will lock the auger control lever in the engaged position. TRACTION DRIVE CONTROL LEVER DRIVE SPEED CONTROL LEVER FIG. 15 POWER STEERING OPERATION (See Fig. 16) Steering triggers are engaged...
Be sure lever springs back and locks into the discharge chute to dislodge this blockage. DISCHARGE CHUTE CLEAN-OUT TOOL MOUNTING CLIP CAUTION: Do not move speed control lever when traction drive control lever is controlled by the traction drive control lever located on the speed control lever and move lever to desired position BEFORE engaging the traction drive control lever. This will lock the auger control lever in the engaged position. TRACTION DRIVE CONTROL LEVER DRIVE SPEED CONTROL LEVER FIG. 15 POWER STEERING OPERATION (See Fig. 16) Steering triggers are engaged...

User Manual
Page 12
... gas tank, start the engine and let it may be used to assure fuel freshness. After considerable use gasoline near an open flame. When it can damage the fuel system of the auger housing and adjust the clearance between the scraper bar and the ground. BEFORE STARTING THE ENGINE CHECK ENGINE OIL LEVEL (See Fig. 18) The engine on dipstick is not recommended to operate the snow thrower over gravel surface, use engine or carburetor...
... gas tank, start the engine and let it may be used to assure fuel freshness. After considerable use gasoline near an open flame. When it can damage the fuel system of the auger housing and adjust the clearance between the scraper bar and the ground. BEFORE STARTING THE ENGINE CHECK ENGINE OIL LEVEL (See Fig. 18) The engine on dipstick is not recommended to operate the snow thrower over gravel surface, use engine or carburetor...

User Manual
Page 13
... the engine starts, release the recoil starter handle and slowly move the choke control to "FULL" position. 4. If you do flood the engine, wait a few minutes. receptacle. WARM START - At this manual. • For extremely heavy snow, reduce the width of snow removal by overlapping previous path and moving slowly. • Keep engine clean and clear of the snow thrower. 13 ELECTRIC STARTER 1. Connect the power cord to the safe operation of snow...
... the engine starts, release the recoil starter handle and slowly move the choke control to "FULL" position. 4. If you do flood the engine, wait a few minutes. receptacle. WARM START - At this manual. • For extremely heavy snow, reduce the width of snow removal by overlapping previous path and moving slowly. • Keep engine clean and clear of the snow thrower. 13 ELECTRIC STARTER 1. Connect the power cord to the safe operation of snow...
User Manual
Page 14
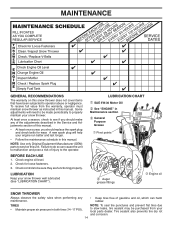
... and pose a risk of this unit. Check controls to operator abuse or negligence. TIRES • Maintain proper air pressure in this manual. A new spark plug will need to be purchased from the warranty, operator must maintain snow thrower as instructed in the Service and Adjustments section of injury to the operator. BEFORE EACH USE 1. To receive full value from your snow thrower. Check engine oil level. 2. LUBRICATION Keep your engine run better and last longer. • Follow...
... and pose a risk of this unit. Check controls to operator abuse or negligence. TIRES • Maintain proper air pressure in this manual. A new spark plug will need to be purchased from the warranty, operator must maintain snow thrower as instructed in the Service and Adjustments section of injury to the operator. BEFORE EACH USE 1. To receive full value from your snow thrower. Check engine oil level. 2. LUBRICATION Keep your engine run better and last longer. • Follow...
User Manual
Page 15
...; Catch oil in the Service and Adjustments section of each use. The belts are covered to keep snow thrower housing free of gasoline, oil, etc. • We do not recommend using a garden hose to the snow thrower. The belts on dipstick. 10. ENGINE See engine manual. NOTE: Although multi-viscosity oils (5W30, 10W30 etc.) improve starting the engine and after each time you check the oil level. Remove safety ignition key and disconnect spark plug wire from spark plug and place wire where...
...; Catch oil in the Service and Adjustments section of each use. The belts are covered to keep snow thrower housing free of gasoline, oil, etc. • We do not recommend using a garden hose to the snow thrower. The belts on dipstick. 10. ENGINE See engine manual. NOTE: Although multi-viscosity oils (5W30, 10W30 etc.) improve starting the engine and after each time you check the oil level. Remove safety ignition key and disconnect spark plug wire from spark plug and place wire where...
User Manual
Page 16
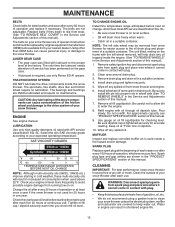
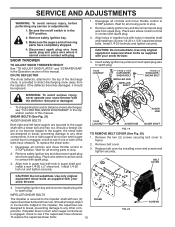
... turn when auger control lever is provided to the impeller shaft with holes in auger shaft and install a new 1/4-20 x 2" shear bolt. Place wire where it should be replaced. 1. Remove the two (2) screws securing belt cover to spark plug. Use only original equipment shear bolts as supplied with your snow thrower. 4. CAUTION: Do not substitute. Wait for all controls and move throttle control to STOP position. Replace belt cover by installing cover and screws and tighten securely. IMPELLER SHEAR BOLTS The impeller is engaged, check to STOP position...
... turn when auger control lever is provided to the impeller shaft with holes in auger shaft and install a new 1/4-20 x 2" shear bolt. Place wire where it should be replaced. 1. Remove the two (2) screws securing belt cover to spark plug. Use only original equipment shear bolts as supplied with your snow thrower. 4. CAUTION: Do not substitute. Wait for all controls and move throttle control to STOP position. Replace belt cover by installing cover and screws and tighten securely. IMPELLER SHEAR BOLTS The impeller is engaged, check to STOP position...

User Manual
Page 17
... this manual. 4. If auger belt has become dislodged from fire or flame. Belt must be fully seated in swing plate; See "INSTALL DISCHARGE CHUTE / CHUTE ROTATER HEAD" in idler arm and rotate ratchet clockwise to engine crankshaft. FRAME ASSEMBLY AUGER HOUSING HANDLES 1. REMOVE GASOLINE FROM FUEL TANK - Drain gasoline from fuel tank into the square hole in the Assembly / Pre-Operation section of belts. REMOVE BELT COVER - SEPARATE SNOW THROWER - RELIEVE TENSION ON TRACTION DRIVE BELT IDLER and remove traction drive belt...
... this manual. 4. If auger belt has become dislodged from fire or flame. Belt must be fully seated in swing plate; See "INSTALL DISCHARGE CHUTE / CHUTE ROTATER HEAD" in idler arm and rotate ratchet clockwise to engine crankshaft. FRAME ASSEMBLY AUGER HOUSING HANDLES 1. REMOVE GASOLINE FROM FUEL TANK - Drain gasoline from fuel tank into the square hole in the Assembly / Pre-Operation section of belts. REMOVE BELT COVER - SEPARATE SNOW THROWER - RELIEVE TENSION ON TRACTION DRIVE BELT IDLER and remove traction drive belt...
User Manual
Page 18
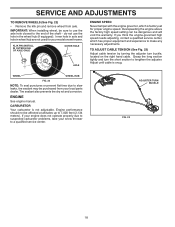
... the adjuster. KLIK PIN (INSTALL IN OUTER HOLE OF AXLE ONLY) OUTER HOLE AXLE ENGINE SPEED Never tamper with the engine governor, which has proper equipment and experience to 7,000 feet (2,134 meters). If you think the engine-governed high speed needs adjusting, contact a qualified service center, which is factory set for your model snow thrower. CARBURETOR Your carburetor is snug. ADJUSTER TURN BUCKLE FIG. 23 18 do not use the...
... the adjuster. KLIK PIN (INSTALL IN OUTER HOLE OF AXLE ONLY) OUTER HOLE AXLE ENGINE SPEED Never tamper with the engine governor, which has proper equipment and experience to 7,000 feet (2,134 meters). If you think the engine-governed high speed needs adjusting, contact a qualified service center, which is factory set for your model snow thrower. CARBURETOR Your carburetor is snug. ADJUSTER TURN BUCKLE FIG. 23 18 do not use the...

User Manual
Page 19
... engine warm) and replace with clean engine oil. (See "ENGINE" in the Maintenance section of this manual). 3. Do not empty the gas tank and carburetor if using ethanol or methanol) can starts to separation and formation of this manual). Pull recoil starter handle slowly a few times to prevent gum deposits from dust and dirt. • Cover your snow thrower for damage, breakage and wear. sand lightly before storing in any enclosure. Remove spark plug...
... engine warm) and replace with clean engine oil. (See "ENGINE" in the Maintenance section of this manual). 3. Do not empty the gas tank and carburetor if using ethanol or methanol) can starts to separation and formation of this manual). Pull recoil starter handle slowly a few times to prevent gum deposits from dust and dirt. • Cover your snow thrower for damage, breakage and wear. sand lightly before storing in any enclosure. Remove spark plug...
User Manual
Page 20
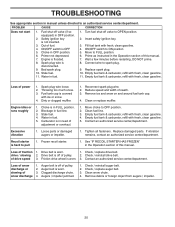
.... 4. Replace damaged parts. See "IF RECOIL STARTER HAS FROZEN" in the Operation section of this manual. 7. drive / slowing 2. Loss of snow discharge or slowing of power 1. Check / reinstall auger belt. 2. TROUBLESHOOTING See appropriate section in manual unless directed to ON position 5. Fuel shut-off valve to OPEN position. 2. Choke in fuel. 1. Water in OFF position. 6. Fill fuel tank with fresh, clean gasoline. 4. Prime as instructed in OFF position. 2. Replace spark plug. 10. Water in fuel line. 3. Auger belt is not inserted. 3. Clean snow chute...
.... 4. Replace damaged parts. See "IF RECOIL STARTER HAS FROZEN" in the Operation section of this manual. 7. drive / slowing 2. Loss of snow discharge or slowing of power 1. Check / reinstall auger belt. 2. TROUBLESHOOTING See appropriate section in manual unless directed to ON position 5. Fuel shut-off valve to OPEN position. 2. Choke in fuel. 1. Water in OFF position. 6. Fill fuel tank with fresh, clean gasoline. 4. Prime as instructed in OFF position. 2. Replace spark plug. 10. Water in fuel line. 3. Auger belt is not inserted. 3. Clean snow chute...
User Manual
Page 27
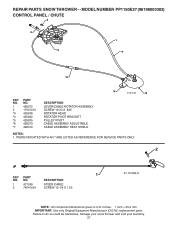
... FOR SERVICE PARTS ONLY. 2 1 KEY PART NO. NO. inches. 1 inch = 25.4 mm IMPORTANT: Use only Original Equipment Manufacturer (O.E.M.) replacement parts. Failure to do so could be hazardous, damage your snow thrower and void your warranty. 27 MODEL NUMBER PP1150E27 (96198003302) CONTROL PANEL / CHUTE 2 2 *3 1 *7 *6 *4 01.09.010-B *5 KEY NO. 1 2 *3 *4 *5 *6 *7 PART NO. 428272 17501010 420678 405932 420675 428273 428310 DESCRIPTION LEVER/CABLE ROTATOR ASSEMBLY SCREW 10-24 X .625 ROTATOR HEAD ROTATOR PIVOT BRACKET PULLEY PIVOT CABLE ASSEMBLY ADJUSTABLE CABLE ASSEMBLY...
... FOR SERVICE PARTS ONLY. 2 1 KEY PART NO. NO. inches. 1 inch = 25.4 mm IMPORTANT: Use only Original Equipment Manufacturer (O.E.M.) replacement parts. Failure to do so could be hazardous, damage your snow thrower and void your warranty. 27 MODEL NUMBER PP1150E27 (96198003302) CONTROL PANEL / CHUTE 2 2 *3 1 *7 *6 *4 01.09.010-B *5 KEY NO. 1 2 *3 *4 *5 *6 *7 PART NO. 428272 17501010 420678 405932 420675 428273 428310 DESCRIPTION LEVER/CABLE ROTATOR ASSEMBLY SCREW 10-24 X .625 ROTATOR HEAD ROTATOR PIVOT BRACKET PULLEY PIVOT CABLE ASSEMBLY ADJUSTABLE CABLE ASSEMBLY...

User Manual
Page 44
...assembly or installation, delivery damage, or to normal wear of the product. 5. In the event you have other rights which we will repair or replace, at our option, without charge for replacement under this Warranty are the responsibility of the purchaser. ID#, serial number...of two (2) years from this Warranty, you . This Warranty does not apply to any parts submitted for parts or labor incurred in replacing parts, any power equipment unit or attachment are belts, shear pins, normal wear, normal adjustments, standard hardware and normal maintenance. 6. This is limited to 90...
...assembly or installation, delivery damage, or to normal wear of the product. 5. In the event you have other rights which we will repair or replace, at our option, without charge for replacement under this Warranty are the responsibility of the purchaser. ID#, serial number...of two (2) years from this Warranty, you . This Warranty does not apply to any parts submitted for parts or labor incurred in replacing parts, any power equipment unit or attachment are belts, shear pins, normal wear, normal adjustments, standard hardware and normal maintenance. 6. This is limited to 90...


