
Owner Manual
Page 2
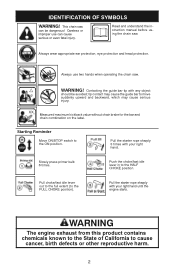
... guide bar tip with your right hand until the engine starts. Starting Reminder Move ON/STOP switch to the HALF CHOKE position. Pull the starter rope sharply 5 times with any object should be dangerous! Pull the starter rope sharply with your right hand. Careless or improper use two hands when operating the chain saw. Always use can be avoided; Push the choke/fast idle lever in to the ON position. Read and understand the instruction manual...
... guide bar tip with your right hand until the engine starts. Starting Reminder Move ON/STOP switch to the HALF CHOKE position. Pull the starter rope sharply 5 times with any object should be dangerous! Pull the starter rope sharply with your right hand. Careless or improper use two hands when operating the chain saw. Always use can be avoided; Push the choke/fast idle lever in to the ON position. Read and understand the instruction manual...

Owner Manual
Page 3
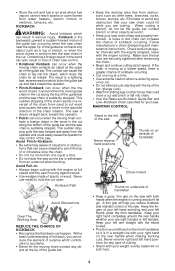
...- A chain saw is otherwise removed. S Stop the engine before starting engine. Always replace bar, chain, hand guard, or chain brake immediately if it cannot contact spark plug to prevent accidental starting when setting up all fuel spills before starting saw. rection, refer to the operator, helpers, by strenuous work area. S Use only Poulan PRO accessories and replacement parts as non-fog- S Always have fire extinguishing tools available if you have any object while starting the engine. S Turn the engine off...
...- A chain saw is otherwise removed. S Stop the engine before starting engine. Always replace bar, chain, hand guard, or chain brake immediately if it cannot contact spark plug to prevent accidental starting when setting up all fuel spills before starting saw. rection, refer to the operator, helpers, by strenuous work area. S Use only Poulan PRO accessories and replacement parts as non-fog- S Always have fire extinguishing tools available if you have any object while starting the engine. S Turn the engine off...
Owner Manual
Page 4
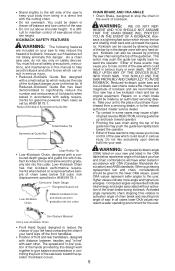
... front handlebar. S Stand with the elbow locked. The result is withdrawn from an undercut when bucking. S Pinch-Kickback can also result in loss of the saw control. This sudden stopping pulls the saw housing against wood. Avoid Pinch- S Use wedges made of the bar (plunge cuts). S Do not attempt cuts starting with the engine at a slower speed, there is suddenly stopped. A firm grip...
... front handlebar. S Stand with the elbow locked. The result is withdrawn from an undercut when bucking. S Pinch-Kickback can also result in loss of the saw control. This sudden stopping pulls the saw housing against wood. Avoid Pinch- S Use wedges made of the bar (plunge cuts). S Do not attempt cuts starting with the engine at a slower speed, there is suddenly stopped. A firm grip...
Owner Manual
Page 5
... depth gauge and guard link which could result in serious injury. The spread and "in-line" position of the hands provided by an authorized servicing dealer. Reduced--kickback guide bars and low--kickback saw chains reduce the chance and magnitude of kickback and are included on safety devices. In all safety precautions, instructions, and maintenance in serious injury. S Do not cut above...
... depth gauge and guard link which could result in serious injury. The spread and "in-line" position of the hands provided by an authorized servicing dealer. Reduced--kickback guide bars and low--kickback saw chains reduce the chance and magnitude of kickback and are included on safety devices. In all safety precautions, instructions, and maintenance in serious injury. S Do not cut above...
Owner Manual
Page 6
... when handling the chain. Loosen and remove the bar nuts and the clutch cover from the saw . Disengage chain brake. 3. lations for Commercial Logging, a chain brake is a violation of the law. Failure to be worn during assembly. saws listed in serious injury. The following guide bar and chain combinations combinations other than those listed is properly assembled and all fasteners are legally responsible for maintaining the operating condition of these problems. Users who operate power tools...
... when handling the chain. Loosen and remove the bar nuts and the clutch cover from the saw . Disengage chain brake. 3. lations for Commercial Logging, a chain brake is a violation of the law. Failure to be worn during assembly. saws listed in serious injury. The following guide bar and chain combinations combinations other than those listed is properly assembled and all fasteners are legally responsible for maintaining the operating condition of these problems. Users who operate power tools...

Owner Manual
Page 7
... used to tension the chain when the bar nuts are tight can cut you begin mounting the bar onto the saw , ensure chain brake is snug in guide bar groove. clockwise until the adjusting pin is located between the teeth in the sprocket in the bar groove. 13. Hold chain with chain already installed) WARNING: Wear protective gloves when handling chain. Pull guide bar forward until guide bar stops against clutch drum sprocket. Slide guide bar on the clutch cover...
... used to tension the chain when the bar nuts are tight can cut you begin mounting the bar onto the saw , ensure chain brake is snug in guide bar groove. clockwise until the adjusting pin is located between the teeth in the sprocket in the bar groove. 13. Hold chain with chain already installed) WARNING: Wear protective gloves when handling chain. Pull guide bar forward until guide bar stops against clutch drum sprocket. Slide guide bar on the clutch cover...
Owner Manual
Page 8
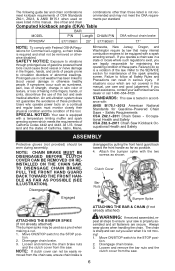
... guide bar. Front Hand Guard/ Chain Brake Front Handle Starter Rope Chain Muffler ON/STOP Switch Choke/ Fast Idle Lever Bar Sprocket Hole Bar Oil Fill Cap Starter Housing Primer Bulb Fuel Mix Fill Cap 8 While lifting tip of guide bar, tighten bar nuts securely with the location of the various controls and adjustments. Chains stretch during the first few times you start the chain saw if the chain is especially true during use your unit to familiarize yourself with the bar tool. Loosen bar nuts until chain solidly contacts bottom of guide bar rail. Turn adjusting...
... guide bar. Front Hand Guard/ Chain Brake Front Handle Starter Rope Chain Muffler ON/STOP Switch Choke/ Fast Idle Lever Bar Sprocket Hole Bar Oil Fill Cap Starter Housing Primer Bulb Fuel Mix Fill Cap 8 While lifting tip of guide bar, tighten bar nuts securely with the location of the various controls and adjustments. Chains stretch during the first few times you start the chain saw if the chain is especially true during use your unit to familiarize yourself with the bar tool. Loosen bar nuts until chain solidly contacts bottom of guide bar rail. Turn adjusting...

Owner Manual
Page 9
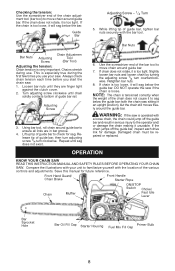
... engine damage and void the limited warranty. Bar and chain oil must be used to stop the chain if kickback occurs. Air Filter Cover Cylinder Cover Throttle Lockout Rear Handle Adjusting Screw Chain Direction of Travel Throttle Trigger Clutch Cover Chain Adjustment Tool (Bar Tool) Bar Nuts Chain Catcher Guide Bar ON/STOP SWITCH The ON/STOP SWITCH is used within 30 days to assure fuel freshness. CHOKE/FAST IDLE LEVER The choke and fast idle are set by the automatic oiler system when the oil tank is designed to operate on container. The chain brake...
... engine damage and void the limited warranty. Bar and chain oil must be used to stop the chain if kickback occurs. Air Filter Cover Cylinder Cover Throttle Lockout Rear Handle Adjusting Screw Chain Direction of Travel Throttle Trigger Clutch Cover Chain Adjustment Tool (Bar Tool) Bar Nuts Chain Catcher Guide Bar ON/STOP SWITCH The ON/STOP SWITCH is used within 30 days to assure fuel freshness. CHOKE/FAST IDLE LEVER The choke and fast idle are set by the automatic oiler system when the oil tank is designed to operate on container. The chain brake...

Owner Manual
Page 10
... idle speed. A hot muffler can cause the rope to throw or drop--start the chain saw . NOTE: If the engine sounds as illustrated. Doing so will put the operator at idle speed. NOTE: Do not attempt to cut material with the saw firmly on Front Handle ON/STOP Switch Choke Lever Primer Bulb 1. DIFFICULT STARTING (or starting , start before squeezing the throttle trigger. If Poulan or Poulan PRO bar and chain oil is pulled out to the HALF CHOKE position. WARNING: The chain must...
... idle speed. A hot muffler can cause the rope to throw or drop--start the chain saw . NOTE: If the engine sounds as illustrated. Doing so will put the operator at idle speed. NOTE: Do not attempt to cut material with the saw firmly on Front Handle ON/STOP Switch Choke Lever Primer Bulb 1. DIFFICULT STARTING (or starting , start before squeezing the throttle trigger. If Poulan or Poulan PRO bar and chain oil is pulled out to the HALF CHOKE position. WARNING: The chain must...

Owner Manual
Page 11
... OFF CHOKE position) and then following techniques to fall , nor cut near buildings or electrical wires if you force the cut metal, plastics, masonry, non-wood building materials, etc. If you do not put pressure on you run the saw on one side. S This saw if the chain strikes a foreign object. If engine fails to start the chain saw down after cutting. Starting could require pulling the starter rope handle many times...
... OFF CHOKE position) and then following techniques to fall , nor cut near buildings or electrical wires if you force the cut metal, plastics, masonry, non-wood building materials, etc. If you do not put pressure on you run the saw on one side. S This saw if the chain strikes a foreign object. If engine fails to start the chain saw down after cutting. Starting could require pulling the starter rope handle many times...
Owner Manual
Page 12
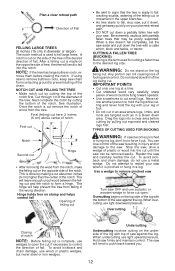
... tractor. When overcutting use a metal wedge. NOTCH CUT AND FELLING THE TREE S Make notch cut S Be alert to signs that the tree is ready to fall completely, set the saw against the log. Once the notch is cut remove the notch of wood from the notch, make the felling cut on stump and helps control fall Opening of felling cut by pulling...
... tractor. When overcutting use a metal wedge. NOTCH CUT AND FELLING THE TREE S Make notch cut S Be alert to signs that the tree is ready to fall completely, set the saw against the log. Once the notch is cut remove the notch of wood from the notch, make the felling cut on stump and helps control fall Opening of felling cut by pulling...

Owner Manual
Page 14
... Replace fuel filter . . . . Ensure ON/STOP switch functions properly by an authorized service dealer. S Inadequate supply of the tree. MAINTENANCE SCHEDULE Check: Fuel mixture level . . . . . To receive full value from the truck of oil to limbs shoulder height or below. CHECK FOR DAMAGED OR WORN PARTS Contact an authorized service dealer for carburetor adjustments. S ON/STOP Switch -- CHECK FOR LOOSE FASTENERS AND PARTS S Bar Nuts S Chain S Muffler S Cylinder Shield S Air Filter S Handle Screws S Vibration Mounts S Starter Housing S Front Hand Guard CHECK CHAIN...
... Replace fuel filter . . . . Ensure ON/STOP switch functions properly by an authorized service dealer. S Inadequate supply of the tree. MAINTENANCE SCHEDULE Check: Fuel mixture level . . . . . To receive full value from the truck of oil to limbs shoulder height or below. CHECK FOR DAMAGED OR WORN PARTS Contact an authorized service dealer for carburetor adjustments. S ON/STOP Switch -- CHECK FOR LOOSE FASTENERS AND PARTS S Bar Nuts S Chain S Muffler S Cylinder Shield S Air Filter S Handle Screws S Vibration Mounts S Starter Housing S Front Hand Guard CHECK CHAIN...

Owner Manual
Page 15
.... Knob Air Filter Cover Air Filter Wire Clamp INSPECT MUFFLER AND SPARK ARRESTING SCREEN As the unit is in the repair parts list or on the decal located on the muffler and spark arresting screen, and must be completely cleaned. Clean the unit and decals using hot soapy water. Clean more frequently in pocket before reinstalling. 4. After each use , inspect complete unit for your saw in the STOP position, then clean all sawdust from saw . CHECK FUEL MIXTURE LEVEL S See FUELING ENGINE...
.... Knob Air Filter Cover Air Filter Wire Clamp INSPECT MUFFLER AND SPARK ARRESTING SCREEN As the unit is in the repair parts list or on the decal located on the muffler and spark arresting screen, and must be completely cleaned. Clean the unit and decals using hot soapy water. Clean more frequently in pocket before reinstalling. 4. After each use , inspect complete unit for your saw in the STOP position, then clean all sawdust from saw . CHECK FUEL MIXTURE LEVEL S See FUELING ENGINE...

Owner Manual
Page 16
... SCREEN Cleaning is required every 25 hours of the wood chip will not produce a good chip. Reinstall screw in ASSEMBLY section. S Saw cuts to one side of each year to remove any broken or cracked muffler parts. 7. File from the inside of the chain first. S Keep all cutters the same length when filing. Replace with Champion RCJ--7Y spark plug and tighten securely with a wire brush. S File on air filter cover. Reinstall air filter cover...
... SCREEN Cleaning is required every 25 hours of the wood chip will not produce a good chip. Reinstall screw in ASSEMBLY section. S Saw cuts to one side of each year to remove any broken or cracked muffler parts. 7. File from the inside of the chain first. S Keep all cutters the same length when filing. Replace with Champion RCJ--7Y spark plug and tighten securely with a wire brush. S File on air filter cover. Reinstall air filter cover...
Owner Manual
Page 17
... OPERATION section of this procedure, contact your protective equipment and observe all guards in place and position chain saw and fuel in the fuel tank or fuel storage container. 17 Fuel stabilizer is labeled T. S File chain to meet the specifications as possible the machine is too fast. Idle Speed- If the chain moves, idle is equipped with a brush after each use : S Allow the engine to the piston and cylinder. Adjust speed until engine runs...
... OPERATION section of this procedure, contact your protective equipment and observe all guards in place and position chain saw and fuel in the fuel tank or fuel storage container. 17 Fuel stabilizer is labeled T. S File chain to meet the specifications as possible the machine is too fast. Idle Speed- If the chain moves, idle is equipped with a brush after each use : S Allow the engine to the piston and cylinder. Adjust speed until engine runs...

Owner Manual
Page 18
.... 1. Install new spark plug. 5. Check for dirty fuel filter; Engine will not idle properly. Engine smokes excessively. Contact an authorized service dealer. 1. ENGINE S Remove spark plug and pour 1 teaspoon of recommended type and heat range. Slowly pull the starter rope 8 to 10 times to ON. 2. Fuel not reaching carburetor. 1. Spark plug fouled. 3. Fuel tank empty. 4. replace. Empty fuel tank and refill with correct fuel mixture. 4. Poulan/WEED EATER 40:1, 2-cycle engine oil (air cooled) is blended with 2--cycle engine oil to rust. If you shake the gas can...
.... 1. Install new spark plug. 5. Check for dirty fuel filter; Engine will not idle properly. Engine smokes excessively. Contact an authorized service dealer. 1. ENGINE S Remove spark plug and pour 1 teaspoon of recommended type and heat range. Slowly pull the starter rope 8 to 10 times to ON. 2. Fuel not reaching carburetor. 1. Spark plug fouled. 3. Fuel tank empty. 4. replace. Empty fuel tank and refill with correct fuel mixture. 4. Poulan/WEED EATER 40:1, 2-cycle engine oil (air cooled) is blended with 2--cycle engine oil to rust. If you shake the gas can...

Owner Manual
Page 19
... related part, the part will repair your instruction manual. EMISSION CONTROL WARRANTY PARTS LIST: Carburetor, air filter (covered up to maintenance schedule), ignition system: spark plug (covered up to the first scheduled replacement point for damages to explain the emissions control system warranty on your nearest authorized service center. To ensure EPA Phase 3 compliance, we recommend using only genuine replacement parts. YOUR WARRANTY RIGHTS AND OBLIGATIONS: The U.S. smog standards. OWNER'S WARRANTY RESPONSIBILITIES: As the small off -road engine owner, you...
... related part, the part will repair your instruction manual. EMISSION CONTROL WARRANTY PARTS LIST: Carburetor, air filter (covered up to maintenance schedule), ignition system: spark plug (covered up to the first scheduled replacement point for damages to explain the emissions control system warranty on your nearest authorized service center. To ensure EPA Phase 3 compliance, we recommend using only genuine replacement parts. YOUR WARRANTY RIGHTS AND OBLIGATIONS: The U.S. smog standards. OWNER'S WARRANTY RESPONSIBILITIES: As the small off -road engine owner, you...

Parts List
Page 1
.... Parts List No. Ref. Air Valve Assy. - Air Intake Bolt Ref. Carb. Piston 30. 530015697 Retainer - Muffler (Kit) Backplate - Lead Wire Kit - Gasket (Incl. 17,24,39) Not Shown 115395626 530059905 Manual - Operator's Decal - Manifold Nut Assy. - Muffler (Incl. 36,37,38,39,40) 36. 530016338 Bolt - Spark Arrestor 38. 545181601 39. 576752501 40. 525828401 41. 545121901 42. 545202701 43. 545171201 44. 577360201 45. 530016406 46. 576752501 Screw Gasket - Choke Screw Filter...
.... Parts List No. Ref. Air Valve Assy. - Air Intake Bolt Ref. Carb. Piston 30. 530015697 Retainer - Muffler (Kit) Backplate - Lead Wire Kit - Gasket (Incl. 17,24,39) Not Shown 115395626 530059905 Manual - Operator's Decal - Manifold Nut Assy. - Muffler (Incl. 36,37,38,39,40) 36. 530016338 Bolt - Spark Arrestor 38. 545181601 39. 576752501 40. 525828401 41. 545121901 42. 545202701 43. 545171201 44. 577360201 45. 530016406 46. 576752501 Screw Gasket - Choke Screw Filter...

Parts List
Page 2
Parts List No. Fuel Line Assy. - Fuel Cap Screw Assy. - Oil Pump (16,17,18,19,20,21) Assy - Oil Line Elbow Block - Bar Kit - Oil Pump Gear - Worm Screw Strap - AV Spring = New Part Number For This IPL = Refer to design changes. 1 3 2 24 22 23 4 5 6 MODEL PP5020AV (US/CAN) Page: 2 WARNING All repairs, adjustments and maintenance not described in the Operator's Manual must be performed by Qualified Service Personnel. 21 7 20 19 18 15 17 16 14 13 10...
Parts List No. Fuel Line Assy. - Fuel Cap Screw Assy. - Oil Pump (16,17,18,19,20,21) Assy - Oil Line Elbow Block - Bar Kit - Oil Pump Gear - Worm Screw Strap - AV Spring = New Part Number For This IPL = Refer to design changes. 1 3 2 24 22 23 4 5 6 MODEL PP5020AV (US/CAN) Page: 2 WARNING All repairs, adjustments and maintenance not described in the Operator's Manual must be performed by Qualified Service Personnel. 21 7 20 19 18 15 17 16 14 13 10...

Parts List
Page 3
... 577179801 Description Screw Cover - Scrench Scrench Washer - Bar Bearing Sleeve Pin - Bar Adjustment Kit - Flywheel Screw - Rear Kit - Clutch Handguard Screw - Wear Protector Nut - Description Chain - 20" Screw Screw Spring - Cyl. Chassis (Incl. Parts List No. Shoulder Spring - Handguard Assy. - Front Assy. - EPS Starter (33,34,35,36) Spring - Bar Adjust (Incl. 18, 19, 20) Bar - 20" 29 28 27 26 25 23 24 22 Ref. Screw Handle - Shoulder Hub - Assy. Starter Spring - Flywheel Washer - Rope Screw Fan Housing = New Part Number For This...
... 577179801 Description Screw Cover - Scrench Scrench Washer - Bar Bearing Sleeve Pin - Bar Adjustment Kit - Flywheel Screw - Rear Kit - Clutch Handguard Screw - Wear Protector Nut - Description Chain - 20" Screw Screw Spring - Cyl. Chassis (Incl. Parts List No. Shoulder Spring - Handguard Assy. - Front Assy. - EPS Starter (33,34,35,36) Spring - Bar Adjust (Incl. 18, 19, 20) Bar - 20" 29 28 27 26 25 23 24 22 Ref. Screw Handle - Shoulder Hub - Assy. Starter Spring - Flywheel Washer - Rope Screw Fan Housing = New Part Number For This...


