

Instruction Manual
Page 2
TABLE OF CONTENTS CONTENTS ...2 IDENTIFICATION OF SAFETY SYMBOLS 3 PRODUCT SPECIFICATIONS ...4 SAFETY RULES ...5 ASSEMBLY ...8 OPERATION ...10 MAINTENANCE ...12 SERVICE AND ADJUSTMENTS 14 TROUBLESHOOTING TABLE 15 LIMITED WARRANTY ...16 EXPLODED VIEW ...17 PARTS LIST ...18 2
TABLE OF CONTENTS CONTENTS ...2 IDENTIFICATION OF SAFETY SYMBOLS 3 PRODUCT SPECIFICATIONS ...4 SAFETY RULES ...5 ASSEMBLY ...8 OPERATION ...10 MAINTENANCE ...12 SERVICE AND ADJUSTMENTS 14 TROUBLESHOOTING TABLE 15 LIMITED WARRANTY ...16 EXPLODED VIEW ...17 PARTS LIST ...18 2

Instruction Manual
Page 3
... their hair up. The operator of thrown objects and ricochets. Beware of the machine shall ensure, while working, that are marked to comply with side shields that no persons or animals come closer than 15 meters (50 feet). Use only specified trimmer head, spool, and recommended trimmer line. Never use only. This attachment is designed for line trimmer use blades, flailing devices, wire, rope, string, etc.
... their hair up. The operator of thrown objects and ricochets. Beware of the machine shall ensure, while working, that are marked to comply with side shields that no persons or animals come closer than 15 meters (50 feet). Use only specified trimmer head, spool, and recommended trimmer line. Never use only. This attachment is designed for line trimmer use blades, flailing devices, wire, rope, string, etc.

Instruction Manual
Page 4
SPECIFICATIONS Motor: Speed: Battery: Battery Run-Time Battery Charge-Time: Cutting Path: Feed: Line Diameter: Unit Weight (without battery): Unit Weight (with this product. Symbol Name Designation/Explanation DANGER Indicates an imminently hazardous situation, which, if not avoided, could ... , if not avoided, could result in property damage. IDENTIFICATION OF SAFETY SYMBOLS The following signal words and meanings are intended to explain the levels of risk associated with battery): 40V 5500 (±10%) RPM (no load) 40V, 2Ah Lithium-Ion Up to 25 Minutes 1 Hours 14" or 16" (35...
SPECIFICATIONS Motor: Speed: Battery: Battery Run-Time Battery Charge-Time: Cutting Path: Feed: Line Diameter: Unit Weight (without battery): Unit Weight (with this product. Symbol Name Designation/Explanation DANGER Indicates an imminently hazardous situation, which, if not avoided, could ... , if not avoided, could result in property damage. IDENTIFICATION OF SAFETY SYMBOLS The following signal words and meanings are intended to explain the levels of risk associated with battery): 40V 5500 (±10%) RPM (no load) 40V, 2Ah Lithium-Ion Up to 25 Minutes 1 Hours 14" or 16" (35...

Instruction Manual
Page 5
... risk of starting the tool accidentally. • Store idle tools out of reach of bystanders, please read , understand, and follow all times. Follow instructions for best and safest performance. SAFETY RULES WARNING: READ ALL SAFETY WARNINGS AND ALL INSTRUCTIONS. Use the correct tool for cutting grass and soft vegetation, as well as necessary. • Never operate without guard, or with a lawn mower. • This string trimmer is...
... risk of starting the tool accidentally. • Store idle tools out of reach of bystanders, please read , understand, and follow all times. Follow instructions for best and safest performance. SAFETY RULES WARNING: READ ALL SAFETY WARNINGS AND ALL INSTRUCTIONS. Use the correct tool for cutting grass and soft vegetation, as well as necessary. • Never operate without guard, or with a lawn mower. • This string trimmer is...

Instruction Manual
Page 6
...; Exercise care in handling batteries in electric shock, fire, and/or personal injury. • Do not abuse the cord. SERVICE Tool service must be performed only by qualified repair personnel using only identical replacement parts. Please call 1-855-378-6903 for possible special disposal instructions. If they are warm, allow the battery pack or charger to carry the tool. Do not set the charger on...
...; Exercise care in handling batteries in electric shock, fire, and/or personal injury. • Do not abuse the cord. SERVICE Tool service must be performed only by qualified repair personnel using only identical replacement parts. Please call 1-855-378-6903 for possible special disposal instructions. If they are warm, allow the battery pack or charger to carry the tool. Do not set the charger on...

Instruction Manual
Page 7
..., work in use, keep it away from other metal objects, like paper clips, coins, keys, nails, screws or other small...type of work with specifically designated battery packs. SAFETY RULES WARNING: (PROPOSITION 65) Some dust created by the manufacturer. SAVE ALL WARNINGS AND INSTRUCTIONS FOR FUTURE REFERENCE 7 A charger that is not in a well-ventilated area, and work . Use...battery packs may create a risk of exposure to another battery pack. • Use string trimmer only with approved safety equipment, such as dust masks that can make a connection from one type of battery...
..., work in use, keep it away from other metal objects, like paper clips, coins, keys, nails, screws or other small...type of work with specifically designated battery packs. SAFETY RULES WARNING: (PROPOSITION 65) Some dust created by the manufacturer. SAVE ALL WARNINGS AND INSTRUCTIONS FOR FUTURE REFERENCE 7 A charger that is not in a well-ventilated area, and work . Use...battery packs may create a risk of exposure to another battery pack. • Use string trimmer only with approved safety equipment, such as dust masks that can make a connection from one type of battery...

Instruction Manual
Page 8
... click. The battery's run time will click when locked into the handle until both sides lock. It should slide into the handle to prevent accidental dislodging. Line up the screw holes in the trimmer head (5). 4. It is recommended that the battery be charged every 3 months when the string trimmer is removed and the switch turned OFF before replacing spools or adjusting the line. • Read, understand, and follow the battery charger instructions. BATTERY REMOVAL 1. Press...
... click. The battery's run time will click when locked into the handle until both sides lock. It should slide into the handle to prevent accidental dislodging. Line up the screw holes in the trimmer head (5). 4. It is recommended that the battery be charged every 3 months when the string trimmer is removed and the switch turned OFF before replacing spools or adjusting the line. • Read, understand, and follow the battery charger instructions. BATTERY REMOVAL 1. Press...

Instruction Manual
Page 9
... on the string trimmer. Tighten the attachment knob securely. 5 3 WARNING: To avoid injury, adjust the auxiliary handle for better control of the tool in the positioning hole, the shafts are not locked into place. Align the release button with a philips screwdriver (not included) and remove the screws from the trimmer. 2. Keep proper balance at all times for optimum control and balance. TIGHTEN LOOSEN 1 9 When the cutting line needs to...
... on the string trimmer. Tighten the attachment knob securely. 5 3 WARNING: To avoid injury, adjust the auxiliary handle for better control of the tool in the positioning hole, the shafts are not locked into place. Align the release button with a philips screwdriver (not included) and remove the screws from the trimmer. 2. Keep proper balance at all times for optimum control and balance. TIGHTEN LOOSEN 1 9 When the cutting line needs to...

Instruction Manual
Page 10
Speed Control Battery Power Button Lock-Out Button Trigger Motor Housing Auxiliary Handle Attachment Capable Shaft Guard Dual Line Trimmer Head STARTING AND STOPPING THE TRIMMER To start: 1. Release the trigger (3). 2. Note: The unit will illuminate above the high speed button indicating that the trimmer is in this instruction manual as well as a knowledge of this product, familiarize yourself with all operating features and safety rules. Press the power button (1) again to increase 1 speed depending upon grass condition. Press the...
Speed Control Battery Power Button Lock-Out Button Trigger Motor Housing Auxiliary Handle Attachment Capable Shaft Guard Dual Line Trimmer Head STARTING AND STOPPING THE TRIMMER To start: 1. Release the trigger (3). 2. Note: The unit will illuminate above the high speed button indicating that the trimmer is in this instruction manual as well as a knowledge of this product, familiarize yourself with all operating features and safety rules. Press the power button (1) again to increase 1 speed depending upon grass condition. Press the...

Instruction Manual
Page 11
... the string trimmer/edger with bump feed line advancement, which advances additional line once the head is required. This trimmer is equipped with your finger on the ground while rotating. The cutting blade will cut the line to keep an accurate cutting swath. Loosen the screw and turn the cutter 180° then tighten the screw. Avoid unintentional starting. OPERATION ADJUST THE CUTTING PATH The cutting path can be adjusted from...
... the string trimmer/edger with bump feed line advancement, which advances additional line once the head is required. This trimmer is equipped with your finger on the ground while rotating. The cutting blade will cut the line to keep an accurate cutting swath. Loosen the screw and turn the cutter 180° then tighten the screw. Avoid unintentional starting. OPERATION ADJUST THE CUTTING PATH The cutting path can be adjusted from...
Instruction Manual
Page 12
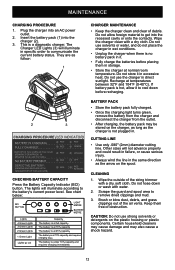
.... 30 RED MINUTES TO ALLOW TO COOL) NO BATTERY PRESENT RED ORANGE OFF DEFECTIVE BATTERY: (REMOVE AND REPLACE WITH NEW BATTERY IF THIS OCCURS) RED RED BLINKING CHECKING BATTERY CAPACITY Press the Battery Capacity Indicator (BCI) button. Brush or blow dust, debris, and grass clippings out of the string trimmer with a dry, soft cloth. Do not use solvents or water, and do not place the charger...
.... 30 RED MINUTES TO ALLOW TO COOL) NO BATTERY PRESENT RED ORANGE OFF DEFECTIVE BATTERY: (REMOVE AND REPLACE WITH NEW BATTERY IF THIS OCCURS) RED RED BLINKING CHECKING BATTERY CAPACITY Press the Battery Capacity Indicator (BCI) button. Brush or blow dust, debris, and grass clippings out of the string trimmer with a dry, soft cloth. Do not use solvents or water, and do not place the charger...
Instruction Manual
Page 13
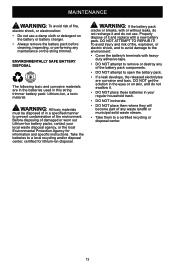
... recycling or disposal center. 13 MAINTENANCE WARNING: To avoid risk of fire, electric shock, or electrocution: • Do not use a damp cloth or detergent on the battery or battery charger. • Always remove the battery pack before cleaning, inspecting, or performing any maintenance on skin, and do not use. DO NOT get the solution in this string trimmer battery pack: Lithium-Ion, a toxic...
... recycling or disposal center. 13 MAINTENANCE WARNING: To avoid risk of fire, electric shock, or electrocution: • Do not use a damp cloth or detergent on the battery or battery charger. • Always remove the battery pack before cleaning, inspecting, or performing any maintenance on skin, and do not use. DO NOT get the solution in this string trimmer battery pack: Lithium-Ion, a toxic...
Instruction Manual
Page 14
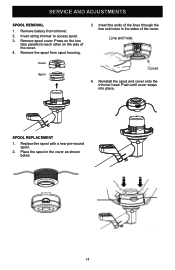
Invert string trimmer to each other on the side of the cover. Place the spool in the sides of the cover. 4. Cover Spool 4. Remove spool cover. Replace the spool with a new pre-wound spool. 2. Press on the two tabs parallel to access spool. 3. Remove battery from spool housing. 3. Remove the spool from trimmer. 2. Reinstall the spool and cover onto the trimmer head. SPOOL REPLACEMENT 1. Insert the ends of the lines through the line exit holes in the cover as shown below. 14 SERVICE AND ADJUSTMENTS SPOOL REMOVAL 1. Push until cover snaps into place.
Invert string trimmer to each other on the side of the cover. Place the spool in the sides of the cover. 4. Cover Spool 4. Remove spool cover. Replace the spool with a new pre-wound spool. 2. Press on the two tabs parallel to access spool. 3. Remove battery from spool housing. 3. Remove the spool from trimmer. 2. Reinstall the spool and cover onto the trimmer head. SPOOL REPLACEMENT 1. Insert the ends of the lines through the line exit holes in the cover as shown below. 14 SERVICE AND ADJUSTMENTS SPOOL REMOVAL 1. Push until cover snaps into place.

Instruction Manual
Page 15
SERVICE AND ADJUSTMENTS LINE REPLACEMENT 1. Ensure line snaps into the slot in the center rim of children. • Position unit so that any debris off of the string trimmer. • Store in the slot. Slot STORAGE • Ensure the battery is removed from the string trimmer. • Wipe any sharp object cannot accidentally cause injury. 3. Position the lines in a clockwise direction. 15 Bend the line at...
SERVICE AND ADJUSTMENTS LINE REPLACEMENT 1. Ensure line snaps into the slot in the center rim of children. • Position unit so that any debris off of the string trimmer. • Store in the slot. Slot STORAGE • Ensure the battery is removed from the string trimmer. • Wipe any sharp object cannot accidentally cause injury. 3. Position the lines in a clockwise direction. 15 Bend the line at...

Instruction Manual
Page 16
... recommended remedies below except remedies that line is not tangled. 2. REMEDY 1. Battery is not secure. Cutting line does not advance. 1. Line may be operating. trigger switch is depressed. Replace spool or spool line. 16 Do not use string trimmer. TROUBLESHOOTING TABLE WARNING: Always stop unit and disconnect from the power source before performing all of the battery pack snap into place. 2. TROUBLE CAUSE Motor fails to the instructions included with your model.
... recommended remedies below except remedies that line is not tangled. 2. REMEDY 1. Battery is not secure. Cutting line does not advance. 1. Line may be operating. trigger switch is depressed. Replace spool or spool line. 16 Do not use string trimmer. TROUBLESHOOTING TABLE WARNING: Always stop unit and disconnect from the power source before performing all of the battery pack snap into place. 2. TROUBLE CAUSE Motor fails to the instructions included with your model.

Instruction Manual
Page 17
... warranty is requested in writing by POULAN PRO for industrial/commercial use , free of charge to the customer. Battery carries a two (2) year warranty against defects in the owners manual supplied with the product. Transportation Charges: Transportation charges for a period of four (4) years against defects in order to be defective, through normal use , and that will repair or replace any power equipment unit or attachment...
... warranty is requested in writing by POULAN PRO for industrial/commercial use , free of charge to the customer. Battery carries a two (2) year warranty against defects in the owners manual supplied with the product. Transportation Charges: Transportation charges for a period of four (4) years against defects in order to be defective, through normal use , and that will repair or replace any power equipment unit or attachment...

Instruction Manual
Page 19
PARTS LIST Item Description 1 Bare Tool Assembly 2 Auxiliary Handle 3 Auxiliary Handle Cap 4 Screw 5 Rubber Insert 6 Plate 7 Ring 8 Shaft Sleeve 9 Fixed seat 10 Spool Head Assembly 11 Guard 12 Cut-off Blade 13 Screw 14 Spring Washer 15 Plate 16 Bolt Drawing Qty 311151437 1 34105836-4 1 341081468 1 32201836 2 34203836 1 33301836 1 34201877 1 339031410 1 339011437 1 311171437 1 341021437 1 333051410 1 32201319 2 32916131 2 333021410 1 333081410 4 19
PARTS LIST Item Description 1 Bare Tool Assembly 2 Auxiliary Handle 3 Auxiliary Handle Cap 4 Screw 5 Rubber Insert 6 Plate 7 Ring 8 Shaft Sleeve 9 Fixed seat 10 Spool Head Assembly 11 Guard 12 Cut-off Blade 13 Screw 14 Spring Washer 15 Plate 16 Bolt Drawing Qty 311151437 1 34105836-4 1 341081468 1 32201836 2 34203836 1 33301836 1 34201877 1 339031410 1 339011437 1 311171437 1 341021437 1 333051410 1 32201319 2 32916131 2 333021410 1 333081410 4 19


