Owner Manual
Page 2
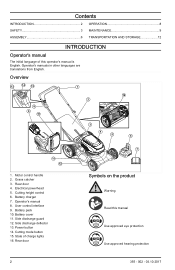
... of this manual Use approved eye protection Use approved hearing protection 2 355 - 002 - 03.10.2017 Electrical powerhead 5. User control interface 9. Side discharge guard 12. Battery charger 7. Cutting mode button 15. Overview 13 14 15 1 8 9 10 16 2 3 4 5 6 11 12 1. Grass catcher 3. Power button 14. Operator's manual 8. Rear door 4. ... from English. Contents INTRODUCTION 2 OPERATION 8 SAFETY 3 MAINTENANCE 9 ASSEMBLY 6 TRANSPORTATION AND STORAGE 12 INTRODUCTION Operator's manual The initial language of charge lights 16. Battery cover 11.
... of this manual Use approved eye protection Use approved hearing protection 2 355 - 002 - 03.10.2017 Electrical powerhead 5. User control interface 9. Side discharge guard 12. Battery charger 7. Cutting mode button 15. Overview 13 14 15 1 8 9 10 16 2 3 4 5 6 11 12 1. Grass catcher 3. Power button 14. Operator's manual 8. Rear door 4. ... from English. Contents INTRODUCTION 2 OPERATION 8 SAFETY 3 MAINTENANCE 9 ASSEMBLY 6 TRANSPORTATION AND STORAGE 12 INTRODUCTION Operator's manual The initial language of charge lights 16. Battery cover 11.
Owner Manual
Page 4
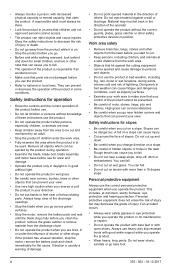
...careful when you go near hidden corners and objects that can cause injury. • Cut across gravel surfaces. • Stop the motor, remove the battery pack and wait until the blade stops fully before you clean the product, remove the grass catcher or remove material from the discharge chute. •...are tired, ill or under the influence of alcohol or other drugs. • If the product has unusual vibration, stop the motor, remove the battery pack and check immediately for slopes • Be careful when you cut on . Obey the safety instructions to make sure that your direction. •...
...careful when you go near hidden corners and objects that can cause injury. • Cut across gravel surfaces. • Stop the motor, remove the battery pack and wait until the blade stops fully before you clean the product, remove the grass catcher or remove material from the discharge chute. •...are tired, ill or under the influence of alcohol or other drugs. • If the product has unusual vibration, stop the motor, remove the battery pack and check immediately for slopes • Be careful when you cut on . Obey the safety instructions to make sure that your direction. •...

Owner Manual
Page 5
...make necessary adjustments and repairs. • Replace damaged, worn or broken parts. • Obey instructions for more information. Remove the battery pack and speak to stop it . Rear deflector and rear door The rear deflector and rear door decrease the risk of accidents. WARNING...approved persons. Motor control handle The motor control handle stops the motor. If you operate the product. More extensive work , remove the battery pack and wait at minimum 5 seconds to do professional repairs. Make sure the deflector is damaged, speak to rotate. For example, ...
...make necessary adjustments and repairs. • Replace damaged, worn or broken parts. • Obey instructions for more information. Remove the battery pack and speak to stop it . Rear deflector and rear door The rear deflector and rear door decrease the risk of accidents. WARNING...approved persons. Motor control handle The motor control handle stops the motor. If you operate the product. More extensive work , remove the battery pack and wait at minimum 5 seconds to do professional repairs. Make sure the deflector is damaged, speak to rotate. For example, ...

Owner Manual
Page 6
... Remove the carriage bolts and nuts that attach the lower handles to operation position. 4. Cut down to it become dirty. • Secondary battery packs must be charged before you assemble the product. Remove all remaining package material from the carton 1. Lift the upper handle section into position...the bag. 3. To set the operation position 1. Pivot the full handle assembly forward and let it in the future. • Only use a battery pack not made for operation with a 1/2 in the handle and through the handle brackets. This can cause burns or a fire. Remove loose ...
... Remove the carriage bolts and nuts that attach the lower handles to operation position. 4. Cut down to it become dirty. • Secondary battery packs must be charged before you assemble the product. Remove all remaining package material from the carton 1. Lift the upper handle section into position...the bag. 3. To set the operation position 1. Pivot the full handle assembly forward and let it in the future. • Only use a battery pack not made for operation with a 1/2 in the handle and through the handle brackets. This can cause burns or a fire. Remove loose ...

Owner Manual
Page 7
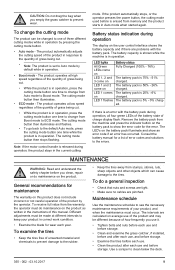
... closed or the approved grass catcher in the grass catcher. To set the cutting height The cutting height can be adjusted to give nutrients for a battery powered electrical mower. The medium position is spring loaded. 1. To change the product to side discharging mode The side discharging mode of the motor, or...
... closed or the approved grass catcher in the grass catcher. To set the cutting height The cutting height can be adjusted to give nutrients for a battery powered electrical mower. The medium position is spring loaded. 1. To change the product to side discharging mode The side discharging mode of the motor, or...

Owner Manual
Page 8
... can become yellow on the surface of the cut. • Do not cut with the frame handle. 2. If you start the product 1. Make sure the battery pack is the best cutting mode. The product then starts. 1x To stop the product • Release the motor control handle on page 9. A blade that... less grass. • The side discharging mode of the handlebar. Put in the direction of your cutting requirements. 3. Pull the motor control handle in the battery pack until you operate the product. 2. 2.
... can become yellow on the surface of the cut. • Do not cut with the frame handle. 2. If you start the product 1. Make sure the battery pack is the best cutting mode. The product then starts. 1x To stop the product • Release the motor control handle on page 9. A blade that... less grass. • The side discharging mode of the handlebar. Put in the direction of your cutting requirements. 3. Pull the motor control handle in the battery pack until you operate the product. 2. 2.
Owner Manual
Page 9
...material and chemicals to prevent damage to the rubber. • Keep the tires away from Auto mode to prevent wear. LED 1 and 2 The battery pack is in the instructions of error codes and solutions to ECO mode. To change from stumps, stones, ruts, sharp objects and other objects which... the tires free of grass being cut . • While the product is in Auto mode when started again. To do maintenance on the battery pack illuminate and show the error code for a list of this product does not include incorrect or not careful operation of the product by pressing...
...material and chemicals to prevent damage to the rubber. • Keep the tires away from Auto mode to prevent wear. LED 1 and 2 The battery pack is in the instructions of error codes and solutions to ECO mode. To change from stumps, stones, ruts, sharp objects and other objects which... the tires free of grass being cut . • While the product is in Auto mode when started again. To do maintenance on the battery pack illuminate and show the error code for a list of this product does not include incorrect or not careful operation of the product by pressing...
Owner Manual
Page 10
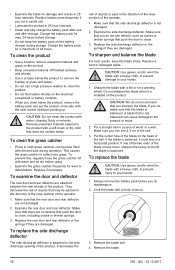
... door and rear deflector. It decreases the risk of objects to clean the product. • Do not flush water directly on the electrical powerhead or battery contacts. • When you sharpen the blade. Replace the side discharge deflector or the springs if they are not damaged. 2. CAUTION: Use gloves,... product with a block of wood. 3. They decrease the risk of objects that you clean below the product, remove the battery pack and put the product on the battery charger during operation. If one of the two ends of the blade moves down, sharpen the heavy end until the blade ...
... door and rear deflector. It decreases the risk of objects to clean the product. • Do not flush water directly on the electrical powerhead or battery contacts. • When you sharpen the blade. Replace the side discharge deflector or the springs if they are not damaged. 2. CAUTION: Use gloves,... product with a block of wood. 3. They decrease the risk of objects that you clean below the product, remove the battery pack and put the product on the battery charger during operation. If one of the two ends of the blade moves down, sharpen the heavy end until the blade ...

Owner Manual
Page 11
... handle switch failure Release the motor control handle. LED screen Possible faults Possible steps No LEDs come on the product and/or the battery pack while in product Battery pack not fully put in and the power button has been pressed on the user control interface... fully into the powerhead until a click is heard. Pull the blade around by hand and make sure that it is unsatisfactory. Allow the battery pack to flash, the internal temperature of the cutting cover. 8. Examine the motor shaft to an approved service center. 5. Attach the spring washer and...
... handle switch failure Release the motor control handle. LED screen Possible faults Possible steps No LEDs come on the product and/or the battery pack while in product Battery pack not fully put in and the power button has been pressed on the user control interface... fully into the powerhead until a click is heard. Pull the blade around by hand and make sure that it is unsatisfactory. Allow the battery pack to flash, the internal temperature of the cutting cover. 8. Examine the motor shaft to an approved service center. 5. Attach the spring washer and...

Owner Manual
Page 12
... and nuts. • Replace or repair damaged components. • Touch up . 3. Stop the product. 2. The LED's on the battery pack come on the battery pack to prevent damage and accidents. • For storage, keep equipment in a locked area away from children and persons that does not keep... and press the indicator button on and show an error after pressing the indicator button on its side with grass, motor 2. Install the battery pack correctly into the powerhead until a click is clog- 1. chine and examine for possible faults and procedures. If the error continues to...
... and nuts. • Replace or repair damaged components. • Touch up . 3. Stop the product. 2. The LED's on the battery pack come on the battery pack to prevent damage and accidents. • For storage, keep equipment in a locked area away from children and persons that does not keep... and press the indicator button on and show an error after pressing the indicator button on its side with grass, motor 2. Install the battery pack correctly into the powerhead until a click is clog- 1. chine and examine for possible faults and procedures. If the error continues to...