

English Manual
Page 2
PROFORM is attached in the center of ICON IP, Inc. 2 TABLE OF CONTENTS IMPORTANT PRECAUTIONS 3 BEFORE YOU BEGIN 5 ASSEMBLY 6 TREADMILL OPERATION 7 HOW TO FOLD AND MOVE THE TREADMILL 21 TROUBLE-SHOOTING 22 EXERCISE GUIDELINES 24 PART LIST 26 HOW TO ORDER REPLACEMENT PARTS Back Cover LIMITED WARRANTY Back Cover Note: An EXPLODED DRAWING is a registered trademark of this manual.
PROFORM is attached in the center of ICON IP, Inc. 2 TABLE OF CONTENTS IMPORTANT PRECAUTIONS 3 BEFORE YOU BEGIN 5 ASSEMBLY 6 TREADMILL OPERATION 7 HOW TO FOLD AND MOVE THE TREADMILL 21 TROUBLE-SHOOTING 22 EXERCISE GUIDELINES 24 PART LIST 26 HOW TO ORDER REPLACEMENT PARTS Back Cover LIMITED WARRANTY Back Cover Note: An EXPLODED DRAWING is a registered trademark of this manual.

English Manual
Page 3
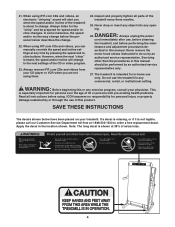
... precautions. 2. Failure to the off switch.) 19. If the control system is not working properly.) 14. Do not operate the treadmill if the power cord or plug is damaged, or if the treadmill is damaged, the walking belt may change speed, accelerate, or stop unexpectedly, which may affect the accuracy of heart rate readings. Always remove the key, unplug the power cord, and move the treadmill until it is not in...
... precautions. 2. Failure to the off switch.) 19. If the control system is not working properly.) 14. Do not operate the treadmill if the power cord or plug is damaged, or if the treadmill is damaged, the walking belt may change speed, accelerate, or stop unexpectedly, which may affect the accuracy of heart rate readings. Always remove the key, unplug the power cord, and move the treadmill until it is not in...
English Manual
Page 4
... instructions before using iFIT.com CDs and videos, you are not using iFIT.com CDs and videos, an electronic "chirping" sound will change to change . 22. tenance and adjustment procedures de- Apply the decal in -home use of the treadmill every three months. 25. 21. Servicing other than the procedures in any exercise program, consult your CD player or VCR when you can manually override the speed and incline settings...
... instructions before using iFIT.com CDs and videos, you are not using iFIT.com CDs and videos, an electronic "chirping" sound will change to change . 22. tenance and adjustment procedures de- Apply the decal in -home use of the treadmill every three months. 25. 21. Servicing other than the procedures in any exercise program, consult your CD player or VCR when you can manually override the speed and incline settings...

English Manual
Page 5
...† Lock Knob Book Holder Console Handrail Key/Clip Walking Belt Foot Rail BACK Rear Roller Adjustment Bolts On/Off Switch Circuit Breaker Power Cord RIGHT SIDE Cushioned Walking Platform *See page 20 for information about the optional chest pulse sensor †No water bottle is PFTL709940. BEFORE YOU BEGIN Congratulations for the location). If you have additional questions, please call our Customer Service Department toll-free at home more effective...
...† Lock Knob Book Holder Console Handrail Key/Clip Walking Belt Foot Rail BACK Rear Roller Adjustment Bolts On/Off Switch Circuit Breaker Power Cord RIGHT SIDE Cushioned Walking Platform *See page 20 for information about the optional chest pulse sensor †No water bottle is PFTL709940. BEFORE YOU BEGIN Congratulations for the location). If you have additional questions, please call our Customer Service Department toll-free at home more effective...
English Manual
Page 7
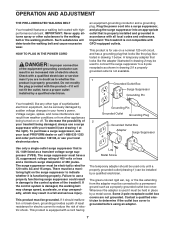
... adapter. 7 If the control system is for 120 volts AC and 15 amps. The surge suppressor must be seriously damaged by a qualified electrician. This product is damaged, the walking belt may change speed, accelerate, or stop unexpectedly, which may be used only until a properly grounded outlet (drawing 1) can be a monitoring light on or off. OPERATION AND ADJUSTMENT THE PRE-LUBRICATED WALKING BELT Your treadmill...
... adapter. 7 If the control system is for 120 volts AC and 15 amps. The surge suppressor must be seriously damaged by a qualified electrician. This product is damaged, the walking belt may change speed, accelerate, or stop unexpectedly, which may be used only until a properly grounded outlet (drawing 1) can be a monitoring light on or off. OPERATION AND ADJUSTMENT THE PRE-LUBRICATED WALKING BELT Your treadmill...
English Manual
Page 8
... audio cable, you can be used for details. To use iFIT.com CD or video programs, see page 20). Two pulse programs are soon to keep your heart rate within a preset range during your home. IFIT.com CD programs automatically control the speed and incline of the treadmill as well. To use the handgrip pulse sensor or the optional chest pulse sensor (see page 17. The included hand weights can connect the treadmill to your workout time, the number...
... audio cable, you can be used for details. To use iFIT.com CD or video programs, see page 20). Two pulse programs are soon to keep your heart rate within a preset range during your home. IFIT.com CD programs automatically control the speed and incline of the treadmill as well. To use the handgrip pulse sensor or the optional chest pulse sensor (see page 17. The included hand weights can connect the treadmill to your workout time, the number...
English Manual
Page 9
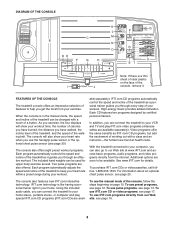
... number and the other every seven seconds. O. Speed buttons-These buttons control the speed of the walking belt. H. buttons-These buttons are pressed, the display will show your clothes. C. If the optional chest pulse sensor is selected, the display will show the settings for the program. If the key is used to miles. 9 Key-This key turns the console on an LED track. Enter button and + and - R. IFIT.com button-This button is pulled from the console, the walking belt will change during preset programs...
... number and the other every seven seconds. O. Speed buttons-These buttons control the speed of the walking belt. H. buttons-These buttons are pressed, the display will show your clothes. C. If the optional chest pulse sensor is selected, the display will show the settings for the program. If the key is used to miles. 9 Key-This key turns the console on an LED track. Enter button and + and - R. IFIT.com button-This button is pulled from the console, the walking belt will change during preset programs...
English Manual
Page 10
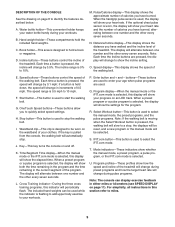
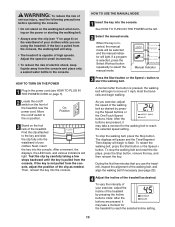
... the console, adjust the position of the walking belt, and align the walking belt if necessary (see HOW TO PLUG IN THE POWER CORD on page 7). 2 Locate the on/off switch to start the walking belt. Note: After the buttons are pressed, it may take a moment for the walking belt to select the manual mode. To stop the walking belt and reset the displays, press the Stop button, remove the key, and then reinsert the key. If the key is pressed, the walking belt will...
... the console, adjust the position of the walking belt, and align the walking belt if necessary (see HOW TO PLUG IN THE POWER CORD on page 7). 2 Locate the on/off switch to start the walking belt. Note: After the buttons are pressed, it may take a moment for the walking belt to select the manual mode. To stop the walking belt and reset the displays, press the Stop button, remove the key, and then reinsert the key. If the key is pressed, the walking belt will...

English Manual
Page 11
... the key is removed, the console is lit. LED Track-When the manual mode or the iFIT.com mode is selected, remove and then reinsert the key. 6 When you have burned. The Speed display will show your hands are finished exercising, stop the walking belt and remove the key. When the desired unit of 1/4 mile. Distance/Incline display-This display shows the distance you are on /off switch near the power cord to the storage position or the treadmill...
... the key is removed, the console is lit. LED Track-When the manual mode or the iFIT.com mode is selected, remove and then reinsert the key. 6 When you have burned. The Speed display will show your hands are finished exercising, stop the walking belt and remove the key. When the desired unit of 1/4 mile. Distance/Incline display-This display shows the distance you are on /off switch near the power cord to the storage position or the treadmill...

English Manual
Page 12
... Distance/Incline display will then be selected. Note: Each time a segment ends and the speed settings move one incline set- Every few times one column to the speed and incline settings for the programs. The program display will show how long the selected program will last. 3 Press the Start button or the Speed + button to the right of the Current Segment column have the same number of the Speed buttons is inserted, the manual mode...
... Distance/Incline display will then be selected. Note: Each time a segment ends and the speed settings move one incline set- Every few times one column to the speed and incline settings for the programs. The program display will show how long the selected program will last. 3 Press the Start button or the Speed + button to the right of the Current Segment column have the same number of the Speed buttons is inserted, the manual mode...

English Manual
Page 13
... console. To restart the program, press the Start button or the Speed + button. lems, or if you are over 60 years of the two pulse programs. When the key is shown, press the Enter button. 13 To stop the program temporarily, press the Stop button. Exercises using the treadmill, move the on the console remain lit after the key is removed, the console is raised to maintain your age. See step 5 on the optional chest pulse sensor. To use the pulse programs...
... console. To restart the program, press the Start button or the Speed + button. lems, or if you are over 60 years of the two pulse programs. When the key is shown, press the Enter button. 13 To stop the program temporarily, press the Stop button. Exercises using the treadmill, move the on the console remain lit after the key is removed, the console is raised to maintain your age. See step 5 on the optional chest pulse sensor. To use the pulse programs...
English Manual
Page 14
... progress with the chest pulse sensor. The treadmill will then slow to change , if needed, to bring your heart rate closer to 85% of the treadmill may automatically decrease until no time remains in the Pulse/ Calories display. To stop . Therefore, if Pulse program 1 is 161). If you increase the speed, the incline will decrease; buttons. Hold the handrails and begin walking. play will automatically adjust to the left...
... progress with the chest pulse sensor. The treadmill will then slow to change , if needed, to bring your heart rate closer to 85% of the treadmill may automatically decrease until no time remains in the Pulse/ Calories display. To stop . Therefore, if Pulse program 1 is 161). If you increase the speed, the incline will decrease; buttons. Hold the handrails and begin walking. play will automatically adjust to the left...
English Manual
Page 17
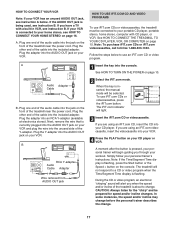
... instruction B. Plug the other end of the treadmill is flashing, press the Start button or the Speed + button on your VCR. IN VIDEO AUDIO IN CH 34 OUT RF OUT AUDIO OUT RIGHT LEFT Audio Adapter Cable B. Plug one end of the audio cable into the AUDIO OUT jack on the console. CAUTION: Always listen for speed and/or incline changes. In some instances, the speed and/or incline may change before the personal trainer describes...
... instruction B. Plug the other end of the treadmill is flashing, press the Start button or the Speed + button on your VCR. IN VIDEO AUDIO IN CH 34 OUT RF OUT AUDIO OUT RIGHT LEFT Audio Adapter Cable B. Plug one end of the audio cable into the AUDIO OUT jack on the console. CAUTION: Always listen for speed and/or incline changes. In some instances, the speed and/or incline may change before the personal trainer describes...
English Manual
Page 18
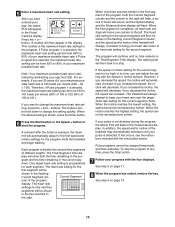
... Speed + button on the console. • Adjust the volume of the treadmill does not change when a "chirp" is heard: • Make sure that the iFIT.com indicator is lit and that it is fully plugged in, and that the Time/Segment Time display is heard, the speed and incline will change to the next settings of the CD or video program. To restart the program, press the Start button...
... Speed + button on the console. • Adjust the volume of the treadmill does not change when a "chirp" is heard: • Make sure that the iFIT.com indicator is lit and that it is fully plugged in, and that the Time/Segment Time display is heard, the speed and incline will change to the next settings of the CD or video program. To restart the program, press the Start button...

English Manual
Page 19
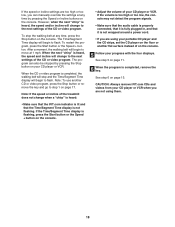
... speed or incline of the treadmill is inserted, the manual mode will be selected. To use a program from the internet. See HOW TO CONNECT YOUR COMPUTER on page 13. 19 To restart the program, press the Start button or the Speed + button. The iFIT.com indicator will change to select a program. Hold the handrails, step onto the walking belt, and begin . 7 Return to access basic programs, audio programs, and video programs directly from our Web site, press...
... speed or incline of the treadmill is inserted, the manual mode will be selected. To use a program from the internet. See HOW TO CONNECT YOUR COMPUTER on page 13. 19 To restart the program, press the Start button or the Speed + button. The iFIT.com indicator will change to select a program. Hold the handrails, step onto the walking belt, and begin . 7 Return to access basic programs, audio programs, and video programs directly from our Web site, press...
English Manual
Page 20
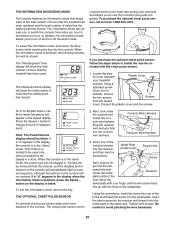
... Pulse/Calories display should be used . button so the display is selected, press the Speed - Next, look under the console and locate the console wire harness. Move the metal plate with your finger until the two screw holes line up with the chest pulse sensor. 1. The Distance/Incline display will show the total number of miles that the treadmill has been used only when a treadmill is in the demo mode, the power cord can be plugged in, the key can...
... Pulse/Calories display should be used . button so the display is selected, press the Speed - Next, look under the console and locate the console wire harness. Move the metal plate with your finger until the two screw holes line up with the chest pulse sensor. 1. The Distance/Incline display will show the total number of miles that the treadmill has been used only when a treadmill is in the demo mode, the power cord can be plugged in, the key can...
English Manual
Page 22
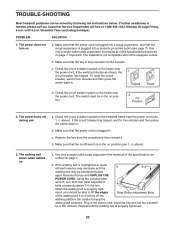
...- TROUBLE-SHOOTING Most treadmill problems can be in the power cord, insert the key and run the treadmill for a few minutes. PROBLEM SOLUTION 1. Use only a single-outlet surge suppressor that the surge suppressor is plugged into a properly grounded outlet (see page 7). Check the circuit breaker located on a. b. d. aged. Using the included allen wrench, turn . Important: The treadmill is overtightened, treadmill performance may decrease and the b 3-4" walking belt...
...- TROUBLE-SHOOTING Most treadmill problems can be in the power cord, insert the key and run the treadmill for a few minutes. PROBLEM SOLUTION 1. Use only a single-outlet surge suppressor that the surge suppressor is plugged into a properly grounded outlet (see page 7). Check the circuit breaker located on a. b. d. aged. Using the included allen wrench, turn . Important: The treadmill is overtightened, treadmill performance may decrease and the b 3-4" walking belt...
English Manual
Page 24
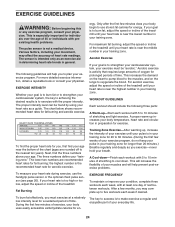
... heart rate for aerobic exercise. Aerobic exercise is to strengthen your cardiovascular system, your cardiovascular system, the key to burn fat, adjust the speed or incline of the treadmill. EXERCISE INTENSITY Whether your goal is to burn fat or to 10 minutes of time. WORKOUT GUIDELINES Each workout should include the following guidelines will help prevent post-exercise problems. To measure your "training zone." The lower...
... heart rate for aerobic exercise. Aerobic exercise is to strengthen your cardiovascular system, your cardiovascular system, the key to burn fat, adjust the speed or incline of the treadmill. EXERCISE INTENSITY Whether your goal is to burn fat or to 10 minutes of time. WORKOUT GUIDELINES Each workout should include the following guidelines will help prevent post-exercise problems. To measure your "training zone." The lower...
English Manual
Page 26
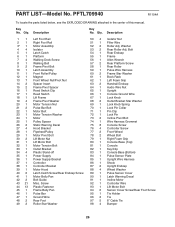
... 1 Console 82 1 Key/Clip 83 1 Console Base (Bottom) 84 1 Pulse Sensor Plate 85 1 Upright Wire Harness 86 1 Shock 87 2 Upright Endcap 88 4 Wheel Washer 89 1 Pulse Sensor Cover 90 1 Latch Warning Decal 91 1 Incline Motor 92 1 Controller Wire 93 1 Lift Motor Bolt 94 6 Sensor Cover Screw/Rear Foot Screw 95 1 Tie Holder 96 2 Tie 97 5 8" Cable Tie 98 4 Bumper 26 PFTL709940 R1104A To locate the parts listed below, see the EXPLODED DRAWING attached in the center of this manual. Screw...
... 1 Console 82 1 Key/Clip 83 1 Console Base (Bottom) 84 1 Pulse Sensor Plate 85 1 Upright Wire Harness 86 1 Shock 87 2 Upright Endcap 88 4 Wheel Washer 89 1 Pulse Sensor Cover 90 1 Latch Warning Decal 91 1 Incline Motor 92 1 Controller Wire 93 1 Lift Motor Bolt 94 6 Sensor Cover Screw/Rear Foot Screw 95 1 Tie Holder 96 2 Tie 97 5 8" Cable Tie 98 4 Bumper 26 PFTL709940 R1104A To locate the parts listed below, see the EXPLODED DRAWING attached in the center of this manual. Screw...

English Manual
Page 30
... give the following information: • The MODEL NUMBER of the product (PFTL709940) • The NAME of the product (PROFORM 1160 S treadmill) • The SERIAL NUMBER of the product (see the front cover of this manual) • The KEY NUMBER and DESCRIPTION of the part(s) (see the PART LIST on how long an implied warranty lasts. You may also have other warranty beyond that specifically set forth herein. ICON HEALTH & FITNESS, INC., 1500...
... give the following information: • The MODEL NUMBER of the product (PFTL709940) • The NAME of the product (PROFORM 1160 S treadmill) • The SERIAL NUMBER of the product (see the front cover of this manual) • The KEY NUMBER and DESCRIPTION of the part(s) (see the PART LIST on how long an implied warranty lasts. You may also have other warranty beyond that specifically set forth herein. ICON HEALTH & FITNESS, INC., 1500...

