ProForm 3001 Silent Drive Support and Manuals
Get Help and Manuals for this ProForm item

View All Support Options Below
Free ProForm 3001 Silent Drive manuals!
Problems with ProForm 3001 Silent Drive?
Ask a Question
Free ProForm 3001 Silent Drive manuals!
Problems with ProForm 3001 Silent Drive?
Ask a Question
Popular ProForm 3001 Silent Drive Manual Pages
Owners Manual - Page 1
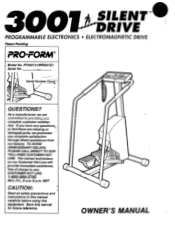
... • ELECTROMAGNETIC DRIVE
Patent Pending
PRO•FORM®
Model No.
If you have any questions,
or find there are missing or
damagedparts, we are
r••• ft.. :aa.- 4 try eeeeeeeee Us
ale
gas
Iliad
via
complete customer satisfac- MST
CAUTION:
Read all safety precautions and instructions in this manual carefully before using...
Owners Manual - Page 2

...PROFORM's obligation under normal use and service conditions, for commercial or rental purposes. No other warranty beyond that specifically set forth above is made must be pre-authorized by PRO FORM. This warranty gives you specific legal rights. This warranty extends only to replacing or repairing... OR USE, COSTS OF REMOVAL, INSTALLATION OR OTHER CONSEQUENTIAL DAMAGES OF WHATSOEVER NATURE...
Owners Manual - Page 3
... PART LIST EXPLODED VIEW ORDERING REPLACEMENT PARTS
3 4 5 6 11 12 14 15 Back Cover
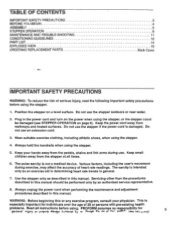
IMPORTANT SAFETY PRECAUTIONS
WARNING: To reduce the risk of serious injury, read the following important safety precautions before using. Keep your physician. PROFORM assumes no responsibility for individuals over the age of 35 or persons with pre-existing health
problems. Read all times...
Owners Manual - Page 4

... blends advanced engineering with innovative styling to the stepper (see the drawing on the front cover for selecting the PROFORM° 3001 SILENT DRIVE stepper with the parts that are labeled.
The model number is printed on the 3001 SILENT DRIVE stepper will be found on a decal attached to provide you with such features as independent-action pedals, adjustable...
Owners Manual - Page 5

...Washers (40) and Nuts (38).
Rest the upper end of the Frame about one fool and place a support under it in the Frame as shown. O
9
51
8
6
11 Attach the lower end of the ... for. Attach the Rear Stabilizer to the Frame with a Handrail Mounting Bolt (53). ASSEMBLY
Place all parts are toward the Frame (11). Assembly can be completed using your own adjustable wrench.
1. Insert a ...
Owners Manual - Page 7
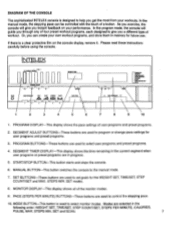
... order: WEIGHT SET, TIME/SET, STEP COUNT/SET, STEPS PER MINUTE, CALORIES,
PULSE, MAX. STEPS MIN. Or, you instant feedback on the console display, remove it. NOMEM,MAW
.n.
4 D
MN
Unt •
PW
LAW MIEM& WW1'
0
ANL -AA 111111 AA
I
3
5
1
2
3
4
STAXMOP
I
5
6
MT NY GI. PROGRAM BUTTONS-These buttons are used to the manual mode.
7. MANUAL BUTTON-This...
Owners Manual - Page 8

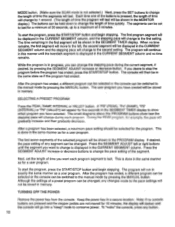
... on your toes as you exercise.
To exercise your calf muscles, rise on your current stepping pace, in the manual mode. When the time goal is completed, a tone will sound and the pace setting will automatically change to 25 steps per minute. Begin stepping, alternately pressing the right and left pedals down .
STEPS...
Owners Manual - Page 9

... the next six upcoming segments.
The segments are selected. Each program segment is used to last for
a different length of time, if desired. The segments can be set to select maximum pace settings for user programs and preset programs. Note: This mode can be selected only when user programs or preset programs are...
Owners Manual - Page 10
... and begin stepping.
When no time remains.
The first seven segments of time quickly. TURNING OFF THE POWER
Remove the power key from the console. gradually increase and then gradually decrease. After a program has been selected, a maximum pace setting should be switched to the manual mode by pressing the MANUAL button.
After the program has...
Owners Manual - Page 11

...can remove the Access Cover (71).
Unplug the power cord. Replace the Access Cover (71).
33
24
N
10
19
19 < 1
71
The axles to be adjusted. Step for a
71
37
few drops of... the HootFcnid lift the Hood off the stepper.
mei
0
0
11 MAINTENANCE AND TROUBLE-SHOOTING
Inspect and tighten all parts of the Hood. Outside surfaces can remove the Access Cover
(71). Remove the...
Owners Manual - Page 12

... your heart rate should consist of three basic parts: a warm-up with the proper intensity.... If your condition, work out 2 to 3 times per week. To maintain or improve your heart ...heart rate using the heart rate as a guide. CONDITIONING GUIDELINES
The following guidelines will help you... as well as offset muscle contractions and other problems caused when you ' training zone.
A day...
Owners Manual - Page 13

... the soles of your hips toward your foot. Stretches: Quadriceps, hip muscles. Hold for balance, reach behind you stretch down toward the wall. Repeat three times for 15 counts, then relax. Stretches: Calves, achilles tendons, and ankles.
Move slowly as you and grasp your toes. Stretches: Hamstrings, lower back and groin...
Owners Manual - Page 14
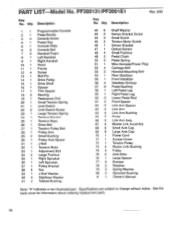
... 1 Power Cord 71 1 Access Cover 72 1 Tension Pulley 73 4 Master Link Bushing 74 2 Pulley 75 2 Axle Shim 76 1 Large Spacer 77 4 Bumper 78 2 Retainer 79 2 Spring Washer 80 2 Sprocket Bushing # 1 Owner's Manual
Note: "#" indicates a non-illustrated part. PART LIST Model No. Qty. Specifications are subject to change without notice. PF300131/PF3001E1
Rev. 3/93
Key No. Qty.
Owners Manual - Page 16

until 6 p.m. The MODEL NUMBER of the product (PROFORM6 3001 SILENT DRIVE stepper). 3. The KEY NUMBER of the part(s) from page 14 of this manual. 5. The NAME of the product (PF300131/PF3001E1). 2. The SERIAL NUMBER of the product (see the front cover of this manual.
•If possible, place the stepper near your telephone for reference when calling. The...
ProForm 3001 Silent Drive Reviews
We have not received any reviews for ProForm yet.