

Owners Manual
Page 11
... may need to come in contact with the four Screws (12). mei 0 0 11 Replace the Access Cover (71). 33 24 N 10 19 19 < 1 71 The axles to be adjusted. Gently pull outward on the sides of 10 the Hood (10) until the tension is needed, turn . Outside surfaces can remove the...
... may need to come in contact with the four Screws (12). mei 0 0 11 Replace the Access Cover (71). 33 24 N 10 19 19 < 1 71 The axles to be adjusted. Gently pull outward on the sides of 10 the Hood (10) until the tension is needed, turn . Outside surfaces can remove the...
Owners Manual
Page 14
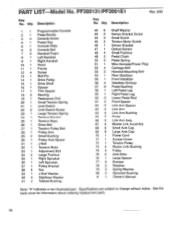
... 1 Console Plate 6 2 Console Bolt 7 2 Handrail Foam 8 1 Left Handrail 9 1 Right Handrail 10 1 Hood 11 1 Frame 12 4 Screw 13 1 Roll Pin 14 1 Drive Pulley 15 1 Drive Shaft 16 1 Spacer 17 1 Thin Spacer 18 2 Bearing 19 1 Resistance Disk 20 1 Small Tension Spring 21 1 Limit Switch 22 2 Limit Switch Screw 23 1 Large... Tension Spring 94 1 Tension RrarkAt 25 1 Tension Rope 26 1 Drive Belt 27 1 Tension Pulley Belt 28 1 Pulley Axle 29 2 Small Bushing 30 1 Pulley Axle Spacer 31 1 J-Bolt 32 1 Tension Motor 33 1 Adjustment Bolt 34 2 Large Pushnut 35 1 Right Sprocket ...
... 1 Console Plate 6 2 Console Bolt 7 2 Handrail Foam 8 1 Left Handrail 9 1 Right Handrail 10 1 Hood 11 1 Frame 12 4 Screw 13 1 Roll Pin 14 1 Drive Pulley 15 1 Drive Shaft 16 1 Spacer 17 1 Thin Spacer 18 2 Bearing 19 1 Resistance Disk 20 1 Small Tension Spring 21 1 Limit Switch 22 2 Limit Switch Screw 23 1 Large... Tension Spring 94 1 Tension RrarkAt 25 1 Tension Rope 26 1 Drive Belt 27 1 Tension Pulley Belt 28 1 Pulley Axle 29 2 Small Bushing 30 1 Pulley Axle Spacer 31 1 J-Bolt 32 1 Tension Motor 33 1 Adjustment Bolt 34 2 Large Pushnut 35 1 Right Sprocket ...

