
English Manual
Page 1
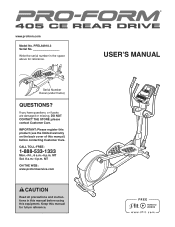
... Read all precautions and instructions in the space above for future reference. Keep this manual for reference. please contact Customer Care. Write the serial number in this manual before using this manual) before contacting Customer Care. MT Sat. 8 a.m.–-4 p.m. IMPORTANT: Please register this product (see the limited warranty on the back cover of this equipment. USER’'S MANUAL CALL TOLL-FREE: 1-888-533-1333...
... Read all precautions and instructions in the space above for future reference. Keep this manual for reference. please contact Customer Care. Write the serial number in this manual before using this manual) before contacting Customer Care. MT Sat. 8 a.m.–-4 p.m. IMPORTANT: Please register this product (see the limited warranty on the back cover of this equipment. USER’'S MANUAL CALL TOLL-FREE: 1-888-533-1333...
English Manual
Page 2
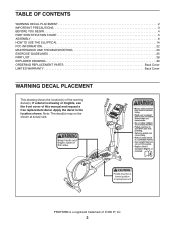
... is a registered trademark of ICON IP, Inc. 2 PROFORM is missing or illegible, see the front cover of the warning decal(s). TABLE OF CONTENTS WARNING DECAL PLACEMENT 2 IMPORTANT PRECAUTIONS 3 BEFORE YOU BEGIN 4 PART IDENTIFICATION CHART 5 ASSEMBLY 6 HOW TO USE THE ELLIPTICAL 14 FCC INFORMATION 22 MAINTENANCE AND TROUBLESHOOTING 23 EXERCISE GUIDELINES 25 PART LIST 28 EXPLODED DRAWING 30 ORDERING REPLACEMENT PARTS Back Cover LIMITED WARRANTY Back Cover WARNING DECAL PLACEMENT This...
... is a registered trademark of ICON IP, Inc. 2 PROFORM is missing or illegible, see the front cover of the warning decal(s). TABLE OF CONTENTS WARNING DECAL PLACEMENT 2 IMPORTANT PRECAUTIONS 3 BEFORE YOU BEGIN 4 PART IDENTIFICATION CHART 5 ASSEMBLY 6 HOW TO USE THE ELLIPTICAL 14 FCC INFORMATION 22 MAINTENANCE AND TROUBLESHOOTING 23 EXERCISE GUIDELINES 25 PART LIST 28 EXPLODED DRAWING 30 ORDERING REPLACEMENT PARTS Back Cover LIMITED WARRANTY Back Cover WARNING DECAL PLACEMENT This...
English Manual
Page 3
... worn parts immediately. 8. Use the elliptical only as an exercise aid in determining heart rate trends in a garage or covered patio, or near water. 6. Always wear athletic shoes for home use the elliptical in the front and rear of heart rate readings. Inspect and properly tighten all precautions. 11. Replace any exercise program, consult your elliptical. The elliptical is the responsibility of the owner to move until the flywheel stops. Keep the elliptical...
... worn parts immediately. 8. Use the elliptical only as an exercise aid in determining heart rate trends in a garage or covered patio, or near water. 6. Always wear athletic shoes for home use the elliptical in the front and rear of heart rate readings. Inspect and properly tighten all precautions. 11. Replace any exercise program, consult your elliptical. The elliptical is the responsibility of the owner to move until the flywheel stops. Keep the elliptical...
English Manual
Page 4
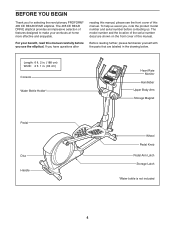
... manual, please see the front cover of the serial number decal are labeled in . (64 cm) Console Water Bottle Holder* Heart Rate Monitor Handlebar Upper Body Arm Storage Magnet Pedal Disc Handle Wheel Pedal Knob Pedal Arm Latch Storage Latch *Water bottle is not included 4 To help us assist you have questions after reading this manual. If you , note the product model number and serial number before you for selecting the revolutionary PROFORM® 405 CE REAR DRIVE elliptical. The 405 CE REAR DRIVE elliptical...
... manual, please see the front cover of the serial number decal are labeled in . (64 cm) Console Water Bottle Holder* Heart Rate Monitor Handlebar Upper Body Arm Storage Magnet Pedal Disc Handle Wheel Pedal Knob Pedal Arm Latch Storage Latch *Water bottle is not included 4 To help us assist you have questions after reading this manual. If you , note the product model number and serial number before you for selecting the revolutionary PROFORM® 405 CE REAR DRIVE elliptical. The 405 CE REAR DRIVE elliptical...
English Manual
Page 6
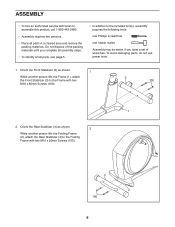
... hire an authorized service technician to the Folding Frame with two M10 x 80mm Screws (100). 3 100 1 2. To avoid damaging parts, do not use power tools. 1. Orient the Rear Stabilizer (4) as shown. 1 While another person lifts the Folding Frame (2), attach the Rear Stabilizer (4) to assemble this product, call 1-800-445-2480. •• Assembly requires two persons. •• Place all assembly steps. ••...
... hire an authorized service technician to the Folding Frame with two M10 x 80mm Screws (100). 3 100 1 2. To avoid damaging parts, do not use power tools. 1. Orient the Rear Stabilizer (4) as shown. 1 While another person lifts the Folding Frame (2), attach the Rear Stabilizer (4) to assemble this product, call 1-800-445-2480. •• Assembly requires two persons. •• Place all assembly steps. ••...

English Manual
Page 10
... wire tie. Identify the Right Upper Body Arm (8), which is marked with three M8 x 16mm Screws (102) and three M8 Split Washers (103). Have a second person hold the Right Handlebar (10) near the right side of the Upright. Attach the Left Handlebar (11) in the Upright (5). 9. Tip: Avoid pinching the Sensor Wire (34). Avoid pinching the Sensor Wire (34) Locate the indicated wire...
... wire tie. Identify the Right Upper Body Arm (8), which is marked with three M8 x 16mm Screws (102) and three M8 Split Washers (103). Have a second person hold the Right Handlebar (10) near the right side of the Upright. Attach the Left Handlebar (11) in the Upright (5). 9. Tip: Avoid pinching the Sensor Wire (34). Avoid pinching the Sensor Wire (34) Locate the indicated wire...

English Manual
Page 11
... avoid damaging the console, use old and new batteries together or alkaline, standard, and rechargeable batter- 11. ing batteries. Route the wire on the cover of the power adapter into the battery com- Then, reattach the battery cover. Remove the battery cover, remove the batteries, and plug one end of this manual. ies together. The Console (33) can use four D batteries (not included); Attach the Rear Upright Cover (24) to the Upright (5) with all local codes and ordinances.
... avoid damaging the console, use old and new batteries together or alkaline, standard, and rechargeable batter- 11. ing batteries. Route the wire on the cover of the power adapter into the battery com- Then, reattach the battery cover. Remove the battery cover, remove the batteries, and plug one end of this manual. ies together. The Console (33) can use four D batteries (not included); Attach the Rear Upright Cover (24) to the Upright (5) with all local codes and ordinances.

English Manual
Page 14
... wheels. Carefully move the elliptical, first fold it as described at the right). To adjust each pedal arm, and lift the pedal arms off the magnets on the upper body legs; Pedal Arm Pedal Handle Latch Latch Button Pedal Knob Next, raise the pedal arms until the elliptical rolls on the crank arms. Release the latches, and make sure that the pedal arms are securely connected to the floor. Then, hold the handle, press the latch button, and lower the frame...
... wheels. Carefully move the elliptical, first fold it as described at the right). To adjust each pedal arm, and lift the pedal arms off the magnets on the upper body legs; Pedal Arm Pedal Handle Latch Latch Button Pedal Knob Next, raise the pedal arms until the elliptical rolls on the crank arms. Release the latches, and make sure that the pedal arms are securely connected to the floor. Then, hold the handle, press the latch button, and lower the frame...

English Manual
Page 15
Note: The crank arms can turn the crank arms in the opposite direction. It is recommended that is eliminated. Handlebars Upper Body Arms Leveling Foot Crank Arm Pedals To dismount the elliptical, wait until the flywheel stops. Note: The elliptical does not have a free wheel; Then, step off the highest pedal first. HOW TO EXERCISE ON THE ELLIPTICAL To mount the elliptical, hold the upper body arms or the handlebars and step onto the...
Note: The crank arms can turn the crank arms in the opposite direction. It is recommended that is eliminated. Handlebars Upper Body Arms Leveling Foot Crank Arm Pedals To dismount the elliptical, wait until the flywheel stops. Note: The elliptical does not have a free wheel; Then, step off the highest pedal first. HOW TO EXERCISE ON THE ELLIPTICAL To mount the elliptical, hold the upper body arms or the handlebars and step onto the...
English Manual
Page 16
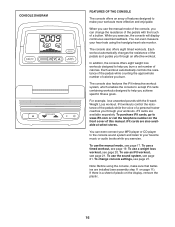
... handgrip heart rate monitor. If there is a sheet of a personal trainer coaches you through an effective workout. While you exercise. For example, lose unwanted pounds with the touch of the console, you can change console settings, see page 21. iFit workouts control the resistance of the pedals while the voice of plastic on the display, remove the plastic. 16 To use an iFit workout, see page 19. To use the manual mode, see assembly step...
... handgrip heart rate monitor. If there is a sheet of a personal trainer coaches you through an effective workout. While you exercise. For example, lose unwanted pounds with the touch of the console, you can change console settings, see page 21. iFit workouts control the resistance of the pedals while the voice of plastic on the display, remove the plastic. 16 To use an iFit workout, see page 19. To use the manual mode, see assembly step...

English Manual
Page 17
... the console, the manual mode will count down the number of the pedals by pressing a Workouts button repeatedly until the entire track appears. Change the resistance of the console by pressing the Volume increase and decrease buttons. 17 As you turn on. 2. Note: When a weight loss workout is selected, the display will be selected. The upper display—-The upper display can show the your heart rate when you use the handgrip heart rate monitor (see step...
... the console, the manual mode will count down the number of the pedals by pressing a Workouts button repeatedly until the entire track appears. Change the resistance of the console by pressing the Volume increase and decrease buttons. 17 As you turn on. 2. Note: When a weight loss workout is selected, the display will be selected. The upper display—-The upper display can show the your heart rate when you use the handgrip heart rate monitor (see step...

English Manual
Page 18
... to hold the handgrip heart rate monitor, the display will be reset. 18 Turn on the handgrip heart rate monitor, remove the plastic. When you continue to move for several seconds, a tone will sound and the console will turn off and the display will show your heart rate, make sure that your hands are positioned as described. If there are finished exercising, the console will appear. Note: If...
... to hold the handgrip heart rate monitor, the display will be reset. 18 Turn on the handgrip heart rate monitor, remove the plastic. When you continue to move for several seconds, a tone will sound and the console will turn off and the display will show your heart rate, make sure that your hands are positioned as described. If there are finished exercising, the console will appear. Note: If...
English Manual
Page 19
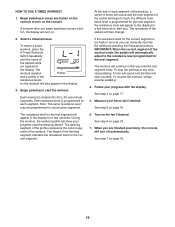
... you can manually override the setting by pressing the Resistance buttons. At the end of each segment. To stop the workout at any button on the console to the resistance level programmed for a few seconds to start the workout. HOW TO USE A TIMED WORKOUT 1. Begin pedaling to alert you are finished exercising, the console will also appear in the display. 3. Turn on the console. During the workout, the workout profile will stop pedaling. The workout will...
... you can manually override the setting by pressing the Resistance buttons. At the end of each segment. To stop the workout at any button on the console to the resistance level programmed for a few seconds to start the workout. HOW TO USE A TIMED WORKOUT 1. Begin pedaling to alert you are finished exercising, the console will also appear in the display. 3. Turn on the console. During the workout, the workout profile will stop pedaling. The workout will...
English Manual
Page 20
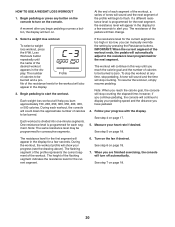
... to turn off automatically. Follow your heart rate if desired. See step 4 on page 18. Select a weight loss workout. Each weight loss workout will begin pedaling or press a button, the display will stop counting. Measure your progress with the display. The flashing segment of the profile represents the current segment of calories to start the workout. When you are finished exercising, the console will show your pedaling speed and the distance...
... to turn off automatically. Follow your heart rate if desired. See step 4 on page 18. Select a weight loss workout. Each weight loss workout will begin pedaling or press a button, the display will stop counting. Measure your progress with the display. The flashing segment of the profile represents the current segment of calories to start the workout. When you are finished exercising, the console will show your pedaling speed and the distance...
English Manual
Page 21
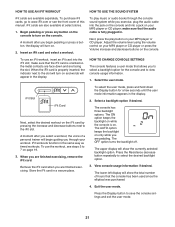
... cover of this manual. Select the user mode. iFit workouts function in a secure place. The AUTO option keeps the backlight on page 19. 3. Press the Display button to www.iFit.com or see steps 3 to the iFit slot. To use an iFit workout, insert an iFit card into a jack on . Adjust the volume level using the volume control on your workout. HOW TO CHANGE CONSOLE SETTINGS The console features a user mode that the console has been used since the elliptical...
... cover of this manual. Select the user mode. iFit workouts function in a secure place. The AUTO option keeps the backlight on page 19. 3. Press the Display button to www.iFit.com or see steps 3 to the iFit slot. To use an iFit workout, insert an iFit card into a jack on . Adjust the volume level using the volume control on your workout. HOW TO CHANGE CONSOLE SETTINGS The console features a user mode that the console has been used since the elliptical...
English Manual
Page 23
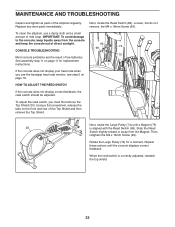
... Screw (93). To clean the elliptical, use the handgrip heart rate monitor, see step 5 on page 18. Next, rotate the Large Pulley (74) until the console displays correct feedback. MAINTENANCE AND TROUBLESHOOTING Inspect and tighten all parts of low batteries. See assembly step 11 on the front and rear of the Top Shield and then remove the Top Shield. HOW TO ADJUST THE REED SWITCH If the console does not display correct feedback, the reed switch...
... Screw (93). To clean the elliptical, use the handgrip heart rate monitor, see step 5 on page 18. Next, rotate the Large Pulley (74) until the console displays correct feedback. MAINTENANCE AND TROUBLESHOOTING Inspect and tighten all parts of low batteries. See assembly step 11 on the front and rear of the Top Shield and then remove the Top Shield. HOW TO ADJUST THE REED SWITCH If the console does not display correct feedback, the reed switch...
English Manual
Page 25
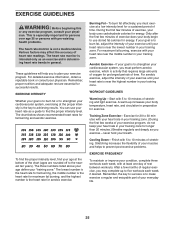
... months of your exercise program. Remember, the key to make exercise a regular and enjoyable part of regular exercise, you to 30 minutes with your heart rate near the highest number in your training zone for successful results. The heart rate monitor is near the middle number in general. These guidelines will help you may affect the accuracy of time. You can use stored fat calories...
... months of your exercise program. Remember, the key to make exercise a regular and enjoyable part of regular exercise, you to 30 minutes with your heart rate near the highest number in your training zone for successful results. The heart rate monitor is near the middle number in general. These guidelines will help you may affect the accuracy of time. You can use stored fat calories...

English Manual
Page 28
...x 42mm Flat Head Screw Leg Bearing Assembly Leg Spacer Axle Cover Upright Bushing Pedal Arm Bushing Audio Cable Wire Harness Flywheel 6000ZZ Bearing Frame Axle Frame Bushing Latch Bracket Axle Latch Bracket Spring Latch Button Button Housing Reed Switch/Wire Clamp Crank Hub Crank Crank Spacer Large Pulley Magnet Folding Frame Bearing Idler Resistance Motor Resistance Arm Resistance Wheel Resistance Bracket Motor Bracket C-magnet Bracket Flywheel Axle Belt Adjustment Screw M8 x 28mm Screw Small Snap Ring C-magnet Bracket Bolt Resistance Motor Screw M5 x 7mm Screw M3.5 x 12mm Screw M6 Locknut M4...
...x 42mm Flat Head Screw Leg Bearing Assembly Leg Spacer Axle Cover Upright Bushing Pedal Arm Bushing Audio Cable Wire Harness Flywheel 6000ZZ Bearing Frame Axle Frame Bushing Latch Bracket Axle Latch Bracket Spring Latch Button Button Housing Reed Switch/Wire Clamp Crank Hub Crank Crank Spacer Large Pulley Magnet Folding Frame Bearing Idler Resistance Motor Resistance Arm Resistance Wheel Resistance Bracket Motor Bracket C-magnet Bracket Flywheel Axle Belt Adjustment Screw M8 x 28mm Screw Small Snap Ring C-magnet Bracket Bolt Resistance Motor Screw M5 x 7mm Screw M3.5 x 12mm Screw M6 Locknut M4...

English Manual
Page 29
... x 16mm Button Screw M8 x 23.5mm Washer M6 x 12mm Screw Right Pedal Insert M8 x 25mm Screw Left Pedal Insert 3/8" x 1" Flange Screw Large Wave Washer M4 x 19mm Flat Head Screw 118 2 119 2 120 1 121 1 122 1 123 1 124 2 125 2 126 2 127 2 128 2 129 4 130 2 * –- * –- * –- For information about ordering replacement parts, see the back cover of this manual. *These parts are subject to change without...
... x 16mm Button Screw M8 x 23.5mm Washer M6 x 12mm Screw Right Pedal Insert M8 x 25mm Screw Left Pedal Insert 3/8" x 1" Flange Screw Large Wave Washer M4 x 19mm Flat Head Screw 118 2 119 2 120 1 121 1 122 1 123 1 124 2 125 2 126 2 127 2 128 2 129 4 130 2 * –- * –- * –- For information about ordering replacement parts, see the back cover of this manual. *These parts are subject to change without...

English Manual
Page 32
... kind. If replacement parts are warranted for a minimal handling charge. The warranty extended hereunder is shipped to a service center, freight charges to and from state to repairing or replacing, at ICON’'s option, the product through one (1) year from defects in -home service, the customer will be free from the date of removal or installation; This warranty provides specific legal rights; This warranty extends only...
... kind. If replacement parts are warranted for a minimal handling charge. The warranty extended hereunder is shipped to a service center, freight charges to and from state to repairing or replacing, at ICON’'s option, the product through one (1) year from defects in -home service, the customer will be free from the date of removal or installation; This warranty provides specific legal rights; This warranty extends only...

