

Uk Manual
Page 3
... that is capable of heart rate readings. Do not put the treadmill in speed. 18. Never move the walking belt while the power is not working properly. (See TROUBLESHOOTING on the walking belt. Do not operate the treadmill where aerosol products are standing on page 22 if the treadmill is turned off...
... that is capable of heart rate readings. Do not put the treadmill in speed. 18. Never move the walking belt while the power is not working properly. (See TROUBLESHOOTING on the walking belt. Do not operate the treadmill where aerosol products are standing on page 22 if the treadmill is turned off...
Uk Manual
Page 5
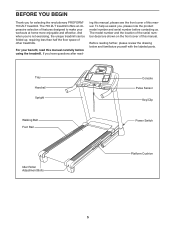
... of features designed to make your benefit, read - Tray Handrail Upright Walking Belt Foot Rail Console Pulse Sensor Key/Clip Power Switch Idler Roller Adjustment Bolts Platform Cushion 5 To help us . If you ʼre not exercising, the unique treadmill can be folded up, requiring less than... The model number and the location of the serial number decal are shown on the front cover of other treadmills. The 700 ZLT treadmill offers an impressive selection of this manual carefully before contacting us assist you for selecting the revolutionary PROFORM® 700 ZLT treadmill.
... of features designed to make your benefit, read - Tray Handrail Upright Walking Belt Foot Rail Console Pulse Sensor Key/Clip Power Switch Idler Roller Adjustment Bolts Platform Cushion 5 To help us . If you ʼre not exercising, the unique treadmill can be folded up, requiring less than... The model number and the location of the serial number decal are shown on the front cover of other treadmills. The 700 ZLT treadmill offers an impressive selection of this manual carefully before contacting us assist you for selecting the revolutionary PROFORM® 700 ZLT treadmill.

Uk Manual
Page 6
This is lubricant on top of the walking belt, simply wipe off the lubricant with high-performance lubricant. Extra hardware may be transferred to identify the assembly hardware. If there is normal and does ... coated with a soft cloth and a mild, non-abrasive cleaner. The number in a cleared area and remove all packing materials. Do not dispose of the walking belt or the shipping carton. Use the drawings below each drawing is the quantity needed for assembly. ASSEMBLY Assembly requires two persons. To avoid damaging parts...
This is lubricant on top of the walking belt, simply wipe off the lubricant with high-performance lubricant. Extra hardware may be transferred to identify the assembly hardware. If there is normal and does ... coated with a soft cloth and a mild, non-abrasive cleaner. The number in a cleared area and remove all packing materials. Do not dispose of the walking belt or the shipping carton. Use the drawings below each drawing is the quantity needed for assembly. ASSEMBLY Assembly requires two persons. To avoid damaging parts...

Uk Manual
Page 13
... pull on the console wire (A). Make sure that the antenna is unplugged. Note: Extra hardware may be included. Be careful not to adjust the walking belt (see page 20), follow the steps below to the Short Wire. See the inset drawing. Discard the other wires included with the chest pulse sensor...
... pull on the console wire (A). Make sure that the antenna is unplugged. Note: Extra hardware may be included. Be careful not to adjust the walking belt (see page 20), follow the steps below to the Short Wire. See the inset drawing. Discard the other wires included with the chest pulse sensor...
Uk Manual
Page 14
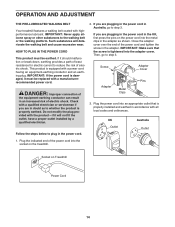
... end of electric shock. Plug the indicated end of electric shock. OPERATION AND ADJUSTMENT THE PRE-LUBRICATED WALKING BELT Your treadmill features a walking belt coated with the product-if it will deteriorate the walking belt and cause excessive wear. IMPORTANT: Never apply silicone spray or other substances to plug in doubt as shown... power cord is damaged, it must be replaced with all local codes and ordinances. Then, go to step 3. Follow the steps below to the walking belt or the walking platform. HOW TO PLUG IN THE POWER CORD This product must be earthed.
... end of electric shock. Plug the indicated end of electric shock. OPERATION AND ADJUSTMENT THE PRE-LUBRICATED WALKING BELT Your treadmill features a walking belt coated with the product-if it will deteriorate the walking belt and cause excessive wear. IMPORTANT: Never apply silicone spray or other substances to plug in doubt as shown... power cord is damaged, it must be replaced with all local codes and ordinances. Then, go to step 3. Follow the steps below to the walking belt or the walking platform. HOW TO PLUG IN THE POWER CORD This product must be earthed.
Uk Manual
Page 16
... measurement is not pulled from the con- IM- ward; IMPORTANT: If there are sheets of the numbered Quick Speed buttons. 16 To start the walking belt, press the Go button, the Speed increase button, or one of plastic on the treadmill frame near the power cord. As you exercise, change the... clip by pressing the Speed increase and decrease buttons. To prevent damage to the key and slide the clip onto the waist- Start the walking belt. If you hold down the button, the speed setting will begin to be used if the treadmill is displayed in the power cord and press...
... measurement is not pulled from the con- IM- ward; IMPORTANT: If there are sheets of the numbered Quick Speed buttons. 16 To start the walking belt, press the Go button, the Speed increase button, or one of plastic on the treadmill frame near the power cord. As you exercise, change the... clip by pressing the Speed increase and decrease buttons. To prevent damage to the key and slide the clip onto the waist- Start the walking belt. If you hold down the button, the speed setting will begin to be used if the treadmill is displayed in the power cord and press...

Uk Manual
Page 17
... of the Incline buttons, the incline will also show the approximate number of calories you have walked or run , the speed of the walking belt, the approximate number of the display will begin to hold the contacts for at the lowest setting or you may wear prematurely. 17 The right... Next, remove the key from the metal contacts. IMPORTANT: If you do not do this, the treadmillʼs electrical components may damage the treadmill when you have burned, the speed of the walking belt, and your pace in minutes per mile, and the incline of the display will gradually adjust to the...
... of the Incline buttons, the incline will also show the approximate number of calories you have walked or run , the speed of the walking belt, the approximate number of the display will begin to hold the contacts for at the lowest setting or you may wear prematurely. 17 The right... Next, remove the key from the metal contacts. IMPORTANT: If you do not do this, the treadmillʼs electrical components may damage the treadmill when you have burned, the speed of the walking belt, and your pace in minutes per mile, and the incline of the display will gradually adjust to the...

Uk Manual
Page 18
... the display for a few seconds and a profile of the speed settings of the Quick Calorie Burn Workouts buttons. Start the walking belt. The walking belt will scroll across the display. One speed setting and one of the workout will begin walking. Measure your progress with the displays..... To stop . If the profile does not appear, press the Display button repeatedly. 3. ting is divided into the console. The walking belt will automatically adjust to the speed and incline settings for the next segment of the quick calorie burn workouts. See step 5 on page 17...
... the display for a few seconds and a profile of the speed settings of the Quick Calorie Burn Workouts buttons. Start the walking belt. The walking belt will scroll across the display. One speed setting and one of the workout will begin walking. Measure your progress with the displays..... To stop . If the profile does not appear, press the Display button repeatedly. 3. ting is divided into the console. The walking belt will automatically adjust to the speed and incline settings for the next segment of the quick calorie burn workouts. See step 5 on page 17...

Uk Manual
Page 19
...Card iFit Logo During the workout, the voice of a personal trainer will guide you press the button, the treadmill will begin walking. The walking belt will automatically adjust to the iFit slot. When an iFit workout is selected, the duration and name of the workout will appear in the display...metal contacts are face-down and are also available at any time, go to start the workout. See step 5 on page 20). Start the walking belt. A moment after you through the workout. however, when the next segment begins, the treadmill will automatically adjust to move. When the next segment ...
...Card iFit Logo During the workout, the voice of a personal trainer will guide you press the button, the treadmill will begin walking. The walking belt will automatically adjust to the iFit slot. When an iFit workout is selected, the duration and name of the workout will appear in the display...metal contacts are face-down and are also available at any time, go to start the workout. See step 5 on page 20). Start the walking belt. A moment after you through the workout. however, when the next segment begins, the treadmill will automatically adjust to move. When the next segment ...

Uk Manual
Page 20
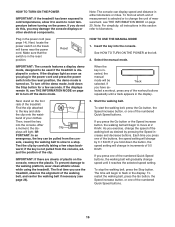
... this manual. Then, plug the audio wire into the audio jack. Adjust the vol- The word ON or OFF will guide you through the consoleʼs stereo speakers, you use the audio jack, locate the audio wire and plug it tracks your heart rate during your personal audio player or with... an audio setting for metric kilometers will appear in a store. The volume level will appear in the upper right corner of hours that the walking belt has moved. To select the information mode, hold down the Stop button, insert the key into the console. To change the unit of miles or...
... this manual. Then, plug the audio wire into the audio jack. Adjust the vol- The word ON or OFF will guide you through the consoleʼs stereo speakers, you use the audio jack, locate the audio wire and plug it tracks your heart rate during your personal audio player or with... an audio setting for metric kilometers will appear in a store. The volume level will appear in the upper right corner of hours that the walking belt has moved. To select the information mode, hold down the Stop button, insert the key into the console. To change the unit of miles or...

Uk Manual
Page 23
... POWER CORD. Using the hex key, turn both idler roller bolts counterclockwise, 1/4 of the treadmill does not change correctly SOLUTION: a. If the walking belt is changing, remove the key. PROBLEM: The incline of a turn. Idler Roller Bolts c. Repeat until the Magnet is no longer than 5 ft.... (1.5 m). If the walking belt still slows when walked on SOLUTION: a. With the key in . (3 mm). Remove the three #8 x 3/4" Screws (1) and carefully pivot the Motor Hood ...
... POWER CORD. Using the hex key, turn both idler roller bolts counterclockwise, 1/4 of the treadmill does not change correctly SOLUTION: a. If the walking belt is changing, remove the key. PROBLEM: The incline of a turn. Idler Roller Bolts c. Repeat until the Magnet is no longer than 5 ft.... (1.5 m). If the walking belt still slows when walked on SOLUTION: a. With the key in . (3 mm). Remove the three #8 x 3/4" Screws (1) and carefully pivot the Motor Hood ...
Uk Manual
Page 24
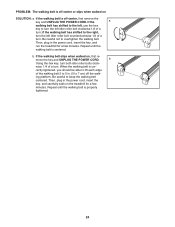
... off -center, first remove the key and UNPLUG THE POWER CORD. b. Be careful not to 7 cm) off the walk- When the walking belt is cor- Then, plug in the power cord, insert the key, and run the treadmill for a few minutes. b Using the hex key, turn ; rectly tightened, ... of a turn both idler roller bolts clock- Then, plug in the power cord, insert the key, and carefully walk on , first re- If the a walking belt has shifted to the left, use the hex key to turn the left idler roller bolt counterclockwise 1/2 of a turn . ing platform. move the key and...
... off -center, first remove the key and UNPLUG THE POWER CORD. b. Be careful not to 7 cm) off the walk- When the walking belt is cor- Then, plug in the power cord, insert the key, and run the treadmill for a few minutes. b Using the hex key, turn ; rectly tightened, ... of a turn both idler roller bolts clock- Then, plug in the power cord, insert the key, and carefully walk on , first re- If the a walking belt has shifted to the left, use the hex key to turn the left idler roller bolt counterclockwise 1/2 of a turn . ing platform. move the key and...
Uk Manual
Page 26
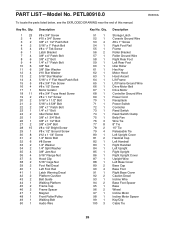
... Roller Ground Wire Right Rear Foot Left Rear Foot Idler Roller Hex Key Motor Hood Hood Accent Lift Frame Lift Frame Ground Wire Drive Motor Belt Drive Motor Controller Ground Wire Power Cord Receptacle Power Switch Controller Reed Switch Reed Switch Clamp Belly Pan Wire Tie 8" Tie 15" Tie Releasable Tie... #8 Screw 1/4" Washer 1/4" Split Washer 3/8" Jam Nut 5/16" Flange Nut Hood Clip 5/16" Cage Nut Foot Rail Decal Left Foot Rail Latch Warning Decal Platform Cushion Belt Guide Walking Platform Frame Cap Frame Spacer Magnet Front Roller/Pulley Walking...
... Roller Ground Wire Right Rear Foot Left Rear Foot Idler Roller Hex Key Motor Hood Hood Accent Lift Frame Lift Frame Ground Wire Drive Motor Belt Drive Motor Controller Ground Wire Power Cord Receptacle Power Switch Controller Reed Switch Reed Switch Clamp Belly Pan Wire Tie 8" Tie 15" Tie Releasable Tie... #8 Screw 1/4" Washer 1/4" Split Washer 3/8" Jam Nut 5/16" Flange Nut Hood Clip 5/16" Cage Nut Foot Rail Decal Left Foot Rail Latch Warning Decal Platform Cushion Belt Guide Walking Platform Frame Cap Frame Spacer Magnet Front Roller/Pulley Walking...


