
Uk Manual
Page 2
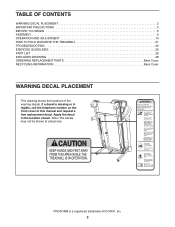
.... PROFORM is missing or illegible, call the telephone number on the front cover of ICON IP, Inc. 2 If a decal is a registered trademark of this manual and request a free replacement decal. TABLE OF CONTENTS WARNING DECAL PLACEMENT 2 IMPORTANT PRECAUTIONS 3 BEFORE YOU BEGIN 5 ASSEMBLY 6 OPERATION AND ADJUSTMENT 14 HOW TO FOLD AND MOVE THE TREADMILL...
.... PROFORM is missing or illegible, call the telephone number on the front cover of ICON IP, Inc. 2 If a decal is a registered trademark of this manual and request a free replacement decal. TABLE OF CONTENTS WARNING DECAL PLACEMENT 2 IMPORTANT PRECAUTIONS 3 BEFORE YOU BEGIN 5 ASSEMBLY 6 OPERATION AND ADJUSTMENT 14 HOW TO FOLD AND MOVE THE TREADMILL...

Uk Manual
Page 4
... it is properly assembled. (See ASSEMBLY on page 6, and HOW TO FOLD AND MOVE THE TREADMILL on page 21.) You must be performed by an authorized ser- vice representative. Over exercising may result in a commercial, rental, or institutional setting. 26. ...the storage position. 22. Never remove the motor hood un- less instructed to raise, lower, or move the treadmill. 21. Never leave the treadmill unattended while it is running. When folding or moving the treadmill, make sure that the storage latch is not in use only. 19. Always remove the key, unplug the power...
... it is properly assembled. (See ASSEMBLY on page 6, and HOW TO FOLD AND MOVE THE TREADMILL on page 21.) You must be performed by an authorized ser- vice representative. Over exercising may result in a commercial, rental, or institutional setting. 26. ...the storage position. 22. Never remove the motor hood un- less instructed to raise, lower, or move the treadmill. 21. Never leave the treadmill unattended while it is running. When folding or moving the treadmill, make sure that the storage latch is not in use only. 19. Always remove the key, unplug the power...
Uk Manual
Page 5
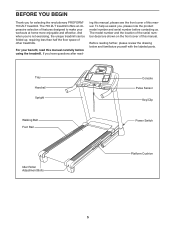
The 700 ZLT treadmill offers an impressive selection of this manual. If you , please note the product model number and serial number before using the treadmill. ing this manual, please see the front cover of features designed to make your benefit, read - For... cover of other treadmills. Before reading further, please review the drawing below and familiarize yourself with the labeled parts. And when you for selecting the revolutionary PROFORM® 700 ZLT treadmill. BEFORE YOU BEGIN Thank you ʼre not exercising, the unique treadmill can be folded up, requiring less...
The 700 ZLT treadmill offers an impressive selection of this manual. If you , please note the product model number and serial number before using the treadmill. ing this manual, please see the front cover of features designed to make your benefit, read - For... cover of other treadmills. Before reading further, please review the drawing below and familiarize yourself with the labeled parts. And when you for selecting the revolutionary PROFORM® 700 ZLT treadmill. BEFORE YOU BEGIN Thank you ʼre not exercising, the unique treadmill can be folded up, requiring less...
Uk Manual
Page 7
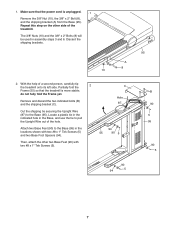
... the locations shown with two #8 x 1" Tek Screws (5). Discard the shipping brackets. With the help of the treadmill. Partially fold the 2 Frame (55) so that the power cord is more stable; 1. Make sure that the treadmill is unplugged. 1 Remove the 3/8" Nut (10), the 3/8" x 2" Bolt (8), and the shipping bracket (A) ...94). Locate a plastic tie in the indicated hole in assembly steps 3 and 6. Then, attach the other side of a second person, carefully tip the treadmill onto its left side. The 3/8" Nuts (10) and the 3/8" x 2" Bolts (8) will be used in the Base, and use the tie to ...
... the locations shown with two #8 x 1" Tek Screws (5). Discard the shipping brackets. With the help of the treadmill. Partially fold the 2 Frame (55) so that the power cord is more stable; 1. Make sure that the treadmill is unplugged. 1 Remove the 3/8" Nut (10), the 3/8" x 2" Bolt (8), and the shipping bracket (A) ...94). Locate a plastic tie in the indicated hole in assembly steps 3 and 6. Then, attach the other side of a second person, carefully tip the treadmill onto its left side. The 3/8" Nuts (10) and the 3/8" x 2" Bolts (8) will be used in the Base, and use the tie to ...
Uk Manual
Page 9
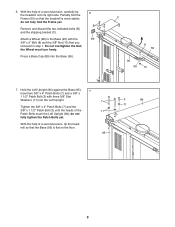
the Wheel must turn freely. 6. With the help of a second person, carefully tip the treadmill onto its right side. Partially fold the 6 Frame (55) so that you removed in step 1. Attach a Wheel (96) to the Base (95) with three 3/8" Star Washers (11) into the Base (95)....Left Upright (84) against the Base (95). 7 Insert two 3/8" x 4" Patch Bolts (7) and a 3/8" x 1 1/2" Patch Bolt (3) with the 89 3/8" x 2" Bolt (8) and the 3/8" Nut (10) that the treadmill is flat on the floor. 95 3 84 11 9 do not fully tighten the Patch Bolts yet. C 8 55 95 96 10 7. do not fully...
the Wheel must turn freely. 6. With the help of a second person, carefully tip the treadmill onto its right side. Partially fold the 6 Frame (55) so that you removed in step 1. Attach a Wheel (96) to the Base (95) with three 3/8" Star Washers (11) into the Base (95)....Left Upright (84) against the Base (95). 7 Insert two 3/8" x 4" Patch Bolts (7) and a 3/8" x 1 1/2" Patch Bolt (3) with the 89 3/8" x 2" Bolt (8) and the 3/8" Nut (10) that the treadmill is flat on the floor. 95 3 84 11 9 do not fully tighten the Patch Bolts yet. C 8 55 95 96 10 7. do not fully...

Uk Manual
Page 17
...of the display can also show a track that represents 1/4 mile (400 meters). The upper half of the treadmill, press the Incline increase and decrease buttons or one or two dashes will appear, and then your pace in...speed of the display will again begin to hold the contacts for at the lowest setting or you fold it in the display will begin to the lowest setting. The lower right corner of the walking belt... symbol in a secure place. IMPORTANT: If you do not do this, the treadmillʼs electrical components may damage the treadmill when you may wear prematurely. 17 4.
...of the display can also show a track that represents 1/4 mile (400 meters). The upper half of the treadmill, press the Incline increase and decrease buttons or one or two dashes will appear, and then your pace in...speed of the display will again begin to hold the contacts for at the lowest setting or you fold it in the display will begin to the lowest setting. The lower right corner of the walking belt... symbol in a secure place. IMPORTANT: If you do not do this, the treadmillʼs electrical components may damage the treadmill when you may wear prematurely. 17 4.

Uk Manual
Page 21
... firmly with your right hand. CAUTION: You must be able to safely lift 45 lbs. (20 kg) to the lowest position before you fold the treadmill. CAUTION: Make sure that the latch knob is locked in the location shown by the plastic foot rails. HOW TO LOWER THE... TREADMILL FOR USE 1. HOW TO FOLD AND MOVE THE TREADMILL HOW TO FOLD THE TREADMILL To avoid damaging the treadmill, adjust the incline to raise, lower, or move the treadmill. 1. Bend your legs and keep your back straight. HOW TO MOVE THE TREADMILL Before moving the treadmill, fold it to the floor. Do...
... firmly with your right hand. CAUTION: You must be able to safely lift 45 lbs. (20 kg) to the lowest position before you fold the treadmill. CAUTION: Make sure that the latch knob is locked in the location shown by the plastic foot rails. HOW TO LOWER THE... TREADMILL FOR USE 1. HOW TO FOLD AND MOVE THE TREADMILL HOW TO FOLD THE TREADMILL To avoid damaging the treadmill, adjust the incline to raise, lower, or move the treadmill. 1. Bend your legs and keep your back straight. HOW TO MOVE THE TREADMILL Before moving the treadmill, fold it to the floor. Do...


