
English Manual
Page 1
... missing parts, we will provide immediate assistance, free of charge. MST CAUTION Read all precautions and instructions in the space above for future reference. USERÕS MANUAL Serial Number Decal (under seat) QUESTIONS? The trained technicians on our customer hot line will guarantee complete satisfaction through direct assistance from our factory. Visit our website at www.proform.com new products, prizes, fitness tips...
... missing parts, we will provide immediate assistance, free of charge. MST CAUTION Read all precautions and instructions in the space above for future reference. USERÕS MANUAL Serial Number Decal (under seat) QUESTIONS? The trained technicians on our customer hot line will guarantee complete satisfaction through direct assistance from our factory. Visit our website at www.proform.com new products, prizes, fitness tips...
English Manual
Page 2
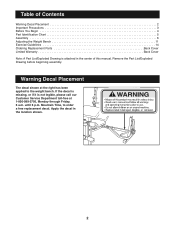
... Begin 4 Part Identification Chart 5 Assembly 6 Adjusting the Weight Bench 11 Exercise Guidelines 14 Ordering Replacement Parts Back Cover Limited Warranty Back Cover Note: A Part List/Exploded Drawing is not legible, please call our Customer Service Department toll-free at the right has been applied to order a free replacement decal. Apply the decal in the center of this manual. If the decal is missing, or if it is attached in the location shown...
... Begin 4 Part Identification Chart 5 Assembly 6 Adjusting the Weight Bench 11 Exercise Guidelines 14 Ordering Replacement Parts Back Cover Limited Warranty Back Cover Note: A Part List/Exploded Drawing is not legible, please call our Customer Service Department toll-free at the right has been applied to order a free replacement decal. Apply the decal in the center of this manual. If the decal is missing, or if it is attached in the location shown...

English Manual
Page 3
... the weight rests are turned so the locking pins are performing bench press exercises, squat exercises, or toe raise exercises, your back to support a maximum of 560 pounds, including the user, a barbell and weights. Do not use of this manual before performing leg curl or leg extension exercises with pre-existing health problems. Read all parts each side of weight (not included) on a level surface. Inspect and tighten all instructions before using the weight bench...
... the weight rests are turned so the locking pins are performing bench press exercises, squat exercises, or toe raise exercises, your back to support a maximum of 560 pounds, including the user, a barbell and weights. Do not use of this manual before performing leg curl or leg extension exercises with pre-existing health problems. Read all parts each side of weight (not included) on a level surface. Inspect and tighten all instructions before using the weight bench...

English Manual
Page 4
... manual carefully before calling. until 6 p.m. The PROFORM¨ 733 is PFBE62290. Department toll-free at 1-800-999-3756, Monday through Friday, 6 a.m. To help you achieve the specific results you for selecting the versatile PROFORM¨ 733 weight bench. They do not correspond to help you , please note the product model number and serial number before Before reading further, please review the drawing using the PROFORM¨ 733 weight bench...
... manual carefully before calling. until 6 p.m. The PROFORM¨ 733 is PFBE62290. Department toll-free at 1-800-999-3756, Monday through Friday, 6 a.m. To help you achieve the specific results you for selecting the versatile PROFORM¨ 733 weight bench. They do not correspond to help you , please note the product model number and serial number before Before reading further, please review the drawing using the PROFORM¨ 733 weight bench...
English Manual
Page 6
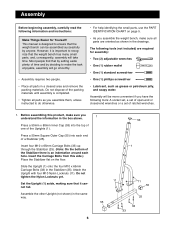
... water. Set the Upright (1) aside, making sure that it is designed to ensure that the weight bench can be more convenient if you assemble the weight bench, make the task enjoyable, assembly will go smoothly. ¥ Assembly requires two people. ¥ Place all parts as you assemble them, unless instructed to do otherwise. ¥ For help identifying the small parts, use the PART IDENTIFICATION CHART on...
... water. Set the Upright (1) aside, making sure that it is designed to ensure that the weight bench can be more convenient if you assemble the weight bench, make the task enjoyable, assembly will go smoothly. ¥ Assembly requires two people. ¥ Place all parts as you assemble them, unless instructed to do otherwise. ¥ For help identifying the small parts, use the PART IDENTIFICATION CHART on...

English Manual
Page 7
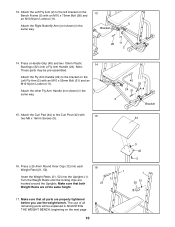
...(46). Insert the Left Crossbar (46) into and out of the Front Leg (19). Slide the bracket on the Bench Frame (5). Set the Curl Post aside until assem- 11 bly step 15. 34 6 19 4. Make sure that all parts are oriented exactly as shown. 2. Insert the Curl Post (42) into ...using an olympic barbell, align the holes indicated by the arrows in drawing 4b. 4a 5 Next, insert two M10 x 70mm Carriage Bolts (56) into the Front leg. 42 Secure the M10 x 70mm Bolts (34) with M10 x 70mm Bolts (34), Support Plates (16), and M10 Nylon Locknuts (11) as shown in the bracket on the Bench...
...(46). Insert the Left Crossbar (46) into and out of the Front Leg (19). Slide the bracket on the Bench Frame (5). Set the Curl Post aside until assem- 11 bly step 15. 34 6 19 4. Make sure that all parts are oriented exactly as shown. 2. Insert the Curl Post (42) into ...using an olympic barbell, align the holes indicated by the arrows in drawing 4b. 4a 5 Next, insert two M10 x 70mm Carriage Bolts (56) into the Front leg. 42 Secure the M10 x 70mm Bolts (34) with M10 x 70mm Bolts (34), Support Plates (16), and M10 Nylon Locknuts (11) as shown in the bracket on the Bench...

English Manual
Page 8
... of the Weight Tube. Attach a Weight Tube (39) to the Leg Lever (18) with the Bolt, two M10 Washers (6), and an M10 Nylon Locknut (11). When moving the Adjustment Tube (29), always make sure the Locking Clip locking clip is in steps 1 to the Backrest (15) with the locking 29 clip into place around the right Upright (1). Press a 25.4mm...
... of the Weight Tube. Attach a Weight Tube (39) to the Leg Lever (18) with the Bolt, two M10 Washers (6), and an M10 Nylon Locknut (11). When moving the Adjustment Tube (29), always make sure the Locking Clip locking clip is in steps 1 to the Backrest (15) with the locking 29 clip into place around the right Upright (1). Press a 25.4mm...

English Manual
Page 9
...to the Bench Frame (5) with two M6 x 16mm Screws (3). Secure each Pad Tube (38). 54 38 19 54 18 Insert the free ends of the Seat (14) to freely pivot 10 the Backrest. Attach the Weight Tube to the bracket on the Adjustment Tube (29). Assemble the Right Fly Arm (not...Weight Tube must slant upward 13 2 37 23 41 12 43 12 23 39 9 Insert the M10 x 165mm Bolt (22) through the Spacer and the Backrest Tube. Tighten the four M6 x 40mm Bolts used in the Leg Lever (18) and the bracket on the other Fly Arm. Tighten the M6 x 65mm Bolt (7). 14 5 30 7 3 11. Press...
...to the Bench Frame (5) with two M6 x 16mm Screws (3). Secure each Pad Tube (38). 54 38 19 54 18 Insert the free ends of the Seat (14) to freely pivot 10 the Backrest. Attach the Weight Tube to the bracket on the Adjustment Tube (29). Assemble the Right Fly Arm (not...Weight Tube must slant upward 13 2 37 23 41 12 43 12 23 39 9 Insert the M10 x 165mm Bolt (22) through the Spacer and the Backrest Tube. Tighten the four M6 x 40mm Bolts used in the Leg Lever (18) and the bracket on the other Fly Arm. Tighten the M6 x 65mm Bolt (7). 14 5 30 7 3 11. Press...
English Manual
Page 10
... Fly Arm (2) with 15 two M6 x 16mm Screws (3). 40 24 51 32 11 2 Bracket 44 3 42 3 16. Make sure that both 12 21 52 12 Weight Rests are hooked around the Uprights. The use of all parts are properly tightened before you use the weight bench. Press a ...Handle Grip (40) and two 10mm Plastic 14 Bushings (32) onto a Fly Arm Handle (24). Attach the Curl Pad (44) to the left bracket on the next page. 10 Attach the Left Fly Arm (2) to the Curl Post (42) with an M10 x 55mm Bolt...
... Fly Arm (2) with 15 two M6 x 16mm Screws (3). 40 24 51 32 11 2 Bracket 44 3 42 3 16. Make sure that both 12 21 52 12 Weight Rests are hooked around the Uprights. The use of all parts are properly tightened before you use the weight bench. Press a ...Handle Grip (40) and two 10mm Plastic 14 Bushings (32) onto a Fly Arm Handle (24). Attach the Curl Pad (44) to the left bracket on the next page. 10 Attach the Left Fly Arm (2) to the Curl Post (42) with an M10 x 55mm Bolt...

English Manual
Page 11
... set of the Backrest (15), move the Adjustment Tube (29) to adjust the weight bench. MOVING THE ADJUSTMENT TUBE Remove the Adjustment Tube (29) by first pushing the end without the locking clip into place around the right Upright (1). Insert the Adjustment Tube (29) by first rotating it will go. Also, refer to the accompanying exercise poster to see the correct form for important information...
... set of the Backrest (15), move the Adjustment Tube (29) to adjust the weight bench. MOVING THE ADJUSTMENT TUBE Remove the Adjustment Tube (29) by first pushing the end without the locking clip into place around the right Upright (1). Insert the Adjustment Tube (29) by first rotating it will go. Also, refer to the accompanying exercise poster to see the correct form for important information...

English Manual
Page 12
... tighten the Adjustment 42 Knob. Note: Make sure that are hooked around the Uprights. Secure the Curl Post with your barbell to go dur- WARNING: Always set both weight rests at 21 the lowest point to the weight bench. Insert the Curl Post (42) into the holes in the Uprights (1) that the locking clips are best suited for the exercise. USING...
... tighten the Adjustment 42 Knob. Note: Make sure that are hooked around the Uprights. Secure the Curl Post with your barbell to go dur- WARNING: Always set both weight rests at 21 the lowest point to the weight bench. Insert the Curl Post (42) into the holes in the Uprights (1) that the locking clips are best suited for the exercise. USING...

English Manual
Page 13
... ATTACHING WEIGHTS TO THE LEG LEVER OR THE FLY ARMS To use the Leg Lever (18) or the Fly Arms (2, 9), slide the desired amount of the way when performing squat exercises. Remove the Adjustment Tube (29) from the back, in the highest set of holes in the bracket. Do not sit on the Front Leg (19) and re-insert it into the upright...
... ATTACHING WEIGHTS TO THE LEG LEVER OR THE FLY ARMS To use the Leg Lever (18) or the Fly Arms (2, 9), slide the desired amount of the way when performing squat exercises. Remove the Adjustment Tube (29) from the back, in the highest set of holes in the bracket. Do not sit on the Front Leg (19) and re-insert it into the upright...

English Manual
Page 14
... of weight training and aerobic exercise will continually adapt and grow. Weight Loss To lose weight, use a low amount of weight and increase the number of repetitions in each set . The combination of your exercise, your muscles will reshape and strengthen your body plus develop your heart and lungs. You should include 6 to 10 different exercises. formed. (A ÒrepetitionÓ is the highest. PERSONALIZING YOUR EXERCISE PROGRAM...
... of weight training and aerobic exercise will continually adapt and grow. Weight Loss To lose weight, use a low amount of weight and increase the number of repetitions in each set . The combination of your exercise, your muscles will reshape and strengthen your body plus develop your heart and lungs. You should include 6 to 10 different exercises. formed. (A ÒrepetitionÓ is the highest. PERSONALIZING YOUR EXERCISE PROGRAM...
English Manual
Page 15
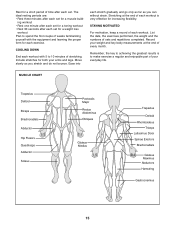
...after each set for a weight loss workout Plan to spend the first couple of weeks familiarizing yourself with 5 to make exercise a regular and enjoyable part of your arms and legs. Ease into each set . MUSCLE CHART Trapezius ...key body measurements at the end of stretching. ing workout ¥ Rest one minute after each set for a toning workout ¥ Rest 30 seconds after each stretch gradually and go only as far as you can without strain. Move slowly as you stretch and do not bounce. List the date, the exercises performed, the weight and the numbers of each workout...
...after each set for a weight loss workout Plan to spend the first couple of weeks familiarizing yourself with 5 to make exercise a regular and enjoyable part of your arms and legs. Ease into each set . MUSCLE CHART Trapezius ...key body measurements at the end of stretching. ing workout ¥ Rest one minute after each set for a toning workout ¥ Rest 30 seconds after each stretch gradually and go only as far as you can without strain. Move slowly as you stretch and do not bounce. List the date, the exercises performed, the weight and the numbers of each workout...

English Manual
Page 16
... Crossbar Bumper Bumper Screw Angle Cap 13mm Spacer M10 x 55mm Bolt Left Weight Rest 50mm x 80mm Inner Cap 19mm Round Inner Cap 50mm Square Outer Cap M10 x 70mm Carriage Bolt UserÕs Manual Exercise Poster Note: Ò#Ó indicates a non-illustrated part. See the back cover of the userÕs manual for information about ordering replacement parts. Part ListÑModel No. Specifications are subject to change without notice.
... Crossbar Bumper Bumper Screw Angle Cap 13mm Spacer M10 x 55mm Bolt Left Weight Rest 50mm x 80mm Inner Cap 19mm Round Inner Cap 50mm Square Outer Cap M10 x 70mm Carriage Bolt UserÕs Manual Exercise Poster Note: Ò#Ó indicates a non-illustrated part. See the back cover of the userÕs manual for information about ordering replacement parts. Part ListÑModel No. Specifications are subject to change without notice.

English Manual
Page 18
... warranty claim is authorized by ICON at one of its scope and duration to the terms set forth above limitation may not apply to give the following information when calling: ¥ The MODEL NUMBER of the product (PFBE62290) ¥ The NAME of the product (PROFORM¨ 733 weight bench) ¥ The SERIAL NUMBER of the product (see the front cover of this manual) ¥ The KEY NUMBER...
... warranty claim is authorized by ICON at one of its scope and duration to the terms set forth above limitation may not apply to give the following information when calling: ¥ The MODEL NUMBER of the product (PFBE62290) ¥ The NAME of the product (PROFORM¨ 733 weight bench) ¥ The SERIAL NUMBER of the product (see the front cover of this manual) ¥ The KEY NUMBER...

