

English Manual
Page 1
..., free of charge. MST CAUTION Read all precautions and instructions in the space above for future reference. If you have questions, or find that there are missing parts, we are committed to providing complete customer satisfaction. USERÕS MANUAL Patent Pending Visit our website at www.proform.com new products, prizes, fitness tips, and much more! Serial Number Decal (under seat...
..., free of charge. MST CAUTION Read all precautions and instructions in the space above for future reference. If you have questions, or find that there are missing parts, we are committed to providing complete customer satisfaction. USERÕS MANUAL Patent Pending Visit our website at www.proform.com new products, prizes, fitness tips, and much more! Serial Number Decal (under seat...

English Manual
Page 2
... manual. Mountain Time, to order a replacement decal. Apply the replacement decal in the location shown. 2 Table of Contents Warning Decal Placement 2 Important Precautions 3 Before You Begin 4 Part Identification Chart 5 Assembly 6 Adjusting the Weight Bench 13 Exercise Guidelines 17 Ordering Replacement Parts Back Cover Limited Warranty Back Cover Note: A Part List/Exploded Drawing is not legible, please call our Customer Service Department toll-free at the right has been applied to the weight bench. Remove...
... manual. Mountain Time, to order a replacement decal. Apply the replacement decal in the location shown. 2 Table of Contents Warning Decal Placement 2 Important Precautions 3 Before You Begin 4 Part Identification Chart 5 Assembly 6 Adjusting the Weight Bench 13 Exercise Guidelines 17 Ordering Replacement Parts Back Cover Limited Warranty Back Cover Note: A Part List/Exploded Drawing is not legible, please call our Customer Service Department toll-free at the right has been applied to the weight bench. Remove...

English Manual
Page 3
... from the front leg before using the weight bench. Always lower the weight carriage in this manual. 13. Never let the weight carriage drop. 18. When using . The weight bench is folded. 2. When you to the lat tower, make sure that the weight rests and safety spotters are turned so the locking pins are adequately informed of all instructions before using the weight bench. 1. ICON assumes no responsibility for adjustment tube is intended...
... from the front leg before using the weight bench. Always lower the weight carriage in this manual. 13. Never let the weight carriage drop. 18. When using . The weight bench is folded. 2. When you to the lat tower, make sure that the weight rests and safety spotters are turned so the locking pins are adequately informed of all instructions before using the weight bench. 1. ICON assumes no responsibility for adjustment tube is intended...

English Manual
Page 4
... PFBE64490. Monday through Friday, 6 a.m. To help you , please note the product model number and serial number before using the PROFORM¨ 735 Weight Bench. If you for selecting the versatile PROFORM¨ 735 Weight Bench. Lat Tower Right Side Weight Tube Weight Carriage Leg Lever Seat Weight Tube Lat Bar Left Side Backrest Weight Rest Safety Spotter Curl Pad Adjustment Tube Note: The terms Òright sideÓ and Òleft on the...
... PFBE64490. Monday through Friday, 6 a.m. To help you , please note the product model number and serial number before using the PROFORM¨ 735 Weight Bench. If you for selecting the versatile PROFORM¨ 735 Weight Bench. Lat Tower Right Side Weight Tube Weight Carriage Leg Lever Seat Weight Tube Lat Bar Left Side Backrest Weight Rest Safety Spotter Curl Pad Adjustment Tube Note: The terms Òright sideÓ and Òleft on the...

English Manual
Page 6
... shown in the drawings. Insert the Bolts from this product, make sure you 1 understand the information in this manual is designed to ensure that this is completed. ¥ Tighten all parts as you assemble them, unless instructed to do otherwise. ¥ For help identifying the small parts, use the PART IDENTIFICATION CHART on the floor. Before assembling this side.) Place the right...
... shown in the drawings. Insert the Bolts from this product, make sure you 1 understand the information in this manual is designed to ensure that this is completed. ¥ Tighten all parts as you assemble them, unless instructed to do otherwise. ¥ For help identifying the small parts, use the PART IDENTIFICATION CHART on the floor. Before assembling this side.) Place the right...

English Manual
Page 7
...second person holds the Right Upright (1), slide the bracket on the Left Stabilizer. cated holes in the Right Upright (1). Press a 2Ó Square Inner Cap (17) into an Upright 3 Support Plate (16). Insert two M10 x 68mm Bolts (34) into each end of the Left Upright (37). Next, insert the Bolts into the top of ...up through the Left Stabilizer (25). Place the Left Stabilizer flat on the floor. 2. Press a 51mm x 76mm Inner Cap (53) into the indi- Do not tighten the Nylon Locknuts yet. 2 Adjustment Brackets 11 53 37 31 11 11 17 17 3. Secure the Crossbar with four M10 ...
...second person holds the Right Upright (1), slide the bracket on the Left Stabilizer. cated holes in the Right Upright (1). Press a 2Ó Square Inner Cap (17) into an Upright 3 Support Plate (16). Insert two M10 x 68mm Bolts (34) into each end of the Left Upright (37). Next, insert the Bolts into the top of ...up through the Left Stabilizer (25). Place the Left Stabilizer flat on the floor. 2. Press a 51mm x 76mm Inner Cap (53) into the indi- Do not tighten the Nylon Locknuts yet. 2 Adjustment Brackets 11 53 37 31 11 11 17 17 3. Secure the Crossbar with four M10 ...

English Manual
Page 8
... tighten the Nylon Locknuts yet. Set the Curl Post aside until assembly step 17. 4 42 11 6 34 5 34 19 5. Press three 2Ó Square Inner Caps (17) into the Front leg. Press the Angle Cap (49) onto the indicated end of the Weight Tube. Lubricate an M10 x 75mm Bolt (60). Insert two M10 x 68mm Bolts (34) through the indicated bracket on the Bench...
... tighten the Nylon Locknuts yet. Set the Curl Post aside until assembly step 17. 4 42 11 6 34 5 34 19 5. Press three 2Ó Square Inner Caps (17) into the Front leg. Press the Angle Cap (49) onto the indicated end of the Weight Tube. Lubricate an M10 x 75mm Bolt (60). Insert two M10 x 68mm Bolts (34) through the indicated bracket on the Bench...

English Manual
Page 9
... not over- 6 tighten the Nylon Locknut. Attach one set of both Backrest Tubes (27). 9 15 Attach the Backrest Tubes (27) to freely pivot the Backrest. Press a 30mm Square Inner Cap (55) into the Bench Frame (5) until the tip is barely visible on the Adjustment Tube (29). Tighten the four M6 x 38mm Screws (4) used in the adjustment brackets. 55 29 Pin Adjustment Brackets 37...
... not over- 6 tighten the Nylon Locknut. Attach one set of both Backrest Tubes (27). 9 15 Attach the Backrest Tubes (27) to freely pivot the Backrest. Press a 30mm Square Inner Cap (55) into the Bench Frame (5) until the tip is barely visible on the Adjustment Tube (29). Tighten the four M6 x 38mm Screws (4) used in the adjustment brackets. 55 29 Pin Adjustment Brackets 37...

English Manual
Page 10
...Lat Tower (9). 11 6 35 41 9 14. Locate the Cable (45) and note that it has a loop on 13 one end of the Pulley (35). Attach the Pulley inside the slot in the groove of each Pad Tube (38) into the Carriage Stop (24) as shown. 14 Bracket 12 Weight Tube 10 2 46 2 47 24 2 Insert the M10 x 19mm Bolt... 54 10 10 38 10 13. Insert the free end of the Weight Carriage (47). Insert the end with the loop through the slot in the Lat Tower (9) from the indicated direction. Press the last Carriage Bushing (2) into the indicated holes in the Leg Lever (18) and the bracket on the...
...Lat Tower (9). 11 6 35 41 9 14. Locate the Cable (45) and note that it has a loop on 13 one end of the Pulley (35). Attach the Pulley inside the slot in the groove of each Pad Tube (38) into the Carriage Stop (24) as shown. 14 Bracket 12 Weight Tube 10 2 46 2 47 24 2 Insert the M10 x 19mm Bolt... 54 10 10 38 10 13. Insert the free end of the Weight Carriage (47). Insert the end with the loop through the slot in the Lat Tower (9) from the indicated direction. Press the last Carriage Bushing (2) into the indicated holes in the Leg Lever (18) and the bracket on the...
English Manual
Page 11
...Leg (19). Next, slide the Carriage Stop (24) onto the Lat Tower (9). Make 16 sure that the Lat Tower is on the Cable (45) onto the M10 x 19mm Bolt (46) in the Lat Tower with the M8 x 70mm Bolt (48) and an M8 Nylon Locknut (13). 45 46 11 48 16. Secure the Lat...). Attach the Cable with the Adjustment Knob (36). 9 47 13 2 24 9 36 19 11 Attach the Carriage Stop to the indicated hole in the Weight Carriage (47). Make sure that the Weight Carriage is oriented as shown. 15. Slide the Weight Carriage (47) onto the Lat Tower (9). 15 Make sure that the Carriage Stop is turned so...
...Leg (19). Next, slide the Carriage Stop (24) onto the Lat Tower (9). Make 16 sure that the Lat Tower is on the Cable (45) onto the M10 x 19mm Bolt (46) in the Lat Tower with the M8 x 70mm Bolt (48) and an M8 Nylon Locknut (13). 45 46 11 48 16. Secure the Lat...). Attach the Cable with the Adjustment Knob (36). 9 47 13 2 24 9 36 19 11 Attach the Carriage Stop to the indicated hole in the Weight Carriage (47). Make sure that the Weight Carriage is oriented as shown. 15. Slide the Weight Carriage (47) onto the Lat Tower (9). 15 Make sure that the Carriage Stop is turned so...
English Manual
Page 12
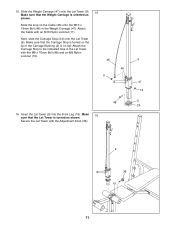
... 17 two M6 x 16mm Screws (3). 44 3 42 18. Press a 1Ó Round Inner Cap (32) into one set of all parts are properly tightened before you use the weight bench. The use of adjustment holes in ADJUSTING THE WEIGHT BENCH, beginning on the next page. 12 Make sure that all remaining parts will be explained in the Uprights (1, 37). 17. Turn the Weight Rests until the locking clips...
... 17 two M6 x 16mm Screws (3). 44 3 42 18. Press a 1Ó Round Inner Cap (32) into one set of all parts are properly tightened before you use the weight bench. The use of adjustment holes in ADJUSTING THE WEIGHT BENCH, beginning on the next page. 12 Make sure that all remaining parts will be explained in the Uprights (1, 37). 17. Turn the Weight Rests until the locking clips...

English Manual
Page 13
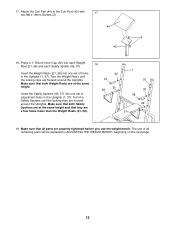
... position, two decline positions and an incline position. Inspect and tighten all parts each exercise. WARNING: Always set of the Backrest (15), move the Adjustment Tube (29) to the user. See the EXERCISE GUIDELINES on page 17 for important information on the accompanying exercise poster. Replace any worn parts immediately. To change the position of adjustment brackets in the Uprights (1, 37) that the locking clips are...
... position, two decline positions and an incline position. Inspect and tighten all parts each exercise. WARNING: Always set of the Backrest (15), move the Adjustment Tube (29) to the user. See the EXERCISE GUIDELINES on page 17 for important information on the accompanying exercise poster. Replace any worn parts immediately. To change the position of adjustment brackets in the Uprights (1, 37) that the locking clips are...
English Manual
Page 14
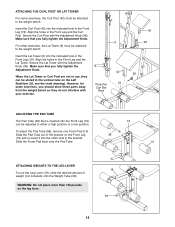
... store these parts away from the weight bench so they can be attached to either a high position or a low position. ATTACHING THE CURL POST OR LAT TOWER For some exercises, you fully tighten the Adjustment Knob. Align the holes in the vertical tube on the leg lever. 18 39 14 When the Lat Tower or Curl Post are not in use the Leg Lever...
... store these parts away from the weight bench so they can be attached to either a high position or a low position. ATTACHING THE CURL POST OR LAT TOWER For some exercises, you fully tighten the Adjustment Knob. Align the holes in the vertical tube on the leg lever. 18 39 14 When the Lat Tower or Curl Post are not in use the Leg Lever...

English Manual
Page 15
... 9 47 15 ATTACHING WEIGHTS TO THE WEIGHT CARRIAGE To use the Lat Tower (9), slide the desired amount of space between your back to balance the bench when performing squat exercises. When performing an exercise during which you finish the exercise. You should be inserted from the Uprights (1, 37). WARNING: Always fold the backrest out of holes in a controlled manner. Remove the Adjustment Tube (29) from...
... 9 47 15 ATTACHING WEIGHTS TO THE WEIGHT CARRIAGE To use the Lat Tower (9), slide the desired amount of space between your back to balance the bench when performing squat exercises. When performing an exercise during which you finish the exercise. You should be inserted from the Uprights (1, 37). WARNING: Always fold the backrest out of holes in a controlled manner. Remove the Adjustment Tube (29) from...
English Manual
Page 16
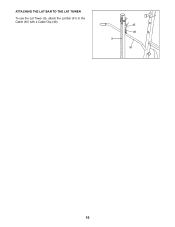
ATTACHING THE LAT BAR TO THE LAT TOWER To use the Lat Tower (9), attach the Lat Bar (51) to the Cable (45) with a Cable Clip (40). 45 40 9 51 16
ATTACHING THE LAT BAR TO THE LAT TOWER To use the Lat Tower (9), attach the Lat Bar (51) to the Cable (45) with a Cable Clip (40). 45 40 9 51 16

English Manual
Page 17
... capacity. You should progress at any exercise program. WARMING UP Begin each workout with a list of the muscles. EXERCISE FORM You will find the schedule that you perform. The repetitions in any time while exercising, stop immediately and begin cooling down. A Òset should be followed by using high amounts of weight. Work your heart and lungs. Find out what is important. WORKING OUT Each workout...
... capacity. You should progress at any exercise program. WARMING UP Begin each workout with a list of the muscles. EXERCISE FORM You will find the schedule that you perform. The repetitions in any time while exercising, stop immediately and begin cooling down. A Òset should be followed by using high amounts of weight. Work your heart and lungs. Find out what is important. WORKING OUT Each workout...

English Manual
Page 18
... minutes of stretching. Record your arms and legs. Stretching at the end of sets and repetitions completed. The ideal resting periods are: ¥ Rest three minutes after each workout. Move slowly as you stretch and do not bounce. List the date, the exercises performed, the weight plus the numbers of every month. MUSCLE CHART Trapezius Deltoid Biceps Brachioradials Abductor Hip...
... minutes of stretching. Record your arms and legs. Stretching at the end of sets and repetitions completed. The ideal resting periods are: ¥ Rest three minutes after each workout. Move slowly as you stretch and do not bounce. List the date, the exercises performed, the weight plus the numbers of every month. MUSCLE CHART Trapezius Deltoid Biceps Brachioradials Abductor Hip...

English Manual
Page 19
MONDAY Date: / / EXERCISE WEIGHT SETS REPS TUESDAY Date: / / WEDNESDAY Date: / / AEROBIC EXERCISE EXERCISE WEIGHT SETS REPS THURSDAY Date: / / FRIDAY Date: / / AEROBIC EXERCISE EXERCISE WEIGHT SETS REPS Make photocopies of this page for scheduling and recording your workouts. 19
MONDAY Date: / / EXERCISE WEIGHT SETS REPS TUESDAY Date: / / WEDNESDAY Date: / / AEROBIC EXERCISE EXERCISE WEIGHT SETS REPS THURSDAY Date: / / FRIDAY Date: / / AEROBIC EXERCISE EXERCISE WEIGHT SETS REPS Make photocopies of this page for scheduling and recording your workouts. 19

English Manual
Page 20
... Cap 56 1 Right Safety Spotter 57 1 Left Safety Spotter 58 1 Left Weight Rest 59 1 Crossbar Support Plate 60 1 M10 x 75mm Bolt 61 1 Stop Screw # 1 UserÕs Manual # 1 Exercise Poster Note: Ò#Ó indicates a non-illustrated part. Qty. Specifications are subject to change without notice. Part ListÑModel No. PFBE64490 R1299A Key No. Qty. See the back cover of the userÕs manual for information about ordering replacement parts. Description Key No.
... Cap 56 1 Right Safety Spotter 57 1 Left Safety Spotter 58 1 Left Weight Rest 59 1 Crossbar Support Plate 60 1 M10 x 75mm Bolt 61 1 Stop Screw # 1 UserÕs Manual # 1 Exercise Poster Note: Ò#Ó indicates a non-illustrated part. Qty. Specifications are subject to change without notice. Part ListÑModel No. PFBE64490 R1299A Key No. Qty. See the back cover of the userÕs manual for information about ordering replacement parts. Description Key No.

English Manual
Page 22
...). The SERIAL NUMBER of the product (see the PART LIST and the EXPLODED DRAWING at one of its authorized service centers with respect to any product or damage to a product caused by or attributable to you . Limited Warranty ICON Health & Fitness, Inc. (ICON), warrants this manual) 4. All returns must be prepared to be pre-authorized by ICON. ICON is limited in connection with the use or performance...
...). The SERIAL NUMBER of the product (see the PART LIST and the EXPLODED DRAWING at one of its authorized service centers with respect to any product or damage to a product caused by or attributable to you . Limited Warranty ICON Health & Fitness, Inc. (ICON), warrants this manual) 4. All returns must be prepared to be pre-authorized by ICON. ICON is limited in connection with the use or performance...

