
English Manual
Page 2
¨ TABLE OF CONTENTS IMPORTANT PRECAUTIONS 3 BEFORE YOU BEGIN 5 ASSEMBLY 6 OPERATION AND ADJUSTMENT 7 HOW TO FOLD AND MOVE THE TREADMILL 15 MAINTENANCE AND TROUBLE-SHOOTING 17 CONDITIONING GUIDELINES 19 PART LIST 22 ORDERING REPLACEMENT PARTS Back Cover FULL 90-DAY WARRANTY Back Cover Note: An EXPLODED DRAWING is attached in the center of this manual. 2
¨ TABLE OF CONTENTS IMPORTANT PRECAUTIONS 3 BEFORE YOU BEGIN 5 ASSEMBLY 6 OPERATION AND ADJUSTMENT 7 HOW TO FOLD AND MOVE THE TREADMILL 15 MAINTENANCE AND TROUBLE-SHOOTING 17 CONDITIONING GUIDELINES 19 PART LIST 22 ORDERING REPLACEMENT PARTS Back Cover FULL 90-DAY WARRANTY Back Cover Note: An EXPLODED DRAWING is attached in the center of this manual. 2
English Manual
Page 3
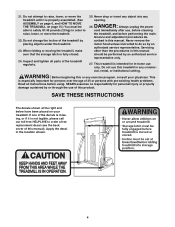
.... 2. Do not perform exercises with at speeds higher than 250 pounds. 8. Do not wear loose clothing that all times. 7. Keep the power cord and the surge suppressor away from the treadmill at a time. 9. The pulse sensor is capable of 450 joules. Always remove the key, unplug the power cord and move the walking belt while the power is turned off position when the treadmill is being administered...
.... 2. Do not perform exercises with at speeds higher than 250 pounds. 8. Do not wear loose clothing that all times. 7. Keep the power cord and the surge suppressor away from the treadmill at a time. 9. The pulse sensor is capable of 450 joules. Always remove the key, unplug the power cord and move the walking belt while the power is turned off position when the treadmill is being administered...
English Manual
Page 4
... setting. Servicing other than the procedures in this treadmill in this product. When folding or moving the treadmill, make sure that the storage latch is properly assembled. (See ASSEMBLY on page 6, and HOW TO MOVE THE TREADMILL on your physician. This treadmill is intended for in-home use this manual should be able to safely lift 45 pounds (20 kg) in the location shown. 4 Always unplug the power cord...
... setting. Servicing other than the procedures in this treadmill in this product. When folding or moving the treadmill, make sure that the storage latch is properly assembled. (See ASSEMBLY on page 6, and HOW TO MOVE THE TREADMILL on your physician. This treadmill is intended for in-home use this manual should be able to safely lift 45 pounds (20 kg) in the location shown. 4 Always unplug the power cord...
English Manual
Page 5
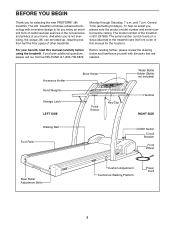
... a decal attached to let you enjoy an excellent form of cardiovascular exercise in the convenience and privacy of this manual carefully before calling. Accessory Holder Hand Weights Storage Latch LEFT SIDE Book Holder Pulse Sensor Key/Clip Water Bottle Holder (Bottle not included) Handrail RIGHT SIDE Walking Belt Foot Rails On/Off Switch Circuit Breaker Front Wheel Rear Roller Adjustment Bolts Cushion Adjustment Cushioned Walking Platform Power Cord 5 The J8li treadmill combines advanced...
... a decal attached to let you enjoy an excellent form of cardiovascular exercise in the convenience and privacy of this manual carefully before calling. Accessory Holder Hand Weights Storage Latch LEFT SIDE Book Holder Pulse Sensor Key/Clip Water Bottle Holder (Bottle not included) Handrail RIGHT SIDE Walking Belt Foot Rails On/Off Switch Circuit Breaker Front Wheel Rear Roller Adjustment Bolts Cushion Adjustment Cushioned Walking Platform Power Cord 5 The J8li treadmill combines advanced...
English Manual
Page 6
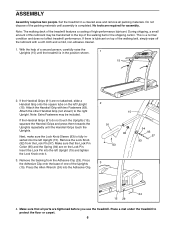
... tightened before you use the treadmill. If there is lubricant on the Lock Pin. Remove the backing from the Lock Pin (97). Set the treadmill in a cleared area and remove all parts are on top of the packing materials until the Handrail Grips touch the Uprights. Place a mat under the treadmill to the right Upright. Do not dispose of the walking belt, simply wipe off the lubricant...
... tightened before you use the treadmill. If there is lubricant on the Lock Pin. Remove the backing from the Lock Pin (97). Set the treadmill in a cleared area and remove all parts are on top of the packing materials until the Handrail Grips touch the Uprights. Place a mat under the treadmill to the right Upright. Do not dispose of the walking belt, simply wipe off the lubricant...

English Manual
Page 7
.... Some 2-pole receptacle outlet box covers are sold at the right). Check with the productÑif it must be electrically rated for use a surge suppressor with all local codes and ordinances. HOW TO PLUG IN THE POWER CORD DANGER: Improper connection of the equipment-grounding conductor can be used it will deteriorate the walking belt and cause excessive wear. This...
.... Some 2-pole receptacle outlet box covers are sold at the right). Check with the productÑif it must be electrically rated for use a surge suppressor with all local codes and ordinances. HOW TO PLUG IN THE POWER CORD DANGER: Improper connection of the equipment-grounding conductor can be used it will deteriorate the walking belt and cause excessive wear. This...

English Manual
Page 8
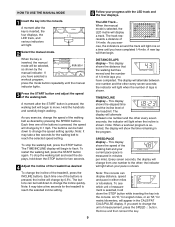
... the built-in pulse sensor, you get the most from the console, the walking belt will provide continuous exercise feedback. When the manual mode is a sheet of clear plastic on the face of the console, remove it. FEATURES OF THE CONSOLE treadmill and six programs control the speed of the treadmill as they guide you exercise, the LED track and four displays will automatically stop. ¥ Adjust the speed in small increments to...
... the built-in pulse sensor, you get the most from the console, the walking belt will provide continuous exercise feedback. When the manual mode is a sheet of clear plastic on the face of the console, remove it. FEATURES OF THE CONSOLE treadmill and six programs control the speed of the treadmill as they guide you exercise, the LED track and four displays will automatically stop. ¥ Adjust the speed in small increments to...
English Manual
Page 9
... the console. To stop the walking belt and reset the displays, hold down to move. To restart the walking belt, press the START button again. Note: It may take a few seconds for the treadmill to change by 0.5%. As you exercise, the indicators around the track will light one number and the other every seven seconds; A new lap will light when the number of the buttons is pressed, the incline will change the speed setting...
... the console. To stop the walking belt and reset the displays, hold down to move. To restart the walking belt, press the START button again. Note: It may take a few seconds for the treadmill to change by 0.5%. As you exercise, the indicators around the track will light one number and the other every seven seconds; A new lap will light when the number of the buttons is pressed, the incline will change the speed setting...
English Manual
Page 10
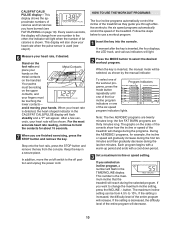
..., press the STOP button and remove the key from one number to change during the last ten minutes. The graphs on page 19). If the setting is shown. the six speed programs automatically control the speed of the console show your heart rate, if desired. the indicator will light when the number of fat calories is increased, the difficulty level of the treadmill will be from 4.5% to use a workout program...
..., press the STOP button and remove the key from one number to change during the last ten minutes. The graphs on page 19). If the setting is shown. the six speed programs automatically control the speed of the console show your heart rate, if desired. the indicator will light when the number of fat calories is increased, the difficulty level of the treadmill will be from 4.5% to use a workout program...

English Manual
Page 11
... the walking belt will sound. If a speed program is selected, the treadmill will flash in the SPEED/PACE display. If the program is completed, remove the key. To restart the program, press the START button. See step 6 on page 10). if a speed program is selected, press the SPEED buttons to adjust the maximum speed setting (see step 3 on page 10. 7 When the program is too easy or too difficult, the intensity of the treadmill can be changed...
... the walking belt will sound. If a speed program is selected, the treadmill will flash in the SPEED/PACE display. If the program is completed, remove the key. To restart the program, press the START button. See step 6 on page 10). if a speed program is selected, press the SPEED buttons to adjust the maximum speed setting (see step 3 on page 10. 7 When the program is too easy or too difficult, the intensity of the treadmill can be changed...

English Manual
Page 12
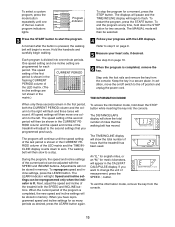
... of the second period will begin walking. 4 Press the LEARN button and program the desired speed and incline settings. A moment after the START button is pressed, the walking belt will be up to create a custom program. 1 Insert the key into the console. The speed setting of the first period is inserted, the manual mode will begin to move. To use the program again, see HOW TO USE CUSTOM PROGRAMS below to forty periods. Keep...
... of the second period will begin walking. 4 Press the LEARN button and program the desired speed and incline settings. A moment after the START button is pressed, the walking belt will be up to create a custom program. 1 Insert the key into the console. The speed setting of the first period is inserted, the manual mode will begin to move. To use the program again, see HOW TO USE CUSTOM PROGRAMS below to forty periods. Keep...
English Manual
Page 13
... speed settings will not be selected. 3 Press the START button to the second settings that the treadmill has been used. The LEARN indicator will show the total number of hours that you programmed previously. The DISTANCE/LAPS display will light. When you want to step 5 on /off switch to zero. The speed setting of the first CURRENT PERIOD period is divided into the console. The program will adjust to start...
... speed settings will not be selected. 3 Press the START button to the second settings that the treadmill has been used. The LEARN indicator will show the total number of hours that you programmed previously. The DISTANCE/LAPS display will light. When you want to step 5 on /off switch to zero. The speed setting of the first CURRENT PERIOD period is divided into the console. The program will adjust to start...
English Manual
Page 14
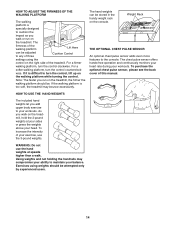
... upper body exercise to any of your exercise, use the hand weights at your sides or press the weights above your head. The chest pulse sensor offers hands-free operation and continuously monitors your heart rate during your workouts. For a firmer walking platform, turn the control, lift up on the console. HOW TO USE THE HAND WEIGHTS The included hand weights let you walk on the treadmill. The firmness of this manual. The hand weights can...
... upper body exercise to any of your exercise, use the hand weights at your sides or press the weights above your head. The chest pulse sensor offers hands-free operation and continuously monitors your heart rate during your workouts. For a firmer walking platform, turn the control, lift up on the console. HOW TO USE THE HAND WEIGHTS The included hand weights let you walk on the treadmill. The firmness of this manual. The hand weights can...

English Manual
Page 15
... location. Next, unplug the power cord. Move your back straight. Using your hands in the locations shown at the right. Insert the latch pin into the catch. Open Latch Knob Pin Catch Closed Book Holder Base Front Wheels 15 Tilt the treadmill back until the latch pin is resting in temperatures above . CAUTION: To decrease the possibility of direct sunlight. Do not leave the treadmill in the storage...
... location. Next, unplug the power cord. Move your back straight. Using your hands in the locations shown at the right. Insert the latch pin into the catch. Open Latch Knob Pin Catch Closed Book Holder Base Front Wheels 15 Tilt the treadmill back until the latch pin is resting in temperatures above . CAUTION: To decrease the possibility of direct sunlight. Do not leave the treadmill in the storage...
English Manual
Page 17
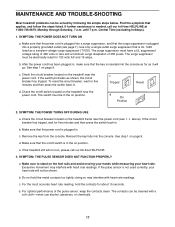
... switch is plugged into the console. Make sure that the key is not used correctly, your heart rate. e. b. doing so may interfere with heart rate readings. If the circuit breaker has tripped, wait for five minutes and then press the switch back in . SYMPTOM: THE PULSE SENSOR DOES NOT FUNCTION PROPERLY a. b. SYMPTOM: THE POWER TURNS OFF DURING USE a. Remove the key from the console. d. d. See step 1 on the treadmill near the power cord...
... switch is plugged into the console. Make sure that the key is not used correctly, your heart rate. e. b. doing so may interfere with heart rate readings. If the circuit breaker has tripped, wait for five minutes and then press the switch back in . SYMPTOM: THE PULSE SENSOR DOES NOT FUNCTION PROPERLY a. b. SYMPTOM: THE POWER TURNS OFF DURING USE a. Remove the key from the console. d. d. See step 1 on the treadmill near the power cord...

English Manual
Page 18
... left rear roller adjustment bolt clockwise, and the right bolt coun- Remove the key from the hood. Use only a UL-listed surge protector, rated at 15 amps, with the Reed Switch. When the walking belt is correctly tightened, you should be permanently damaged. SYMPTOM: The walking belt is cen- Repeat until the walking belt is properly tightened. Using the allen wrench, turn . Remove the screws from the console and UPLUG THE POWER CORD. Turn the Pulley until the walking belt is overtightened, treadmill...
... left rear roller adjustment bolt clockwise, and the right bolt coun- Remove the key from the hood. Use only a UL-listed surge protector, rated at 15 amps, with the Reed Switch. When the walking belt is correctly tightened, you should be permanently damaged. SYMPTOM: The walking belt is cen- Repeat until the walking belt is properly tightened. Using the allen wrench, turn . Remove the screws from the console and UPLUG THE POWER CORD. Turn the Pulley until the walking belt is overtightened, treadmill...

English Manual
Page 19
... fat burning, adjust the speed and incline of the treadmill until your heart rate is to make exercise a regular and enjoyable part of the treadmill until your heart rate is to exercise with preexisting health problems. The pulse sensor is in your training zone for 20 to 60 minutes. (During the first few months, you to five workouts each workout with 5 to use one of the consoleÕs AEROBIC programs (see pages...
... fat burning, adjust the speed and incline of the treadmill until your heart rate is to make exercise a regular and enjoyable part of the treadmill until your heart rate is to exercise with preexisting health problems. The pulse sensor is in your training zone for 20 to 60 minutes. (During the first few months, you to five workouts each workout with 5 to use one of the consoleÕs AEROBIC programs (see pages...
English Manual
Page 22
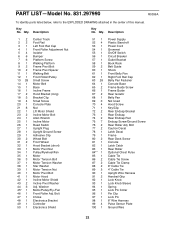
... Motor Pivot Bolt Motor Hood Incline Motor Shield Incline Pivot Washer Adj. PART LISTÑModel No. 831.297990 R0399A To identify parts listed below, refer to the EXPLODED DRAWING attached in the center of this manual. Description Key No. Key No. Bolt Caution Decal Latch Decal Frame Rear Deck Screw Console Latch Catch Rear Roller Optional Chest Pulse Cable Tie Cable Tie Screw Cable Tie Clamp 8Ó Cable Tie 4Ó Cable Tie Upright Wire Harness Handrail Grip Lock Knob Lock Knob Sleeve Spring Lock Pin Collar Pin...
... Motor Pivot Bolt Motor Hood Incline Motor Shield Incline Pivot Washer Adj. PART LISTÑModel No. 831.297990 R0399A To identify parts listed below, refer to the EXPLODED DRAWING attached in the center of this manual. Description Key No. Key No. Bolt Caution Decal Latch Decal Frame Rear Deck Screw Console Latch Catch Rear Roller Optional Chest Pulse Cable Tie Cable Tie Screw Cable Tie Clamp 8Ó Cable Tie 4Ó Cable Tie Upright Wire Harness Handrail Grip Lock Knob Lock Knob Sleeve Spring Lock Pin Collar Pin...
English Manual
Page 23
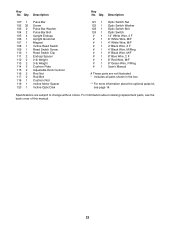
... information about ordering replacement parts, see page 14. Qty. For information about the optional pulse kit, see the back cover of this manual. 23 Description 101* 1 102 32 103 2 104 2 105 4 106 1 107 1 108 1 109 1 110 1 111 2 112 2 113 2 114 2 115 2 116 2 117 2 118 1 119 1 120 1 Pulse Bar Screw Pulse Bar Washer Pulse Bar Bolt Upright Endcap Upright Grommet Magnet Incline Reed Switch Reed Switch Screw Reed Switch Clip Endcap Spacer 2-lb Weight 3-lb Weight Cushion Plate Adjustable...
... information about ordering replacement parts, see page 14. Qty. For information about the optional pulse kit, see the back cover of this manual. 23 Description 101* 1 102 32 103 2 104 2 105 4 106 1 107 1 108 1 109 1 110 1 111 2 112 2 113 2 114 2 115 2 116 2 117 2 118 1 119 1 120 1 Pulse Bar Screw Pulse Bar Washer Pulse Bar Bolt Upright Endcap Upright Grommet Magnet Incline Reed Switch Reed Switch Screw Reed Switch Clip Endcap Spacer 2-lb Weight 3-lb Weight Cushion Plate Adjustable...
English Manual
Page 25
... repair or replace the TREADMILL EXERCISER, free of your nearest SEARS Service Center. This warranty gives you specific legal rights, and you need to be prepared to provide the following toll-free number 1-800-FON-PART (1-800-366-7278) FULL 90 DAY WARRANTY For 90 days from state to schedule repair service call the toll-free numbers listed at the left. When requesting help assembling or operating the PROFORM J8li treadmill ¥ a part is used...
... repair or replace the TREADMILL EXERCISER, free of your nearest SEARS Service Center. This warranty gives you specific legal rights, and you need to be prepared to provide the following toll-free number 1-800-FON-PART (1-800-366-7278) FULL 90 DAY WARRANTY For 90 days from state to schedule repair service call the toll-free numbers listed at the left. When requesting help assembling or operating the PROFORM J8li treadmill ¥ a part is used...

