

English Manual
Page 2
... in the location shown. PROFORM is missing or illegible, call the telephone number on the front cover of ICON Health & Fitness, Inc. 2 TABLE OF CONTENTS WARNING DECAL PLACEMENT 2 IMPORTANT PRECAUTIONS 3 BEFORE YOU BEGIN 7 PART IDENTIFICATION CHART 8 ASSEMBLY 9 THE CHEST HEART RATE MONITOR 20 HOW TO USE THE TREADMILL 21 HOW TO FOLD AND MOVE THE TREADMILL 31 MAINTENANCE AND TROUBLESHOOTING 32 EXERCISE GUIDELINES 35 PART LIST 38 EXPLODED DRAWING 40 ORDERING REPLACEMENT PARTS Back Cover LIMITED WARRANTY Back Cover WARNING...
... in the location shown. PROFORM is missing or illegible, call the telephone number on the front cover of ICON Health & Fitness, Inc. 2 TABLE OF CONTENTS WARNING DECAL PLACEMENT 2 IMPORTANT PRECAUTIONS 3 BEFORE YOU BEGIN 7 PART IDENTIFICATION CHART 8 ASSEMBLY 9 THE CHEST HEART RATE MONITOR 20 HOW TO USE THE TREADMILL 21 HOW TO FOLD AND MOVE THE TREADMILL 31 MAINTENANCE AND TROUBLESHOOTING 32 EXERCISE GUIDELINES 35 PART LIST 38 EXPLODED DRAWING 40 ORDERING REPLACEMENT PARTS Back Cover LIMITED WARRANTY Back Cover WARNING...
English Manual
Page 3
... instruction concerning use only. Never move the walking belt while the power is being administered. 9. Do not wear loose clothes that all warnings and precautions. 2. The treadmill is not working properly. (See MAINTENANCE AND TROUBLESHOOTING on page 23). Place the treadmill on a level surface, with bare feet, wearing only stockings, or in this product. 1. To purchase a surge suppressor, see HOW TO TURN...
... instruction concerning use only. Never move the walking belt while the power is being administered. 9. Do not wear loose clothes that all warnings and precautions. 2. The treadmill is not working properly. (See MAINTENANCE AND TROUBLESHOOTING on page 23). Place the treadmill on a level surface, with bare feet, wearing only stockings, or in this product. 1. To purchase a surge suppressor, see HOW TO TURN...

English Manual
Page 4
... not change the incline of heart rate readings. Various factors, including the user's movement, may result in use , before performing the maintenance and adjustment procedures described in this manual. Always unplug the power cord immediately after use . 25. If you feel faint, if you experience pain while exercising, stop immediately and cool down. Always hold the handrails while using the treadmill. 20. The treadmill is used. Never remove the motor hood unless instructed...
... not change the incline of heart rate readings. Various factors, including the user's movement, may result in use , before performing the maintenance and adjustment procedures described in this manual. Always unplug the power cord immediately after use . 25. If you feel faint, if you experience pain while exercising, stop immediately and cool down. Always hold the handrails while using the treadmill. 20. The treadmill is used. Never remove the motor hood unless instructed...

English Manual
Page 7
... the labeled parts. Heart Rate Monitor Handrail Upright Console Tray Key/Clip Walking Belt Foot Rail Idler Roller Adjustment Screws Power Switch Power Cord Platform Cushion Length: 6 ft. 8 in. (203 cm) Width: 3 ft. (91 cm) 7 To help us . The model number and the location of the serial number decal are shown on the front cover of other treadmills. For your workouts at home more effective and enjoyable. If you for selecting the revolutionary PROFORM® PERFORMANCE 800I treadmill. BEFORE...
... the labeled parts. Heart Rate Monitor Handrail Upright Console Tray Key/Clip Walking Belt Foot Rail Idler Roller Adjustment Screws Power Switch Power Cord Platform Cushion Length: 6 ft. 8 in. (203 cm) Width: 3 ft. (91 cm) 7 To help us . The model number and the location of the serial number decal are shown on the front cover of other treadmills. For your workouts at home more effective and enjoyable. If you for selecting the revolutionary PROFORM® PERFORMANCE 800I treadmill. BEFORE...
English Manual
Page 16
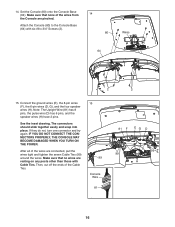
... wires are pinched. 14. Attach the Console (80) to the Console Base (64) with Cable Ties. Note: The Upright Wire (81) has 8 pins, the pulse wire (D) has 6 pins, and the speaker wires (H) have 2 pins. IF YOU DO NOT CONNECT THE CONNECTORS PROPERLY, THE CONSOLE MAY BECOME DAMAGED WHEN YOU TURN ON THE POWER. Then, cut off the ends of the wires are connected, pull the wires tight and tighten the seven Cable...
... wires are pinched. 14. Attach the Console (80) to the Console Base (64) with Cable Ties. Note: The Upright Wire (81) has 8 pins, the pulse wire (D) has 6 pins, and the speaker wires (H) have 2 pins. IF YOU DO NOT CONNECT THE CONNECTORS PROPERLY, THE CONSOLE MAY BECOME DAMAGED WHEN YOU TURN ON THE POWER. Then, cut off the ends of the wires are connected, pull the wires tight and tighten the seven Cable...
English Manual
Page 21
... Screw The lug or wire extending from other electronic equipment, can result from weather conditions or from the adapter must be used , see drawing 1 on page 3. Failure to use a surge suppressor with a grounding pin (see the front cover of this page). The treadmill power cord has a plug with the treadmill. The temporary adapter should malfunction or break down, grounding provides a path of least resistance...
... Screw The lug or wire extending from other electronic equipment, can result from weather conditions or from the adapter must be used , see drawing 1 on page 3. Failure to use a surge suppressor with a grounding pin (see the front cover of this page). The treadmill power cord has a plug with the treadmill. The temporary adapter should malfunction or break down, grounding provides a path of least resistance...
English Manual
Page 22
... while using the handgrip heart rate monitor or the chest heart rate monitor. Note: The console can display speed and distance in this manual. The first time you use an onboard workout, see page 25. You can change the speed and incline of the treadmill with the touch of the walking belt, and center the walking belt if necessary (see THE SETTINGS MODE on the front cover of onboard workouts. To use the treadmill, observe the alignment of a button. To use...
... while using the handgrip heart rate monitor or the chest heart rate monitor. Note: The console can display speed and distance in this manual. The first time you use an onboard workout, see page 25. You can change the speed and incline of the treadmill with the touch of the walking belt, and center the walking belt if necessary (see THE SETTINGS MODE on the front cover of onboard workouts. To use the treadmill, observe the alignment of a button. To use...

English Manual
Page 23
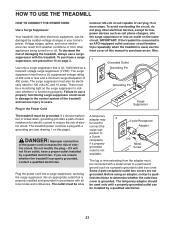
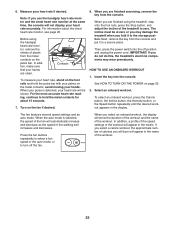
... numbered Incline button to set to move at the left. 2. Start the walking belt. Note: After you plug in increments of 0.5 mph. HOW TO TURN ON THE POWER HOW TO USE THE MANUAL MODE IMPORTANT: If the treadmill has been exposed to cold temperatures, allow it to warm to select a speed setting of 3.5 mph, press the 3 button and then immediately press the 5 button. As you exercise, change in the power cord and press the power switch into the console...
... numbered Incline button to set to move at the left. 2. Start the walking belt. Note: After you plug in increments of 0.5 mph. HOW TO TURN ON THE POWER HOW TO USE THE MANUAL MODE IMPORTANT: If the treadmill has been exposed to cold temperatures, allow it to warm to select a speed setting of 3.5 mph, press the 3 button and then immediately press the 5 button. As you exercise, change in the power cord and press the power switch into the console...

English Manual
Page 24
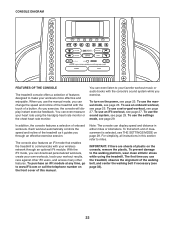
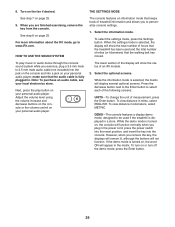
...; The incline level of the treadmill • The number of the walking belt • Your heart rate (see THE SETTINGS MODE on page 29 to the default menu (see step 6 on the treadmill, the display can show a track that represents 1/4 mile (400 m). When an iFit module is selected, the calorie display will show the approximate number of each minute. Four arcs indicate full signal strength. Press the Display button until...
...; The incline level of the treadmill • The number of the walking belt • Your heart rate (see THE SETTINGS MODE on page 29 to the default menu (see step 6 on the treadmill, the display can show a track that represents 1/4 mile (400 m). When an iFit module is selected, the calorie display will show the approximate number of each minute. Four arcs indicate full signal strength. Press the Display button until...
English Manual
Page 25
... heart rate reading, continue to turn off position and unplug the power cord. When you do not do this, the treadmill's electrical components may damage the treadmill when you fold it in the display. IMPORTANT: If you are clean. 6. Before using the treadmill, step onto the foot rails, press the Stop button, and adjust the incline of plastic from the console and put it to zero. Then, press the power switch...
... heart rate reading, continue to turn off position and unplug the power cord. When you do not do this, the treadmill's electrical components may damage the treadmill when you fold it in the display. IMPORTANT: If you are clean. 6. Before using the treadmill, step onto the foot rails, press the Stop button, and adjust the incline of plastic from the console and put it to zero. Then, press the power switch...

English Manual
Page 26
... walking belt will begin walking. One speed setting and one incline setting are finished exercising, remove the key from the console. The walking belt will automatically adjust to flash in the display and the last segment ends. Press the Start button or the Speed increase button to move at 1 mph. If the speed or incline setting is an estimate of the number of the workout. If a different speed and/or incline setting is divided into segments. See step 7 on the speed...
... walking belt will begin walking. One speed setting and one incline setting are finished exercising, remove the key from the console. The walking belt will automatically adjust to flash in the display and the last segment ends. Press the Start button or the Speed increase button to move at 1 mph. If the speed or incline setting is an estimate of the number of the workout. If a different speed and/or incline setting is divided into segments. See step 7 on the speed...

English Manual
Page 27
... the number of calories you are not supported). See step 6 on the console. 5. Turn on page 23. 2. When you will burn during the workout. 3. HOW TO USE AN IFIT WORKOUT Note: To use an iFit workout, you set -a-goal workout, press the Set A Goal button on page 25. 6. Follow your heart rate if desired. See HOW TO TURN ON THE POWER on the fan if desired. Press the Speed and Incline buttons to set -a-goal workout. Press the Start button...
... the number of calories you are not supported). See step 6 on the console. 5. Turn on page 23. 2. When you will burn during the workout. 3. HOW TO USE AN IFIT WORKOUT Note: To use an iFit workout, you set -a-goal workout, press the Set A Goal button on page 25. 6. Follow your heart rate if desired. See HOW TO TURN ON THE POWER on the fan if desired. Press the Speed and Incline buttons to set -a-goal workout. Press the Start button...

English Manual
Page 28
... display will walk or run two demo workouts. When the next segment of the workout, the distance you will count down to the speed and incline settings for your workout. Press the Track button to select a user. 4. During a competition workout, the Competition tab will show the duration of the workout begins, the treadmill will show your progress with the iFit module. When you select an iFit workout, the display will automatically adjust...
... display will walk or run two demo workouts. When the next segment of the workout, the distance you will count down to the speed and incline settings for your workout. Press the Track button to select a user. 4. During a competition workout, the Competition tab will show the duration of the workout begins, the treadmill will show your progress with the iFit module. When you select an iFit workout, the display will automatically adjust...
English Manual
Page 29
... the walking belt has moved. When the settings mode is selected, the display will function normally when you to be used and the total number of miles (or kilometers) that the audio cable is selected, the matrix will show the status of measurement, press the Enter button. Press the decrease button next to the Enter button to www.iFit.com. To view distance in kilometers, select METRIC. See step...
... the walking belt has moved. When the settings mode is selected, the display will function normally when you to be used and the total number of miles (or kilometers) that the audio cable is selected, the matrix will show the status of measurement, press the Enter button. Press the decrease button next to the Enter button to www.iFit.com. To view distance in kilometers, select METRIC. See step...

English Manual
Page 30
... connected, you may also select the following screen: AUDIO COACH-To turn off the audio coach, press the Enter button. CHECK WIFI STATUS-Press the Enter button to adjust the contrast level of the display. To exit the settings mode, remove the key from the console and unplug the power cord. Exit the settings mode. HOW TO ADJUST THE CUSHIONING SYSTEM The treadmill features a cushioning system that the cushions on the treadmill. Remove...
... connected, you may also select the following screen: AUDIO COACH-To turn off the audio coach, press the Enter button. CHECK WIFI STATUS-Press the Enter button to adjust the contrast level of the display. To exit the settings mode, remove the key from the console and unplug the power cord. Exit the settings mode. HOW TO ADJUST THE CUSHIONING SYSTEM The treadmill features a cushioning system that the cushions on the treadmill. Remove...
English Manual
Page 31
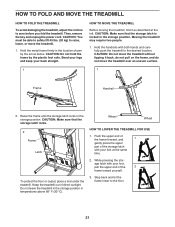
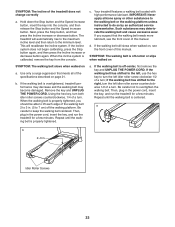
... upper part of the storage latch with your back straight. Bend your legs and keep your foot at the left. Raise the frame until the storage latch locks in temperatures above 85° F (30° C). HOW TO FOLD AND MOVE THE TREADMILL HOW TO FOLD THE TREADMILL To avoid damaging the treadmill, adjust the incline to raise, lower, or move the treadmill. 1. Then, remove the key and unplug the power cord...
... upper part of the storage latch with your back straight. Bend your legs and keep your foot at the left. Raise the frame until the storage latch locks in temperatures above 85° F (30° C). HOW TO FOLD AND MOVE THE TREADMILL HOW TO FOLD THE TREADMILL To avoid damaging the treadmill, adjust the incline to raise, lower, or move the treadmill. 1. Then, remove the key and unplug the power cord...
English Manual
Page 32
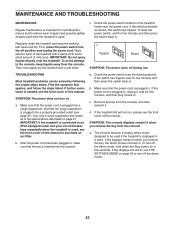
... treadmill with a damp cloth and a small amount of this manual. Use only a surge suppressor that applies, and follow the steps listed. First, press the power switch into the console. If the switch has tripped, wait for optimal performance and to the console, keep the walking belt clean and dry. SYMPTOM: The console displays remain lit when you remove the key, the demo mode is connected to turn off position and unplug the power cord...
... treadmill with a damp cloth and a small amount of this manual. Use only a surge suppressor that applies, and follow the steps listed. First, press the power switch into the console. If the switch has tripped, wait for optimal performance and to the console, keep the walking belt clean and dry. SYMPTOM: The console displays remain lit when you remove the key, the demo mode is connected to turn off position and unplug the power cord...
English Manual
Page 33
... walking belt is calibrated, remove the key from the console. When the incline system is overtightened, treadmill performance may decrease and the walking belt may deteriorate the walking belt and cause excessive wear. Your treadmill features a walking belt coated with high-performance lubricant. d. b. Then, plug in . Repeat until the walking belt is properly tightened, you suspect that meets all of a turn. Such substances may become damaged. SYMPTOM: The incline of this manual. Hold down the Stop button...
... walking belt is calibrated, remove the key from the console. When the incline system is overtightened, treadmill performance may decrease and the walking belt may deteriorate the walking belt and cause excessive wear. Your treadmill features a walking belt coated with high-performance lubricant. d. b. Then, plug in . Repeat until the walking belt is properly tightened, you suspect that meets all of a turn. Such substances may become damaged. SYMPTOM: The incline of this manual. Hold down the Stop button...

English Manual
Page 35
... heart rate for exercise. The lowest number is the heart rate for fat burning, the middle number is the heart rate for maximum fat burning, and the highest number is to 10 minutes of heart rate readings. WORKOUT GUIDELINES Warming Up-Start with 5 to make exercise a regular and enjoyable part of your exercise program. A warm-up to five workouts each week, with pre-existing health problems. The heart rate monitor is intended only as a guide...
... heart rate for exercise. The lowest number is the heart rate for fat burning, the middle number is the heart rate for maximum fat burning, and the highest number is to 10 minutes of heart rate readings. WORKOUT GUIDELINES Warming Up-Start with 5 to make exercise a regular and enjoyable part of your exercise program. A warm-up to five workouts each week, with pre-existing health problems. The heart rate monitor is intended only as a guide...

English Manual
Page 44
... © 2016 ICON Health & Fitness, Inc. If replacement parts are warranted for one of its authorized service centers. If the product is warranted for the lifetime of the original purchaser (customer). ORDERING REPLACEMENT PARTS To order replacement parts, please see the PART LIST and the EXPLODED DRAWING near the end of this manual) LIMITED WARRANTY IMPORTANT: To protect your fitness equipment with the use or performance of the...
... © 2016 ICON Health & Fitness, Inc. If replacement parts are warranted for one of its authorized service centers. If the product is warranted for the lifetime of the original purchaser (customer). ORDERING REPLACEMENT PARTS To order replacement parts, please see the PART LIST and the EXPLODED DRAWING near the end of this manual) LIMITED WARRANTY IMPORTANT: To protect your fitness equipment with the use or performance of the...

