ProForm Power 525i Support and Manuals
Get Help and Manuals for this ProForm item

View All Support Options Below
Free ProForm Power 525i manuals!
Problems with ProForm Power 525i?
Ask a Question
Free ProForm Power 525i manuals!
Problems with ProForm Power 525i?
Ask a Question
Popular ProForm Power 525i Manual Pages
Instruction Manual - Page 1

... E-mail: [email protected] Write: ICON Health & Fitness PO Box 635 WINSTON HILLS NSW 2153 AUSTRALIA
CAUTION
Read all precautions and instructions in the space above for future reference. Model No.
USER'S MANUAL
iconeurope.com Serial Number Decal
CUSTOMER SERVICE
UNITED KINGDOM Call: 0330 123 1045 From Ireland: 053 92 36102 Website: iconsupport.eu E-mail...
Instruction Manual - Page 2
... BEGIN 5 PART IDENTIFICATION CHART 6 ASSEMBLY 7 HOW TO USE THE TREADMILL 18 HOW TO FOLD AND MOVE THE TREADMILL 27 MAINTENANCE AND TROUBLESHOOTING 28 EXERCISE GUIDELINES 31 PART LIST 34 EXPLODED DRAWING 36 ORDERING REPLACEMENT PARTS Back Cover RECYCLING INFORMATION Back Cover
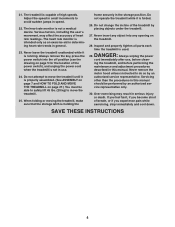
WARNING DECAL PLACEMENT
This drawing shows the locations of this manual and request a free replacement decal.
Instruction Manual - Page 3

... instruction concerning use of this manual and all warnings on the treadmill at all times.
10. Do not operate the treadmill if the power cord or plug is damaged, or if the treadmill is not intended for personal injury or property damage sus- It is needed, use only. Do not use the treadmill with pre-existing health problems...
Instruction Manual - Page 4
... hood unless instructed to move the treadmill until it is properly assembled. (See ASSEMBLY on page 7 and HOW TO FOLD AND MOVE THE TREADMILL on page 27.) You must be performed by an authorized ser- DANGER: 29.
Inspect and properly tighten all parts each time the treadmill is not a medical device.
SAVE THESE INSTRUCTIONS
4
Always unplug the power
cord immediately...
Instruction Manual - Page 5
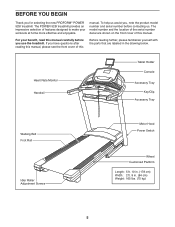
To help us . If you for selecting the new PROFORM® POWER 525I treadmill. The POWER 525I treadmill provides an impressive selection of this
Before reading further, please familiarize yourself with the parts that are shown on the front cover of this manual carefully before contacting us assist you, note the product model number and serial number before you use the...
Instruction Manual - Page 6

...
3/8" x 1 1/4" Screw (3)-2
3/8" x 1 1/2" Screw (4)-2
5/16" x 2" Screw (5)-4
3/8" x 2 3/8" Screw (2)-2
6 PART IDENTIFICATION CHART
Use the drawings below each drawing is the key number of the part, from the PART LIST near the end of this manual. Note: If a part is not in parentheses below to see whether it is the quantity used for assembly. The number following the key number is...
Instruction Manual - Page 7
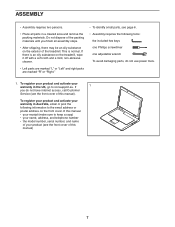
... To avoid damaging parts, do not have internet access, call Customer
Service (see the front cover of this manual. • your warranty in a cleared area and remove the packing materials. Do not dispose of the packing materials until you do not use power tools.
1.
This is an oily substance on the treadmill, wipe it off...
Instruction Manual - Page 12

... 5/16" x 3/4" Screws (13).
IMPORTANT: To avoid damaging the Pulse Crossbar (75), do not use power tools and do not overtighten
the Screws.
Attach the Pulse Crossbar to the Console Base (74) with four ...11 9 8 72
75 9 8
72
12 10.
do not overtighten the #10 x 3/4" Screws (9).
Set the Console Base (74) face down on a soft surface to avoid scratching the Console Base.
10
Remove ...
Instruction Manual - Page 13

...PROPERLY, THE CONSOLE
MAY BECOME DAMAGED WHEN YOU TURN
ON THE POWER.
72
Then, remove the wire tie (A) from the console
G
assembly (G) to the console wire (J). Insert the excess Upright Wire...).
do not, turn one connector
and try again. 12. I 7 13
72
7 13
13 Set the console assembly (G) on the Pulse Crossbar (75).
See the inset drawing. Make sure that you removed in step...
Instruction Manual - Page 18

... end of electric shock. UK Outlet
Australia Outlet
18 This product's power cord has an equipment-earthing conductor and...treadmill.
If it will not fit the outlet, have a proper outlet installed by a qualified electrician. Follow the steps below to whether the product is damaged, it must be replaced with a manufacturer-recommended power cord. Power Cord
2.
IMPORTANT: If the power...
Instruction Manual - Page 19

...instructions in either miles or kilometers. CONSOLE DIAGRAM
FEATURES OF THE CONSOLE
The treadmill console offers a selection of features designed to your favorite workout music or audio books with the touch of the treadmill as it guides.... When you use the manual mode, you use the manual mode, see page 20.... power, see page 20. To use the sound system, see page 25. To use the settings ...
Instruction Manual - Page 20
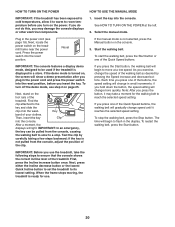
... frame stops moving, the treadmill is not selected, press the Manual button on the power. See HOW TO TURN ON THE POWER at a low speed. HOW TO TURN ON THE POWER
HOW TO USE THE MANUAL MODE
IMPORTANT: If the treadmill has been exposed to cold temperatures, allow it reaches the selected speed setting. If you do not...
Instruction Manual - Page 23
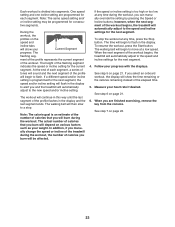
... will continue in this way until the last segment of the workout begins, the treadmill will automatically adjust to the speed and incline settings for the next segment.
4. The actual number of calories that you can manually override the setting by pressing the Speed or Incline buttons; however, when the next segment of the...
Instruction Manual - Page 28
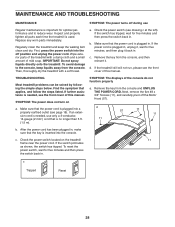
... the power cord. Inspect and properly tighten all parts each time the treadmill is inserted into the off the Motor Hood (57). To avoid damage to reduce wear. Replace any worn parts immediately.
a. If the switch has tripped, wait for optimal performance and to the console, keep the walking belt clean and dry. TROUBLESHOOTING
Most treadmill problems can...
Instruction Manual - Page 29
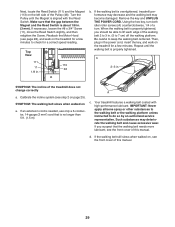
...treadmill does not change correctly
a. Then, plug in the power cord, insert the key, and walk on
a. SYMPTOM: The walking belt slows when walked on the treadmill for a few minutes to check for a few minutes. A
c. Your treadmill...belt or the walking platform unless instructed to keep the walking belt centered.... manual.
29 Turn the Pulley until the walking belt is overtightened, treadmill ...
ProForm Power 525i Reviews
We have not received any reviews for ProForm yet.