
Instruction Manual
Page 2
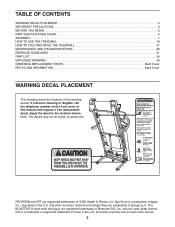
... PLACEMENT 2 IMPORTANT PRECAUTIONS 3 BEFORE YOU BEGIN 5 PART IDENTIFICATION CHART 6 ASSEMBLY 7 HOW TO USE THE TREADMILL 18 HOW TO FOLD AND MOVE THE TREADMILL 27 MAINTENANCE AND TROUBLESHOOTING 28 EXERCISE GUIDELINES 31 PART LIST 34 EXPLODED DRAWING 36 ORDERING REPLACEMENT PARTS Back Cover RECYCLING INFORMATION Back Cover WARNING DECAL PLACEMENT This drawing shows the locations of ICON Health & Fitness, Inc. PROFORM and IFIT are trademarks of this manual and request a free replacement decal. Android and Google Play are...
... PLACEMENT 2 IMPORTANT PRECAUTIONS 3 BEFORE YOU BEGIN 5 PART IDENTIFICATION CHART 6 ASSEMBLY 7 HOW TO USE THE TREADMILL 18 HOW TO FOLD AND MOVE THE TREADMILL 27 MAINTENANCE AND TROUBLESHOOTING 28 EXERCISE GUIDELINES 31 PART LIST 34 EXPLODED DRAWING 36 ORDERING REPLACEMENT PARTS Back Cover RECYCLING INFORMATION Back Cover WARNING DECAL PLACEMENT This drawing shows the locations of ICON Health & Fitness, Inc. PROFORM and IFIT are trademarks of this manual and request a free replacement decal. Android and Google Play are...

Instruction Manual
Page 3
... safety. 4. Athletic support clothes are recommended for home use only a 3-conductor, 14-gauge (2 mm2) cord that is walking on the treadmill at least 8 ft. (2.4 m) of clearance behind it and 2 ft. (0.6 m) on each side. Do not place the treadmill on any commercial, rental, or institutional setting. 6. Before beginning any exercise program, consult your treadmill. The treadmill is not working properly. (See MAINTENANCE AND TROUBLESHOOTING on page...
... safety. 4. Athletic support clothes are recommended for home use only a 3-conductor, 14-gauge (2 mm2) cord that is walking on the treadmill at least 8 ft. (2.4 m) of clearance behind it and 2 ft. (0.6 m) on each side. Do not place the treadmill on any commercial, rental, or institutional setting. 6. Before beginning any exercise program, consult your treadmill. The treadmill is not working properly. (See MAINTENANCE AND TROUBLESHOOTING on page...
Instruction Manual
Page 4
... not change the incline of high speeds. Adjust the speed in small increments to move the treadmill until it is properly assembled. (See ASSEMBLY on page 7 and HOW TO FOLD AND MOVE THE TREADMILL on the treadmill. 28. The heart rate monitor is folded. 26. Do not operate the treadmill while it is not a medical device. Always unplug the power cord immediately after use . 24. Never remove the motor hood unless instructed to move the treadmill. 25...
... not change the incline of high speeds. Adjust the speed in small increments to move the treadmill until it is properly assembled. (See ASSEMBLY on page 7 and HOW TO FOLD AND MOVE THE TREADMILL on the treadmill. 28. The heart rate monitor is folded. 26. Do not operate the treadmill while it is not a medical device. Always unplug the power cord immediately after use . 24. Never remove the motor hood unless instructed to move the treadmill. 25...
Instruction Manual
Page 5
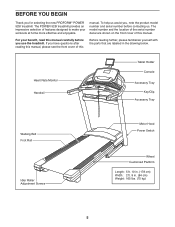
... familiarize yourself with the parts that are shown on the front cover of this manual. To help us assist you, note the product model number and serial number before you for selecting the new PROFORM® POWER 525I treadmill. manual. For your workouts at home more effective and enjoyable. Heart Rate Monitor Handrail Tablet Holder Console Accessory Tray Key/Clip Accessory Tray Walking Belt Foot Rail Idler Roller Adjustment Screws Motor Hood Power Switch Wheel Cushioned Platform Length...
... familiarize yourself with the parts that are shown on the front cover of this manual. To help us assist you, note the product model number and serial number before you for selecting the new PROFORM® POWER 525I treadmill. manual. For your workouts at home more effective and enjoyable. Heart Rate Monitor Handrail Tablet Holder Console Accessory Tray Key/Clip Accessory Tray Walking Belt Foot Rail Idler Roller Adjustment Screws Motor Hood Power Switch Wheel Cushioned Platform Length...
Instruction Manual
Page 7
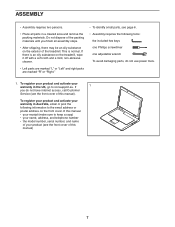
... keys one Phillips screwdriver one adjustable wrench To avoid damaging parts, do not have internet access, call Customer Service (see the front cover of this manual) 7 To register your product and activate your product (see the front cover of this manual). If there is normal. Do not dispose of the packing materials until you do not use power tools. 1. ASSEMBLY • Assembly...
... keys one Phillips screwdriver one adjustable wrench To avoid damaging parts, do not have internet access, call Customer Service (see the front cover of this manual) 7 To register your product and activate your product (see the front cover of this manual). If there is normal. Do not dispose of the packing materials until you do not use power tools. 1. ASSEMBLY • Assembly...

Instruction Manual
Page 12
... Right Trays (85, 86). start all four Screws, and then tighten them. 11 9 8 72 75 9 8 72 12 Orient the Pulse Crossbar (75) as shown. F 10 86 10 75 F 10 85 10 74 13 11. IMPORTANT: To avoid damaging the Pulse Crossbar (75), do not use power tools and do not overtighten the Screws. Set the Console Base (74) face down...
... Right Trays (85, 86). start all four Screws, and then tighten them. 11 9 8 72 75 9 8 72 12 Orient the Pulse Crossbar (75) as shown. F 10 86 10 75 F 10 85 10 74 13 11. IMPORTANT: To avoid damaging the Pulse Crossbar (75), do not use power tools and do not overtighten the Screws. Set the Console Base (74) face down...

Instruction Manual
Page 13
... not tighten the Screws yet. 13 G 80 72 I ). Set the console assembly (G) on the Pulse Crossbar (75). 12. The connec- Insert the excess Upright Wire (80) into place. See the inset drawing. IF YOU DO NOT CONNECT THE 80 CONNECTORS PROPERLY, THE CONSOLE MAY BECOME DAMAGED WHEN YOU TURN ON THE POWER. 72 Then, remove the wire tie (A) from the console G assembly (G) to the console wire (J). Then, attach the console assembly...
... not tighten the Screws yet. 13 G 80 72 I ). Set the console assembly (G) on the Pulse Crossbar (75). 12. The connec- Insert the excess Upright Wire (80) into place. See the inset drawing. IF YOU DO NOT CONNECT THE 80 CONNECTORS PROPERLY, THE CONSOLE MAY BECOME DAMAGED WHEN YOU TURN ON THE POWER. 72 Then, remove the wire tie (A) from the console G assembly (G) to the console wire (J). Then, attach the console assembly...

Instruction Manual
Page 17
... the Storage Latch. Note: Extra hardware may be able to adjust the walking belt (see HOW TO LOWER THE TREADMILL FOR USE on the Tablet Holder (26) into the slots (O) in the console assembly (G). Press the two tabs on page 27). 20 51 N 100 98 54 52 21. If there are properly tightened before you use with most full-size tablets. the hex key is...
... the Storage Latch. Note: Extra hardware may be able to adjust the walking belt (see HOW TO LOWER THE TREADMILL FOR USE on the Tablet Holder (26) into the slots (O) in the console assembly (G). Press the two tabs on page 27). 20 51 N 100 98 54 52 21. If there are properly tightened before you use with most full-size tablets. the hex key is...

Instruction Manual
Page 18
... Treadmill DANGER: Improper connection of the power cord into an appropriate outlet that is damaged, it must be replaced with a manufacturer-recommended power cord. Power Cord 2. IMPORTANT: If the power cord is properly installed and earthed in accordance with all local codes and ordinances. UK Outlet Australia Outlet 18 HOW TO USE THE TREADMILL HOW TO PLUG IN THE POWER CORD This product must be earthed. Follow the steps...
... Treadmill DANGER: Improper connection of the power cord into an appropriate outlet that is damaged, it must be replaced with a manufacturer-recommended power cord. Power Cord 2. IMPORTANT: If the power cord is properly installed and earthed in accordance with all local codes and ordinances. UK Outlet Australia Outlet 18 HOW TO USE THE TREADMILL HOW TO PLUG IN THE POWER CORD This product must be earthed. Follow the steps...

Instruction Manual
Page 19
... while using the handgrip heart rate monitor or a compatible heart rate monitor. To use the iFit®-Smart Cardio Equipment app to the console, see page 20. To connect your heart rate monitor to record and track your favorite workout music or audio books with the touch of a button. To use the settings mode, see page 25. To change the speed and incline of the treadmill with the console's sound system while you through an effective exercise session...
... while using the handgrip heart rate monitor or a compatible heart rate monitor. To use the iFit®-Smart Cardio Equipment app to the console, see page 20. To connect your heart rate monitor to record and track your favorite workout music or audio books with the touch of a button. To use the settings mode, see page 25. To change the speed and incline of the treadmill with the console's sound system while you through an effective exercise session...
Instruction Manual
Page 20
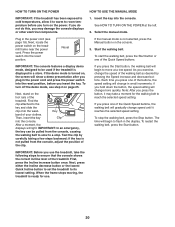
... the clip attached to its lowest setting. Key band of the Quick Speed buttons. Then, insert the key Clip into the console. If you press the Start button, the walking belt will begin to move at the left. 2. To restart the walking belt, press the Start button. To turn on the foot rails of the treadmill. if the key is displayed in the power cord and press the power switch into the reset position. As you exercise, change speed until it...
... the clip attached to its lowest setting. Key band of the Quick Speed buttons. Then, insert the key Clip into the console. If you press the Start button, the walking belt will begin to move at the left. 2. To restart the walking belt, press the Start button. To turn on the foot rails of the treadmill. if the key is displayed in the power cord and press the power switch into the reset position. As you exercise, change speed until it...

Instruction Manual
Page 21
... approximate intensity level of your exercise. • The workout intensity bar • The approximate number of calories you have burned • The incline level of the treadmill • The number of the treadmill as desired. Change the incline of vertical meters you walk or run on the treadmill, the display can measure your heart rate if desired. To reset the displays, press the Stop button repeatedly. 6. 4. As you have burned...
... approximate intensity level of your exercise. • The workout intensity bar • The approximate number of calories you have burned • The incline level of the treadmill • The number of the treadmill as desired. Change the incline of vertical meters you walk or run on the treadmill, the display can measure your heart rate if desired. To reset the displays, press the Stop button repeatedly. 6. 4. As you have burned...

Instruction Manual
Page 22
... workout. Press the Start button to the storage position. Before using the treadmill, step onto the foot rails, press the Stop button, and adjust the incline of plastic from the console. In addition, make sure that your palms on page 20. 2. For the most accurate heart rate reading, continue to hold the pulse bar with your hands are finished using the handgrip heart rate monitor, remove the sheets of the treadmill to the first speed...
... workout. Press the Start button to the storage position. Before using the treadmill, step onto the foot rails, press the Stop button, and adjust the incline of plastic from the console. In addition, make sure that your palms on page 20. 2. For the most accurate heart rate reading, continue to hold the pulse bar with your hands are finished using the handgrip heart rate monitor, remove the sheets of the treadmill to the first speed...
Instruction Manual
Page 23
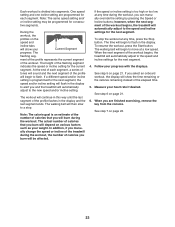
... adjust to flash. The workout will begin to a stop the workout at any time, press the Stop button. If you are programmed for the next segment. 4. During the workout, the profiles on page 22. 23 One speed setting and one incline setting are finished exercising, remove the key from the console. If the speed or incline setting is divided into segments. Note: The same speed setting and/ or incline setting may be affected. The walking belt...
... adjust to flash. The workout will begin to a stop the workout at any time, press the Stop button. If you are programmed for the next segment. 4. During the workout, the profiles on page 22. 23 One speed setting and one incline setting are finished exercising, remove the key from the console. If the speed or incline setting is divided into segments. Note: The same speed setting and/ or incline setting may be affected. The walking belt...

Instruction Manual
Page 25
... settings mode, press the Settings button. The treadmill will display several optional screens. To speed up correctly. Adjust the volume level using the volume increase and decrease buttons on the console or the volume control on your personal audio player. TOTAL TIME/DISTANCE-The screen will display the total number of hours that the treadmill has been used and the total number of the following screens: To exit the settings mode, press the Settings button. DISPLAY...
... settings mode, press the Settings button. The treadmill will display several optional screens. To speed up correctly. Adjust the volume level using the volume increase and decrease buttons on the console or the volume control on your personal audio player. TOTAL TIME/DISTANCE-The screen will display the total number of hours that the treadmill has been used and the total number of the following screens: To exit the settings mode, press the Settings button. DISPLAY...

Instruction Manual
Page 27
... carefully lower the treadmill. HOW TO FOLD AND MOVE THE TREADMILL HOW TO FOLD THE TREADMILL HOW TO MOVE THE TREADMILL To avoid damaging the treadmill, adjust the incline to the floor. 27 Then, remove the key and unplug the power cord. CAUTION: You must be able to safely lift 45 lbs. (20 kg) to the desired location. Hold the metal frame (A) firmly in the storage position...
... carefully lower the treadmill. HOW TO FOLD AND MOVE THE TREADMILL HOW TO FOLD THE TREADMILL HOW TO MOVE THE TREADMILL To avoid damaging the treadmill, adjust the incline to the floor. 27 Then, remove the key and unplug the power cord. CAUTION: You must be able to safely lift 45 lbs. (20 kg) to the desired location. Hold the metal frame (A) firmly in the storage position...
Instruction Manual
Page 28
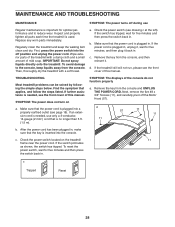
... extension cord is needed , see the front cover of this manual. c Tripped Reset 28 Regularly clean the treadmill and keep liquids away from the console and UNPLUG THE POWER CORD. Next, remove the five #8 x 3/4" Screws (11), and carefully pivot off position and unplug the power cord. b. Replace any worn parts immediately. Make sure that applies, and follow the steps listed. MAINTENANCE AND TROUBLESHOOTING MAINTENANCE SYMPTOM: The power turns off during use only...
... extension cord is needed , see the front cover of this manual. c Tripped Reset 28 Regularly clean the treadmill and keep liquids away from the console and UNPLUG THE POWER CORD. Next, remove the five #8 x 3/4" Screws (11), and carefully pivot off position and unplug the power cord. b. Replace any worn parts immediately. Make sure that applies, and follow the steps listed. MAINTENANCE AND TROUBLESHOOTING MAINTENANCE SYMPTOM: The power turns off during use only...
Instruction Manual
Page 29
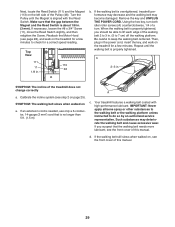
... the walking belt is properly tightened, you suspect that the walking belt needs more lubricant, see page 28), and walk on the left side of the walking belt 2 to 7 cm) off the walking platform. Remove the key and UNPLUG THE POWER CORD. Your treadmill features a walking belt coated with the Reed Switch. Such substances may become damaged. If necessary, loosen the #8 x 3/4" Screw (11), move the Reed Switch slightly, and then retighten the Screw. Then, plug in...
... the walking belt is properly tightened, you suspect that the walking belt needs more lubricant, see page 28), and walk on the left side of the walking belt 2 to 7 cm) off the walking platform. Remove the key and UNPLUG THE POWER CORD. Your treadmill features a walking belt coated with the Reed Switch. Such substances may become damaged. If necessary, loosen the #8 x 3/4" Screw (11), move the Reed Switch slightly, and then retighten the Screw. Then, plug in...

Instruction Manual
Page 31
.... Training Zone Exercise-Exercise for 20 to use your everyday life. 31 never hold your body begin to 30 minutes with pre-existing health problems. The heart rate monitor is intended only as you must exercise at the proper intensity is near the highest number in general. For detailed exercise information, obtain a reputable book or consult your training zone. The chart below shows recommended heart rates for aerobic exercise...
.... Training Zone Exercise-Exercise for 20 to use your everyday life. 31 never hold your body begin to 30 minutes with pre-existing health problems. The heart rate monitor is intended only as you must exercise at the proper intensity is near the highest number in general. For detailed exercise information, obtain a reputable book or consult your training zone. The chart below shows recommended heart rates for aerobic exercise...
Instruction Manual
Page 40
... to provide the following information when contacting us: • the model number and serial number of the product (see the front cover of this manual) • the name of the product (see the front cover of this manual) • the key number and description of the replacement part(s) (see the front cover of this manual. ORDERING REPLACEMENT PARTS To order replacement parts, please see the PART LIST and the EXPLODED DRAWING...
... to provide the following information when contacting us: • the model number and serial number of the product (see the front cover of this manual) • the name of the product (see the front cover of this manual) • the key number and description of the replacement part(s) (see the front cover of this manual. ORDERING REPLACEMENT PARTS To order replacement parts, please see the PART LIST and the EXPLODED DRAWING...

