
English Manual
Page 1
Serial Number Decal USER'S MANUAL SEARS, ROEBUCK AND CO., HOFFMAN ESTATES, IL 60179 CAUTION Read all precautions and instructions in this manual before using this manual for future reference. Visit our website at www.proform.com new products, prizes, fitness tips, and much more! Patent Pending Model No. 831.283110 Serial No. Keep this equipment.
Serial Number Decal USER'S MANUAL SEARS, ROEBUCK AND CO., HOFFMAN ESTATES, IL 60179 CAUTION Read all precautions and instructions in this manual before using this manual for future reference. Visit our website at www.proform.com new products, prizes, fitness tips, and much more! Patent Pending Model No. 831.283110 Serial No. Keep this equipment.
English Manual
Page 2
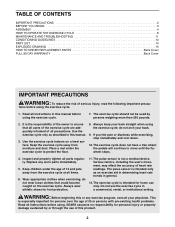
... EXERCISE CYCLE 8 MAINTENANCE AND TROUBLESHOOTING 11 CONDITIONING GUIDELINES 12 PART LIST 14 EXPLODED DRAWING 15 HOW TO ORDER REPLACEMENT PARTS Back Cover FULL 90 DAY WARRANTY Back Cover IMPORTANT PRECAUTIONS WARNING: To reduce the risk of all precautions. Use the exercise cycle only as an exercise aid in determining heart rate trends in this product. 2 Inspect and properly tighten all instructions before using . Always wear athletic shoes for home use...
... EXERCISE CYCLE 8 MAINTENANCE AND TROUBLESHOOTING 11 CONDITIONING GUIDELINES 12 PART LIST 14 EXPLODED DRAWING 15 HOW TO ORDER REPLACEMENT PARTS Back Cover FULL 90 DAY WARRANTY Back Cover IMPORTANT PRECAUTIONS WARNING: To reduce the risk of all precautions. Use the exercise cycle only as an exercise aid in determining heart rate trends in this product. 2 Inspect and properly tighten all instructions before using . Always wear athletic shoes for home use...
English Manual
Page 3
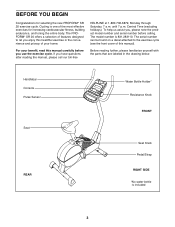
... yourself with the parts that are labeled in the convenience and privacy of your benefit, read this manual carefully before calling. Handlebar Console Pulse Sensor Seat REAR Water Bottle Holder* Resistance Knob FRONT Seat Knob Pedal/Strap RIGHT SIDE *No water bottle is 831.283110. If you , please note the product model number and serial number before you use the exercise cycle. The model number is included 3 The serial number can be found...
... yourself with the parts that are labeled in the convenience and privacy of your benefit, read this manual carefully before calling. Handlebar Console Pulse Sensor Seat REAR Water Bottle Holder* Resistance Knob FRONT Seat Knob Pedal/Strap RIGHT SIDE *No water bottle is 831.283110. If you , please note the product model number and serial number before you use the exercise cycle. The model number is included 3 The serial number can be found...
English Manual
Page 4
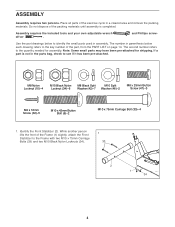
... number refers to the Frame with two M10 x 75mm Carriage Bolts (33) and two M10 Black Nylon Locknuts (34). 1 33 2 1 34 4 While another person lifts the front of the exercise cycle in a cleared area and remove the packing materials. ASSEMBLY Assembly requires two persons. Place all parts of the Frame (1) slightly, attach the Front Stabilizer to the quantity needed...
... number refers to the Frame with two M10 x 75mm Carriage Bolts (33) and two M10 Black Nylon Locknuts (34). 1 33 2 1 34 4 While another person lifts the front of the exercise cycle in a cleared area and remove the packing materials. ASSEMBLY Assembly requires two persons. Place all parts of the Frame (1) slightly, attach the Front Stabilizer to the quantity needed...
English Manual
Page 5
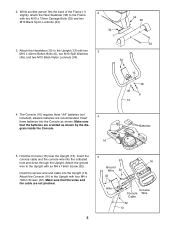
... shown. gram inside the Console. 16 Batteries 5. Make sure that the batteries are recommended. Attach the ground wire to the Frame with an M4 x 16mm Screw (32). Hold the Console (16) near the Upright (13). While another person lifts the back of the Frame (1) slightly, attach the Rear Stabilizer (30) to the Upright with two M10 x 75mm Carriage Bolts (33) and two...
... shown. gram inside the Console. 16 Batteries 5. Make sure that the batteries are recommended. Attach the ground wire to the Frame with an M4 x 16mm Screw (32). Hold the Console (16) near the Upright (13). While another person lifts the back of the Frame (1) slightly, attach the Rear Stabilizer (30) to the Upright with two M10 x 75mm Carriage Bolts (33) and two...
English Manual
Page 6
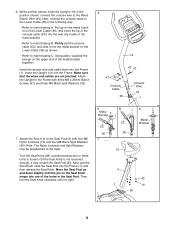
... (1). Move the Seat Post up on the metal bracket on the upper end of the holes in the Seat Post. Then, turn the Seat Knob clockwise until the pin on the Lower Cable (36) as shown. • Refer to inset drawing B. Next, connect the console cable to the Lower Cable (36) in the position shown, connect the console wire to loosen it (if the Seat Knob is tight. Attach the Upright...
... (1). Move the Seat Post up on the metal bracket on the upper end of the holes in the Seat Post. Then, turn the Seat Knob clockwise until the pin on the Lower Cable (36) as shown. • Refer to inset drawing B. Next, connect the console cable to the Lower Cable (36) in the position shown, connect the console wire to loosen it (if the Seat Knob is tight. Attach the Upright...
English Manual
Page 7
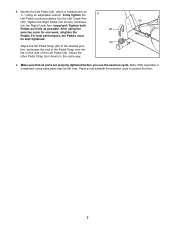
... one week, retighten the Pedals. Note: After assembly is marked with an "L." Tighten the Right Pedal (not shown) clockwise 40 into the Left Crank Arm (40). Make sure that all parts are properly tightened before you use the exercise cycle. Important: Tighten both Pedals as firmly as possible. Using an adjustable wrench, firmly tighten the 8 Left Pedal counterclockwise into the Right Crank Arm. Adjust the other Pedal Strap (not shown) in...
... one week, retighten the Pedals. Note: After assembly is marked with an "L." Tighten the Right Pedal (not shown) clockwise 40 into the Left Crank Arm (40). Make sure that all parts are properly tightened before you use the exercise cycle. Important: Tighten both Pedals as firmly as possible. Using an adjustable wrench, firmly tighten the 8 Left Pedal counterclockwise into the Right Crank Arm. Adjust the other Pedal Strap (not shown) in...
English Manual
Page 8
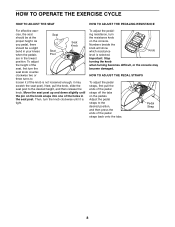
... the pedal straps back onto the tabs. HOW TO OPERATE THE EXERCISE CYCLE HOW TO ADJUST THE SEAT HOW TO ADJUST THE PEDALING RESISTANCE For effective exer- ing resistance, turn the seat knob counter- Important: Stop turning the knob when turning becomes difficult, or the console may scratch the seat post). clockwise two or three turns to loosen it (if the knob is not loosened enough, it is selected. Move the seat...
... the pedal straps back onto the tabs. HOW TO OPERATE THE EXERCISE CYCLE HOW TO ADJUST THE SEAT HOW TO ADJUST THE PEDALING RESISTANCE For effective exer- ing resistance, turn the seat knob counter- Important: Stop turning the knob when turning becomes difficult, or the console may scratch the seat post). clockwise two or three turns to loosen it (if the knob is not loosened enough, it is selected. Move the seat...

English Manual
Page 9
... a few seconds each, in the console (see FAT BURNING on the power, press the On/Reset button or simply begin pedaling. To change the unit of fat calories you have burned. When the power is selected, you use the pulse sensor. Note: If a different mode is Mode Indicators turned on page 11). To reset the display, press the On/Reset button. 9 Speed-This mode displays your heart rate when you can display speed and distance in the display.
... a few seconds each, in the console (see FAT BURNING on the power, press the On/Reset button or simply begin pedaling. To change the unit of fat calories you have burned. When the power is selected, you use the pulse sensor. Note: If a different mode is Mode Indicators turned on page 11). To reset the display, press the On/Reset button. 9 Speed-This mode displays your heart rate when you can display speed and distance in the display.

English Manual
Page 10
... indicator in general. 4. Avoid moving your heart rate if desired. To turn off to hold the handle on the metal contacts of the pulse sensor, peel off " feature. If the pedals are not moved and the console buttons are thin sheets of heart rate readings. Measure your hands. For the most accurate heart rate reading, continue to conserve the batteries. 10 3. Various factors may affect...
... indicator in general. 4. Avoid moving your heart rate if desired. To turn off to hold the handle on the metal contacts of the pulse sensor, peel off " feature. If the pedals are not moved and the console buttons are thin sheets of heart rate readings. Measure your hands. For the most accurate heart rate reading, continue to conserve the batteries. 10 3. Various factors may affect...
English Manual
Page 11
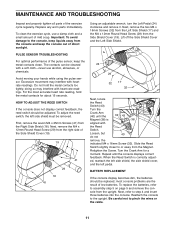
... the Screw. Turn the Crank Arm for about 15 seconds. BATTERY REPLACEMENT If the console display becomes dim, the batteries should be replaced; Reattach the console to or away from the upright. Replace any worn parts immediately. Avoid moving your hands while using the pulse sensor. Lift off the Side Shield Cover and the Left Side Shield. 24 29 32 17 32 Next, locate the Reed Switch (43). Slide the Reed Switch slightly closer...
... the Screw. Turn the Crank Arm for about 15 seconds. BATTERY REPLACEMENT If the console display becomes dim, the batteries should be replaced; Reattach the console to or away from the upright. Replace any worn parts immediately. Avoid moving your hands while using the pulse sensor. Lift off the Side Shield Cover and the Left Side Shield. 24 29 32 17 32 Next, locate the Reed Switch (43). Slide the Reed Switch slightly closer...
English Manual
Page 12
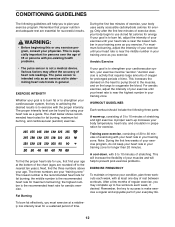
... exercise does your training zone as an exercise aid in determining heart rate trends in your body begin to plan your physician. Aerobic Exercise • The pulse sensor is intended only as you to use stored fat calories for energy. Note: During the first few minutes of your exercise program, do not keep your heart rate in your everyday life. The chart below shows recommended heart rates...
... exercise does your training zone as an exercise aid in determining heart rate trends in your body begin to plan your physician. Aerobic Exercise • The pulse sensor is intended only as you to use stored fat calories for energy. Note: During the first few minutes of your exercise program, do not keep your heart rate in your everyday life. The chart below shows recommended heart rates...
English Manual
Page 13
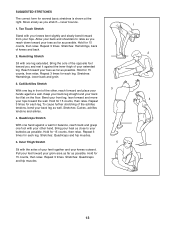
...as possible. Reach toward you stretch-never bounce. 1. Stretches: Hamstrings, lower back and groin. 3. Hold for each leg. Stretches: Hamstrings, back of your hips. Stretches: Calves, achilles tendons...relax. Stretches: Quadriceps and hip muscles. 3 5 1 2 4 13 Bend your front leg, lean forward and move your back leg as possible. Hold for 15 counts, then relax. Pull your feet toward the wall. ...SUGGESTED STRETCHES The correct form for 15 counts, then relax. Repeat 3 times for balance, reach back and grasp one leg extended. Keep your back leg straight and your other ...
...as possible. Reach toward you stretch-never bounce. 1. Stretches: Hamstrings, lower back and groin. 3. Hold for each leg. Stretches: Hamstrings, back of your hips. Stretches: Calves, achilles tendons...relax. Stretches: Quadriceps and hip muscles. 3 5 1 2 4 13 Bend your front leg, lean forward and move your back leg as possible. Hold for 15 counts, then relax. Pull your feet toward the wall. ...SUGGESTED STRETCHES The correct form for 15 counts, then relax. Repeat 3 times for balance, reach back and grasp one leg extended. Keep your back leg straight and your other ...
English Manual
Page 14
... Carriage Bolt 34 7 M10 Black Nylon Locknut 35 1 Flywheel Washer 36 1 Lower Cable 37 1 Flywheel 38 1 Magnet 39 1 Flywheel Axle 40 1 Pulley 41 7 M4 x 25mm Screw 42 7 M8 Black Split Washer 43 1 Reed Switch/Wire 44 1 Crank Bearing 45 1 Idler Arm 46 2 M10 Split Washer 47 3 M8 x 25mm Button Screw # 1 User's Manual # 2 Allen Wrench Note: "#" indicates a non-illustrated part. Specifications are subject to change without notice. Description Key...
... Carriage Bolt 34 7 M10 Black Nylon Locknut 35 1 Flywheel Washer 36 1 Lower Cable 37 1 Flywheel 38 1 Magnet 39 1 Flywheel Axle 40 1 Pulley 41 7 M4 x 25mm Screw 42 7 M8 Black Split Washer 43 1 Reed Switch/Wire 44 1 Crank Bearing 45 1 Idler Arm 46 2 M10 Split Washer 47 3 M8 x 25mm Button Screw # 1 User's Manual # 2 Allen Wrench Note: "#" indicates a non-illustrated part. Specifications are subject to change without notice. Description Key...
English Manual
Page 15
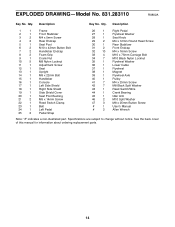
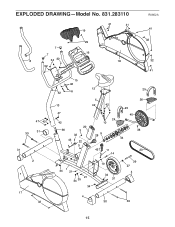
EXPLODED DRAWING-Model No. 831.283110 41 41 19 29 7 7 16 8 34 32 18 32 R0802A 41 32 32 41 47 42 31 33 31 2 17 32 15 46 12 32 6 25 13 47 42 36 20 3 32 43 22 3 5 42 42 24 10 26 25 40 28 9 38 44 45 11 23 14 34 34 1 21 21 34 35 34 10 34 37 39 27 4 4 30 33 15
EXPLODED DRAWING-Model No. 831.283110 41 41 19 29 7 7 16 8 34 32 18 32 R0802A 41 32 32 41 47 42 31 33 31 2 17 32 15 46 12 32 6 25 13 47 42 36 20 3 32 43 22 3 5 42 42 24 10 26 25 40 28 9 38 44 45 11 23 14 34 34 1 21 21 34 35 34 10 34 37 39 27 4 4 30 33 15

English Manual
Page 16
... to schedule repair service call the toll-free numbers listed at the left. Model No. 831.283110 QUESTIONS? This warranty gives you specific legal rights, and you need to defect in material or workmanship in China © 2002 Sears, Roebuck and Co. To request service or to state. When requesting help assembling or operating the PROFORM® SR 20 exercise cycle • a part is used commercially...
... to schedule repair service call the toll-free numbers listed at the left. Model No. 831.283110 QUESTIONS? This warranty gives you specific legal rights, and you need to defect in material or workmanship in China © 2002 Sears, Roebuck and Co. To request service or to state. When requesting help assembling or operating the PROFORM® SR 20 exercise cycle • a part is used commercially...


