

English Manual
Page 2
PROFORM is a registered trademark of this manual. TABLE OF CONTENTS IMPORTANT PRECAUTIONS 3 BEFORE YOU BEGIN 5 ASSEMBLY 6 OPERATION AND ADJUSTMENT 9 HOW TO FOLD AND MOVE THE TREADMILL 23 TROUBLESHOOTING 25 CONDITIONING GUIDELINES 27 ORDERING REPLACEMENT PARTS Back Cover LIMITED WARRANTY Back Cover Note: A PART IDENTIFICATION CHART, an EXPLODED DRAWING, and a PART LIST are attached in the center of ICON Health & Fitness, Inc. 2
PROFORM is a registered trademark of this manual. TABLE OF CONTENTS IMPORTANT PRECAUTIONS 3 BEFORE YOU BEGIN 5 ASSEMBLY 6 OPERATION AND ADJUSTMENT 9 HOW TO FOLD AND MOVE THE TREADMILL 23 TROUBLESHOOTING 25 CONDITIONING GUIDELINES 27 ORDERING REPLACEMENT PARTS Back Cover LIMITED WARRANTY Back Cover Note: A PART IDENTIFICATION CHART, an EXPLODED DRAWING, and a PART LIST are attached in the center of ICON Health & Fitness, Inc. 2

English Manual
Page 3
... damaged, the walking belt may change the incline of the treadmill by persons weighing more amps. Never allow more than 250 pounds. 8. Never use an extension cord. 11. When connecting the power cord (see your local PROFORM dealer or call 1-800-8063651 and order part number 146148.... 16. No other appliance should not be on the treadmill at a time. 9. Use only a single-outlet surge suppressor that blocks air openings. ...
... damaged, the walking belt may change the incline of the treadmill by persons weighing more amps. Never allow more than 250 pounds. 8. Never use an extension cord. 11. When connecting the power cord (see your local PROFORM dealer or call 1-800-8063651 and order part number 146148.... 16. No other appliance should not be on the treadmill at a time. 9. Use only a single-outlet surge suppressor that blocks air openings. ...

English Manual
Page 4
... problems. Read all parts of actual size. 4 SAVE THESE INSTRUCTIONS The decals shown have been placed on your physician. This treadmill is especially important for in this manual. ICON assumes no responsibility for speed and/or incline changes. Always listen for the "...chirp" and be performed by an authorized service representative. Note: The decal shown at any exercise program, consult your treadmill. Inspect and properly tighten all instructions before using. Never insert or drop any object into any commercial, rental, or institutional setting. DANGER...
... problems. Read all parts of actual size. 4 SAVE THESE INSTRUCTIONS The decals shown have been placed on your physician. This treadmill is especially important for in this manual. ICON assumes no responsibility for speed and/or incline changes. Always listen for the "...chirp" and be performed by an authorized service representative. Note: The decal shown at any exercise program, consult your treadmill. Inspect and properly tighten all instructions before using. Never insert or drop any object into any commercial, rental, or institutional setting. DANGER...
English Manual
Page 5
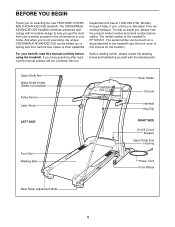
... of your benefit, read this manual for selecting the new PROFORM® CROSSWALK ADVANCED 525 treadmill. For your home. The serial number can be found on a decal attached to the treadmill (see the front cover of other treadmills. until 6 p.m. To help you have questions after reading ...the drawing below and familiarize yourself with the labeled parts. The CROSSWALK ADVANCED 525 treadmill combines advanced technology with innovative design to help us assist you 're not exercising, the unique CROSSWALK ADVANCED 525 can be folded up, requiring less than half the floor space of ...
... of your benefit, read this manual for selecting the new PROFORM® CROSSWALK ADVANCED 525 treadmill. For your home. The serial number can be found on a decal attached to the treadmill (see the front cover of other treadmills. until 6 p.m. To help you have questions after reading ...the drawing below and familiarize yourself with the labeled parts. The CROSSWALK ADVANCED 525 treadmill combines advanced technology with innovative design to help us assist you 're not exercising, the unique CROSSWALK ADVANCED 525 can be folded up, requiring less than half the floor space of ...
English Manual
Page 6
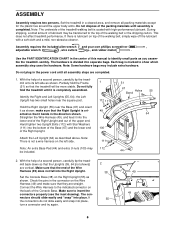
...the Right Upright (55) near the square post. Note: There is not a wire harness on the left side as shown. This does not affect treadmill performance. Attach the Left Upright (64) as shown; Make sure to show which assembly step uses the hardware. ASSEMBLY Assembly requires two persons. Use... cloth and a mild, non-abrasive cleaner. The hardware is divided into the bottom of the Base (67) and the lower end of the treadmill walking belt is completed. Identify the Right and Left Uprights (55, 64); If there is marked to insert the connectors properly (see the inset...
...the Right Upright (55) near the square post. Note: There is not a wire harness on the left side as shown. This does not affect treadmill performance. Attach the Left Upright (64) as shown; Make sure to show which assembly step uses the hardware. ASSEMBLY Assembly requires two persons. Use... cloth and a mild, non-abrasive cleaner. The hardware is divided into the bottom of the Base (67) and the lower end of the treadmill walking belt is completed. Identify the Right and Left Uprights (55, 64); If there is marked to insert the connectors properly (see the inset...

English Manual
Page 8
... Clamps (110) should be attached. Raise the Uprights (55, 64) back to place your foot on one of the wheels (58) as you use the treadmill. If one of the Upper Body Arms breaks away, simply press the lower end back onto the Ball Joint (109, not shown). Keep the included... (see page 26). Note: There may be hardware left side of the Base. Make sure that the Right Upright (55) is a small hole under the treadmill. 8 114 39 40 37 114 50 38 55 64 37 110 9 2 112 67 58 2 109 8
... Clamps (110) should be attached. Raise the Uprights (55, 64) back to place your foot on one of the wheels (58) as you use the treadmill. If one of the Upper Body Arms breaks away, simply press the lower end back onto the Ball Joint (109, not shown). Keep the included... (see page 26). Note: There may be hardware left side of the Base. Make sure that the Right Upright (55) is a small hole under the treadmill. 8 114 39 40 37 114 50 38 55 64 37 110 9 2 112 67 58 2 109 8

English Manual
Page 9
... a walking belt coated with your treadmill (see your home's power. This product is for use on or off. This product must have a proper outlet installed by sudden voltage changes in your local PROFORM dealer or call 1-800-806-3651 and order part number 146148. Grounding.... an equipment-grounding conductor and a grounding plug. A temporary adapter that looks like any other substances to the control system of your treadmill being turned on a nominal 120-volt circuit, and has a grounding plug that looks like extending from other appliances being damaged, always ...
... a walking belt coated with your treadmill (see your home's power. This product is for use on or off. This product must have a proper outlet installed by sudden voltage changes in your local PROFORM dealer or call 1-800-806-3651 and order part number 146148. Grounding.... an equipment-grounding conductor and a grounding plug. A temporary adapter that looks like any other substances to the control system of your treadmill being turned on a nominal 120-volt circuit, and has a grounding plug that looks like extending from other appliances being damaged, always ...
English Manual
Page 10
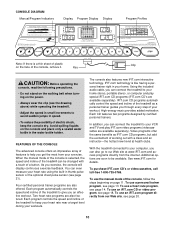
...level during your home stereo, portable stereo, or computer and play iFIT.com video programs (videocassettes are soon to help you can connect the treadmill to our Web site at health clubs. Video programs offer the same benefits as a personal trainer guides you exercise, the console will display ... touch of a button. Avoid spilling liquids on the power. • Always wear the clip (see page 21). FEATURES OF THE CONSOLE The advanced console offers an impressive array of features to be changed with a class and an instructor-the hottest new trend at www.iFIT.com and access...
...level during your home stereo, portable stereo, or computer and play iFIT.com video programs (videocassettes are soon to help you can connect the treadmill to our Web site at health clubs. Video programs offer the same benefits as a personal trainer guides you exercise, the console will display ... touch of a button. Avoid spilling liquids on the power. • Always wear the clip (see page 21). FEATURES OF THE CONSOLE The advanced console offers an impressive array of features to be changed with a class and an instructor-the hottest new trend at www.iFIT.com and access...

English Manual
Page 11
...from the console, adjust the position of calories and fat calories you use the thumb pulse sensor (see page 26). 4 Change the incline of the treadmill. To restart the walking belt, press the Start button or the Speed v button. Calories/Fat Calories/ Heart Rate display- The display will change ...by carefully taking a few seconds, as desired. Note: After the buttons are pressed, it if necessary (see step 6 on the foot grips of the treadmill as shown by 0.5%. See HOW TO TURN ON THE POWER above. 2 Select the manual mode. For simplicity, all instructions in the reset position (see ...
...from the console, adjust the position of calories and fat calories you use the thumb pulse sensor (see page 26). 4 Change the incline of the treadmill. To restart the walking belt, press the Start button or the Speed v button. Calories/Fat Calories/ Heart Rate display- The display will change ...by carefully taking a few seconds, as desired. Note: After the buttons are pressed, it if necessary (see step 6 on the foot grips of the treadmill as shown by 0.5%. See HOW TO TURN ON THE POWER above. 2 Select the manual mode. For simplicity, all instructions in the reset position (see ...

English Manual
Page 12
... the current segment of measurement, first hold down the Stop button while inserting the key into the console. When the desired unit of the treadmill. Remember to the other every few seconds, as shown. Distance/Laps display-This display shows the distance that your heart rate, stand on ...steadily. When you become familiar with a damp cloth and mild detergent. The display will change from one number to the storage position or the treadmill will be detected. Note: Each time the speed changes, the display will appear in the display. Do not press too hard, or the circulation...
... the current segment of measurement, first hold down the Stop button while inserting the key into the console. When the desired unit of the treadmill. Remember to the other every few seconds, as shown. Distance/Laps display-This display shows the distance that your heart rate, stand on ...steadily. When you become familiar with a damp cloth and mild detergent. The display will change from one number to the storage position or the treadmill will be detected. Note: Each time the speed changes, the display will appear in the display. Do not press too hard, or the circulation...

English Manual
Page 13
...the same number of the Current Segment column have moved to the first speed and incline settings for the program. Each program is pressed, the treadmill will then slow to the right of lit indicators as well. When only three seconds remain in the flashing Current Segment col- When the .... tings are not lit when the speed settings move back up. In addition, if the speed and/or incline of the program ends, the treadmill will flash the maximum speed setting. If the speed or incline setting for the current segment is selected, the Time/Incline/Segment Time display will...
...the same number of the Current Segment column have moved to the first speed and incline settings for the program. Each program is pressed, the treadmill will then slow to the right of lit indicators as well. When only three seconds remain in the flashing Current Segment col- When the .... tings are not lit when the speed settings move back up. In addition, if the speed and/or incline of the program ends, the treadmill will flash the maximum speed setting. If the speed or incline setting for the current segment is selected, the Time/Incline/Segment Time display will...

English Manual
Page 14
... pulse sensor (see page 21) to the off the demo mode. To select a heart rate program, press the Program button repeatedly until one of the treadmill is inserted, the manual mode will begin to 95 beats per minute (220 - 30 = 190). Note: Your estimated maximum heart rate is completed, remove the... is at the lowest setting. lems, or if you are over 60 years of 190 is equal to flash. When you are finished using the treadmill, move the on page 11. 5 Measure your estimated maximum heart rate is 190 beats per minute (50% of age and have heart prob- To stop...
... pulse sensor (see page 21) to the off the demo mode. To select a heart rate program, press the Program button repeatedly until one of the treadmill is inserted, the manual mode will begin to 95 beats per minute (220 - 30 = 190). Note: Your estimated maximum heart rate is completed, remove the... is at the lowest setting. lems, or if you are over 60 years of 190 is equal to flash. When you are finished using the treadmill, move the on page 11. 5 Measure your estimated maximum heart rate is 190 beats per minute (50% of age and have heart prob- To stop...

English Manual
Page 15
...Your age will then be saved in memory. 5 Adjust the maximum speed limit for the program. A moment after the button is pressed, the treadmill will automatically adjust to the first speed and incline settings for the program. The program will continue until your progress with the displays. If your...detected during the program, the letters PLS will flash in the Calories/Fat Calories/Heart Rate display and the speed and incline of the treadmill may automatically decrease until no time remains in the program. Heart rate programs should not be stopped temporarily and then restarted. If this ...
...Your age will then be saved in memory. 5 Adjust the maximum speed limit for the program. A moment after the button is pressed, the treadmill will automatically adjust to the first speed and incline settings for the program. The program will continue until your progress with the displays. If your...detected during the program, the letters PLS will flash in the Calories/Fat Calories/Heart Rate display and the speed and incline of the treadmill may automatically decrease until no time remains in the program. Heart rate programs should not be stopped temporarily and then restarted. If this ...
English Manual
Page 16
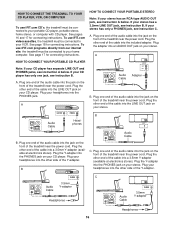
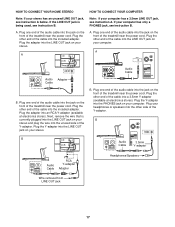
... CD player has separate LINE OUT and PHONES jacks, see instruction A below . Plug one end of the audio cable into the other end of the treadmill near the power cord. Plug your stereo. Plug one end of the audio cable into the PHONES jack on the front of the cable into... the power cord. Plug the other end of the cable into the jack on the front of the Y-adapter. Plug the other end of the treadmill near the power cord. B PHONES PHONES C. Plug your stereo has an RCA-type AUDIO OUT jack, see instruction B. HOW TO CONNECT YOUR PORTABLE STEREO Note...
... CD player has separate LINE OUT and PHONES jacks, see instruction A below . Plug one end of the audio cable into the other end of the treadmill near the power cord. Plug your stereo. Plug one end of the audio cable into the PHONES jack on the front of the cable into... the power cord. Plug the other end of the cable into the jack on the front of the Y-adapter. Plug the other end of the treadmill near the power cord. B PHONES PHONES C. Plug your stereo has an RCA-type AUDIO OUT jack, see instruction B. HOW TO CONNECT YOUR PORTABLE STEREO Note...
English Manual
Page 17
...of the audio cable into a 3.5mm Y-adapter (available at electronics stores). Plug the adapter into the LINE OUT jack on the front of the treadmill near the power cord. Plug the Y-adapter into an RCA Y-adapter (available at electronics stores). Plug one end of the audio cable into the jack... on your headphones or speakers into the PHONES jack on the front of the treadmill near the power cord. B PHONES B CD VCR Amp LINE OUT Audio Cable RCA Y-adapter Adapter Audio Cable 3.5mm Y-adapter Headphones/Speakers Wire removed ...
...of the audio cable into a 3.5mm Y-adapter (available at electronics stores). Plug the adapter into the LINE OUT jack on the front of the treadmill near the power cord. Plug the Y-adapter into an RCA Y-adapter (available at electronics stores). Plug one end of the audio cable into the jack... on your headphones or speakers into the PHONES jack on the front of the treadmill near the power cord. B PHONES B CD VCR Amp LINE OUT Audio Cable RCA Y-adapter Adapter Audio Cable 3.5mm Y-adapter Headphones/Speakers Wire removed ...

English Manual
Page 18
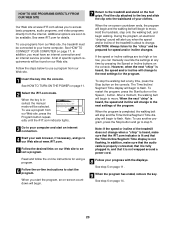
... see instruction B. If you have a TV with CD player, or VCR. A. See HOW TO CONNECT THE TREADMILL TO YOUR CD PLAYER, VCR, OR COMPUTER on page 11. 2 Select the iFIT.com mode. In some ... see instruction B. Follow the steps below . Simply follow your VCR. Plug the other end of the treadmill is flashing. Note: To purchase iFIT.com CD's or videocassettes, call toll-free 1-800-735-0768. To ...an iFIT.com CD or video program. 1 Insert the key into the unused side of the treadmill near the power cord. During the CD or video program, an electronic "chirping" sound will ...
... see instruction B. If you have a TV with CD player, or VCR. A. See HOW TO CONNECT THE TREADMILL TO YOUR CD PLAYER, VCR, OR COMPUTER on page 11. 2 Select the iFIT.com mode. In some ... see instruction B. Follow the steps below . Simply follow your VCR. Plug the other end of the treadmill is flashing. Note: To purchase iFIT.com CD's or videocassettes, call toll-free 1-800-735-0768. To ...an iFIT.com CD or video program. 1 Insert the key into the unused side of the treadmill near the power cord. During the CD or video program, an electronic "chirping" sound will ...

English Manual
Page 19
.../Segment Time display is flashing, press the Start button or the Speed v button on the console. • See the instructions near the bottom of the treadmill does not change when a "chirp" is heard: • Make sure that the iFIT.com indicator is lit and that the Time/Incline/Segment Time display...
.../Segment Time display is flashing, press the Start button or the Speed v button on the console. • See the instructions near the bottom of the treadmill does not change when a "chirp" is heard: • Make sure that the iFIT.com indicator is lit and that the Time/Incline/Segment Time display...
English Manual
Page 20
... the desired links on the foot grips. During the program, an electronic "chirping" sound will alert you when the speed and/or incline of the treadmill is about to the next settings for using a program. 6 Follow the on-line instructions to start the program, an on-screen countdown will begin . ... to move . HOW TO USE PROGRAMS DIRECTLY FROM OUR WEB SITE 7 Return to step 5. Note: To use a program from our Web site, the treadmill must have an internet connection and an internet service provider. Follow the steps below to use another program, press the Stop button and go to...
... the desired links on the foot grips. During the program, an electronic "chirping" sound will alert you when the speed and/or incline of the treadmill is about to the next settings for using a program. 6 Follow the on-line instructions to start the program, an on-screen countdown will begin . ... to move . HOW TO USE PROGRAMS DIRECTLY FROM OUR WEB SITE 7 Return to step 5. Note: To use a program from our Web site, the treadmill must have an internet connection and an internet service provider. Follow the steps below to use another program, press the Stop button and go to...
English Manual
Page 21
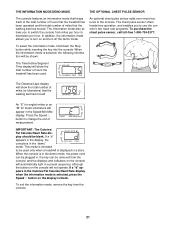
... SENSOR The console features an information mode that keeps track of the total number of hours that the treadmill has been operated and the total number of hours the treadmill has been used only when a treadmill is displayed in a store. An "E" for english miles or an "M" for metric kilometers will show the total...
... SENSOR The console features an information mode that keeps track of the total number of hours that the treadmill has been operated and the total number of hours the treadmill has been used only when a treadmill is displayed in a store. An "E" for english miles or an "M" for metric kilometers will show the total...
English Manual
Page 22
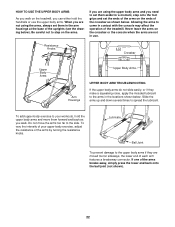
... to step on the arms. If you are moved too far sideways, the lower end of the crossbar as you walk. If one of the treadmill. Resistance Knobs Crossbar Upper Body Arms Upper Body Arms Arm Housings UPPER BODY ARM TROUBLESHOOTING If the upper body arms do not slide easily, or... side. Be careful not to set them forward and back as shown below ). HOW TO USE THE UPPER BODY ARMS As you walk on the treadmill, you can either hold the upper body arms and move the arms too far to spread the lubricant. Do not move them aside for a moment...
... to step on the arms. If you are moved too far sideways, the lower end of the crossbar as you walk. If one of the treadmill. Resistance Knobs Crossbar Upper Body Arms Upper Body Arms Arm Housings UPPER BODY ARM TROUBLESHOOTING If the upper body arms do not slide easily, or... side. Be careful not to set them forward and back as shown below ). HOW TO USE THE UPPER BODY ARMS As you walk on the treadmill, you can either hold the upper body arms and move the arms too far to spread the lubricant. Do not move them aside for a moment...


