

English Manual
Page 1
WEIGHT BENCH EXERCISER User's Manual Serial Number Decal (under seat) • Assembly • Adjustments • Part List and Drawing CAUTION Read all precautions and instructions in the space above for future reference. Sears, Roebuck and Co., Hoffman Estates, IL 60179 Model No. 831.15619.0 Serial No. Save this equipment. Write the serial number in this manual before using this manual for reference.
WEIGHT BENCH EXERCISER User's Manual Serial Number Decal (under seat) • Assembly • Adjustments • Part List and Drawing CAUTION Read all precautions and instructions in the space above for future reference. Sears, Roebuck and Co., Hoffman Estates, IL 60179 Model No. 831.15619.0 Serial No. Save this equipment. Write the serial number in this manual before using this manual for reference.

English Manual
Page 2
Remove the PART IDENTIFICATION CHART and PART LIST/EXPLODED DRAWING before beginning assembly. WARNING DECAL PLACEMENT The decal shown here has been placed on the weight bench. Mountain Time, and order a free replacement decal. TABLE OF CONTENTS WARNING DECAL PLACEMENT 2 IMPORTANT PRECAUTIONS 3 BEFORE YOU BEGIN 4 ASSEMBLY 5 ADJUSTMENTS 12 EXERCISE GUIDELINES 14 ORDERING REPLACEMENT PARTS Back Cover FULL 90-DAY WARRANTY Back Cover Note: A PART IDENTIFICATION CHART and a PART LIST/EXPLODED DRAWING are attached in...
Remove the PART IDENTIFICATION CHART and PART LIST/EXPLODED DRAWING before beginning assembly. WARNING DECAL PLACEMENT The decal shown here has been placed on the weight bench. Mountain Time, and order a free replacement decal. TABLE OF CONTENTS WARNING DECAL PLACEMENT 2 IMPORTANT PRECAUTIONS 3 BEFORE YOU BEGIN 4 ASSEMBLY 5 ADJUSTMENTS 12 EXERCISE GUIDELINES 14 ORDERING REPLACEMENT PARTS Back Cover FULL 90-DAY WARRANTY Back Cover Note: A PART IDENTIFICATION CHART and a PART LIST/EXPLODED DRAWING are attached in...
English Manual
Page 3
... the responsibility of the owner to mount, dismount, and use the bench. 18. Replace any commercial, rental, or institutional setting. Always make sure that all precautions. 3. Always secure the weights with the weight clips when they are exercising, stop immediately and begin cooling down. WARNING: Before beginning this manual and all instructions in any worn parts immediately. 6. Note: The weight bench does not include...
... the responsibility of the owner to mount, dismount, and use the bench. 18. Replace any commercial, rental, or institutional setting. Always make sure that all precautions. 3. Always secure the weights with the weight clips when they are exercising, stop immediately and begin cooling down. WARNING: Before beginning this manual and all instructions in any worn parts immediately. 6. Note: The weight bench does not include...
English Manual
Page 4
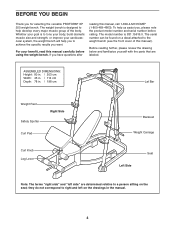
... review the drawing below and familiarize yourself with the parts that are determined relative to achieve the specific results you , please note the product model number and serial number before using the weight bench. For your cardiovascular system, the weight bench will help you to a person sitting on the drawings in . / 198 cm Lat Bar Weight Rest Safety Spotter Curl Pad Right Side Curl Knob Leg Lever...
... review the drawing below and familiarize yourself with the parts that are determined relative to achieve the specific results you , please note the product model number and serial number before using the weight bench. For your cardiovascular system, the weight bench will help you to a person sitting on the drawings in . / 198 cm Lat Bar Weight Rest Safety Spotter Curl Pad Right Side Curl Knob Leg Lever...

English Manual
Page 5
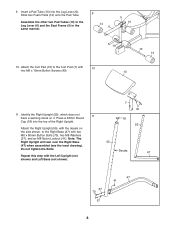
...; Tighten all parts are oriented as shown in a cleared area and remove the packing materials. Most people find that there is oriented 38 as you assemble the weight bench, make sure you assemble them, unless instructed to walk around the weight bench as shown. 2. Assembly will go smoothly. Before beginning assembly, make sure all parts as shown. Do not dispose of ratchet wrenches. 1. Attach a Bench Foot...
...; Tighten all parts are oriented as shown in a cleared area and remove the packing materials. Most people find that there is oriented 38 as you assemble the weight bench, make sure you assemble them, unless instructed to walk around the weight bench as shown. 2. Assembly will go smoothly. Before beginning assembly, make sure all parts as shown. Do not dispose of ratchet wrenches. 1. Attach a Bench Foot...
English Manual
Page 6
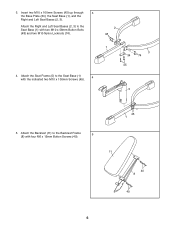
Attach the Backrest (11) to the Seat Base (1) 4 with the indicated two M10 x 100mm Screws (45). 2 48 1 3 34 74 45 5 5. Attach the Seat Frame (5) to the Backrest Frame 5 (8) with two M10 x 58mm Button Bolts (48) and two M10 Nylon Locknuts (74). 4. Attach the Right and Left Seat Bases (2, 3) to the Seat Base (1) with four M6 x 15mm Button Screws (40). 45 1 11 40 8 40 6 Insert two M10 x 100mm Screws (45) up through 3 the Base Plate (34), the Seat Base (1), and the Right and Left Seat Bases (2, 3). 3.
Attach the Backrest (11) to the Seat Base (1) 4 with the indicated two M10 x 100mm Screws (45). 2 48 1 3 34 74 45 5 5. Attach the Seat Frame (5) to the Backrest Frame 5 (8) with two M10 x 58mm Button Bolts (48) and two M10 Nylon Locknuts (74). 4. Attach the Right and Left Seat Bases (2, 3) to the Seat Base (1) with four M6 x 15mm Button Screws (40). 45 1 11 40 8 40 6 Insert two M10 x 100mm Screws (45) up through 3 the Base Plate (34), the Seat Base (1), and the Right and Left Seat Bases (2, 3). 3.
English Manual
Page 7
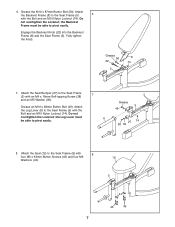
... Washer (39). Fully tighten the Knob. Attach the Seat Bumper (27) to pivot easily. 6 27 74 38 39 8. Do not overtighten the Locknut; the Leg Lever must be able to the Seat Frame 7 (5) with the Bolt and an M10 Nylon Locknut (74). Grease 50 8 22 74 5 7. Attach the Seat (12) to the Seat Frame (5) with 8 four M6 x 63mm Button Screws (43) and four...
... Washer (39). Fully tighten the Knob. Attach the Seat Bumper (27) to pivot easily. 6 27 74 38 39 8. Do not overtighten the Locknut; the Leg Lever must be able to the Seat Frame 7 (5) with the Bolt and an M10 Nylon Locknut (74). Grease 50 8 22 74 5 7. Attach the Seat (12) to the Seat Frame (5) with 8 four M6 x 63mm Button Screws (43) and four...
English Manual
Page 8
... Locknut (41). Do not tighten the Bolts. Insert a Pad Tube (10) into the top of the Right Upright. Assemble the other two Pad Tubes (10) to the Right Base (47) with the decals on it. Attach the Curl Pad (13) to the Curl Post (7) with the Left Upright (not shown) and Left ...Leg Lever (6) and the Seat Frame (5) in the same manner. 9 14 6 5 10 10. 9. Slide two Foam Pads (14) onto the Pad Tube. Note: The Right Upright will lean over the Right Base (47) when assembled (see the inset drawing). Repeat this step with 10 two M6 x 15mm Button Screws (40). 10 10 14 13 11. Press...
... Locknut (41). Do not tighten the Bolts. Insert a Pad Tube (10) into the top of the Right Upright. Assemble the other two Pad Tubes (10) to the Right Base (47) with the decals on it. Attach the Curl Pad (13) to the Curl Post (7) with the Left Upright (not shown) and Left ...Leg Lever (6) and the Seat Frame (5) in the same manner. 9 14 6 5 10 10. 9. Slide two Foam Pads (14) onto the Pad Tube. Note: The Right Upright will lean over the Right Base (47) when assembled (see the inset drawing). Repeat this step with 10 two M6 x 15mm Button Screws (40). 10 10 14 13 11. Press...

English Manual
Page 9
... the Rear Upright (33) as shown. 41 37 47 58 46 53 9 55 Hole 24 42 Hole 24 42 33 62 66 9 12. Attach a Weight Rest Pin (24) and the Right Weight Rest (53) to the Right Spotter (9) with an M4 x 25mm Self-tapping Screw (42). Make sure that the bolts heads are inside the hexag- Attach a Weight Rest Pin (24...
... the Rear Upright (33) as shown. 41 37 47 58 46 53 9 55 Hole 24 42 Hole 24 42 33 62 66 9 12. Attach a Weight Rest Pin (24) and the Right Weight Rest (53) to the Right Spotter (9) with an M4 x 25mm Self-tapping Screw (42). Make sure that the bolts heads are inside the hexag- Attach a Weight Rest Pin (24...

English Manual
Page 10
... (37), and two M8 Nylon Locknuts (41). Attach the Right Top Frame (69) to the Rear 17 Upright (33) with two M8 x 80mm Button Bolts (70), two M8 Washers (37), and an M8 Nylon Locknut (41). Make sure that the bolts heads are inside the hexag- Attach the Left Top Frame (54) to the Left... 41 55 10 54 4 Attach the Right Top Frame (69) to the Left Upright (4) in the Left Top Frame. Do not tighten the Locknuts. 72 41 37 37 58 54 41 37 33 54 18. Tighten the bolts and locknuts used in the Left Base. Do not tighten the Locknut. Attach the Rear Upright (33) to the Left ...
... (37), and two M8 Nylon Locknuts (41). Attach the Right Top Frame (69) to the Rear 17 Upright (33) with two M8 x 80mm Button Bolts (70), two M8 Washers (37), and an M8 Nylon Locknut (41). Make sure that the bolts heads are inside the hexag- Attach the Left Top Frame (54) to the Left... 41 55 10 54 4 Attach the Right Top Frame (69) to the Left Upright (4) in the Left Top Frame. Do not tighten the Locknuts. 72 41 37 37 58 54 41 37 33 54 18. Tighten the bolts and locknuts used in the Left Base. Do not tighten the Locknut. Attach the Rear Upright (33) to the Left ...
English Manual
Page 11
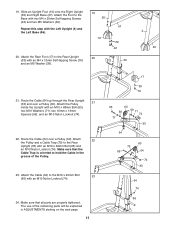
... Rear Upright (33) and over a Pulley (60). Route the Cable (64) over a Pulley (60). Attach the Foot to hold the Cable in ADJUSTMENTS starting on the next page. 11 17 39 76 63 71 60 59 59 71 74 33 64 75 65 60 64 74 33 64 74 66 19. Make sure that all parts are properly tightened. Attach 22 the Pulley and a Cable...
... Rear Upright (33) and over a Pulley (60). Route the Cable (64) over a Pulley (60). Attach the Foot to hold the Cable in ADJUSTMENTS starting on the next page. 11 17 39 76 63 71 60 59 59 71 74 33 64 75 65 60 64 74 33 64 74 66 19. Make sure that all parts are properly tightened. Attach 22 the Pulley and a Cable...
English Manual
Page 12
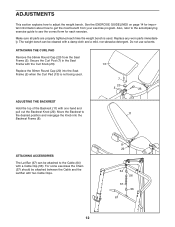
... (20) from your exercise program. ATTACHING ACCESSORIES The Lat Bar (67) can be cleaned with a damp cloth and a mild, non-abrasive detergent. Do not use solvents. Replace the 56mm Round Cap (20) into the Backrest Frame (8). Move the Backrest to see the correct form for important information about how to adjust the weight bench. Also, refer to the accompanying exercise guide to 11 the desired...
... (20) from your exercise program. ATTACHING ACCESSORIES The Lat Bar (67) can be cleaned with a damp cloth and a mild, non-abrasive detergent. Do not use solvents. Replace the 56mm Round Cap (20) into the Backrest Frame (8). Move the Backrest to see the correct form for important information about how to adjust the weight bench. Also, refer to the accompanying exercise guide to 11 the desired...

English Manual
Page 13
...24 55 13 ADJUSTING THE WEIGHT RESTS To adjust the Right Weight Rest (53), remove the Weight Rest Pin (24) and slide the Weight Rest to the Leg Lever (not shown) or your barbell (not included) in the same manner. Engage the Pin into the Weight Rest and Upright. Adjust the Left Weight Rest (not shown...including a barbell (not included) on the Weight Carriage or Leg Lever (6). Secure the weight with the Spring Clips (35). Add weight to the desired height on each side of weight (not included) onto the Weight Carriage (62). WARNING: Always set both Weight Rests (52, 53) and both Spotters ...
...24 55 13 ADJUSTING THE WEIGHT RESTS To adjust the Right Weight Rest (53), remove the Weight Rest Pin (24) and slide the Weight Rest to the Leg Lever (not shown) or your barbell (not included) in the same manner. Engage the Pin into the Weight Rest and Upright. Adjust the Left Weight Rest (not shown...including a barbell (not included) on the Weight Carriage or Leg Lever (6). Secure the weight with the Spring Clips (35). Add weight to the desired height on each side of weight (not included) onto the Weight Carriage (62). WARNING: Always set both Weight Rests (52, 53) and both Spotters ...
English Manual
Page 14
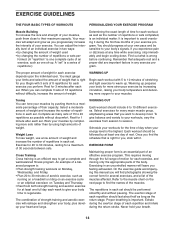
You can adjust the intensity level of an individual exercise in each set. Work your muscles by completing more oxygen to your muscles. Weight Loss To lose weight, use a low amount of weight and increase the number of repetitions in two ways: • by changing the amount of weight used • by using high amounts of weight. EXERCISE FORM Maintaining proper form is a series of repetitions.) Determining the exact...
You can adjust the intensity level of an individual exercise in each set. Work your muscles by completing more oxygen to your muscles. Weight Loss To lose weight, use a low amount of weight and increase the number of repetitions in two ways: • by changing the amount of weight used • by using high amounts of weight. EXERCISE FORM Maintaining proper form is a series of repetitions.) Determining the exact...

English Manual
Page 15
... repetitions completed. List the date, the exercises performed, the resistance used, and the numbers of calf) 15 Sternomastoid (neck) B. Brachioradials (forearm) F. Hip Flexors (upper thigh) G. COOLING DOWN End each workout with the equipment and learning the proper form for each exercise. Soleus (front of your arms and legs. Rest for a short period of time after each set for a toning work- Obliques (waist...
... repetitions completed. List the date, the exercises performed, the resistance used, and the numbers of calf) 15 Sternomastoid (neck) B. Brachioradials (forearm) F. Hip Flexors (upper thigh) G. COOLING DOWN End each workout with the equipment and learning the proper form for each exercise. Soleus (front of your arms and legs. Rest for a short period of time after each set for a toning work- Obliques (waist...
English Manual
Page 16
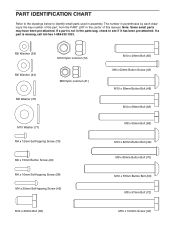
... drawing is the key number of this manual. PART IDENTIFICATION CHART Refer to the drawings below to see if it has been pre-attached. If a part is missing, call toll-free 1-888-533-1333. If a part is not in the parts bag, check to identify small parts used in the center of the part, from the PART LIST in assembly. Note: Some small parts may have been...
... drawing is the key number of this manual. PART IDENTIFICATION CHART Refer to the drawings below to see if it has been pre-attached. If a part is missing, call toll-free 1-888-533-1333. If a part is not in the parts bag, check to identify small parts used in the center of the part, from the PART LIST in assembly. Note: Some small parts may have been...

English Manual
Page 17
... Bolt M10 x 20mm Bolt Lat Bar Handgrip Right Top Frame M8 x 80mm Button Bolt M10 Washer M8 x 97mm Bolt 50mm Square Cap M10 Nylon Locknut Cable Trap M4 x 12mm Self-tapping Screw User's Manual Allen Wrench Grease Pack Exercise Guide Note: "#" indicates a non-illustrated part. If a part is missing, call toll-free 1-888-533-1333. Description Key No. See the back cover of this manual for information about ordering replacement parts. Qty. Qty. Specifications...
... Bolt M10 x 20mm Bolt Lat Bar Handgrip Right Top Frame M8 x 80mm Button Bolt M10 Washer M8 x 97mm Bolt 50mm Square Cap M10 Nylon Locknut Cable Trap M4 x 12mm Self-tapping Screw User's Manual Allen Wrench Grease Pack Exercise Guide Note: "#" indicates a non-illustrated part. If a part is missing, call toll-free 1-888-533-1333. Description Key No. See the back cover of this manual for information about ordering replacement parts. Qty. Qty. Specifications...
English Manual
Page 18
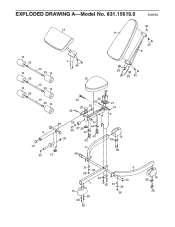
EXPLODED DRAWING A-Model No. 831.15619.0 R0905A 36 13 11 14 25 14 25 14 25 10 25 14 10 25 14 10 25 14 7 40 12 40 8 28 28 40 38 22 20 49 32 50 23 21 74 5 6 19 30 29 30 39 74 38 27 20 44 44 43 43 2 19 48 15 39 38 31 3 39 38 15 39 34 74 1 45 31 39 38 39 38 15 39 38
EXPLODED DRAWING A-Model No. 831.15619.0 R0905A 36 13 11 14 25 14 25 14 25 10 25 14 10 25 14 10 25 14 7 40 12 40 8 28 28 40 38 22 20 49 32 50 23 21 74 5 6 19 30 29 30 39 74 38 27 20 44 44 43 43 2 19 48 15 39 38 31 3 39 38 15 39 34 74 1 45 31 39 38 39 38 15 39 38
English Manual
Page 19
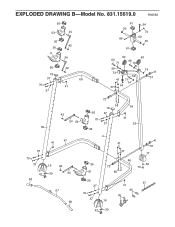
EXPLODED DRAWING B-Model No. 831.15619.0 R0905A 26 53 24 26 26 9 42 24 26 18 37 70 37 42 69 41 61 30 66 61 64 74 62 30 60 63 71 65 75 59 73 59 41 71 74 64 37 60 74 41 37 72 58 18 54 42 26 37 24 52 70 37 41 33 55 26 47 41 37 70 37 16 42 42 39 24 68 67 68 4 41 37 41 37 17 26 72 46 39 76 51 58 26 37 70 37 16 57 41 56 35 42 39
EXPLODED DRAWING B-Model No. 831.15619.0 R0905A 26 53 24 26 26 9 42 24 26 18 37 70 37 42 69 41 61 30 66 61 64 74 62 30 60 63 71 65 75 59 73 59 41 71 74 64 37 60 74 41 37 72 58 18 54 42 26 37 24 52 70 37 41 33 55 26 47 41 37 70 37 16 42 42 39 24 68 67 68 4 41 37 41 37 17 26 72 46 39 76 51 58 26 37 70 37 16 57 41 56 35 42 39
English Manual
Page 20
... warranty gives you specific legal rights, and you may also have other rights which vary from the date of purchase, if failure occurs due to state. Sears, Roebuck and Co., Dept 817WA, Hoffman Estates, IL 60179 Part No. 233271 R0905A Printed in this WEIGHT BENCH EXERCISER, contact the nearest Sears Service Center throughout the United States and Sears will repair or replace...
... warranty gives you specific legal rights, and you may also have other rights which vary from the date of purchase, if failure occurs due to state. Sears, Roebuck and Co., Dept 817WA, Hoffman Estates, IL 60179 Part No. 233271 R0905A Printed in this WEIGHT BENCH EXERCISER, contact the nearest Sears Service Center throughout the United States and Sears will repair or replace...

