
Instruction Manual
Page 3
... with USB cable as a flash drive 10 Rear Lens Slot To connect the rear lens to host with adapter cable to get 11 Microphone Rreeacroimrdaaguedio with OK. After finishing, press MENU to exit 3 Emergency Lock / OK Press to save and lock present video in recording mode It is "OK" key in 3 seconds to power ON/OFF Press to turn ON/OFF the Screen 2 Menu Press on MENU to...
... with USB cable as a flash drive 10 Rear Lens Slot To connect the rear lens to host with adapter cable to get 11 Microphone Rreeacroimrdaaguedio with OK. After finishing, press MENU to exit 3 Emergency Lock / OK Press to save and lock present video in recording mode It is "OK" key in 3 seconds to power ON/OFF Press to turn ON/OFF the Screen 2 Menu Press on MENU to...
Instruction Manual
Page 4
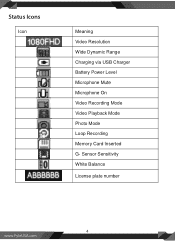
Status Icons Icon Meaning Video Resolution Wide Dynamic Range Charging via USB Charger Battery Power Level Microphone Mute Microphone On Video Recording Mode Video Playback Mode Photo Mode Loop Recording Memory Card Inserted G- Sensor Sensitivity White Balance License plate number 4 www.PyleUSA.com
Status Icons Icon Meaning Video Resolution Wide Dynamic Range Charging via USB Charger Battery Power Level Microphone Mute Microphone On Video Recording Mode Video Playback Mode Photo Mode Loop Recording Memory Card Inserted G- Sensor Sensitivity White Balance License plate number 4 www.PyleUSA.com
Instruction Manual
Page 5
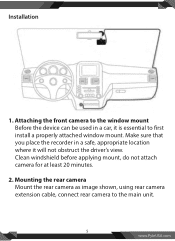
Attaching the front camera to the window mount Before the device can be used in a safe, appropriate location where it is essential to the main unit. 5 www.PyleUSA.com Clean windshield before applying mount, do not attach camera for at least 20 minutes. 2. Installation 1. Mounting the rear camera Mount the rear camera as image shown, using rear camera extension cable, connect rear camera to rst install a properly attached window mount. Make sure that you place the recorder in a car, it will not obstruct the driver's view.
Attaching the front camera to the window mount Before the device can be used in a safe, appropriate location where it is essential to the main unit. 5 www.PyleUSA.com Clean windshield before applying mount, do not attach camera for at least 20 minutes. 2. Installation 1. Mounting the rear camera Mount the rear camera as image shown, using rear camera extension cable, connect rear camera to rst install a properly attached window mount. Make sure that you place the recorder in a car, it will not obstruct the driver's view.
Instruction Manual
Page 7
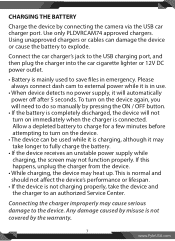
... Service Center. Any damage caused by connecting the camera via the USB car charger port. Please always connect dash cam to external power while it is charging, although it is in emergency. CHARGING THE BATTERY Charge the device by misuse is not charging properly, take longer to fully charge the battery. • If the device receives an unstable power supply while charging, the screen may not function...
... Service Center. Any damage caused by connecting the camera via the USB car charger port. Please always connect dash cam to external power while it is charging, although it is in emergency. CHARGING THE BATTERY Charge the device by misuse is not charging properly, take longer to fully charge the battery. • If the device receives an unstable power supply while charging, the screen may not function...
Instruction Manual
Page 8
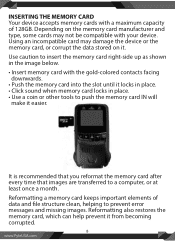
... least once a month. Using an incompatible card may not be compatible with your device. INSERTING THE MEMORY CARD Your device accepts memory cards with a maximum capacity of data and le structure clean, helping to push the memory card IN will make it locks in place. • Click sound when memory card locks in the image below. • Insert memory card with the gold-colored contacts facing downwards...
... least once a month. Using an incompatible card may not be compatible with your device. INSERTING THE MEMORY CARD Your device accepts memory cards with a maximum capacity of data and le structure clean, helping to push the memory card IN will make it locks in place. • Click sound when memory card locks in the image below. • Insert memory card with the gold-colored contacts facing downwards...

Instruction Manual
Page 9
... or the data saved on the device. Gently push the memory card in blue Before formatting a memory card, always remember to format your selection 5. Removing the memory card without properly ejecting may choose to make backup copies of data resulting from your computer. Press the UP button once 6. Before removing a memory card from user actions. 9 www.PyleUSA.com Press the DOWN button to navigate to the memory card or device. Press OK...
... or the data saved on the device. Gently push the memory card in blue Before formatting a memory card, always remember to format your selection 5. Removing the memory card without properly ejecting may choose to make backup copies of data resulting from your computer. Press the UP button once 6. Before removing a memory card from user actions. 9 www.PyleUSA.com Press the DOWN button to navigate to the memory card or device. Press OK...

Instruction Manual
Page 10
... exit Video Settings 7. A goodbye message will be displayed on and o automatically if you keep it permanently connected to the "Resolution" option 3. Press MENU to start recording 8. Press the UP or DOWN button to navigate to the car charger. Note: The Dashboard Camera will be displayed on the device. Press MENU once to con rm your selection 5. A welcome message will switch on screen as shown in the image...
... exit Video Settings 7. A goodbye message will be displayed on and o automatically if you keep it permanently connected to the "Resolution" option 3. Press MENU to start recording 8. Press the UP or DOWN button to navigate to the car charger. Note: The Dashboard Camera will be displayed on the device. Press MENU once to con rm your selection 5. A welcome message will switch on screen as shown in the image...
Instruction Manual
Page 11
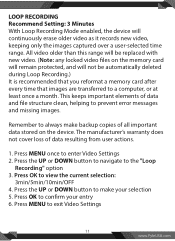
..., helping to prevent error messages and missing images. Press the UP or DOWN button to a computer, or at least once a month. Press MENU to view the current selection: 3min/5min/10min/OFF 4. All video older than this range will be automatically deleted during Loop Recording.) It is recommended that you reformat a memory card after every time that images are transferred to make backup...
..., helping to prevent error messages and missing images. Press the UP or DOWN button to a computer, or at least once a month. Press MENU to view the current selection: 3min/5min/10min/OFF 4. All video older than this range will be automatically deleted during Loop Recording.) It is recommended that you reformat a memory card after every time that images are transferred to make backup...

Instruction Manual
Page 12
... normal speed, time appears to be moving faster and thus lapsing. 1. Press the UP or DOWN button to make your entry 6. Press OK to con rm your selection 5. Press OK to view the current ON/OFF status for this feature automatically adjusts exposure settings to the "WDR" option 3. Press MENU to enter Video Settings 2. TIME LAPSE RECORD Recommend Setting: O Time-lapse photography is...
... normal speed, time appears to be moving faster and thus lapsing. 1. Press the UP or DOWN button to make your entry 6. Press OK to con rm your selection 5. Press OK to view the current ON/OFF status for this feature automatically adjusts exposure settings to the "WDR" option 3. Press MENU to enter Video Settings 2. TIME LAPSE RECORD Recommend Setting: O Time-lapse photography is...

Instruction Manual
Page 13
... the UP or DOWN button to navigate to enter Video Settings 2. Press MENU once to the "Record Audio" option 3. Press OK to mute / unmute the microphone for this feature 4. Press MENU to exit Video Settings Alternatively, you can use a hot key shortcut for brighter or darker recorded video, according to view the current selection: +0.0, +1/3, -1/3, etc. 4. EXPOSURE Recommend Setting: +0.0 Adjust the camera exposure value for this feature...
... the UP or DOWN button to navigate to enter Video Settings 2. Press MENU once to the "Record Audio" option 3. Press OK to mute / unmute the microphone for this feature 4. Press MENU to exit Video Settings Alternatively, you can use a hot key shortcut for brighter or darker recorded video, according to view the current selection: +0.0, +1/3, -1/3, etc. 4. EXPOSURE Recommend Setting: +0.0 Adjust the camera exposure value for this feature...

Instruction Manual
Page 14
...view the current ON/OFF status for this feature 4. Press OK to con rm your vehicle plate number for video recording. Press MENU once to the "Date Stamp" option 3. If "ON" is selected, enter the plate number on the next pop-up screen using the UP and DOWN buttons; Press the UP or DOWN button to navigate to enter Video Settings 2. Press MENU...or DOWN button to enable or disable this feature was enabled at the time of recording. 1. DATE STAMP You have the option to display the date and time in the video. 1. Note that the date and time stamp cannot be removed from videos if this...
...view the current ON/OFF status for this feature 4. Press OK to con rm your vehicle plate number for video recording. Press MENU once to the "Date Stamp" option 3. If "ON" is selected, enter the plate number on the next pop-up screen using the UP and DOWN buttons; Press the UP or DOWN button to navigate to enter Video Settings 2. Press MENU...or DOWN button to enable or disable this feature was enabled at the time of recording. 1. DATE STAMP You have the option to display the date and time in the video. 1. Note that the date and time stamp cannot be removed from videos if this...

Instruction Manual
Page 15
... UP or DOWN button to enter System Settings 2. Press MENU twice to change the device's time and date: 1. they remain on the camera itself. Press MENU to exit Video Settings SYSTEM SETTINGS Date/ Time Setup Use the following procedure to view date/time in the format: YYYY/MM/DD HH:MM:SS 4. Press OK to change the highlighted number 15 www.PyleUSA.com Press MENU once to make your entry 6. GRAVITY...
... UP or DOWN button to enter System Settings 2. Press MENU twice to change the device's time and date: 1. they remain on the camera itself. Press MENU to exit Video Settings SYSTEM SETTINGS Date/ Time Setup Use the following procedure to view date/time in the format: YYYY/MM/DD HH:MM:SS 4. Press OK to change the highlighted number 15 www.PyleUSA.com Press MENU once to make your entry 6. GRAVITY...

Instruction Manual
Page 16
... if Recording Mode is removed from the device, the time and date will be reset. Auto Power O When enabled, this option allows the device to turn the device's button sound e ect on or o . 1. Press the UP or DOWN button to exit System Settings Note: If the battery remains fully discharged or is not engaged. 1. Press MENU to enable or disable this feature 4. Press MENU twice to view the...
... if Recording Mode is removed from the device, the time and date will be reset. Auto Power O When enabled, this option allows the device to turn the device's button sound e ect on or o . 1. Press the UP or DOWN button to exit System Settings Note: If the battery remains fully discharged or is not engaged. 1. Press MENU to enable or disable this feature 4. Press MENU twice to view the...

Instruction Manual
Page 17
... 4. Press OK to make your choice TV Mode Recommend Setting: NTSC This feature will setup video output format. 1. Press the UP or DOWN button to view the current selection: 50Hz / 60Hz 4. Press the UP or DOWN button to navigate to change the device's time and date. Press the UP or DOWN button to the "LIGHT FREQ." Press MENU twice to change the selection 5. LANGUAGE Use the following procedure to...
... 4. Press OK to make your choice TV Mode Recommend Setting: NTSC This feature will setup video output format. 1. Press the UP or DOWN button to view the current selection: 50Hz / 60Hz 4. Press the UP or DOWN button to navigate to change the device's time and date. Press the UP or DOWN button to the "LIGHT FREQ." Press MENU twice to change the selection 5. LANGUAGE Use the following procedure to...
Instruction Manual
Page 18
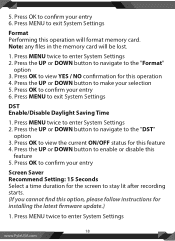
... instructions for the screen to make your entry 6. Press MENU twice to enter System Settings 18 www.PyleUSA.com Press MENU twice to enter System Settings 2. Press the UP or DOWN button to navigate to exit System Settings DST Enable/Disable Daylight Saving Time 1. Press MENU to the "Format" option 3. Press OK to con rm your entry 6. 5. Press OK to exit System Settings Format Performing this operation...
... instructions for the screen to make your entry 6. Press MENU twice to enter System Settings 18 www.PyleUSA.com Press MENU twice to enter System Settings 2. Press the UP or DOWN button to navigate to exit System Settings DST Enable/Disable Daylight Saving Time 1. Press MENU to the "Format" option 3. Press OK to con rm your entry 6. 5. Press OK to exit System Settings Format Performing this operation...

Instruction Manual
Page 19
... can play back recorded video on or o . Press OK to the "Default Settings" option 3. Press OK to con rm your device's settings to turn the LCD screen on your selection 5. Press the UP or DOWN button to navigate to view the current selection: 15 Secs / 1 min / 3 min/ OFF 4. Press MODE twice to switch from Recording to view YES / NO con rmation for this operation will...
... can play back recorded video on or o . Press OK to the "Default Settings" option 3. Press OK to con rm your device's settings to turn the LCD screen on your selection 5. Press the UP or DOWN button to navigate to view the current selection: 15 Secs / 1 min / 3 min/ OFF 4. Press MODE twice to switch from Recording to view YES / NO con rmation for this operation will...

Instruction Manual
Page 20
...MENU to navigate through the stored video les 2. Press on UP or DOWN button to view options for "Current MOV" file or "ALL" files. Press the DOWN button once to pause playback 6. Press OK again to select "Delete" 5. FAST FORWARD: While video is playing, press the DOWN button one or more times to navigate through the video les 2. Press OK once to set... REWIND: While video is playing, press the UP button one particular le: 1. Press the UP or DOWN button to set reverse playback speed ( -2X / -4X / -8X ) Deleting Files To delete one or more times to view options for the...
...MENU to navigate through the stored video les 2. Press on UP or DOWN button to view options for "Current MOV" file or "ALL" files. Press the DOWN button once to pause playback 6. Press OK again to select "Delete" 5. FAST FORWARD: While video is playing, press the DOWN button one or more times to navigate through the video les 2. Press OK once to set... REWIND: While video is playing, press the UP button one particular le: 1. Press the UP or DOWN button to set reverse playback speed ( -2X / -4X / -8X ) Deleting Files To delete one or more times to view options for the...

Instruction Manual
Page 23
... to enter Photo Settings 3. Press MENU to make your entry 7. Press the UP or DOWN button to exit Photo Settings 8. Press the UP or DOWN button to navigate to adjust the lighting balance for different environments. Press OK to capture an image White Balance This setting allows you to the "Sharpness" option 4. Press OK to view the current selection: AUTO / DAYLIGHT / CLOUDY...
... to enter Photo Settings 3. Press MENU to make your entry 7. Press the UP or DOWN button to exit Photo Settings 8. Press the UP or DOWN button to navigate to adjust the lighting balance for different environments. Press OK to capture an image White Balance This setting allows you to the "Sharpness" option 4. Press OK to view the current selection: AUTO / DAYLIGHT / CLOUDY...
Instruction Manual
Page 24
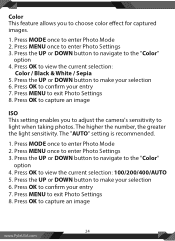
... captured images. 1. The "AUTO" setting is recommended. 1. Press the UP or DOWN button to navigate to view the current selection: 100/200/400/AUTO 5. Press OK to the "Color" option 4. Press the UP or DOWN button to make your entry 7. Press the UP or DOWN button to make your entry 7. Color This feature allows you to adjust the camera's sensitivity to light when taking photos. Press MODE...
... captured images. 1. The "AUTO" setting is recommended. 1. Press the UP or DOWN button to navigate to view the current selection: 100/200/400/AUTO 5. Press OK to the "Color" option 4. Press the UP or DOWN button to make your entry 7. Press the UP or DOWN button to make your entry 7. Color This feature allows you to adjust the camera's sensitivity to light when taking photos. Press MODE...

Instruction Manual
Page 25
... setting allows you to adjust the brightness level of captured images. 1. Press the UP or DOWN button to navigate to enter Photo Mode 2. Press OK to con rm your selection 6. Press MODE once to the "Color" option 4. Press OK to view the current selection: +0.0, +1/3, -1/3, etc. 5. Press OK to capture an image 25 www.PyleUSA.com Press OK to enter Photo Settings 3. Press MENU...
... setting allows you to adjust the brightness level of captured images. 1. Press the UP or DOWN button to navigate to enter Photo Mode 2. Press OK to con rm your selection 6. Press MODE once to the "Color" option 4. Press OK to view the current selection: +0.0, +1/3, -1/3, etc. 5. Press OK to capture an image 25 www.PyleUSA.com Press OK to enter Photo Settings 3. Press MENU...

