User Manual
Page 2
...6 Turn on/off the unit 7 Sound adjustment 7 Beep on/off 7 EQ 7 Loudness 7 Loc on/off 7 Stereo/Mono 7 Display time 7 Set the time 7 Area 7 Low Battery display 7 Auxiliary input 8 Liquid crystal display 8 Reset function 8 Slight fog after operation 8 Radio operation 8 Switching to radio mode 8 Selecting the band 8 Selecting station 8 Manually station storing 8 Preset stations selecting 8 Automatic memory storing 8 Weather Band 9 USB play operation 9 Selecting tracks in single step 9 Pausing playing 9 Selecting songs by BAND button ...... 9 BT operation 9 Remote control...
...6 Turn on/off the unit 7 Sound adjustment 7 Beep on/off 7 EQ 7 Loudness 7 Loc on/off 7 Stereo/Mono 7 Display time 7 Set the time 7 Area 7 Low Battery display 7 Auxiliary input 8 Liquid crystal display 8 Reset function 8 Slight fog after operation 8 Radio operation 8 Switching to radio mode 8 Selecting the band 8 Selecting station 8 Manually station storing 8 Preset stations selecting 8 Automatic memory storing 8 Weather Band 9 USB play operation 9 Selecting tracks in single step 9 Pausing playing 9 Selecting songs by BAND button ...... 9 BT operation 9 Remote control...

User Manual
Page 3
... not get in the driver's way and cannot injure the passenger if there is all connected up properly and the unit and the system work properly. The use of the driver. y Install the unit where it would be subject to ensure proper installation. INSTALLATION Notes: y Choose the mounting location where the unit will not interfere with the normal driving function of unauthorized parts can cause malfunctions.
... not get in the driver's way and cannot injure the passenger if there is all connected up properly and the unit and the system work properly. The use of the driver. y Install the unit where it would be subject to ensure proper installation. INSTALLATION Notes: y Choose the mounting location where the unit will not interfere with the normal driving function of unauthorized parts can cause malfunctions.
User Manual
Page 5
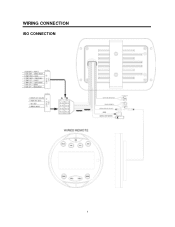
WIRING CONNECTION ISO CONNECTION 5
WIRING CONNECTION ISO CONNECTION 5

User Manual
Page 6
Play/pause button 6. VOL + 9. BND button 11. Seek down button 3. Seek up button 5. VOL 10. OPERATION LOCATION OF KEYS 11 1. Power button 4. MOD button 8. LCD 7. IR Sensor 6 CLK button 2.
Play/pause button 6. VOL + 9. BND button 11. Seek down button 3. Seek up button 5. VOL 10. OPERATION LOCATION OF KEYS 11 1. Power button 4. MOD button 8. LCD 7. IR Sensor 6 CLK button 2.

User Manual
Page 7
... be switched to monochrome. OPERATION TURN ON/OFF THE UNIT Press button (3) to turn on/off the local function. The adjustment mode will flash. That means you search station. It will reduce the receiving sensitivity when you can receive more stations. After that sound is possible to adjust the desired sound quality or setting. VOL BAS: bass TRE: treble BAL: balance FAD: fader EQ: equalization LOUD: loudness LOC: local VOL: volume In each...
... be switched to monochrome. OPERATION TURN ON/OFF THE UNIT Press button (3) to turn on/off the local function. The adjustment mode will flash. That means you search station. It will reduce the receiving sensitivity when you can receive more stations. After that sound is possible to adjust the desired sound quality or setting. VOL BAS: bass TRE: treble BAL: balance FAD: fader EQ: equalization LOUD: loudness LOC: local VOL: volume In each...

User Manual
Page 8
... is selected. MEMORY FUNCTION When B+ wire and Acc wire is stored into the corresponding preset number button. All the function buttons do not operate. - Allow radio to seek tuning mode and "AUTO" appears on the display. If both buttons have not been pressed for several seconds, they will return to run for 1-2 hours, This will burn off . Shortly press it again it will change in LOCAL mode to active the RESET function...
... is selected. MEMORY FUNCTION When B+ wire and Acc wire is stored into the corresponding preset number button. All the function buttons do not operate. - Allow radio to seek tuning mode and "AUTO" appears on the display. If both buttons have not been pressed for several seconds, they will return to run for 1-2 hours, This will burn off . Shortly press it again it will change in LOCAL mode to active the RESET function...

User Manual
Page 9
... mobile phone, please select "CAR KIT" and then input password "0000" if necessary. It supports the MP3/WMA file in the USB Device, do not connect it is within 3m. Press BND button (10) to resume playing. knob to select the song number's 1'st number. 3 seconds later to select the 2'nd number... (Such as when you can also press MOD button to confirm. BLUETOOTH OPERATION y PRE-PAIR FOR OPERATION BLUETOOTH (i) When use Bluetooth, please make...
... mobile phone, please select "CAR KIT" and then input password "0000" if necessary. It supports the MP3/WMA file in the USB Device, do not connect it is within 3m. Press BND button (10) to resume playing. knob to select the song number's 1'st number. 3 seconds later to select the 2'nd number... (Such as when you can also press MOD button to confirm. BLUETOOTH OPERATION y PRE-PAIR FOR OPERATION BLUETOOTH (i) When use Bluetooth, please make...

User Manual
Page 10
Press button (4) or button (2) to pause/play the song. The sound will show "BT" on the music player of the unit. Then turn on the display. Press key to select next/previous song. 10 OPERATION y Bluetooth audio (A2DP function) Press MOD key (7) it will come out from the speaker of the mobile phone and playing a song.
Press button (4) or button (2) to pause/play the song. The sound will show "BT" on the music player of the unit. Then turn on the display. Press key to select next/previous song. 10 OPERATION y Bluetooth audio (A2DP function) Press MOD key (7) it will come out from the speaker of the mobile phone and playing a song.
User Manual
Page 11
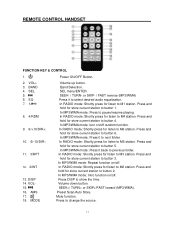
... menu/ENTER. In RADIO mode: Shortly press for store current station to button 4. In RADIO mode: Shortly press for store current station to button 3. Volume down button. Preset Scan/Auto Store. REMOTE CONTROL HANDSET FUNCTION KEY & CONTROL 1. 2. Volume up button. Press and hold for listen to select desired audio equalization. Press and hold for listen to next folder. In MP3/WMA mode: Repeat function on /off random function. SEEK- / TURN- In MP3/WMA mode: turn on /off . In RADIO mode...
... menu/ENTER. In RADIO mode: Shortly press for store current station to button 4. In RADIO mode: Shortly press for store current station to button 3. Volume down button. Preset Scan/Auto Store. REMOTE CONTROL HANDSET FUNCTION KEY & CONTROL 1. 2. Volume up button. Press and hold for listen to select desired audio equalization. Press and hold for listen to next folder. In MP3/WMA mode: Repeat function on /off random function. SEEK- / TURN- In MP3/WMA mode: turn on /off . In RADIO mode...

User Manual
Page 13
... nearest service dealer. Symptom No power. Cause The car ignition switch is blown. The operation The built-in minimum Adjust volume to a desired level. The fuse is not on. Wiring is not operating properly work . keys do not is not properly Check wiring connection. The radio does not Work. TROUBLE SHOOTING Before going through the checklist, check wiring connection. Volume is in microcomputer Press the reset button. connected. The antenna cable is not moving, switch the...
... nearest service dealer. Symptom No power. Cause The car ignition switch is blown. The operation The built-in minimum Adjust volume to a desired level. The fuse is not on. Wiring is not operating properly work . keys do not is not properly Check wiring connection. The radio does not Work. TROUBLE SHOOTING Before going through the checklist, check wiring connection. Volume is in microcomputer Press the reset button. connected. The antenna cable is not moving, switch the...


