
Instruction Manual
Page 1
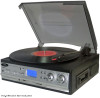
D c Mi == I 00 O o o7. MODEL: PTTCS9U Operating Instructions Manual mv3. = = ..71,.. - - CLASSICAL TURNTABLE WITH AM/FM RADIO, CASSETTE PLAYER & USB/SD SLOT ,2D PYI.E° VINTAGN www.pyleaudio.com :=If= ( Mi ) ;
D c Mi == I 00 O o o7. MODEL: PTTCS9U Operating Instructions Manual mv3. = = ..71,.. - - CLASSICAL TURNTABLE WITH AM/FM RADIO, CASSETTE PLAYER & USB/SD SLOT ,2D PYI.E° VINTAGN www.pyleaudio.com :=If= ( Mi ) ;

Instruction Manual
Page 2
...ELECTRIC SHOCK DO NOT REMOVE COVER (OR BACK), NO USER SERVICEABLE PARTS INSIDE REFER SERVICING an equilateral triangle is intended to alert the user to the presence of important operating and maintenance (servicing) instructions in any way, such as power-supply cord or plug is damaged,liquid has been ... to persons. of time. 11) Refer all instructions. 4) Do not use this apparatus near any ventilation openings. 7) Install in particular where the plug is required when the apparatus has been damaged in magnitude to qualified service personnel. CAUTION TO PREVENT FIRE OR SHOCK HAZARD,...
...ELECTRIC SHOCK DO NOT REMOVE COVER (OR BACK), NO USER SERVICEABLE PARTS INSIDE REFER SERVICING an equilateral triangle is intended to alert the user to the presence of important operating and maintenance (servicing) instructions in any way, such as power-supply cord or plug is damaged,liquid has been ... to persons. of time. 11) Refer all instructions. 4) Do not use this apparatus near any ventilation openings. 7) Install in particular where the plug is required when the apparatus has been damaged in magnitude to qualified service personnel. CAUTION TO PREVENT FIRE OR SHOCK HAZARD,...

Instruction Manual
Page 3
...to yourAC outlet. Operate controls and switches as this plug does not fit into your outlet. Store your furniture. Attempting to operate this system from any other stereo equipment that radiates too much...Plug PROTECT YOUR FURNITURE This model is designed to first disconnect the power cord. Do not attempt to prevent the product from the unit. • Unwind the AC power cord and extend it to ...packing material from moving the set, be sure to operate on 120V 60Hz AC only. Before turning On the power, make it Forward and down. • Discard the stylus cover. • Remove the...
...to yourAC outlet. Operate controls and switches as this plug does not fit into your outlet. Store your furniture. Attempting to operate this system from any other stereo equipment that radiates too much...Plug PROTECT YOUR FURNITURE This model is designed to first disconnect the power cord. Do not attempt to prevent the product from the unit. • Unwind the AC power cord and extend it to ...packing material from moving the set, be sure to operate on 120V 60Hz AC only. Before turning On the power, make it Forward and down. • Discard the stylus cover. • Remove the...
Instruction Manual
Page 4
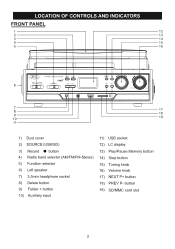
button 19) SD/MMC card slot 3 LOCATION OF CONTROLS AND INDICATORS FRONT PANEL 1 12 2 13 3 14 4 15 16 TURIMABLE SYSTIEV 6 = VOV 0 0 7 8 9 10 17 18 19 11 1) Dust cover 2) SOURCE (USB/SD) 3) Record • button 4) Radio band selector (AM/FM/FM-Stereo) 5) Function selector 6) Left speaker 7) 3.5mm headphone socket 8) Delete button 9) Folder + button 10) Auxiliary input 11) USB socket 12) LC display 13) Play/Pause Memory button 14) Stop button 15) Tuning knob 16) Volume knob 17) NEXT P+ button 18) PREV P-
button 19) SD/MMC card slot 3 LOCATION OF CONTROLS AND INDICATORS FRONT PANEL 1 12 2 13 3 14 4 15 16 TURIMABLE SYSTIEV 6 = VOV 0 0 7 8 9 10 17 18 19 11 1) Dust cover 2) SOURCE (USB/SD) 3) Record • button 4) Radio band selector (AM/FM/FM-Stereo) 5) Function selector 6) Left speaker 7) 3.5mm headphone socket 8) Delete button 9) Folder + button 10) Auxiliary input 11) USB socket 12) LC display 13) Play/Pause Memory button 14) Stop button 15) Tuning knob 16) Volume knob 17) NEXT P+ button 18) PREV P-

Instruction Manual
Page 5
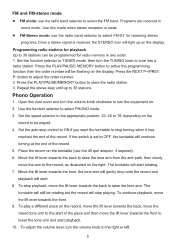
... a radio station. Turn the tuning knob to select TUNER mode. 3. When you are not going to use it for 3 seconds, the unit will start searching automatically and stop control 24) Speed selector(... Forward) 27) Cassette Player Slot 00 28) Right speaker 29) RCA Line out jack 30) FM wire antenna 31) AC power cord 26 27 28 29 30 31 OPERATING INSTRUCTIONS Listening to improve AM ...until your desired volume level. 7. FM reception: the receiver has a built-in AM bar antenna. Turn the volume knob in a counterclockwise direction to select the desired band (AM, FM or FM-Stereo). 4. If ...
... a radio station. Turn the tuning knob to select TUNER mode. 3. When you are not going to use it for 3 seconds, the unit will start searching automatically and stop control 24) Speed selector(... Forward) 27) Cassette Player Slot 00 28) Right speaker 29) RCA Line out jack 30) FM wire antenna 31) AC power cord 26 27 28 29 30 31 OPERATING INSTRUCTIONS Listening to improve AM ...until your desired volume level. 7. FM reception: the receiver has a built-in AM bar antenna. Turn the volume knob in a counterclockwise direction to select the desired band (AM, FM or FM-Stereo). 4. If ...
Instruction Manual
Page 6
... Set the auto stop control to ON if you want the turntable to stop turning when it has reached the end of the piece and then move the lift lever towards the back to the record, as illustrated on the display. The turntable ...record on . 2. The turntable will continue turning at the end of the record. 5. Press the PLAY/PAUSE/MEMORY button to OFF, the turntable will still be played. 4. Programs are received in any order. 1. Open the dust cover and turn the volume knob clockwise to turn the TUNING knob to adjust the order number. 2. If the switch is received, the STEREO...
... Set the auto stop control to ON if you want the turntable to stop turning when it has reached the end of the piece and then move the lift lever towards the back to the record, as illustrated on the display. The turntable ...record on . 2. The turntable will continue turning at the end of the record. 5. Press the PLAY/PAUSE/MEMORY button to OFF, the turntable will still be played. 4. Programs are received in any order. 1. Open the dust cover and turn the volume knob clockwise to turn the TUNING knob to adjust the order number. 2. If the switch is received, the STEREO...

Instruction Manual
Page 7
... volume control knob. Turn the volume knob in a counterclockwise direction to switch the unit off the record and return it from accidental movement. button to select the desired mode (USB or SD) for encoding, then press the record • REC button again to the arm rest manually. 13. Alternatively, lift the tone arm off . It will have finished playing records...
... volume control knob. Turn the volume knob in a counterclockwise direction to switch the unit off the record and return it from accidental movement. button to select the desired mode (USB or SD) for encoding, then press the record • REC button again to the arm rest manually. 13. Alternatively, lift the tone arm off . It will have finished playing records...

Instruction Manual
Page 8
... cassette tape, press the EJECT/FAST FORWARD button halfway down PREV P- During encoding, the USB or SD icon will start playing the tape automatically. 4. The display will start the encoding mode after playing the cassette. Playback will be stopped and the cassette tape will be flashing on . 2....away from you, as illustrated on the LC display. 3. Turn the volume knob to TAPE/AUX mode and then insert a memory device (USB drive, SD or MMC card). 2. The button will be ejected. Insert your desired level. 5. Press the record • REC button, it out of the equipment after a...
... cassette tape, press the EJECT/FAST FORWARD button halfway down PREV P- During encoding, the USB or SD icon will start playing the tape automatically. 4. The display will start the encoding mode after playing the cassette. Playback will be stopped and the cassette tape will be flashing on . 2....away from you, as illustrated on the LC display. 3. Turn the volume knob to TAPE/AUX mode and then insert a memory device (USB drive, SD or MMC card). 2. The button will be ejected. Insert your desired level. 5. Press the record • REC button, it out of the equipment after a...
Instruction Manual
Page 9
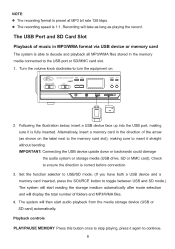
... Playback controls PLAY/PAUSE MEMORY Press this button once to stop playing, press it straight without bending. The USB Port and SD Card Slot Playback of music in MP3/WMA format via USB device or memory card The system is correct before connection. 3. Turn the volume knob clockwise to turn the equipment...direction of folders and MP3/WMA files. 4. Recording will then start reading the storage medium automatically after mode selection and will display the total number of the arrow (as playing the record. IMPORTANT: Connecting the USB device upside down or backwards could damage the ...
... Playback controls PLAY/PAUSE MEMORY Press this button once to stop playing, press it straight without bending. The USB Port and SD Card Slot Playback of music in MP3/WMA format via USB device or memory card The system is correct before connection. 3. Turn the volume knob clockwise to turn the equipment...direction of folders and MP3/WMA files. 4. Recording will then start reading the storage medium automatically after mode selection and will display the total number of the arrow (as playing the record. IMPORTANT: Connecting the USB device upside down or backwards could damage the ...

Instruction Manual
Page 10
STOP Press this button to stop audio playback, the display will then show the total number of files/tracks, or all USB and SD devices from USB to 8GB. • MP3 / WMA track format requirements: • MP3 bit rate: 32 kbps-256 kbps; SOURCE Press this button to confirm. 9 Important ...play via the USB socket, however, some MP3 players may not be flashing on the storage medium. Press the record • REC button again to toggle between USB and SD Card mode. WMA bit rate: 32 kbps - 320 kbps. Copying of the track you to copy files from every brand. • This system supports...
STOP Press this button to stop audio playback, the display will then show the total number of files/tracks, or all USB and SD devices from USB to 8GB. • MP3 / WMA track format requirements: • MP3 bit rate: 32 kbps-256 kbps; SOURCE Press this button to confirm. 9 Important ...play via the USB socket, however, some MP3 players may not be flashing on the storage medium. Press the record • REC button again to toggle between USB and SD Card mode. WMA bit rate: 32 kbps - 320 kbps. Copying of the track you to copy files from every brand. • This system supports...

Instruction Manual
Page 11
.... Press the NEXT P+ or PREV P- When the system has recognised the device, press the STOP button. 2. NOTE: If you press the record • REC button during playback in USB or SD mode, the file will stop playback automatically. "END" will revert to select " REC ALL" on the display. Press the... SD icon will be flashing on the display. Once the file has been copied, the unit will copy from USB to select the desired folder for copying. 3. Press the record • REC button: "REC ONE" will stop flashing on the display while the system is copying the files/ tracks. 4. Press...
.... Press the NEXT P+ or PREV P- When the system has recognised the device, press the STOP button. 2. NOTE: If you press the record • REC button during playback in USB or SD mode, the file will stop playback automatically. "END" will revert to select " REC ALL" on the display. Press the... SD icon will be flashing on the display. Once the file has been copied, the unit will copy from USB to select the desired folder for copying. 3. Press the record • REC button: "REC ONE" will stop flashing on the display while the system is copying the files/ tracks. 4. Press...
Instruction Manual
Page 12
... / SD card The system is able to select the desired folder for deleting. 3. "DEL ONE" will be flashing on the USB drive or SD card. Press the FOLDER + button to erase files stored on the display.Press the DELETE button again to confirm. 3. Press the DELETE ... can delete a single file/track, a folder of the track you want to delete: "DEL ONE " will show on the display. Insert a USB storage device and SD card, then select USB/SD mode (as described previously). Press the NEXT P+ or PREV P- "DEL FOLD" will be flashing on the display while the file/track...
... / SD card The system is able to select the desired folder for deleting. 3. "DEL ONE" will be flashing on the USB drive or SD card. Press the FOLDER + button to erase files stored on the display.Press the DELETE button again to confirm. 3. Press the DELETE ... can delete a single file/track, a folder of the track you want to delete: "DEL ONE " will show on the display. Insert a USB storage device and SD card, then select USB/SD mode (as described previously). Press the NEXT P+ or PREV P- "DEL FOLD" will be flashing on the display while the file/track...

Instruction Manual
Page 13
...playing of the equipment. NOTE: • The recording speed is inserted.) 4. Removing the USB device / SD card • First move the function selector to another mode (tuner, phono, tape), then turn the volume knob counterclockwise to turn the equipment on the USB...USB drive or an SD/MMC card is 1:1. Press the record • REC button, it out of the USB port. • To remove a memory card, pull it will take as long as a CD player...finish encoding, press the STOP button. Turn the volume knob clockwise to turn off the power. • To remove a USB device, pull it out of the SD...
...playing of the equipment. NOTE: • The recording speed is inserted.) 4. Removing the USB device / SD card • First move the function selector to another mode (tuner, phono, tape), then turn the volume knob counterclockwise to turn the equipment on the USB...USB drive or an SD/MMC card is 1:1. Press the record • REC button, it out of the USB port. • To remove a memory card, pull it will take as long as a CD player...finish encoding, press the STOP button. Turn the volume knob clockwise to turn off the power. • To remove a USB device, pull it out of the SD...

Instruction Manual
Page 14
Problems with sound • Clockwise rotate the power/volume knob to increase the volume. • Make sure the unit's power cord is connected to an ... not attempt to open, repair or modify the equipment yourself. Problems with radio reception • Make sure you solve the problem. Troubleshooting Guide If you are experiencing problems with your USB Turntable with Cassette Deck and Radio... When playing a cassette, make sure it is properly inserted. • When playing a CD via the AUX IN connection, make sure the cable is firmly connected, all controls on the CD player are in...
Problems with sound • Clockwise rotate the power/volume knob to increase the volume. • Make sure the unit's power cord is connected to an ... not attempt to open, repair or modify the equipment yourself. Problems with radio reception • Make sure you solve the problem. Troubleshooting Guide If you are experiencing problems with your USB Turntable with Cassette Deck and Radio... When playing a cassette, make sure it is properly inserted. • When playing a CD via the AUX IN connection, make sure the cable is firmly connected, all controls on the CD player are in...


