
User Manual
Page 1
PVTTBT8 Retro Belt-Drive Bluetooth Turntable with USB-to-PC Connection
PVTTBT8 Retro Belt-Drive Bluetooth Turntable with USB-to-PC Connection

User Manual
Page 2
TURNTABLE PARTS 1. Internal Battery Charging Led light Indicator 9. Handle 12. RCA output Jack 17. Power Adaptor Jack Speakers 3. Stylus/cartridge 13. Speaker Cable 15. 3.5mm line-in Jack 16. USB Jack to PC for recording 18. Power/Volume Control Switch 6. BT Led light indicator 8. Speaker Buckles 10. Turntable platter 14. Tone Arm 2. Function Selection Knob 5. Tone Arm Rest 4. Power Led Light Indicator 7. Turntable Player Lock 11. Speed Selection Switch 19.
TURNTABLE PARTS 1. Internal Battery Charging Led light Indicator 9. Handle 12. RCA output Jack 17. Power Adaptor Jack Speakers 3. Stylus/cartridge 13. Speaker Cable 15. 3.5mm line-in Jack 16. USB Jack to PC for recording 18. Power/Volume Control Switch 6. BT Led light indicator 8. Speaker Buckles 10. Turntable platter 14. Tone Arm 2. Function Selection Knob 5. Tone Arm Rest 4. Power Led Light Indicator 7. Turntable Player Lock 11. Speed Selection Switch 19.

User Manual
Page 3
... on the turntable (13) and set the player speed (18) to LINE IN mode. PLAY BLUETOOTH 7. POWER ON THE UNIT Connect the power adaptor to adjust the volume level. 6. Turn the volume control(5) to an electrical outlet (120V-60Hz); Open the BT audio source and connect with the instruction manual). 4. LINE IN 10. Turn the function selection knob (4) to match the record speed (33...
... on the turntable (13) and set the player speed (18) to LINE IN mode. PLAY BLUETOOTH 7. POWER ON THE UNIT Connect the power adaptor to adjust the volume level. 6. Turn the volume control(5) to an electrical outlet (120V-60Hz); Open the BT audio source and connect with the instruction manual). 4. LINE IN 10. Turn the function selection knob (4) to match the record speed (33...

User Manual
Page 4
... Make sure that supports USB Audio devices. Press the Record Button 2. You will see the waveform of the audio on the USB turntable. go back to the USB turntable quick start instruction manual included before proceeding with the supplied USB cable, and both the computer and the turntable are plugged in and on your computer. Play through " selected and the speaker volume up on...
... Make sure that supports USB Audio devices. Press the Record Button 2. You will see the waveform of the audio on the USB turntable. go back to the USB turntable quick start instruction manual included before proceeding with the supplied USB cable, and both the computer and the turntable are plugged in and on your computer. Play through " selected and the speaker volume up on...

User Manual
Page 5
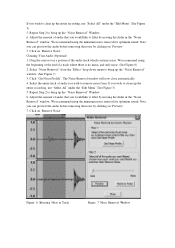
You have completed the recording process. (See Figure 2) Figure 2: Recording Sample Adjusting Your Audio Level (Optional) 1. Select the "Effect" menu and choose the desired effect. There are various types of effects which Press Stop 5. You can also use Ctrl+A on a PC or APPLE+A on 'File' -> 'Save Project'. Select the destination and file name for the project and click 'Save'. 6. SAVE YOUR FILE NOW by selecting "Edit", then "Select...", then click "All". Figure 3: Figure 3: Select All 2. 4. Select your entire recording by clicking on a Macintosh to quickly select all.
You have completed the recording process. (See Figure 2) Figure 2: Recording Sample Adjusting Your Audio Level (Optional) 1. Select the "Effect" menu and choose the desired effect. There are various types of effects which Press Stop 5. You can also use Ctrl+A on a PC or APPLE+A on 'File' -> 'Save Project'. Select the destination and file name for the project and click 'Save'. 6. SAVE YOUR FILE NOW by selecting "Edit", then "Select...", then click "All". Figure 3: Figure 3: Select All 2. 4. Select your entire recording by clicking on a Macintosh to quickly select all.

User Manual
Page 6
Figure 4: Effect Drop Down List b. Select "Noise Removal" from . Click "Get Noise Profile". Normalize should be used to bring up the "Noise Removal" ...noise. Select the entire track of audio you wish to remove noise from the "Effect" drop down menu to have the correct volume on the web (See Figure 4). The Noise Removal window will now close automatically. 4. Drag the cursor over a portion of a...only noise. (See Figure 6) 2. are described further in the software's help section as well as on the recording. (See Figure 5) Figure 5: Normalize Cleaning Your Audio (Optional) 1.
Figure 4: Effect Drop Down List b. Select "Noise Removal" from . Click "Get Noise Profile". Normalize should be used to bring up the "Noise Removal" ...noise. Select the entire track of audio you wish to remove noise from the "Effect" drop down menu to have the correct volume on the web (See Figure 4). The Noise Removal window will now close automatically. 4. Drag the cursor over a portion of a...only noise. (See Figure 6) 2. are described further in the software's help section as well as on the recording. (See Figure 5) Figure 5: Normalize Cleaning Your Audio (Optional) 1.
User Manual
Page 7
... "Select All" under the "Edit Menu" (See Figure 3) 5. If you wish to clean up the entire recording, use "Select All" under the "Edit Menu" (See Figure 3) 5. Note: you can preview the audio before removing the noise by moving the slider in Track ...
... "Select All" under the "Edit Menu" (See Figure 3) 5. If you wish to clean up the entire recording, use "Select All" under the "Edit Menu" (See Figure 3) 5. Note: you can preview the audio before removing the noise by moving the slider in Track ...

User Manual
Page 8
avoid bumping the needle against the turntable platter or record edge. 3. Use only a small amount of mild detergent to any part of the turntable system. TIPS FOR BETTER TURNTABLE PERFORMANCE 1. If you must use a needle cleaning fluid, use a soft brush in a "back-to-front" motion only. 4. When opening or closing the turntable cover, handle it gently, gripping it either...
avoid bumping the needle against the turntable platter or record edge. 3. Use only a small amount of mild detergent to any part of the turntable system. TIPS FOR BETTER TURNTABLE PERFORMANCE 1. If you must use a needle cleaning fluid, use a soft brush in a "back-to-front" motion only. 4. When opening or closing the turntable cover, handle it gently, gripping it either...


