User Guide
Page 7
...Performing Send to Folder 163 Scanning an Original with the Settings Specified When Scanned 173 Changing the Print Settings to Print a Document 174 Specifying a Page to a Folder 154 Printing the Check Sheet...154 Confirming the Computer Information (Windows 155 Creating a Shared Folder (Windows)...156 Confirming... (OS X/macOS 159 Creating a Shared Folder (OS X/macOS 159 Registering the Created Shared Folder in Document Server...173 Printing a Document with Suitable Quality and Density 165 Specifying the File Type or File Name When Scanning a Document 168 6. Document Server Storing ...
...Performing Send to Folder 163 Scanning an Original with the Settings Specified When Scanned 173 Changing the Print Settings to Print a Document 174 Specifying a Page to a Folder 154 Printing the Check Sheet...154 Confirming the Computer Information (Windows 155 Creating a Shared Folder (Windows)...156 Confirming... (OS X/macOS 159 Creating a Shared Folder (OS X/macOS 159 Registering the Created Shared Folder in Document Server...173 Printing a Document with Suitable Quality and Density 165 Specifying the File Type or File Name When Scanning a Document 168 6. Document Server Storing ...
User Guide
Page 39
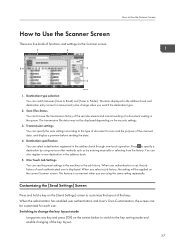
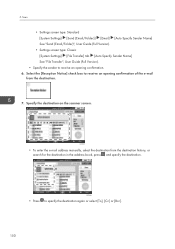
...the setting will be displayed depending on the security settings. 3. Destination type selection You can specify the scan settings according to the type of document to Folder]. When user authentication is displayed. The items displayed in the address book and destination entry screen for...Customization, the screen can select a destination registered in the queue. Transmission settings You can switch between [Scan to Email] and [Scan to scan and the purpose of the scanned data, and display a preview before sending the data. 4. Destination specification You can be customized for ...
...the setting will be displayed depending on the security settings. 3. Destination type selection You can specify the scan settings according to the type of document to Folder]. When user authentication is displayed. The items displayed in the address book and destination entry screen for...Customization, the screen can select a destination registered in the queue. Transmission settings You can switch between [Scan to Email] and [Scan to scan and the purpose of the scanned data, and display a preview before sending the data. 4. Destination specification You can be customized for ...
User Guide
Page 46
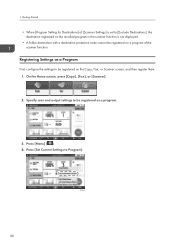
Specify scan and output settings to be registered on a program of [Scanner Settings] is set to [Exclude Destinations], the destination registered on the recalled program in the scanner function is not displayed. • A folder destination with a destination protection code cannot be registered on the Copy, Fax, or Scanner screen, and then register them...
Specify scan and output settings to be registered on a program of [Scanner Settings] is set to [Exclude Destinations], the destination registered on the recalled program in the scanner function is not displayed. • A folder destination with a destination protection code cannot be registered on the Copy, Fax, or Scanner screen, and then register them...
User Guide
Page 152
... an opening confirmation. 6. DZC505 • To enter the e-mail address manually, select the destination from the destination. 7. Scan • Settings screen type: Standard [System Settings] [Send (Email/Folder)] [Email] [Auto Specify Sender Name] See "Send (Email/Folder)", User Guide (Full Version). • Settings screen type: Classic [System Settings] [File Transfer] tab [Auto Specify...
... an opening confirmation. 6. DZC505 • To enter the e-mail address manually, select the destination from the destination. 7. Scan • Settings screen type: Standard [System Settings] [Send (Email/Folder)] [Email] [Auto Specify Sender Name] See "Send (Email/Folder)", User Guide (Full Version). • Settings screen type: Classic [System Settings] [File Transfer] tab [Auto Specify...
User Guide
Page 156
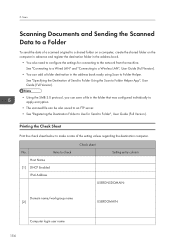
... You can be also saved to an FTP server. • See "Registering the Destination Folder to Use for connecting to Folder Helper. See "Specifying the Destination of Send to Folder Using the Scan to Folder Helper App", User Guide (Full Version). • Using the SMB 3.0 protocol, you can...make a note of a scanned original to a shared folder on a computer, create the shared folder on the computer in advance and register the destination folder in the address book easily using Scan to the network from the machine. Scan Scanning Documents and Sending the Scanned Data to check Host Name...
... You can be also saved to an FTP server. • See "Registering the Destination Folder to Use for connecting to Folder Helper. See "Specifying the Destination of Send to Folder Using the Scan to Folder Helper App", User Guide (Full Version). • Using the SMB 3.0 protocol, you can...make a note of a scanned original to a shared folder on a computer, create the shared folder on the computer in advance and register the destination folder in the address book easily using Scan to the network from the machine. Scan Scanning Documents and Sending the Scanned Data to check Host Name...
User Guide
Page 157
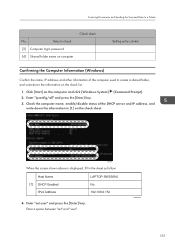
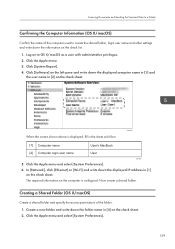
...on the check list. 1. Enter "ipconfig/all" and press the [Enter] key. 3. D0BQIA2201 155 Scanning Documents and Sending the Scanned Data to check [3] Computer login password [4] Shared folder name on computer Check sheet Setting entry column Confirming the Computer Information (Windows) Confirm the name, IP address...click [Windows System] [Command Prompt]. 2. Check the computer name, enable/disable status of the computer used to create a shared folder, and write down the information in the sheet as follow: Host Name [1] DHCP Enabled IPv4 Address LAPTOP-5955S09U No 192.168.0....
...on the check list. 1. Enter "ipconfig/all" and press the [Enter] key. 3. D0BQIA2201 155 Scanning Documents and Sending the Scanned Data to check [3] Computer login password [4] Shared folder name on computer Check sheet Setting entry column Confirming the Computer Information (Windows) Confirm the name, IP address...click [Windows System] [Command Prompt]. 2. Check the computer name, enable/disable status of the computer used to create a shared folder, and write down the information in the sheet as follow: Host Name [1] DHCP Enabled IPv4 Address LAPTOP-5955S09U No 192.168.0....
User Guide
Page 158
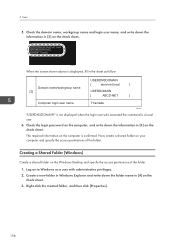
The required information on the computer is displayed, fill in [3] on the check sheet. Create a new folder in Windows Explorer and write down the folder name in [2] on the check sheet. 5. Check the domain name, workgroup name and login user name, and ...Desktop and specify the access permissions of the folder. Creating a Shared Folder (Windows) Create a shared folder on the check sheet. 3. Right-click the created folder, and then click [Properties]. 156 Scan 5. CKX007 When the screen shown above is confirmed. Now create a shared folder on to Windows as follow: Domain name...
The required information on the computer is displayed, fill in [3] on the check sheet. Create a new folder in Windows Explorer and write down the folder name in [2] on the check sheet. 5. Check the domain name, workgroup name and login user name, and ...Desktop and specify the access permissions of the folder. Creating a Shared Folder (Windows) Create a shared folder on the check sheet. 3. Right-click the created folder, and then click [Properties]. 156 Scan 5. CKX007 When the screen shown above is confirmed. Now create a shared folder on to Windows as follow: Domain name...
User Guide
Page 159
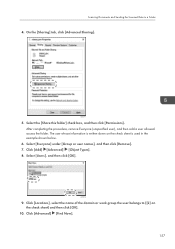
... and Sending the Scanned Data to ([2] on the check sheet is written down on the check sheet) and then click [OK]. 10. Click [Add] [Advanced] [Object Types]. 8. Click [Locations], select the name of the domain or work group the user belongs to a Folder 4. Select [Users...], and then click [OK]. DZC319 9. Select the [Share this folder] check box, and then click [Permissions]. After completing the procedure, remove Everyone (unspecified user), and then add...
... and Sending the Scanned Data to ([2] on the check sheet is written down on the check sheet) and then click [OK]. 10. Click [Add] [Advanced] [Object Types]. 8. Click [Locations], select the name of the domain or work group the user belongs to a Folder 4. Select [Users...], and then click [OK]. DZC319 9. Select the [Share this folder] check box, and then click [Permissions]. After completing the procedure, remove Everyone (unspecified user), and then add...
User Guide
Page 160
...[Logon Name] from the [Available columns] list or [Pre-Windows 2000 Logon Name]. 12. Click [Edit...] on the folder have been successfully configured. Select the added user, and then select the [Allow] check box under [Permissions]. 8. Select ...[Object Types] or [Locations] and click [Search]. 5. Right-click the created folder and then click [Properties]. 2. Click [OK] to close all windows. The access permissions on the [Security] tab. 3. 5. ... the computer to assign permissions and click [OK]. 6. Scan 11.
...[Logon Name] from the [Available columns] list or [Pre-Windows 2000 Logon Name]. 12. Click [Edit...] on the folder have been successfully configured. Select the added user, and then select the [Allow] check box under [Permissions]. 8. Select ...[Object Types] or [Locations] and click [Search]. 5. Right-click the created folder and then click [Properties]. 2. Click [OK] to close all windows. The access permissions on the [Security] tab. 3. 5. ... the computer to assign permissions and click [OK]. 6. Scan 11.
User Guide
Page 161
...and select [System Preferences]. 6. Now create a shared folder. Click the Apple menu and select [System Preferences]. 159 Click [System Report]. 4. Click the Apple menu. 3. Scanning Documents and Sending the Scanned Data to a Folder Confirming the Computer Information (OS X/macOS) Confirm the name... of the folder. 1. Log on the check list. 1. Create a new folder and write down the information on to create the shared folder, login user name...
...and select [System Preferences]. 6. Now create a shared folder. Click the Apple menu and select [System Preferences]. 159 Click [System Report]. 4. Click the Apple menu. 3. Scanning Documents and Sending the Scanned Data to a Folder Confirming the Computer Information (OS X/macOS) Confirm the name... of the folder. 1. Log on the check list. 1. Create a new folder and write down the information on to create the shared folder, login user name...
User Guide
Page 162
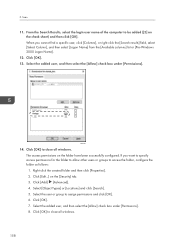
Select the check boxes of the selected account and then click [Done]. 5. DZC529 6. Click [ ] below [Shared Folders] on the [Sharing] screen. Scan 3. DZC527 4. DZC528 When the [Authentication] screen is displayed, enter the password of [Share files and folders using SMB] and the user account to use for file sharing and then click [Done]. Click [Sharing], select the [File Sharing] check box and then click [Options]. Specify the folder created in Step 1 and click [Add]. 160 5.
Select the check boxes of the selected account and then click [Done]. 5. DZC529 6. Click [ ] below [Shared Folders] on the [Sharing] screen. Scan 3. DZC527 4. DZC528 When the [Authentication] screen is displayed, enter the password of [Share files and folders using SMB] and the user account to use for file sharing and then click [Done]. Click [Sharing], select the [File Sharing] check box and then click [Options]. Specify the folder created in Step 1 and click [Add]. 160 5.
User Guide
Page 163
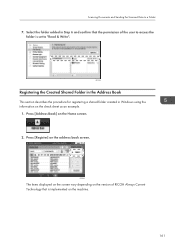
...Register] on the machine. 161 Select the folder added in Windows using the information on the Home screen. 2. EDN022 The items displayed on the screen vary depending on the version of the user to access the folder is implemented on the address book screen. .... 1. DZC530 Registering the Created Shared Folder in the Address Book This section describes the procedure for registering a shared folder created in Step 6 and confirm that the permission of RICOH Always Current Technology that is set to a Folder 7. Scanning Documents and Sending the Scanned Data to "Read & Write".
...Register] on the machine. 161 Select the folder added in Windows using the information on the Home screen. 2. EDN022 The items displayed on the screen vary depending on the version of the user to access the folder is implemented on the address book screen. .... 1. DZC530 Registering the Created Shared Folder in the Address Book This section describes the procedure for registering a shared folder created in Step 6 and confirm that the permission of RICOH Always Current Technology that is set to a Folder 7. Scanning Documents and Sending the Scanned Data to "Read & Write".
User Guide
Page 164
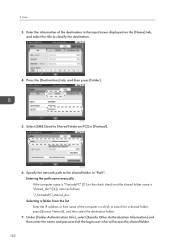
...\shared_doc Selecting a folder from the list Enter the IP address or host name of the login user who will access the shared folder. 162 Scan 3. Enter the information of the destination in [Protocol]. DZC134 6. Press the [Destinations] tab, and then press [Folder]. Specify the network... path to search for a shared folder, press [Browse Network], and then select...
...\shared_doc Selecting a folder from the list Enter the IP address or host name of the login user who will access the shared folder. 162 Scan 3. Enter the information of the destination in [Protocol]. DZC134 6. Press the [Destinations] tab, and then press [Folder]. Specify the network... path to search for a shared folder, press [Browse Network], and then select...
User Guide
Page 165
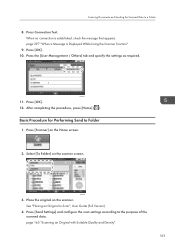
...Press Connection Test. DZC131 11. page 165 "Scanning an Original with Suitable Quality and Density" 163 Press [OK]. 10. Press [OK]. 12. Scanning Documents and Sending the Scanned Data to Folder 1. Basic Procedure for Performing Send to a Folder 8. Press [Scanner] on the Home screen.... 2. Press [Send Settings] and configure the scan settings according to Scan", User Guide (Full Version). 4. Press the...
...Press Connection Test. DZC131 11. page 165 "Scanning an Original with Suitable Quality and Density" 163 Press [OK]. 10. Press [OK]. 12. Scanning Documents and Sending the Scanned Data to Folder 1. Basic Procedure for Performing Send to a Folder 8. Press [Scanner] on the Home screen.... 2. Press [Send Settings] and configure the scan settings according to Scan", User Guide (Full Version). 4. Press the...
User Guide
Page 166
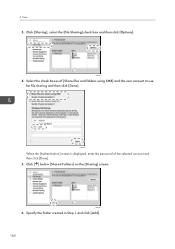
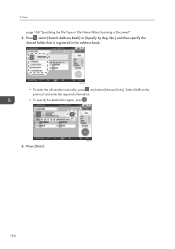
No.] and then specify the shared folder that is registered in the address book. Select SMB as the protocol and enter the required information. • To specify the destination again, press . Press [Start]. 164 DZC536 6. Press , select [Search Address Book] or [Specify by Reg. Scan page 168 "Specifying the File Type or File Name When Scanning a Document" 5. 5. DZC533 • To enter the information manually, press , and select [Manual Entry].
No.] and then specify the shared folder that is registered in the address book. Select SMB as the protocol and enter the required information. • To specify the destination again, press . Press [Start]. 164 DZC536 6. Press , select [Search Address Book] or [Specify by Reg. Scan page 168 "Specifying the File Type or File Name When Scanning a Document" 5. 5. DZC533 • To enter the information manually, press , and select [Manual Entry].
User Guide
Page 173
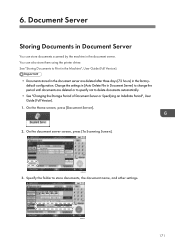
Specify the folder to Print in the Machine", User Guide (Full Version). • Documents stored in the factorydefault configuration. Change the settings in [Auto Delete File in Document ..., press [Document Server]. 2. 6. See "Storing Documents to store documents, the document name, and other settings. On the document server screen, press [To Scanning Screen]. Document Server Storing Documents in the document server. You can store documents scanned by the machine in Document Server You can also store them using the printer driver.
Specify the folder to Print in the Machine", User Guide (Full Version). • Documents stored in the factorydefault configuration. Change the settings in [Auto Delete File in Document ..., press [Document Server]. 2. 6. See "Storing Documents to store documents, the document name, and other settings. On the document server screen, press [To Scanning Screen]. Document Server Storing Documents in the document server. You can store documents scanned by the machine in Document Server You can also store them using the printer driver.
User Guide
Page 174
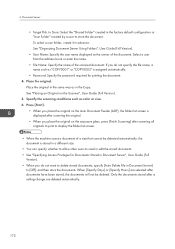
...do not want to delete stored documents, specify [Auto Delete File in the factory default configuration or "User Folder" created by a user to display the folder list screen. • When the machine scans a document of a size that cannot be deleted. Press [Start]. • When you place the ...original on the Auto Document Feeder (ADF), the folder list screen is displayed after scanning the original. • When you place the original on the Scanner", User Guide (Full Version). 5. When [Specify Days] or [Specify...
...do not want to delete stored documents, specify [Auto Delete File in the factory default configuration or "User Folder" created by a user to display the folder list screen. • When the machine scans a document of a size that cannot be deleted. Press [Start]. • When you place the ...original on the Auto Document Feeder (ADF), the folder list screen is displayed after scanning the original. • When you place the original on the Scanner", User Guide (Full Version). 5. When [Specify Days] or [Specify...
User Guide
Page 175
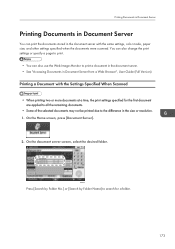
... Server from a Web Browser", User Guide (Full Version). On the document server screen, select the desired folder. DZX236 Press [Search by Folder No.] or [Search by Folder Name] to search for the first document are applied to all the remaining documents. • Some of ... the document server. • See "Accessing Documents in the document server with the Settings Specified When Scanned • When printing two or more documents at a time, the print settings specified for a folder. 173 On the Home screen, press [Document Server]. 2. Printing a Document with the same settings...
... Server from a Web Browser", User Guide (Full Version). On the document server screen, select the desired folder. DZX236 Press [Search by Folder No.] or [Search by Folder Name] to search for the first document are applied to all the remaining documents. • Some of ... the document server. • See "Accessing Documents in the document server with the Settings Specified When Scanned • When printing two or more documents at a time, the print settings specified for a folder. 173 On the Home screen, press [Document Server]. 2. Printing a Document with the same settings...
User Guide
Page 255
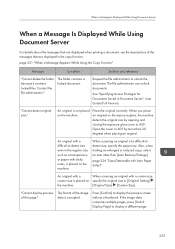
...unlock the document. page 251 "When a Message Appears While Using the Copy Function" Message Condition Solution and reference "Cannot delete the folder because it contains locked files. Contact the file administrator." Request the file administrator to display the preview screen without a thumbnail. See ...and closing the exposure glass cover or ADF. page 226 "Sizes Detectable with Auto Paper Select" An original with a When scanning an original with sticky notes, is placed on the machine. The file administrator can unlock documents. Also, when making an ...
...unlock the document. page 251 "When a Message Appears While Using the Copy Function" Message Condition Solution and reference "Cannot delete the folder because it contains locked files. Contact the file administrator." Request the file administrator to display the preview screen without a thumbnail. See ...and closing the exposure glass cover or ADF. page 226 "Sizes Detectable with Auto Paper Select" An original with a When scanning an original with sticky notes, is placed on the machine. The file administrator can unlock documents. Also, when making an ...

User Guide
Page 256
You cannot specify [Booklet] or [Magazine] to unlock the folder. Condition Solution and reference A document scanned in the copy function and a document stored in the different functions. Troubleshooting Message "Cannot print with magazine and booklet with different image quality." 9. See "Managing Folders as a File Administrator", User Guide (Full Version). 254 The file administrator can...
You cannot specify [Booklet] or [Magazine] to unlock the folder. Condition Solution and reference A document scanned in the copy function and a document stored in the different functions. Troubleshooting Message "Cannot print with magazine and booklet with different image quality." 9. See "Managing Folders as a File Administrator", User Guide (Full Version). 254 The file administrator can...


