
Mopria Guide
Page 7
... print on the operating system. About Mopria Print Service The machine supports the Mopria Print Service. Using Mopria Print This section explains how to install a printer driver specifically for the machine on the machine by using the Mopria Print Service over a wireless network from an Android device.
... print on the operating system. About Mopria Print Service The machine supports the Mopria Print Service. Using Mopria Print This section explains how to install a printer driver specifically for the machine on the machine by using the Mopria Print Service over a wireless network from an Android device.
Mopria Guide
Page 9
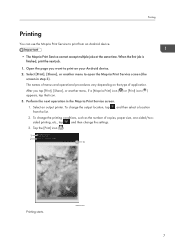
... the next operation in step 3). Select [Print], [Share], or another menu, if a [Mopria Print] icon ( ) or [Print] icon ( ) appears, tap that icon. 3. Select an output printer. M0ESOC0057 7 Tap the [Print] icon ( ). 1 2 3 Printing starts. To change the settings. 3. Printing Printing You can use the Mopria Print Service to print from the list...
... the next operation in step 3). Select [Print], [Share], or another menu, if a [Mopria Print] icon ( ) or [Print] icon ( ) appears, tap that icon. 3. Select an output printer. M0ESOC0057 7 Tap the [Print] icon ( ). 1 2 3 Printing starts. To change the settings. 3. Printing Printing You can use the Mopria Print Service to print from the list...
Users Guide
Page 4
Printing Documents What You Can Do with the Printer Function 57 Configuring Option Settings for the Printer...58 Conditions for Bidirectional Communication 58 If Bidirectional Communication is Disabled 58 Displaying the Printing Preferences Dialog Box 60 Displaying the Printing Preferences... Paper Type and Paper Size Using Web Image Monitor 39 Specifying a Custom Paper Size...39 Specifying Paper Type and Paper Size Using the Printer Driver 40 When Using Windows...40 When Using macOS...41 Supported Paper...43 Specifications of Printing...62 When Using Windows...62 When Using macOS......
Printing Documents What You Can Do with the Printer Function 57 Configuring Option Settings for the Printer...58 Conditions for Bidirectional Communication 58 If Bidirectional Communication is Disabled 58 Displaying the Printing Preferences Dialog Box 60 Displaying the Printing Preferences... Paper Type and Paper Size Using Web Image Monitor 39 Specifying a Custom Paper Size...39 Specifying Paper Type and Paper Size Using the Printer Driver 40 When Using Windows...40 When Using macOS...41 Supported Paper...43 Specifications of Printing...62 When Using Windows...62 When Using macOS......
Users Guide
Page 5
Print Quality Functions...68 Print Output Functions...69 4. Configuring the Machine Using the Control Panel Basic Operation...71 Menu Chart...72 Administrator Tools Menu...73 Printer Features Menu...75 List/Test Print...75 System...75 PCL Menu...76 PS Menu...78 System Settings Menu...79 Tray Paper Settings Menu...82 Network ...
Print Quality Functions...68 Print Output Functions...69 4. Configuring the Machine Using the Control Panel Basic Operation...71 Menu Chart...72 Administrator Tools Menu...73 Printer Features Menu...75 List/Test Print...75 System...75 PCL Menu...76 PS Menu...78 System Settings Menu...79 Tray Paper Settings Menu...82 Network ...

Users Guide
Page 7
... setting...184 Connecting the Machine to Inquire...149 7. Printing the Configuration Page...138 Configuration Page...138 Types of the Machine 172 Checking the Printer Driver Settings...173 Printer Problems...175 When You Cannot Print Properly...175 When You Cannot Print Clearly...177 When Paper Is Not Fed or Ejected Properly 179 Other...
... setting...184 Connecting the Machine to Inquire...149 7. Printing the Configuration Page...138 Configuration Page...138 Types of the Machine 172 Checking the Printer Driver Settings...173 Printer Problems...175 When You Cannot Print Properly...175 When You Cannot Print Clearly...177 When Paper Is Not Fed or Ejected Properly 179 Other...
Users Guide
Page 8
... Computer 194 Enabling and Disabling IPsec Using the Control Panel 196 Notes about the Toner...197 Specifications of the Machine...198 General Function Specifications...198 Printer Function Specifications...200 Paper Feed Unit PB1130...200 Consumables...201 Print Cartridge...201 Information for This Machine...202 User Information on Electrical & Electronic Equipment (mainly...
... Computer 194 Enabling and Disabling IPsec Using the Control Panel 196 Notes about the Toner...197 Specifications of the Machine...198 General Function Specifications...198 Printer Function Specifications...200 Paper Feed Unit PB1130...200 Consumables...201 Print Cartridge...201 Information for This Machine...202 User Information on Electrical & Electronic Equipment (mainly...

Users Guide
Page 15
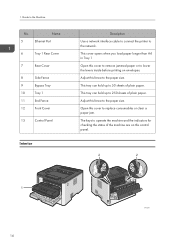
... and outlines their functions. Guide to connect with a wireless LAN when the machine's power is output here. USB Port Use a USB cable to connect the printer to prevent paper from falling off . Standard Tray Printed paper is turned off . USB Port for using the machine and its operating instructions. 1. Exterior 1 2 13...
... and outlines their functions. Guide to connect with a wireless LAN when the machine's power is output here. USB Port Use a USB cable to connect the printer to prevent paper from falling off . Standard Tray Printed paper is turned off . USB Port for using the machine and its operating instructions. 1. Exterior 1 2 13...
Users Guide
Page 16
... Cover 8 Side Fence 9 Bypass Tray 10 Tray 1 11 End Fence 12 Front Cover 13 Control Panel Interior Description Use a network interface cable to connect the printer to lower the levers inside before printing on this fence to 50 sheets of plain paper. This cover opens when you load paper longer than...
... Cover 8 Side Fence 9 Bypass Tray 10 Tray 1 11 End Fence 12 Front Cover 13 Control Panel Interior Description Use a network interface cable to connect the printer to lower the levers inside before printing on this fence to 50 sheets of plain paper. This cover opens when you load paper longer than...
Users Guide
Page 20
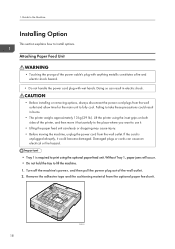
... the tray to take these precautions could become damaged. If the cord is required to print using the inset grips on both sides of the printer, and then move it horizontally to the place where you want to use it could result in electric shock. • Before installing or removing options... the machine. 1. Guide to the Machine Installing Option This section explains how to fully cool. Damaged plugs or cords can result in burns. • The printer weighs approximately 13 kg (29 lb.). Remove the adhesive tape and the cushioning material from the wall outlet. Lift the...
... the tray to take these precautions could become damaged. If the cord is required to print using the inset grips on both sides of the printer, and then move it horizontally to the place where you want to use it could result in electric shock. • Before installing or removing options... the machine. 1. Guide to the Machine Installing Option This section explains how to fully cool. Damaged plugs or cords can result in burns. • The printer weighs approximately 13 kg (29 lb.). Remove the adhesive tape and the cushioning material from the wall outlet. Lift the...
Users Guide
Page 21
... the power plug into the wall outlet, and then turn on the optional paper feed unit. For details, see the printer driver Help. • If the new device is listed in the printer driver. DYG316 5. Installing Option DYH001 4. Installing the Wireless LAN option • Before using the inset grips on both sides...
... the power plug into the wall outlet, and then turn on the optional paper feed unit. For details, see the printer driver Help. • If the new device is listed in the printer driver. DYG316 5. Installing Option DYH001 4. Installing the Wireless LAN option • Before using the inset grips on both sides...

Users Guide
Page 22
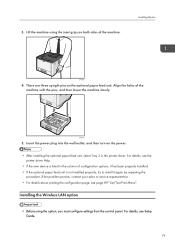
... LAN option. • Insert the wireless LAN option into the USB flash disk port of the front of the machine. • We recommend installing the printer driver on the machine. 5. 1. For details, see page 89 "List/Test Print Menu". • If the option was correctly installed by touching something metal to...
... LAN option. • Insert the wireless LAN option into the USB flash disk port of the front of the machine. • We recommend installing the printer driver on the machine. 5. 1. For details, see page 89 "List/Test Print Menu". • If the option was correctly installed by touching something metal to...
Users Guide
Page 27
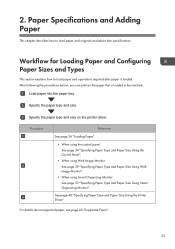
... about supported paper, see page 43 "Supported Paper". 25 Load paper into the paper tray. After following the procedures below, you can print on the printer driver. 2. Specify the paper type and size on the paper that is loaded. Procedure Reference See page 26 "Loading Paper". • When using the control... Monitor See page 37 "Specifying Paper Type and Paper Size Using Smart Organizing Monitor". See page 40 "Specifying Paper Type and Paper Size Using the Printer Driver". For details about their specifications. Specify the paper type and size.
... about supported paper, see page 43 "Supported Paper". 25 Load paper into the paper tray. After following the procedures below, you can print on the printer driver. 2. Specify the paper type and size on the paper that is loaded. Procedure Reference See page 26 "Loading Paper". • When using the control... Monitor See page 37 "Specifying Paper Type and Paper Size Using Smart Organizing Monitor". See page 40 "Specifying Paper Type and Paper Size Using the Printer Driver". For details about their specifications. Specify the paper type and size.
Users Guide
Page 28
... Make sure the paper stack does not exceed the upper limit mark inside the rear cover. Doing so may jam. Loading Paper into the printer. Excessive stacking can cause print quality problems when printing on paper other than envelopes. • Curled paper may damage the tray. •... paper tray (Tray 1). The same procedure applies to pull up the levers on the printer. • Do not move . 26 Straighten curled paper before loading. • After loading paper in the printer driver as specified on the machine rear, inside the paper tray. When printing a document...
... Make sure the paper stack does not exceed the upper limit mark inside the rear cover. Doing so may jam. Loading Paper into the printer. Excessive stacking can cause print quality problems when printing on paper other than envelopes. • Curled paper may damage the tray. •... paper tray (Tray 1). The same procedure applies to pull up the levers on the printer. • Do not move . 26 Straighten curled paper before loading. • After loading paper in the printer driver as specified on the machine rear, inside the paper tray. When printing a document...
Users Guide
Page 35
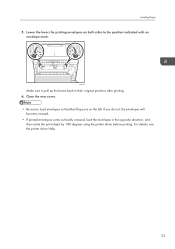
... out badly creased, load the envelopes in the opposite direction, and then rotate the print object by 180 degrees using the printer driver before printing. For details, see the printer driver Help. 33 Lower the levers for printing envelopes on both sides to load envelopes so that their original positions after printing...
... out badly creased, load the envelopes in the opposite direction, and then rotate the print object by 180 degrees using the printer driver before printing. For details, see the printer driver Help. 33 Lower the levers for printing envelopes on both sides to load envelopes so that their original positions after printing...
Users Guide
Page 36
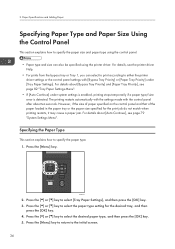
...Settings Menu". • If [Auto Continue] under [Tray Paper Settings]. For details about [Bypass Tray Priority] and [Paper Tray Priority], see the printer driver Help. • For prints from the bypass tray or Tray 1, you can also be specified using the control panel. • Paper type and... control panel after about ten seconds. 2. Press the [ ] or [ ] key to specify the paper size and paper type using the printer driver. Paper Specifications and Adding Paper Specifying Paper Type and Paper Size Using the Control Panel This section explains how to select the desired paper...
...Settings Menu". • If [Auto Continue] under [Tray Paper Settings]. For details about [Bypass Tray Priority] and [Paper Tray Priority], see the printer driver Help. • For prints from the bypass tray or Tray 1, you can also be specified using the control panel. • Paper type and... control panel after about ten seconds. 2. Press the [ ] or [ ] key to specify the paper size and paper type using the printer driver. Paper Specifications and Adding Paper Specifying Paper Type and Paper Size Using the Control Panel This section explains how to select the desired paper...

Users Guide
Page 37
... paper size. • Custom size paper cannot be loaded in tray 2. • When you perform printing, make sure that the paper size specified with the printer driver matches the paper size specified with the control panel. Press the [Menu] key to return to select the desired paper size, and then press...
... paper size. • Custom size paper cannot be loaded in tray 2. • When you perform printing, make sure that the paper size specified with the printer driver matches the paper size specified with the control panel. Press the [Menu] key to return to select the desired paper size, and then press...
Users Guide
Page 39
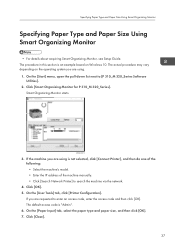
...the access code and then click [OK]. M0ESOC8113 3. If the machine you are using is "Admin". 6. On the [User Tools] tab, click [Printer Configuration]. On the [Start] menu, open the pull-down list next to search the machine via the network. 4. Specifying Paper Type and Paper Size ...about acquiring Smart Organizing Monitor, see Setup Guide. Click [Smart Organizing Monitor for P 310_M 320_Series]. The default access code is not selected, click [Connect Printer], and then do one of the following: • Select the machine's model. • Enter the IP address of the machine manually. • ...
...the access code and then click [OK]. M0ESOC8113 3. If the machine you are using is "Admin". 6. On the [User Tools] tab, click [Printer Configuration]. On the [Start] menu, open the pull-down list next to search the machine via the network. 4. Specifying Paper Type and Paper Size ...about acquiring Smart Organizing Monitor, see Setup Guide. Click [Smart Organizing Monitor for P 310_M 320_Series]. The default access code is not selected, click [Connect Printer], and then do one of the following: • Select the machine's model. • Enter the IP address of the machine manually. • ...

Users Guide
Page 40
... machine via the network. 4. Click [OK]. 5. Click [OK]. 10. On the [User Tools] tab, click [Printer Configuration]. The default access code is not selected, click [Connect Printer], and then do one of the following: • Select the machine's model. • Enter the IP address of ...the machine manually. • Click [Search Network Printer] to [P 310_M 320_Series Software Utilities]. 2. On the [Paper Input] tab, select [Custom Paper Size] in the [Paper Size] list. 7. Click [Close...
... machine via the network. 4. Click [OK]. 5. Click [OK]. 10. On the [User Tools] tab, click [Printer Configuration]. The default access code is not selected, click [Connect Printer], and then do one of the following: • Select the machine's model. • Enter the IP address of ...the machine manually. • Click [Search Network Printer] to [P 310_M 320_Series Software Utilities]. 2. On the [Paper Input] tab, select [Custom Paper Size] in the [Paper Size] list. 7. Click [Close...
Users Guide
Page 42
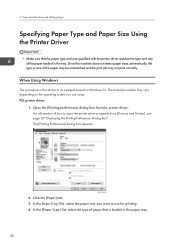
... how to use for printing. 4. When Using Windows The procedure in the paper tray. 40 Open the [Printing preferences] dialog box from [Devices and Printers], see page 60 "Displaying the Printing Preferences Dialog Box". M0ESDC8105 2. In the [Input Tray:] list, select the paper tray you are using. 2.... Paper Specifications and Adding Paper Specifying Paper Type and Paper Size Using the Printer Driver • Make sure that is loaded in this machine does not detect paper sizes automatically, the type or size of the paper loaded ...
... how to use for printing. 4. When Using Windows The procedure in the paper tray. 40 Open the [Printing preferences] dialog box from [Devices and Printers], see page 60 "Displaying the Printing Preferences Dialog Box". M0ESDC8105 2. In the [Input Tray:] list, select the paper tray you are using. 2.... Paper Specifications and Adding Paper Specifying Paper Type and Paper Size Using the Printer Driver • Make sure that is loaded in this machine does not detect paper sizes automatically, the type or size of the paper loaded ...
Users Guide
Page 43
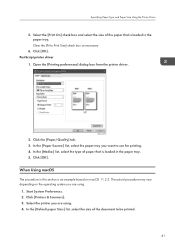
.... In the [Media:] list, select the type of the document to be printed. 41 Start System Preferences. 2. Click [OK]. Click [Printers & Scanners]. 3. PostScript printer driver 1. In the [Paper Source:] list, select the paper tray you are using . 1. When Using macOS The procedure in the paper tray.... 5. M0ESDC8106 2. Specifying Paper Type and Paper Size Using the Printer Driver 5. In the [Default paper Size:] list, select the size of paper that is loaded in this section is an example based ...
.... In the [Media:] list, select the type of the document to be printed. 41 Start System Preferences. 2. Click [OK]. Click [Printers & Scanners]. 3. PostScript printer driver 1. In the [Paper Source:] list, select the paper tray you are using . 1. When Using macOS The procedure in the paper tray.... 5. M0ESDC8106 2. Specifying Paper Type and Paper Size Using the Printer Driver 5. In the [Default paper Size:] list, select the size of paper that is loaded in this section is an example based ...


