Users Guide
Page 12
... the first time. See page 131 "Configuring the Administrator Settings". • FTP Password This is the password for operations such as printing via FTP and firmware updates. This can be changed in [Admin. For the default password, see Setup Guide. • Admin. Tools Lock. See page 110 "Configuring the Network Settings". User restriction You...
... the first time. See page 131 "Configuring the Administrator Settings". • FTP Password This is the password for operations such as printing via FTP and firmware updates. This can be changed in [Admin. For the default password, see Setup Guide. • Admin. Tools Lock. See page 110 "Configuring the Network Settings". User restriction You...
Users Guide
Page 76
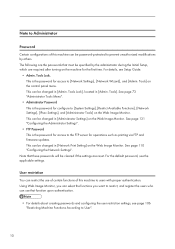
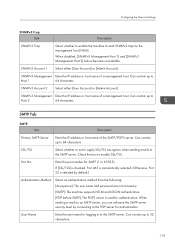
...[Network Settings], [Network Wizard], and [Admin. Tools Lock Specifies an eight-digit password for the first time. Press the [OK] key to execute. Default: [P 310/M 320] • P 310/M 320 • Universal Admin. Default: [On] • On (00000000 to 99999999) • Off IPsec Selects ... to [Universal] when using the normal driver. The password must be specified during the Initial Setup, which is specified under [Admin. For details, see Setup Guide. Default: [Inactive] • Inactive • Active 74 The default password is "00000000". 4. Press the [Back] key to...
...[Network Settings], [Network Wizard], and [Admin. Tools Lock Specifies an eight-digit password for the first time. Press the [OK] key to execute. Default: [P 310/M 320] • P 310/M 320 • Universal Admin. Default: [On] • On (00000000 to 99999999) • Off IPsec Selects ... to [Universal] when using the normal driver. The password must be specified during the Initial Setup, which is specified under [Admin. For details, see Setup Guide. Default: [Inactive] • Inactive • Active 74 The default password is "00000000". 4. Press the [Back] key to...
Users Guide
Page 88
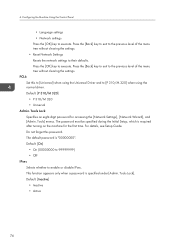
...• 2.4 GHz • 5 GHz IPv4 Configuration • DHCP Sets the machine to check the current IP address when DHCP is not used . Default: XXX.XXX.XXX.XXX The numbers represented by "X" vary according to your network environment. • Subnet Mask Specifies the machine's subnet mask when DHCP ...is used . Use this menu to set a password for Wi-Fi Direct. • Wi-Fi Direct Type Select 2.4 GHz or 5 GHz as the SSID and the wireless signal strength. • Input SSID ...
...• 2.4 GHz • 5 GHz IPv4 Configuration • DHCP Sets the machine to check the current IP address when DHCP is not used . Default: XXX.XXX.XXX.XXX The numbers represented by "X" vary according to your network environment. • Subnet Mask Specifies the machine's subnet mask when DHCP ...is used . Use this menu to set a password for Wi-Fi Direct. • Wi-Fi Direct Type Select 2.4 GHz or 5 GHz as the SSID and the wireless signal strength. • Input SSID ...
Users Guide
Page 94
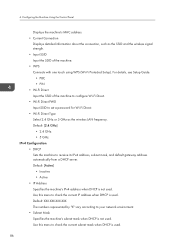
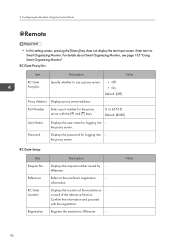
...Description Value RC Gate ProxySvr. RC Gate Setup Item Request No. Registers the machine to use a proxy server. • Off • On Default: [Off] Proxy Address Displays proxy server address. - Configuring the Machine Using the Control Panel @Remote • In this setting screen, pressing the... Organizing Monitor. information. Port Number Enter a port number for the proxy server with the registration. Value 92 Refers to 65535) Default: [8080] User Name Displays the user name for logging into the proxy server. Displays the location of the machine as a result...
...Description Value RC Gate ProxySvr. RC Gate Setup Item Request No. Registers the machine to use a proxy server. • Off • On Default: [Off] Proxy Address Displays proxy server address. - Configuring the Machine Using the Control Panel @Remote • In this setting screen, pressing the... Organizing Monitor. information. Port Number Enter a port number for the proxy server with the registration. Value 92 Refers to 65535) Default: [8080] User Name Displays the user name for logging into the proxy server. Displays the location of the machine as a result...

Users Guide
Page 114
...5222, 5353, 6006, 28900, 29102, 49999, and 53550 (default is "sysadm". • Password Password for the first time. The password must be used for raw printing. The valid range is redirected to 32 characters. The default password is required after turning on the machine for logging in to make... Configuring the Machine Using Utilities Network Application Tab Network Print Setting Item Description IPP Select to the FTP server. The default name is 9100). For details, see Setup Guide. 5. Note that Port 80 cannot be specified during the Initial Setup, which is ...
...5222, 5353, 6006, 28900, 29102, 49999, and 53550 (default is "sysadm". • Password Password for the first time. The password must be used for raw printing. The valid range is redirected to 32 characters. The default password is required after turning on the machine for logging in to make... Configuring the Machine Using Utilities Network Application Tab Network Print Setting Item Description IPP Select to the FTP server. The default name is 9100). For details, see Setup Guide. 5. Note that Port 80 cannot be specified during the Initial Setup, which is ...
Users Guide
Page 121
... the user name for SMTP (1 to an SMTP server, you can enhance the SMTP server security level by default.) Authentication Method Select an authentication method from the following: [Anonymous]: The user name and password are not necessary. [SMTP]: The machine supports NTLM and LOGIN authentication. [POP before SMTP]: The POP3 server is...
... the user name for SMTP (1 to an SMTP server, you can enhance the SMTP server security level by default.) Authentication Method Select an authentication method from the following: [Anonymous]: The user name and password are not necessary. [SMTP]: The machine supports NTLM and LOGIN authentication. [POP before SMTP]: The POP3 server is...
Users Guide
Page 122
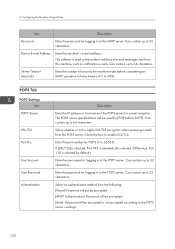
...method from the POP3 server. Can contain up to 65535). Device E-mail Address Enter the machine's e-mail address. This address is selected by default.) Enter the user name for POP3 (1 to 32 characters. Enter the port number for logging in to 64 characters. Select whether or not... to the POP3 server. Enter the password for e-mail reception. User Account User Password Authentication Description Enter the IP address or host name of the POP3 server for logging in to apply SSL/TLS encryption...
...method from the POP3 server. Can contain up to 65535). Device E-mail Address Enter the machine's e-mail address. This address is selected by default.) Enter the user name for POP3 (1 to 32 characters. Enter the port number for logging in to 64 characters. Select whether or not... to the POP3 server. Enter the password for e-mail reception. User Account User Password Authentication Description Enter the IP address or host name of the POP3 server for logging in to apply SSL/TLS encryption...

Users Guide
Page 128
..."Drop", or "Require Security". 126 "ping" command (echo request and echo reply) is specified. Select whether to display the page for the default IPsec policy. This page contains the following : [Active]: All ICMP packets will be bypassed without IPsec protection. Name Address Settings Action Description IPsec policy...) from the following tabs: [IPsec Global Settings] and [IPsec Policy List]. • This function is available only when an administrator password is not encapsulated by IPsec. [Inactive]: Some ICMP message types will be bypassed without IPsec protection. 5.
..."Drop", or "Require Security". 126 "ping" command (echo request and echo reply) is specified. Select whether to display the page for the default IPsec policy. This page contains the following : [Active]: All ICMP packets will be bypassed without IPsec protection. Name Address Settings Action Description IPsec policy...) from the following tabs: [IPsec Global Settings] and [IPsec Policy List]. • This function is available only when an administrator password is not encapsulated by IPsec. [Inactive]: Some ICMP message types will be bypassed without IPsec protection. 5.
Users Guide
Page 133
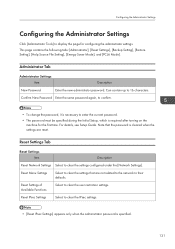
... Tab Reset Settings Item Description Reset Network Settings Select to clear the user restriction settings. Confirm New Password Enter the same password again, to confirm. • To change the password, it is necessary to clear the IPsec settings. • [Reset IPsec Settings] appears only when... settings. Reset IPsec Settings Select to enter the current password. • The password must be specified during the Initial Setup, which is specified. 131 Reset Menu Settings Select to their defaults. Note that the password is cleared when the settings are not related to the...
... Tab Reset Settings Item Description Reset Network Settings Select to clear the user restriction settings. Confirm New Password Enter the same password again, to confirm. • To change the password, it is necessary to clear the IPsec settings. • [Reset IPsec Settings] appears only when... settings. Reset IPsec Settings Select to enter the current password. • The password must be specified during the Initial Setup, which is specified. 131 Reset Menu Settings Select to their defaults. Note that the password is cleared when the settings are not related to the...
Users Guide
Page 134
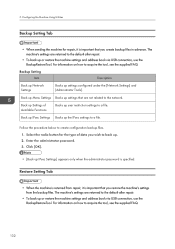
...book via USB connection, use the BackupRestoreTool. Follow the procedure below to the default after repair. • To back up settings configured under the [Network Settings] and [Administrator Tools]. Enter the administrator password. 3. The machine's settings are returned to acquire the tool, see the ...supplied FAQ. Click [OK]. • [Back up IPsec Settings] appears only when the administrator password is important that you restore the machine's settings from repair, it is important that are returned to create configuration backup files. 1....
...book via USB connection, use the BackupRestoreTool. Follow the procedure below to the default after repair. • To back up settings configured under the [Network Settings] and [Administrator Tools]. Enter the administrator password. 3. The machine's settings are returned to acquire the tool, see the ...supplied FAQ. Click [OK]. • [Back up IPsec Settings] appears only when the administrator password is important that you restore the machine's settings from repair, it is important that are returned to create configuration backup files. 1....
Users Guide
Page 195
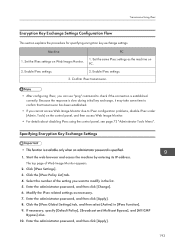
... 193 Specifying Encryption Key Exchange Settings • This function is available only when an administrator password is established correctly. Select the number of Web Image Monitor appears. 2. Enter the administrator password, and then click [Apply]. 8. Set the IPsec settings on the control panel, and...can use "ping" command to IPsec configuration problems, disable IPsec under [Admin. Click [IPsec Settings]. 3. Enter the administrator password, and then click [Change]. 6. If necessary, specify [Default Policy], [Broadcast and Multicast Bypass], and [All ICMP Bypass] also. 10.
... 193 Specifying Encryption Key Exchange Settings • This function is available only when an administrator password is established correctly. Select the number of Web Image Monitor appears. 2. Enter the administrator password, and then click [Apply]. 8. Set the IPsec settings on the control panel, and...can use "ping" command to IPsec configuration problems, disable IPsec under [Admin. Click [IPsec Settings]. 3. Enter the administrator password, and then click [Change]. 6. If necessary, specify [Default Policy], [Broadcast and Multicast Bypass], and [All ICMP Bypass] also. 10.
Users Guide
Page 196
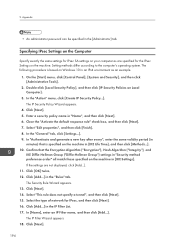
...the [Start] menu, click [Control Panel], [System and Security], and then click [Administrative Tools]. 2. Click [Next]. 5. Clear the "Activate the default response rule" check box, and then click [Next]. 7. Select "Edit properties", and then click [Finish]. 8. In the "General" tab, click ... then click [Next]. 6. Setting methods differ according to the computer's operating system. Click [OK] twice. 12. Appendix • An administrator password can be specified in an IPv4 environment as are not displayed, click [Add...]. 11. The following procedure is specified on Windows 10 in the ...
...the [Start] menu, click [Control Panel], [System and Security], and then click [Administrative Tools]. 2. Click [Next]. 5. Clear the "Activate the default response rule" check box, and then click [Next]. 7. Select "Edit properties", and then click [Finish]. 8. In the "General" tab, click ... then click [Next]. 6. Setting methods differ according to the computer's operating system. Click [OK] twice. 12. Appendix • An administrator password can be specified in an IPv4 environment as are not displayed, click [Add...]. 11. The following procedure is specified on Windows 10 in the ...
Users Guide
Page 213
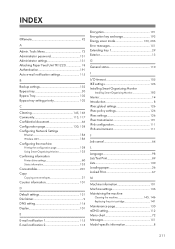
INDEX @Remote 92 A Admin. Tools Menu 73 Administrator password 131 Administrator settings 131 Attaching Paper Feed Unit TK1220 18 Authentication 191 Auto e-mail notification settings 115 B Backup settings 132 Bypass ... 138 Using Smart Organizing Monitor 135 Confirming information Printer driver settings 60 Status information 135 Consumables 201 Copy Copying onto envelopes 31 Counter information 101 D Default settings 131 Disclaimer 9 DNS setting 114 Duplex 101 E E-mail notification 1 115 E-mail notification 2 115 Encryption 191 Encryption key exchange 193 Energy saver...
INDEX @Remote 92 A Admin. Tools Menu 73 Administrator password 131 Administrator settings 131 Attaching Paper Feed Unit TK1220 18 Authentication 191 Auto e-mail notification settings 115 B Backup settings 132 Bypass ... 138 Using Smart Organizing Monitor 135 Confirming information Printer driver settings 60 Status information 135 Consumables 201 Copy Copying onto envelopes 31 Counter information 101 D Default settings 131 Disclaimer 9 DNS setting 114 Duplex 101 E E-mail notification 1 115 E-mail notification 2 115 Encryption 191 Encryption key exchange 193 Energy saver...
Firmware Update Guide
Page 10
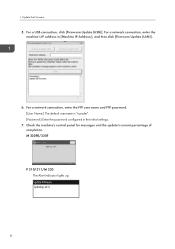
For a network connection, enter the FTP user name and FTP password. [User Name:] The default username is "sysadm". [Password:] Enter the password configured in [Machine IP Address:], and then click [Firmware Update (LAN)]. 6. For a network connection, enter the machine's IP address in the initial settings. 7. 1. M 320FB/320F P 310/311/M 320 The Alert indicator lights up. 8 For a USB connection, click [Firmware Update (USB)]. Check the machine's control panel for messages and the update's current percentage of completion. Update the Firmware 5.
For a network connection, enter the FTP user name and FTP password. [User Name:] The default username is "sysadm". [Password:] Enter the password configured in [Machine IP Address:], and then click [Firmware Update (LAN)]. 6. For a network connection, enter the machine's IP address in the initial settings. 7. 1. M 320FB/320F P 310/311/M 320 The Alert indicator lights up. 8 For a USB connection, click [Firmware Update (USB)]. Check the machine's control panel for messages and the update's current percentage of completion. Update the Firmware 5.
Wi-Fi Direct Guide
Page 10
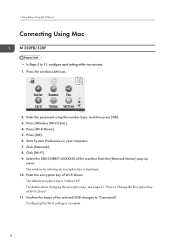
Easy Setup Using Wi-Fi Direct Connecting Using Mac M 320FB/320F • In Steps 5 to "Connected". The default encryption key is complete. 8 Confirm the status of Wi-Fi Direct. Enter the password using the number keys, and then press [OK]. 3. Press [Wireless (Wi-Fi) Sett.]. 4. Select the SSID (DIRECT-XXXXXX) of Wi-Fi...
Easy Setup Using Wi-Fi Direct Connecting Using Mac M 320FB/320F • In Steps 5 to "Connected". The default encryption key is complete. 8 Confirm the status of Wi-Fi Direct. Enter the password using the number keys, and then press [OK]. 3. Press [Wireless (Wi-Fi) Sett.]. 4. Select the SSID (DIRECT-XXXXXX) of Wi-Fi...
Wi-Fi Direct Guide
Page 13
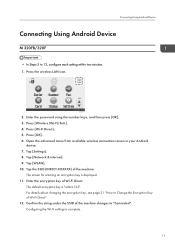
...admin123". Enter the encryption key of the machine changes to "Connected". Confirm the string under the SSID of Wi-Fi Direct. Enter the password using the number keys, and then press [OK]. 3. Press [Wi-Fi Direct]. 5. Open the advanced menu from available wireless connection ...screen in your Android device. 7. Tap [Network & internet]. 9. The default encryption key is displayed. 11. For details about changing the encryption key, see page 21 "How to 12, configure each setting within two minutes. ...
...admin123". Enter the encryption key of the machine changes to "Connected". Confirm the string under the SSID of Wi-Fi Direct. Enter the password using the number keys, and then press [OK]. 3. Press [Wi-Fi Direct]. 5. Open the advanced menu from available wireless connection ...screen in your Android device. 7. Tap [Network & internet]. 9. The default encryption key is displayed. 11. For details about changing the encryption key, see page 21 "How to 12, configure each setting within two minutes. ...
Wi-Fi Direct Guide
Page 25
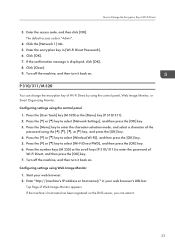
... using the or [ ] key, and press the [OK] key. 4. Press the number keys (M 320) or the scroll keys (P 310/311) to enter the password of Wi-Fi Direct by using Web Image Monitor 1. Turn off the machine, and then turn it back on . Enter "http://(machine's IP address...OK] key. 6. Click [Close]. 9. Press the [User Tools] key (M 320) or the [Menu] key (P 310/311). 2. Configuring settings using the control panel, Web Image Monitor, or Smart Organizing Monitor. The default access code is displayed, click [OK]. 8. Start your web browser's URL bar. Press the [ ] or [ ] key ...
... using the or [ ] key, and press the [OK] key. 4. Press the number keys (M 320) or the scroll keys (P 310/311) to enter the password of Wi-Fi Direct by using Web Image Monitor 1. Turn off the machine, and then turn it back on . Enter "http://(machine's IP address...OK] key. 6. Click [Close]. 9. Press the [User Tools] key (M 320) or the [Menu] key (P 310/311). 2. Configuring settings using the control panel, Web Image Monitor, or Smart Organizing Monitor. The default access code is displayed, click [OK]. 8. Start your web browser's URL bar. Press the [ ] or [ ] key ...
Wi-Fi Direct Guide
Page 27
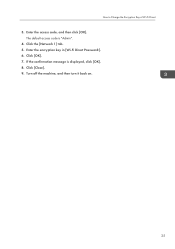
Click [OK]. 7. Turn off the machine, and then turn it back on. 25 How to Change the Encryption Key of Wi-Fi Direct 3. Enter the access code, and then click [OK]. The default access code is displayed, click [OK]. 8. Enter the encryption key in [Wi-Fi Direct Password:]. 6. Click [Close]. 9. Click the [Network 1] tab. 5. If the confirmation message is "Admin". 4.
Click [OK]. 7. Turn off the machine, and then turn it back on. 25 How to Change the Encryption Key of Wi-Fi Direct 3. Enter the access code, and then click [OK]. The default access code is displayed, click [OK]. 8. Enter the encryption key in [Wi-Fi Direct Password:]. 6. Click [Close]. 9. Click the [Network 1] tab. 5. If the confirmation message is "Admin". 4.


