Printer Reference
Page 2
... quality, the supplier recommends that might not be sure to connect the power cord to a power source as above. If you use genuine master and ink from the supplier with your safety and benefit, read this manual are employed in this manual. Copying or printing the following items is prohibited by...
... quality, the supplier recommends that might not be sure to connect the power cord to a power source as above. If you use genuine master and ink from the supplier with your safety and benefit, read this manual are employed in this manual. Copying or printing the following items is prohibited by...

Printer Reference
Page 4
... Problems When Using Combine Mode 70 Loading Paper into the Paper Feed Tray 71 Replenishing Paper 71 Changing the Paper Size 72 When the Add Ink Indicator (j) Lights 73 Master Roll Replacement 77 Placing a New Roll of Optional Auto Document Feeder is Open 94 Master Eject Unit is Open 94 Cover...
... Problems When Using Combine Mode 70 Loading Paper into the Paper Feed Tray 71 Replenishing Paper 71 Changing the Paper Size 72 When the Add Ink Indicator (j) Lights 73 Master Roll Replacement 77 Placing a New Roll of Optional Auto Document Feeder is Open 94 Master Eject Unit is Open 94 Cover...
Printer Reference
Page 8
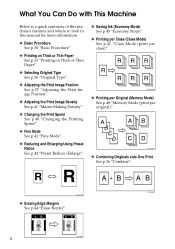
... "Changing the Printing Speed". ❖ Fine Mode See p.42 "Fine Mode". ❖ Reducing and Enlarging Using Preset Ratios See p.42 "Preset Reduce/Enlarge". ❖ Saving Ink (Economy Mode) See p.45 "Economy Mode". ❖ Printing per Class (Class Mode) See p.47 "Class Mode (print per original)". A B C D AB CD GRCLAS1E ❖ Combining Originals...
... "Changing the Printing Speed". ❖ Fine Mode See p.42 "Fine Mode". ❖ Reducing and Enlarging Using Preset Ratios See p.42 "Preset Reduce/Enlarge". ❖ Saving Ink (Economy Mode) See p.45 "Economy Mode". ❖ Printing per Class (Class Mode) See p.47 "Class Mode (print per original)". A B C D AB CD GRCLAS1E ❖ Combining Originals...
Printer Reference
Page 12
...Unplug the power cord from humidity and dust. While moving the machine, you should take place at an authorized dealer. • When disposing of a used ink container, reattach the cap to cause an injury. • If you use the machine in a confined space, make sure there is ingested, induce vomiting...caster fixture to fix it topples over, an injury might occur. • Our products are hard to remove. • Be careful not to get ink on your eyes, rinse immediately in place. Disposal can take care that you disconnect the power plug from splattering. • Be careful not to ...
...Unplug the power cord from humidity and dust. While moving the machine, you should take place at an authorized dealer. • When disposing of a used ink container, reattach the cap to cause an injury. • If you use the machine in a confined space, make sure there is ingested, induce vomiting...caster fixture to fix it topples over, an injury might occur. • Our products are hard to remove. • Be careful not to get ink on your eyes, rinse immediately in place. Disposal can take care that you disconnect the power plug from splattering. • Be careful not to ...
Printer Reference
Page 16
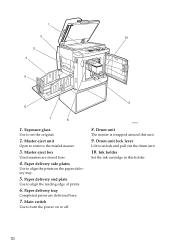
... prints are stored here. 4. Main switch Use to align the leading edge of prints. 6. Drum unit lock lever Lift to set the original. 2. Ink holder Set the ink cartridge in this unit. 9. Drum unit The master is wrapped around this holder. 10 Exposure glass Use to unlock and pull out the drum...
... prints are stored here. 4. Main switch Use to align the leading edge of prints. 6. Drum unit lock lever Lift to set the original. 2. Ink holder Set the ink cartridge in this unit. 9. Drum unit The master is wrapped around this holder. 10 Exposure glass Use to unlock and pull out the drum...

Printer Reference
Page 18
...See p.44 "Erase Border". 4. {User Tools} key Press to change the default settings to make prints darker or lighter. j: Add Ink indicator See p.73 "When the Add Ink Indicator (j) Lights". C: Master End indicator See p.95 "When the Master End Indicator (C) Lights and a Message is Displayed". 7. Counter ...p.71 "Loading Paper into the Paper Feed Tray". While printing, it shows the remainder that is to be printed. 10. {U}{T} keys Press to save ink. See p.41 "Master Making Density". 6. Panel Display The panel display shows the machine status, error messages, and function menus. 8. {Cancel} key ...
...See p.44 "Erase Border". 4. {User Tools} key Press to change the default settings to make prints darker or lighter. j: Add Ink indicator See p.73 "When the Add Ink Indicator (j) Lights". C: Master End indicator See p.95 "When the Master End Indicator (C) Lights and a Message is Displayed". 7. Counter ...p.71 "Loading Paper into the Paper Feed Tray". While printing, it shows the remainder that is to be printed. 10. {U}{T} keys Press to save ink. See p.41 "Master Making Density". 6. Panel Display The panel display shows the machine status, error messages, and function menus. 8. {Cancel} key ...
Printer Reference
Page 26
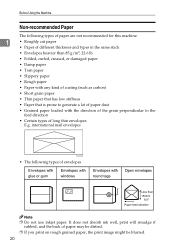
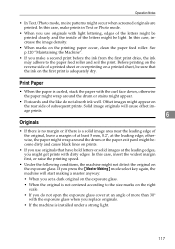
...; Grained paper loaded with the direction of the grain perpendicular to the feed direction • Certain types of long thin envelopes. It does not absorb ink well, print will smudge if rubbed, and the back of paper may be dirtied. ❒ If you print on rough grained paper, the print image...
...; Grained paper loaded with the direction of the grain perpendicular to the feed direction • Certain types of long thin envelopes. It does not absorb ink well, print will smudge if rubbed, and the back of paper may be dirtied. ❒ If you print on rough grained paper, the print image...

Printer Reference
Page 38
... Reset Timer" on p.106 "2 System". ❒ In the following cases, Auto Reset will not shift automatically to Energy Saver mode. • If there is no ink • If originals or paper are jammed • If the machine has not finished making masters or prints • If the machine is printing the... or prints • If the machine is printing the second page of a Combine print • If there is no paper • If there is no ink ❒ You can change the waiting time within a range of making changes to the user tools • If you have set ". for entering a user code...
... Reset Timer" on p.106 "2 System". ❒ In the following cases, Auto Reset will not shift automatically to Energy Saver mode. • If there is no ink • If originals or paper are jammed • If the machine has not finished making masters or prints • If the machine is printing the... or prints • If the machine is printing the second page of a Combine print • If there is no paper • If there is no ink ❒ You can change the waiting time within a range of making changes to the user tools • If you have set ". for entering a user code...
Printer Reference
Page 51
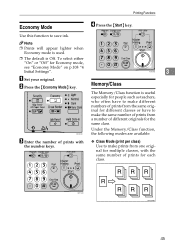
... with the same number of prints from one original for multiple classes, with the number keys. ❖ Class Mode (print per class) Use to save ink. Printing Functions Economy Mode D Press the {Start} key. Memory/Class ANT128S 3 The Memory/Class function is Off. Note ❒ Prints will appear lighter when Economy...
... with the same number of prints from one original for multiple classes, with the number keys. ❖ Class Mode (print per class) Use to save ink. Printing Functions Economy Mode D Press the {Start} key. Memory/Class ANT128S 3 The Memory/Class function is Off. Note ❒ Prints will appear lighter when Economy...
Printer Reference
Page 73
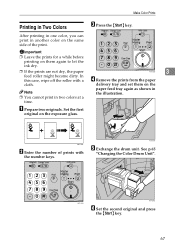
... in two colors at a time. In this case, wipe off the roller with the number keys. delivery tray and set them again to let the ink dry. ❒ If the prints are not dry, the paper ANT128S 3 D feed roller might become dirty. ANT054S ANT122S F Set the second original and press the...
... in two colors at a time. In this case, wipe off the roller with the number keys. delivery tray and set them again to let the ink dry. ❒ If the prints are not dry, the paper ANT128S 3 D feed roller might become dirty. ANT054S ANT122S F Set the second original and press the...
Printer Reference
Page 79
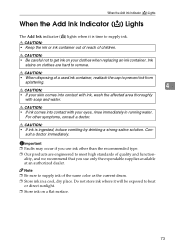
... soap and water. R CAUTION: • If ink comes into contact with ink, wash the affected area thoroughly with your clothes when replacing an ink container. sult a doctor immediately. Note ❒ Be sure to supply ink. Do not store ink where it is ingested, induce vomiting by drinking a... strong saline solution. R CAUTION: • Keep the ink or ink container out of reach of the ...
... soap and water. R CAUTION: • If ink comes into contact with ink, wash the affected area thoroughly with your clothes when replacing an ink container. sult a doctor immediately. Note ❒ Be sure to supply ink. Do not store ink where it is ingested, induce vomiting by drinking a... strong saline solution. R CAUTION: • Keep the ink or ink container out of reach of the ...
Printer Reference
Page 80
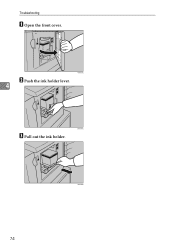
Troubleshooting A Open the front cover. ANT089S 74 ANT057S B Push the ink holder lever. 4 ANT060S C Pull out the ink holder.
Troubleshooting A Open the front cover. ANT089S 74 ANT057S B Push the ink holder lever. 4 ANT060S C Pull out the ink holder.
Printer Reference
Page 81
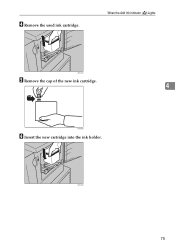
D Remove the used ink cartridge. ANT092S 75 When the Add Ink Indicator (j) Lights ANT091S E Remove the cap of the new ink cartridge. 4 ANT098S F Insert the new cartridge into the ink holder.
D Remove the used ink cartridge. ANT092S 75 When the Add Ink Indicator (j) Lights ANT091S E Remove the cap of the new ink cartridge. 4 ANT098S F Insert the new cartridge into the ink holder.
Printer Reference
Page 82
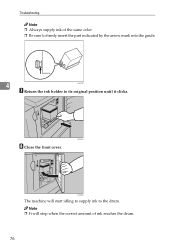
Troubleshooting Note ❒ Always supply ink of ink reaches the drum. 76 Note ❒ It will start idling to supply ink to its original position until it clicks. ANT059S The machine will stop when the correct amount of the same color. ❒ Be sure to firmly insert the part indicated by the arrow mark into the guide. 4 ANT097S G Return the ink holder to the drum. ANT090S H Close the front cover.
Troubleshooting Note ❒ Always supply ink of ink reaches the drum. 76 Note ❒ It will start idling to supply ink to its original position until it clicks. ANT059S The machine will stop when the correct amount of the same color. ❒ Be sure to firmly insert the part indicated by the arrow mark into the guide. 4 ANT097S G Return the ink holder to the drum. ANT090S H Close the front cover.
Printer Reference
Page 97
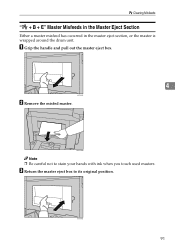
ZFRH120E Note ❒ Be careful not to its original position. ANT096S 91 C Return the master eject box to stain your hands with ink when you touch used masters. A Grip the handle and pull out the master eject box. 4 ANT095S B Remove the misfed master. x Clearing Misfeeds "x + B + E" Master Misfeeds in the Master Eject Section Either a master misfeed has occurred in the master eject section, or the master is wrapped around the drum unit.
ZFRH120E Note ❒ Be careful not to its original position. ANT096S 91 C Return the master eject box to stain your hands with ink when you touch used masters. A Grip the handle and pull out the master eject box. 4 ANT095S B Remove the misfed master. x Clearing Misfeeds "x + B + E" Master Misfeeds in the Master Eject Section Either a master misfeed has occurred in the master eject section, or the master is wrapped around the drum unit.
Printer Reference
Page 104
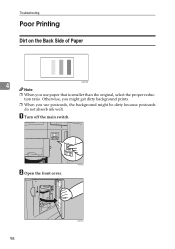
Troubleshooting Poor Printing Dirt on the Back Side of Paper 4 Note GRDIRT0E ❒ When you use postcards, the background might get dirty background prints. ❒ When you use paper that is smaller than the original, select the proper reduction ratio. A Turn off the main switch. ANT076S B Open the front cover. 98 ANT057S Otherwise, you might be dirty because postcards do not absorb ink well.
Troubleshooting Poor Printing Dirt on the Back Side of Paper 4 Note GRDIRT0E ❒ When you use postcards, the background might get dirty background prints. ❒ When you use paper that is smaller than the original, select the proper reduction ratio. A Turn off the main switch. ANT076S B Open the front cover. 98 ANT057S Otherwise, you might be dirty because postcards do not absorb ink well.
Printer Reference
Page 121
... done, feed roller marks will appear on the print image. • If the machine is not consistent, slow the printing speed down to let the ink dry on the drum might decrease. If this case, slow the printing speed down to Setting 1. • When performing duplex or multicolored printing, leave the... 2. 115 Make extra prints until the image density recovers. • When the machine is used for a long period, the image density might decrease because the ink on the printed paper.
... done, feed roller marks will appear on the print image. • If the machine is not consistent, slow the printing speed down to let the ink dry on the drum might decrease. If this case, slow the printing speed down to Setting 1. • When performing duplex or multicolored printing, leave the... 2. 115 Make extra prints until the image density recovers. • When the machine is used for a long period, the image density might decrease because the ink on the printed paper.
Printer Reference
Page 122
...; Also, be wrapped around the drum or cause misfeeds. • If your clothing while emptying the master eject box or while loading a new ink cartridge. • The image density varies according to the printing speed and the room temperature. So, adjust the printing speed or increase the room ...prints. In this case, make a new master with lighter image density mode. • If you make sure the supply from a small image, ink might malfunction and fail to detect the paper. Remarks • When making duplex prints, misdetection of paper wrapping might stick to the back side of...
...; Also, be wrapped around the drum or cause misfeeds. • If your clothing while emptying the master eject box or while loading a new ink cartridge. • The image density varies according to the printing speed and the room temperature. So, adjust the printing speed or increase the room ...prints. In this case, make a new master with lighter image density mode. • If you make sure the supply from a small image, ink might malfunction and fail to detect the paper. Remarks • When making duplex prints, misdetection of paper wrapping might stick to the back side of...
Printer Reference
Page 123
... the Machine". • If you make prints in Text or Photo mode. • When you might appear. • Postcards and the like do not absorb ink well. If you press the {Master Making} mode select key again, the machine will cause offset image prints. 6 Originals • If there is no margin... and the inside of the letters might appear on the rear side of at least 5 mm, 0.2", at the leading edges, you use originals that the ink on a printed sheet, be sure that have bold letters or solid images at the leading edge; otherwise, the paper might wrap around the drum or...
... the Machine". • If you make prints in Text or Photo mode. • When you might appear. • Postcards and the like do not absorb ink well. If you press the {Master Making} mode select key again, the machine will cause offset image prints. 6 Originals • If there is no margin... and the inside of the letters might appear on the rear side of at least 5 mm, 0.2", at the leading edges, you use originals that the ink on a printed sheet, be sure that have bold letters or solid images at the leading edge; otherwise, the paper might wrap around the drum or...
Printer Reference
Page 134
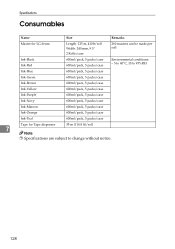
...°C, 10 to 95%RH Ink-Blue 600ml/pack, 5 packs/case Ink-Green 600ml/pack, 5 packs/case Ink-Brown 600ml/pack, 5 packs/case Ink-Yellow 600ml/pack, 5 packs/case Ink-Purple 600ml/pack, 5 packs/case Ink-Navy 600ml/pack, 5 packs/case Ink-Maroon 600ml/pack, 5 packs/case Ink-Orange 600ml/pack, 5 packs/case Ink-Teal 600ml/pack, 5 packs/case...
...°C, 10 to 95%RH Ink-Blue 600ml/pack, 5 packs/case Ink-Green 600ml/pack, 5 packs/case Ink-Brown 600ml/pack, 5 packs/case Ink-Yellow 600ml/pack, 5 packs/case Ink-Purple 600ml/pack, 5 packs/case Ink-Navy 600ml/pack, 5 packs/case Ink-Maroon 600ml/pack, 5 packs/case Ink-Orange 600ml/pack, 5 packs/case Ink-Teal 600ml/pack, 5 packs/case...
