Printer Reference
Page 2
... prohibited by local law: bank notes, revenue stamps, bonds, stock certificates, bank drafts, checks, passports, driver's licenses. Certain options might result from the use genuine master and ink from the machine. Two kinds of handling or operating the machine. For details about power source, see p.119 "Power Connection". For good print...
... prohibited by local law: bank notes, revenue stamps, bonds, stock certificates, bank drafts, checks, passports, driver's licenses. Certain options might result from the use genuine master and ink from the machine. Two kinds of handling or operating the machine. For details about power source, see p.119 "Power Connection". For good print...

Printer Reference
Page 4
...the Paper Size 72 When the Add Ink Indicator (j) Lights 73 Master Roll Replacement 77 Placing a New Roll of Optional Auto Document Feeder is Open 94 Master Eject Unit is Open 94 ii Printing Functions Printing Functions 41 Master Making Density 41 Fine Mode ...42 Preset Reduce/Enlarge 42 Erase ... Registering Print Settings 63 Recalling a Program 64 Make Color Prints 65 Changing the Color Drum Unit 65 Making Color Prints 66 Printing in the Master Eject Section 91 When the Open Cover/Unit Indicator (M) Lights and a Message is Displayed ....94 Front Cover is Open 94 Cover of Tape...
...the Paper Size 72 When the Add Ink Indicator (j) Lights 73 Master Roll Replacement 77 Placing a New Roll of Optional Auto Document Feeder is Open 94 Master Eject Unit is Open 94 ii Printing Functions Printing Functions 41 Master Making Density 41 Fine Mode ...42 Preset Reduce/Enlarge 42 Erase ... Registering Print Settings 63 Recalling a Program 64 Make Color Prints 65 Changing the Color Drum Unit 65 Making Color Prints 66 Printing in the Master Eject Section 91 When the Open Cover/Unit Indicator (M) Lights and a Message is Displayed ....94 Front Cover is Open 94 Cover of Tape...

Printer Reference
Page 5
... Main Frame ...123 Auto Document Feeder (ADF 127 Consumables ...128 INDEX...129 iii When the Master End Indicator (C) Lights and a Message is Displayed ...... 95 Master Feeding Cover is Open 95 Master Tray is Not Set Properly 95 When the Master Eject Indicator (k) Lights 96 When Other Indicators Light 97 Poor Printing ...98 Dirt on...
... Main Frame ...123 Auto Document Feeder (ADF 127 Consumables ...128 INDEX...129 iii When the Master End Indicator (C) Lights and a Message is Displayed ...... 95 Master Feeding Cover is Open 95 Master Tray is Not Set Properly 95 When the Master Eject Indicator (k) Lights 96 When Other Indicators Light 97 Poor Printing ...98 Dirt on...
Printer Reference
Page 8
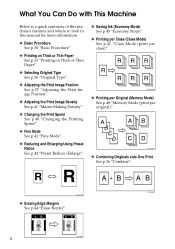
... See p.36 "Original Type". ❖ Adjusting the Print Image Position See p.37 "Adjusting the Print Image Position". ❖ Adjusting the Print Image Density See p.41 "Master Making Density". ❖ Changing the Print Speed See p.40 "Changing the Printing Speed". ❖ Fine Mode See p.42 "Fine Mode". ❖ Reducing and Enlarging Using...
... See p.36 "Original Type". ❖ Adjusting the Print Image Position See p.37 "Adjusting the Print Image Position". ❖ Adjusting the Print Image Density See p.41 "Master Making Density". ❖ Changing the Print Speed See p.40 "Changing the Printing Speed". ❖ Fine Mode See p.42 "Fine Mode". ❖ Reducing and Enlarging Using...
Printer Reference
Page 12
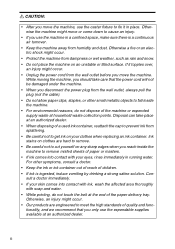
...). • Do not allow paper clips, staples, or other symptoms, consult a doctor. • Keep the ink or ink container out of reach of paper or masters. • If ink comes into contact with ink, wash the affected area thoroughly with your clothes when replacing an ink container. R CAUTION: • After you...
...). • Do not allow paper clips, staples, or other symptoms, consult a doctor. • Keep the ink or ink container out of reach of paper or masters. • If ink comes into contact with ink, wash the affected area thoroughly with your clothes when replacing an ink container. R CAUTION: • After you...
Printer Reference
Page 15
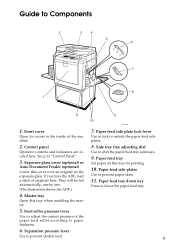
.... 10. Exposure glass cover (optional) or Auto Document Feeder (optional) Lower this cover over an original on this tray when installing the master. 5. Paper feed tray Set paper on the exposure glass. Feed roller pressure lever Use to paper thickness. 6. They will be fed automatically..., one by one. (The illustration shows the ADF.) 8. Paper feed side plates Use to Components ANT046S 1. Master tray Open this tray for access to the inside of the paper feed roller according to adjust the contact pressure of the machine. 7. Separation...
.... 10. Exposure glass cover (optional) or Auto Document Feeder (optional) Lower this cover over an original on this tray when installing the master. 5. Paper feed tray Set paper on the exposure glass. Feed roller pressure lever Use to paper thickness. 6. They will be fed automatically..., one by one. (The illustration shows the ADF.) 8. Paper feed side plates Use to Components ANT046S 1. Master tray Open this tray for access to the inside of the paper feed roller according to adjust the contact pressure of the machine. 7. Separation...
Printer Reference
Page 16
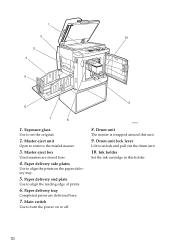
... and pull out the drum unit. 10. Drum unit The master is wrapped around this holder. 10 Master eject box Used masters are delivered here. 7. Paper delivery side plates Use to remove the misfed master. 3. Ink holder Set the ink cartridge in this unit. 9. Master eject unit Open to align the prints on or off...
... and pull out the drum unit. 10. Drum unit The master is wrapped around this holder. 10 Master eject box Used masters are delivered here. 7. Paper delivery side plates Use to remove the misfed master. 3. Ink holder Set the ink cartridge in this unit. 9. Master eject unit Open to align the prints on or off...

Printer Reference
Page 18
... Shows the number of prints entered. See p.105 "User Tools". 5. {Master Making Density} key Press to save ink. k: Master Eject indicator See p.96 "When the Master Eject Indicator (k) Lights". C: Master End indicator See p.95 "When the Master End Indicator (C) Lights and a Message is Displayed". 7. Indicators Show errors and...25 26 27 28 29 30 31 32 33 34 35 BFU008S 1. {Economy} key Press to make prints darker or lighter. See p.41 "Master Making Density". 6. j: Add Ink indicator See p.73 "When the Add Ink Indicator (j) Lights". See p.44 "Erase Border". 4. {User Tools...
... Shows the number of prints entered. See p.105 "User Tools". 5. {Master Making Density} key Press to save ink. k: Master Eject indicator See p.96 "When the Master Eject Indicator (k) Lights". C: Master End indicator See p.95 "When the Master End Indicator (C) Lights and a Message is Displayed". 7. Indicators Show errors and...25 26 27 28 29 30 31 32 33 34 35 BFU008S 1. {Economy} key Press to make prints darker or lighter. See p.41 "Master Making Density". 6. j: Add Ink indicator See p.73 "When the Add Ink Indicator (j) Lights". See p.44 "Erase Border". 4. {User Tools...

Printer Reference
Page 19
...". 30. {Image Position} key Press to select skip feed or A3 Paper Feed printing. See p.59 "Repeat". 28. {Full Size} key Press to make masters and prints in selected modes. 33. {Clear/Stop} key Press to cancel a number you have entered or to stop printing. 34. {Start} key Press to...the previously entered job settings. • Energy Saver Press to switch to and from an optional printer controller. 24. {Hold Data-in progress. • Off: Master Making and printing are completed. 22. See p.61 "Security Mode". 20. {Skip Feed/A3 Paper Feed} key Press to shift the image forwards or backwards...
...". 30. {Image Position} key Press to select skip feed or A3 Paper Feed printing. See p.59 "Repeat". 28. {Full Size} key Press to make masters and prints in selected modes. 33. {Clear/Stop} key Press to cancel a number you have entered or to stop printing. 34. {Start} key Press to...the previously entered job settings. • Energy Saver Press to switch to and from an optional printer controller. 24. {Hold Data-in progress. • Off: Master Making and printing are completed. 22. See p.61 "Security Mode". 20. {Skip Feed/A3 Paper Feed} key Press to shift the image forwards or backwards...

Printer Reference
Page 36
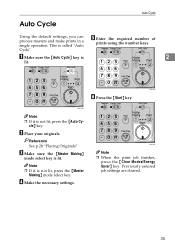
... ❒ If it is lit. 30 ANT127S F Make sure the {Print} mode select key is not lit, press the {Master Making} mode select key. Reference See p.28 "Placing Originals". C Make sure the {Master Making} mode select key is lit. See p.35 "Auto Cycle". ❒ If the machine has user codes set, enter... previous settings remain, press the {Clear Modes/Energy Saver} key before making starts. Basics Basic Procedure When Auto Cycle mode is on, you can process masters and make prints in a single operation. E Press the {Start} key. Note 2 ❒ You can process...
... ❒ If it is lit. 30 ANT127S F Make sure the {Print} mode select key is not lit, press the {Master Making} mode select key. Reference See p.28 "Placing Originals". C Make sure the {Master Making} mode select key is lit. See p.35 "Auto Cycle". ❒ If the machine has user codes set, enter... previous settings remain, press the {Clear Modes/Energy Saver} key before making starts. Basics Basic Procedure When Auto Cycle mode is on, you can process masters and make prints in a single operation. E Press the {Start} key. Note 2 ❒ You can process...

Printer Reference
Page 38
... less electricity. mode is 3 minutes. • If there is called "Auto Re- 2 seconds, the panel display goes off set". This is no master • If the master eject box is full • If there is an original in the optional Auto Document Feeder • If the "cover open " indicator is displayed... • If you are in the optional Auto Document Feeder • If originals or paper are jammed • If the machine has not finished making masters or prints • If the machine is printing the second page of a Combine print • If there is no paper • If there is...
... less electricity. mode is 3 minutes. • If there is called "Auto Re- 2 seconds, the panel display goes off set". This is no master • If the master eject box is full • If there is an original in the optional Auto Document Feeder • If the "cover open " indicator is displayed... • If you are in the optional Auto Document Feeder • If originals or paper are jammed • If the machine has not finished making masters or prints • If the machine is printing the second page of a Combine print • If there is no paper • If there is...
Printer Reference
Page 41
...} mode select key is called "Auto Cycle". Reference See p.28 "Placing Originals". This is lit. ANT125S Note ❒ If it is not lit, press the {Master Making} mode select key. B Place your originals. ANT122S F Press the {Start} key. D Make the necessary settings. E Enter the required number of prints using the number... {Clear Modes/Energy Saver} key. cle} key. Previously entered job settings are cleared. 35 Auto Cycle Auto Cycle Using the default settings, you can process masters and make prints in a single operation. Note ❒ If it is 2 lit.
...} mode select key is called "Auto Cycle". Reference See p.28 "Placing Originals". This is lit. ANT125S Note ❒ If it is not lit, press the {Master Making} mode select key. B Place your originals. ANT122S F Press the {Start} key. D Make the necessary settings. E Enter the required number of prints using the number... {Clear Modes/Energy Saver} key. cle} key. Previously entered job settings are cleared. 35 Auto Cycle Auto Cycle Using the default settings, you can process masters and make prints in a single operation. Note ❒ If it is 2 lit.
Printer Reference
Page 42
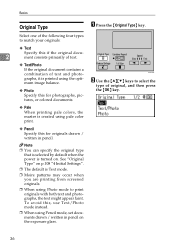
... text. ❖ Text/Photo If the original document contains a combination of original, and then press the {OK} key. ❖ Pale When printing pale colors, the master is turned on the exposure glass. 36 Basics Original Type A Press the {Original Type} key. To avoid this, use Text/Photo mode instead. ❒ When...
... text. ❖ Text/Photo If the original document contains a combination of original, and then press the {OK} key. ❖ Pale When printing pale colors, the master is turned on the exposure glass. 36 Basics Original Type A Press the {Original Type} key. To avoid this, use Text/Photo mode instead. ❒ When...
Printer Reference
Page 43
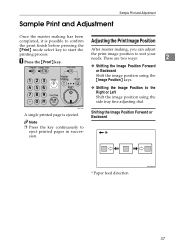
Sample Print and Adjustment Sample Print and Adjustment Once the master making has been completed, it is ejected. There are two ways: 2 ❖ Shifting the Image Position Forward or Backward Shift the image position using the ... select key to the Right or Left Shift the image position using the {Image Position} keys. ❖ Shifting the Image Position to start the After master making, you can adjust printing process. Note ❒ Press the key continuously to suit your needs. Shifting the Image Position Forward or Backward * Paper feed...
Sample Print and Adjustment Sample Print and Adjustment Once the master making has been completed, it is ejected. There are two ways: 2 ❖ Shifting the Image Position Forward or Backward Shift the image position using the ... select key to the Right or Left Shift the image position using the {Image Position} keys. ❖ Shifting the Image Position to start the After master making, you can adjust printing process. Note ❒ Press the key continuously to suit your needs. Shifting the Image Position Forward or Backward * Paper feed...
Printer Reference
Page 47
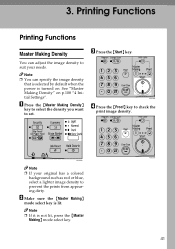
... You can adjust the image density to prevent the prints from appearing dirty. ANT128S D Press the {Proof} key to set. B Make sure the {Master Making} mode select key is lit. ANT123S 41 BFU009S Note ❒ If your original has a colored background such as red or blue, select a lighter... image density to suit your needs. 3. C Press the {Start} key. See "Master Making Density" on . Printing Functions Printing Functions Master Making Density You can specify the image density that is selected by default when the power is not lit, press the...
... You can adjust the image density to prevent the prints from appearing dirty. ANT128S D Press the {Proof} key to set. B Make sure the {Master Making} mode select key is lit. ANT123S 41 BFU009S Note ❒ If your original has a colored background such as red or blue, select a lighter... image density to suit your needs. 3. C Press the {Start} key. See "Master Making Density" on . Printing Functions Printing Functions Master Making Density You can specify the image density that is selected by default when the power is not lit, press the...
Printer Reference
Page 67
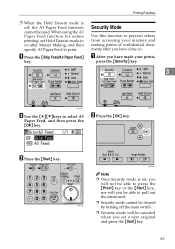
...; Security mode will you be able to select A3 Paper Feed, and then press the {OK} key. A After you have made your masters and making prints of confidential documents after Master Making, and then specify A3 Paper Feed to prevent others from accessing your prints, press the {Security} key. 3 BFU015S BFU016S B Use...
...; Security mode will you be able to select A3 Paper Feed, and then press the {OK} key. A After you have made your masters and making prints of confidential documents after Master Making, and then specify A3 Paper Feed to prevent others from accessing your prints, press the {Security} key. 3 BFU015S BFU016S B Use...
Printer Reference
Page 74
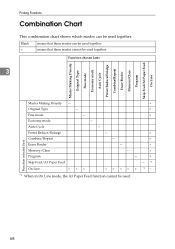
...; ××××× *1 When in On Line mode, the A3 Paper Feed function cannot be used together. Preset Reduce/Enlarge -- Function selected first Master Making Density Original Type Fine mode Economy mode Auto Cycle Preset Reduce/Enlarge Combine/Repeat Erase Border Memory/Class Program Skip Feed/A3 Paper Feed...
...; ××××× *1 When in On Line mode, the A3 Paper Feed function cannot be used together. Preset Reduce/Enlarge -- Function selected first Master Making Density Original Type Fine mode Economy mode Auto Cycle Preset Reduce/Enlarge Combine/Repeat Erase Border Memory/Class Program Skip Feed/A3 Paper Feed...
Printer Reference
Page 75
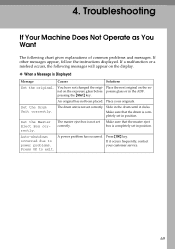
...Box correctly. 4. If other messages appear, follow the instructions displayed. Place your customer service. 69 Make sure that the master eject box is Displayed Message Causes Solutions Set the original. Auto-shutdown occurred due to power problems. Press OK to exit... is completely set in the drum until it occurs frequently, contact your originals. pressing the {Start} key. If it clicks. Slide in position. The master eject box is completely set in the ADF. You have not changed the origi- Press {OK} key. A power problem has occurred. If a malfunction...
...Box correctly. 4. If other messages appear, follow the instructions displayed. Place your customer service. 69 Make sure that the master eject box is Displayed Message Causes Solutions Set the original. Auto-shutdown occurred due to power problems. Press OK to exit... is completely set in the drum until it occurs frequently, contact your originals. pressing the {Start} key. If it clicks. Slide in position. The master eject box is completely set in the ADF. You have not changed the origi- Press {OK} key. A power problem has occurred. If a malfunction...
Printer Reference
Page 76
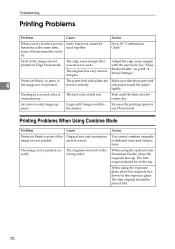
... you set correctly. Adjust the edge erase margin with the user tools. See "Erase Border Width" on the exposure glass. Large solid image wrinkles the master. are Make sure that you try to select several functions at the same time, some of them cannot be placed first. 70 Some functions cannot...
... you set correctly. Adjust the edge erase margin with the user tools. See "Erase Border Width" on the exposure glass. Large solid image wrinkles the master. are Make sure that you try to select several functions at the same time, some of them cannot be placed first. 70 Some functions cannot...
Printer Reference
Page 83
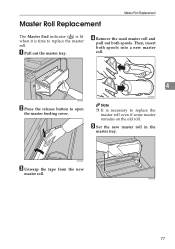
Master Roll Replacement Master Roll Replacement The Master End indicator (C) is lit when it is necessary to replace the master roll even if some master remains on the old roll. ZJVH070E C Unwrap the tape from the new master roll. D Remove the used master roll and pull out both spools into a new master roll. 4 ANT065S B Press the release button to replace the master roll. ZFRH260E 77 Then, insert both spools. TSLT010E Note ❒ It is time to open the master feeding cover. E Set the new master roll in the master tray. A Pull out the master tray.
Master Roll Replacement Master Roll Replacement The Master End indicator (C) is lit when it is necessary to replace the master roll even if some master remains on the old roll. ZJVH070E C Unwrap the tape from the new master roll. D Remove the used master roll and pull out both spools into a new master roll. 4 ANT065S B Press the release button to replace the master roll. ZFRH260E 77 Then, insert both spools. TSLT010E Note ❒ It is time to open the master feeding cover. E Set the new master roll in the master tray. A Pull out the master tray.


