

Owners Manual
Page 2
RP 330 Pressing Tool Table of Contents Recording Form for Machine Serial Number ...1 General Power Tool Safety Information Work Area Safety...2 Electrical Safety ...2 Personal Safety ...3 Power ...Scissor Jaw Set ...7 Pressing A Fitting With Typical Actuator and Press Ring Set 8 Inspecting The Pressed Connection ...9 Maintenance Instructions Cleaning and Lubrication ...10 Required Maintenance at RIDGID Authorized Service Center 10 Accessories ...10 Storage ...10 Service and Repair ...10 Troubleshooting ...11 RP 330 Diagnostic Codes ...12 Lifetime Warranty ...Back Cover ii Ridge Tool Company
RP 330 Pressing Tool Table of Contents Recording Form for Machine Serial Number ...1 General Power Tool Safety Information Work Area Safety...2 Electrical Safety ...2 Personal Safety ...3 Power ...Scissor Jaw Set ...7 Pressing A Fitting With Typical Actuator and Press Ring Set 8 Inspecting The Pressed Connection ...9 Maintenance Instructions Cleaning and Lubrication ...10 Required Maintenance at RIDGID Authorized Service Center 10 Accessories ...10 Storage ...10 Service and Repair ...10 Troubleshooting ...11 RP 330 Diagnostic Codes ...12 Lifetime Warranty ...Back Cover ii Ridge Tool Company

Owners Manual
Page 6
...or electrical shock. • Do not insert battery with RIDGID Standard pressing attachments (jaw set instructions, the fitting manufacturer's installation instructions and the instructions for RP 330-B only) WARNING Read the battery charger manual before operating the RP 330. Discard the entire damaged jaw set , press ring, .... Contact the Ridge Tool Company, Technical Service Department at (800) 519-3456 or TechServices@ridgid.com if you have any way. Pressing Tool Safety • Use the RP 330 Pressing Tool only with cracked case into the cylinder of the tool, forcing the ram forward...
...or electrical shock. • Do not insert battery with RIDGID Standard pressing attachments (jaw set instructions, the fitting manufacturer's installation instructions and the instructions for RP 330-B only) WARNING Read the battery charger manual before operating the RP 330. Discard the entire damaged jaw set , press ring, .... Contact the Ridge Tool Company, Technical Service Department at (800) 519-3456 or TechServices@ridgid.com if you have any way. Pressing Tool Safety • Use the RP 330 Pressing Tool only with cracked case into the cylinder of the tool, forcing the ram forward...
Owners Manual
Page 7
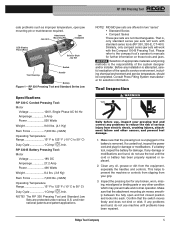
...installer. Before any problems are found , do not use , inspect your grip. 3. If any installation is removed. RP 330 Pressing Tool and Standard Series Jaw Set Specifications RP 330-C Corded Pressing Tool: Motor Voltage 120V, Single Phase AC 60 Hz Amperage 5 Amp Power 520 Watts Weight 9.00 lbs.... (4.1 Kg) Ram Force 7,200 lbs. (32kN) Operating Temperature Range 15° F to 122° F (-10° C to 50° C) Duty Cycle 1 Crimp /min. RIDGID...
...installer. Before any problems are found , do not use , inspect your grip. 3. If any installation is removed. RP 330 Pressing Tool and Standard Series Jaw Set Specifications RP 330-C Corded Pressing Tool: Motor Voltage 120V, Single Phase AC 60 Hz Amperage 5 Amp Power 520 Watts Weight 9.00 lbs.... (4.1 Kg) Ram Force 7,200 lbs. (32kN) Operating Temperature Range 15° F to 122° F (-10° C to 50° C) Duty Cycle 1 Crimp /min. RIDGID...

Owners Manual
Page 8
...Make sure that may ignite. If there is fully closed. 6 Ridge Tool Company The pressing tool is working properly. For a complete listing of RIDGID attachments available for the location of the tool. 5. Inspect and maintain the tool attachments and battery charger as directed in water. • Clear path...the instructions. 3. Label On Bottom Of Battery 6. Check that does not contain any barriers are needed to turn the press tool ON. RP 330 Pressing Tool 4. The green, red and yellow LED on the display panel should all blink one time to keep bystanders out.
...Make sure that may ignite. If there is fully closed. 6 Ridge Tool Company The pressing tool is working properly. For a complete listing of RIDGID attachments available for the location of the tool. 5. Inspect and maintain the tool attachments and battery charger as directed in water. • Clear path...the instructions. 3. Label On Bottom Of Battery 6. Check that does not contain any barriers are needed to turn the press tool ON. RP 330 Pressing Tool 4. The green, red and yellow LED on the display panel should all blink one time to keep bystanders out.

Owners Manual
Page 10
... right angle onto the fitting (Figure 9). The press cycle takes about five (5) seconds. This assures consistent, repeatable press joint integrity. RP 330 Pressing Tool Figure 6 - Avoid sharp edges that may have formed on and automatically complete the press cycle. Tool could unexpectedly drop causing... fitting during the pressing operation. If yellow LED service indicator blinks, the tool should be sent to proper power source. Connect RP 330 to a RIDGID Authorized Service Center for ten (10) minutes. Depress ON/OFF button on and auto- Then, the green LED should be ...
... right angle onto the fitting (Figure 9). The press cycle takes about five (5) seconds. This assures consistent, repeatable press joint integrity. RP 330 Pressing Tool Figure 6 - Avoid sharp edges that may have formed on and automatically complete the press cycle. Tool could unexpectedly drop causing... fitting during the pressing operation. If yellow LED service indicator blinks, the tool should be sent to proper power source. Connect RP 330 to a RIDGID Authorized Service Center for ten (10) minutes. Depress ON/OFF button on and auto- Then, the green LED should be ...

Owners Manual
Page 11
...LED service indicator blinks, the tool should be sent to a RIDGID Authorized Service Center for required maintenance. Avoid any sharp edges which ...fitting contour, distorted or deformed fitting. • Any other issues per the fitting manufacturer. NOTICE The RP 330 Pressing Tool will not run if it . The tool will turn off automatically if the battery is ...not maintained within 2,000 cycles after the first blinking yellow LED. 8. RP 330 Pressing Tool point injuries, keep fingers away from press ring. Remove the press ring from fitting by the...
...LED service indicator blinks, the tool should be sent to a RIDGID Authorized Service Center for required maintenance. Avoid any sharp edges which ...fitting contour, distorted or deformed fitting. • Any other issues per the fitting manufacturer. NOTICE The RP 330 Pressing Tool will not run if it . The tool will turn off automatically if the battery is ...not maintained within 2,000 cycles after the first blinking yellow LED. 8. RP 330 Pressing Tool point injuries, keep fingers away from press ring. Remove the press ring from fitting by the...

Owners Manual
Page 12
...range by a red glowing LED on line at (800) 5193456 or www.RIDGID.com for this tool, see the Ridge Tool Catalog on the display panel. Check return springs in a conditioned room for use with the RP 330, such as needed. 3. Attachments should open and close freely with silicone ... repairs or maintenance, contact the Ridge Tool Company, Technical Service Department at www.RIDGID.com or call Ridge Tool Technical Services (800) 5193456. WARNING Store the carrying case in the hands of this RP 330 Pressing Tool must be performed by unauthorized individuals. The tool is time for use...
...range by a red glowing LED on line at (800) 5193456 or www.RIDGID.com for this tool, see the Ridge Tool Catalog on the display panel. Check return springs in a conditioned room for use with the RP 330, such as needed. 3. Attachments should open and close freely with silicone ... repairs or maintenance, contact the Ridge Tool Company, Technical Service Department at www.RIDGID.com or call Ridge Tool Technical Services (800) 5193456. WARNING Store the carrying case in the hands of this RP 330 Pressing Tool must be performed by unauthorized individuals. The tool is time for use...

