User Guide
Page 1
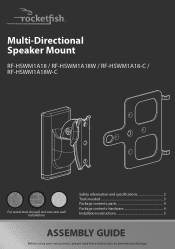
Multi-Directional Speaker Mount RF-HSWM1A18 / RF-HSWM1A18W / RF-HSWM1A18-C / RF-HSWM1A18W-C For wood-stud, drywall, and concrete wall installations Safety information and specifications 2 Tools needed 3 Package contents: parts 4 Package contents: hardware 4 Installation instructions 5 ASSEMBLY GUIDE Before using your new product, please read these instructions to prevent any damage.
Multi-Directional Speaker Mount RF-HSWM1A18 / RF-HSWM1A18W / RF-HSWM1A18-C / RF-HSWM1A18W-C For wood-stud, drywall, and concrete wall installations Safety information and specifications 2 Tools needed 3 Package contents: parts 4 Package contents: hardware 4 Installation instructions 5 ASSEMBLY GUIDE Before using your new product, please read these instructions to prevent any damage.
User Guide
Page 2
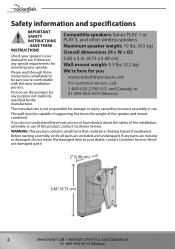
... with this easy installation process. Never use this product, contact Customer Service. If you www.rocketfishproducts.com For customer service, call: 1-800-620-2790 (U.S. Call 1-800-620-2790 (U.S. Safety information and specifications IMPORTANT SAFETY Compatible speakers: Sonos PLAY: 1 or INSTRUCTIONS PLAY 3, and other wireless speakers - If any purpose not explicitly specified by incorrect assembly or use of the speaker and mount combined. and Canada...
... with this easy installation process. Never use this product, contact Customer Service. If you www.rocketfishproducts.com For customer service, call: 1-800-620-2790 (U.S. Call 1-800-620-2790 (U.S. Safety information and specifications IMPORTANT SAFETY Compatible speakers: Sonos PLAY: 1 or INSTRUCTIONS PLAY 3, and other wireless speakers - If any purpose not explicitly specified by incorrect assembly or use of the speaker and mount combined. and Canada...
User Guide
Page 3
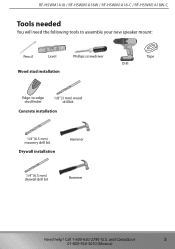
Call 1-800-620-2790 (U.S. and Canada) or 3 01-800-926-3010 (Mexico) RF-HSWM1A18 / RF-HSWM1A18W / RF-HSWM1A18-C / RF-HSWM1A18W-C Tools needed You will need the following tools to assemble your new speaker mount: Pencil Level Phillips screwdriver Tape Drill Wood stud installation Edge-to-edge stud finder 1/8" (3 mm) wood drill bit Concrete installation 1/4" (6.5 mm) masonry drill bit Drywall installation Hammer 1/4" (6.5 mm) drywall drill bit Hammer Need help?
Call 1-800-620-2790 (U.S. and Canada) or 3 01-800-926-3010 (Mexico) RF-HSWM1A18 / RF-HSWM1A18W / RF-HSWM1A18-C / RF-HSWM1A18W-C Tools needed You will need the following tools to assemble your new speaker mount: Pencil Level Phillips screwdriver Tape Drill Wood stud installation Edge-to-edge stud finder 1/8" (3 mm) wood drill bit Concrete installation 1/4" (6.5 mm) masonry drill bit Drywall installation Hammer 1/4" (6.5 mm) drywall drill bit Hammer Need help?
User Guide
Page 4
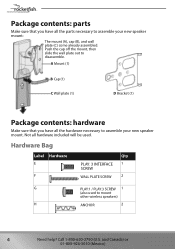
... already assembled. Call 1-800-620-2790 (U.S. Push the cap off the mount, then slide the wall plate out to assemble your new speaker mount. Hardware Bag Label Hardware E F Qty. Package contents: parts Make sure that you have all the hardware necessary to mount other wireless speakers) H ANCHOR 2 4 Need help? A Mount (1) B Cap (1) C Wall plate (1) D Bracket (1) Package contents: hardware Make sure that you...
... already assembled. Call 1-800-620-2790 (U.S. Push the cap off the mount, then slide the wall plate out to assemble your new speaker mount. Hardware Bag Label Hardware E F Qty. Package contents: parts Make sure that you have all the hardware necessary to mount other wireless speakers) H ANCHOR 2 4 Need help? A Mount (1) B Cap (1) C Wall plate (1) D Bracket (1) Package contents: hardware Make sure that you...
User Guide
Page 5
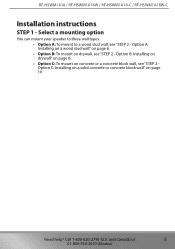
... block wall" on page 10. Option B: Installing on drywall" on page 8. • Option C: To mount on drywall, see "STEP 2 - Call 1-800-620-2790 (U.S. Option A: Installing on a wood stud wall" on page 6. • Option B: To mount on concrete or a concrete block wall, see "STEP 2 - and Canada) or 5 01-800-926-3010 (Mexico) Need help? RF-HSWM1A18 / RF-HSWM1A18W / RF-HSWM1A18-C / RF-HSWM1A18W-C Installation instructions STEP 1 -
... block wall" on page 10. Option B: Installing on drywall" on page 8. • Option C: To mount on drywall, see "STEP 2 - Call 1-800-620-2790 (U.S. Option A: Installing on a wood stud wall" on page 6. • Option B: To mount on concrete or a concrete block wall, see "STEP 2 - and Canada) or 5 01-800-926-3010 (Mexico) Need help? RF-HSWM1A18 / RF-HSWM1A18W / RF-HSWM1A18-C / RF-HSWM1A18W-C Installation instructions STEP 1 -
User Guide
Page 6
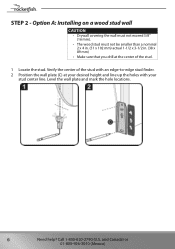
and Canada) or 01-800-926-3010 (Mexico) Level the wall plate and mark the hole locations. 6 Need help? Call 1-800-620-2790 (U.S. Verify the center of the stud. 1 Locate the stud. STEP 2 - Option A: Installing on a wood stud wall CAUTION • Drywall covering the wall must not exceed 5/8" (16 mm). • The wood stud... 1-1/2 x 3-1/2 in. (38 x 89 mm) • Make sure that you drill at your desired height and line up the holes with an edge-to-edge stud finder. 2 Position the wall plate (C) at the center of the stud with your stud center line.
and Canada) or 01-800-926-3010 (Mexico) Level the wall plate and mark the hole locations. 6 Need help? Call 1-800-620-2790 (U.S. Verify the center of the stud. 1 Locate the stud. STEP 2 - Option A: Installing on a wood stud wall CAUTION • Drywall covering the wall must not exceed 5/8" (16 mm). • The wood stud... 1-1/2 x 3-1/2 in. (38 x 89 mm) • Make sure that you drill at your desired height and line up the holes with an edge-to-edge stud finder. 2 Position the wall plate (C) at the center of the stud with your stud center line.

User Guide
Page 7
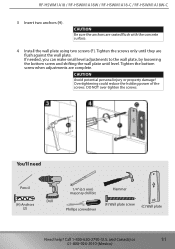
...(45 mm) 1/8 in . (3 mm) diameter drill bit. Tighten the bottom screw when adjustments are flush against the wall plate. RF-HSWM1A18 / RF-HSWM1A18W / RF-HSWM1A18-C / RF-HSWM1A18W-C 3 Drill pilot holes to a depth of 1-3/4 in. (45 mm) using a 1/8 in . 3 mm) CAUTION Both screws must be firmly tightened to prevent unwanted ... it is securely fastened to the wall before continuing on to -edge stud finder Pencil Phillips screwdriver 1/8" (3 mm) wood Drill drill bit (F) Wall plate screw (2) (C) Wall plate Need help? You'll need Edge-to the next step. and Canada) or 7 01-800-926-3010...
...(45 mm) 1/8 in . (3 mm) diameter drill bit. Tighten the bottom screw when adjustments are flush against the wall plate. RF-HSWM1A18 / RF-HSWM1A18W / RF-HSWM1A18-C / RF-HSWM1A18W-C 3 Drill pilot holes to a depth of 1-3/4 in. (45 mm) using a 1/8 in . 3 mm) CAUTION Both screws must be firmly tightened to prevent unwanted ... it is securely fastened to the wall before continuing on to -edge stud finder Pencil Phillips screwdriver 1/8" (3 mm) wood Drill drill bit (F) Wall plate screw (2) (C) Wall plate Need help? You'll need Edge-to the next step. and Canada) or 7 01-800-926-3010...
User Guide
Page 8
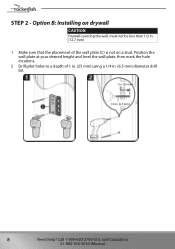
Position the wall plate at your desired height and level the wall plate, then mark the hole locations. 2 Drill pilot holes to a depth of the wall plate (C) is not on a stud. and Canada) or 01-800-926-3010 (Mexico) Call 1-800-620-2790 (U.S. Option B: Installing on drywall CAUTION Drywall covering the wall, must not be less than 1/2 in. (12.7 mm) 1 Make sure that the placement of 1 in. (25 mm) using a 1/4 in. (6.5 mm) diameter drill bit. 1 in. (25 mm) 1/4 in. (6.5 mm) 8 Need help? STEP 2 -
Position the wall plate at your desired height and level the wall plate, then mark the hole locations. 2 Drill pilot holes to a depth of the wall plate (C) is not on a stud. and Canada) or 01-800-926-3010 (Mexico) Call 1-800-620-2790 (U.S. Option B: Installing on drywall CAUTION Drywall covering the wall, must not be less than 1/2 in. (12.7 mm) 1 Make sure that the placement of 1 in. (25 mm) using a 1/4 in. (6.5 mm) diameter drill bit. 1 in. (25 mm) 1/4 in. (6.5 mm) 8 Need help? STEP 2 -
User Guide
Page 9
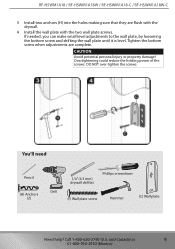
Overtightening could reduce the holding power of the screws. DO NOT over-tighten the screws. If needed, you can make small level adjustments to the wall plate, by loosening the bottom screw and shifting the wall plate until it is level. RF-HSWM1A18 / RF-HSWM1A18W / RF-HSWM1A18-C / RF-HSWM1A18W-C 3 Install two anchors (H) into the holes making sure that they are complete...
Overtightening could reduce the holding power of the screws. DO NOT over-tighten the screws. If needed, you can make small level adjustments to the wall plate, by loosening the bottom screw and shifting the wall plate until it is level. RF-HSWM1A18 / RF-HSWM1A18W / RF-HSWM1A18-C / RF-HSWM1A18W-C 3 Install two anchors (H) into the holes making sure that they are complete...
User Guide
Page 10
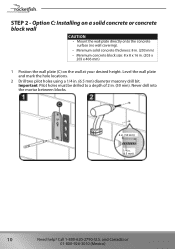
... Need help? and Canada) or 01-800-926-3010 (Mexico) Level the wall plate and mark the hole locations. 2 Drill two pilot holes using a 1/4 in . (203 x 203 x 406 mm) 1 Postion the wall plate (C) on the wall at your desired height. Option C: Installing on a solid concrete or concrete block wall CAUTION • Mount the wall plate directly...
... Need help? and Canada) or 01-800-926-3010 (Mexico) Level the wall plate and mark the hole locations. 2 Drill two pilot holes using a 1/4 in . (203 x 203 x 406 mm) 1 Postion the wall plate (C) on the wall at your desired height. Option C: Installing on a solid concrete or concrete block wall CAUTION • Mount the wall plate directly...
User Guide
Page 11
.... 4 Install the wall plate using two screws (F). DO NOT over-tighten the screws. CAUTION Be sure the anchors are complete. Call 1-800-620-2790 (U.S. If needed, you can make small level adjustments to the wall plate, by loosening the bottom screw and shifting the wall plate until they are flush against the wall plate. RF...
.... 4 Install the wall plate using two screws (F). DO NOT over-tighten the screws. CAUTION Be sure the anchors are complete. Call 1-800-620-2790 (U.S. If needed, you can make small level adjustments to the wall plate, by loosening the bottom screw and shifting the wall plate until they are flush against the wall plate. RF...
User Guide
Page 12
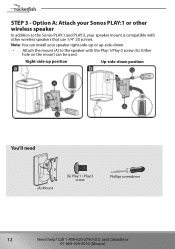
... Up-side-down . • Attach the mount (A) to the speaker with other wireless speakers that use 1/4"-20 screws. Call 1-800-620-2790 (U.S. Either hole on the mount can install your speaker mount is compatible with the Play:1/Play:3 screw (G). Right-side-up -side-down position You'll need (A) Mount (G) Play:1 / Play:3 screw Phillips screwdriver 12 Need help? and Canada) or 01-800-926-3010...
... Up-side-down . • Attach the mount (A) to the speaker with other wireless speakers that use 1/4"-20 screws. Call 1-800-620-2790 (U.S. Either hole on the mount can install your speaker mount is compatible with the Play:1/Play:3 screw (G). Right-side-up -side-down position You'll need (A) Mount (G) Play:1 / Play:3 screw Phillips screwdriver 12 Need help? and Canada) or 01-800-926-3010...
User Guide
Page 13
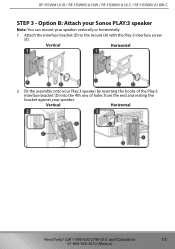
RF-HSWM1A18 / RF-HSWM1A18W / RF-HSWM1A18-C / RF-HSWM1A18W-C STEP 3 - Call 1-800-620-2790 (U.S. Vertical Horizontal 2 Fit the assembly onto your Play:3 speaker by inserting the hooks of the Play:3 interface bracket (D) into the 4th row of holes from the end and resting the bracket against your speaker vertically or horizontally. 1 Attach the interface bracket (D) to the mount (A) with the Play:3 interface screw (E). and Canada) or 13 01-800-926-3010 (Mexico) Option B: Attach your Sonos PLAY:3 speaker Note: You can mount your speaker. Vertical Horizontal Need help?
RF-HSWM1A18 / RF-HSWM1A18W / RF-HSWM1A18-C / RF-HSWM1A18W-C STEP 3 - Call 1-800-620-2790 (U.S. Vertical Horizontal 2 Fit the assembly onto your Play:3 speaker by inserting the hooks of the Play:3 interface bracket (D) into the 4th row of holes from the end and resting the bracket against your speaker vertically or horizontally. 1 Attach the interface bracket (D) to the mount (A) with the Play:3 interface screw (E). and Canada) or 13 01-800-926-3010 (Mexico) Option B: Attach your Sonos PLAY:3 speaker Note: You can mount your speaker. Vertical Horizontal Need help?
User Guide
Page 15
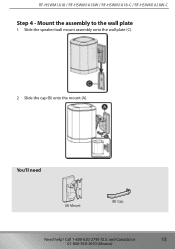
and Canada) or 15 01-800-926-3010 (Mexico) Mount the assembly to the wall plate 1 Slide the speaker/wall mount assembly onto the wall plate (C). 2 Slide the cap (B) onto the mount (A). Call 1-800-620-2790 (U.S. You'll need (A) Mount (B) Cap Need help? RF-HSWM1A18 / RF-HSWM1A18W / RF-HSWM1A18-C / RF-HSWM1A18W-C Step 4 -
and Canada) or 15 01-800-926-3010 (Mexico) Mount the assembly to the wall plate 1 Slide the speaker/wall mount assembly onto the wall plate (C). 2 Slide the cap (B) onto the mount (A). Call 1-800-620-2790 (U.S. You'll need (A) Mount (B) Cap Need help? RF-HSWM1A18 / RF-HSWM1A18W / RF-HSWM1A18-C / RF-HSWM1A18W-C Step 4 -
User Guide
Page 16
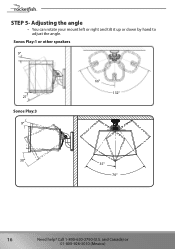
STEP 5- and Canada) or 01-800-926-3010 (Mexico) Adjusting the angle • You can rotate your mount left or right and tilt it up or down by hand to adjust the angle. Sonos Play:1 or other speakers 9° 27° Sonos Play:3 9° 66° 132° 30° 35° 70° 16 Need help? Call 1-800-620-2790 (U.S.
STEP 5- and Canada) or 01-800-926-3010 (Mexico) Adjusting the angle • You can rotate your mount left or right and tilt it up or down by hand to adjust the angle. Sonos Play:1 or other speakers 9° 27° Sonos Play:3 9° 66° 132° 30° 35° 70° 16 Need help? Call 1-800-620-2790 (U.S.
User Guide
Page 17
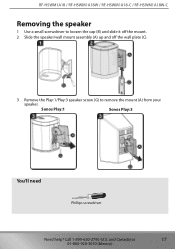
and Canada) or 17 01-800-926-3010 (Mexico) RF-HSWM1A18 / RF-HSWM1A18W / RF-HSWM1A18-C / RF-HSWM1A18W-C Removing the speaker 1 Use a small screwdriver to loosen the cap (B) and slide it off the mount. 2 Slide the speaker/wall mount assembly (A) up and off the wall plate (C). 3 Remove the Play:1/Play:3 speaker screw (G) to remove the mount (A) from your speaker. Call 1-800-620-2790 (U.S. Sonos Play:1 Sonos Play:3 You'll need Phillips screwdriver Need help?
and Canada) or 17 01-800-926-3010 (Mexico) RF-HSWM1A18 / RF-HSWM1A18W / RF-HSWM1A18-C / RF-HSWM1A18W-C Removing the speaker 1 Use a small screwdriver to loosen the cap (B) and slide it off the mount. 2 Slide the speaker/wall mount assembly (A) up and off the wall plate (C). 3 Remove the Play:1/Play:3 speaker screw (G) to remove the mount (A) from your speaker. Call 1-800-620-2790 (U.S. Sonos Play:1 Sonos Play:3 You'll need Phillips screwdriver Need help?
User Guide
Page 18
...and correct the issue over the phone. 18 Need help? Your purchase date is determined to be defective by an authorized Rocketfish repair center or store personnel, Rocketfish will (at no charge with the Product. What does this warranty to any Best Buy store. Warranty coverage terminates if ... warranty service? or (2) replace the Product at its original packaging or packaging that provides the same amount of Products or parts are not returned to you. To obtain warranty service, in the United States or Canada from a Best Buy branded retail store or online at a Best Buy retail ...
...and correct the issue over the phone. 18 Need help? Your purchase date is determined to be defective by an authorized Rocketfish repair center or store personnel, Rocketfish will (at no charge with the Product. What does this warranty to any Best Buy store. Warranty coverage terminates if ... warranty service? or (2) replace the Product at its original packaging or packaging that provides the same amount of Products or parts are not returned to you. To obtain warranty service, in the United States or Canada from a Best Buy branded retail store or online at a Best Buy retail ...
User Guide
Page 19
... factory applied serial number has been altered or removed • Loss or Theft of • God, such as is the warranty valid? Call 1-800-620-2790 (U.S. Need help? RF-HSWM1A18 / RF-HSWM1A18W / RF-HSWM1A18-C / RF-HSWM1A18W-C Where is " or "with all faults" • Consumables, including but not limited to batteries (i.e. This warranty is valid only in the United States and Canada at Best Buy...
... factory applied serial number has been altered or removed • Loss or Theft of • God, such as is the warranty valid? Call 1-800-620-2790 (U.S. Need help? RF-HSWM1A18 / RF-HSWM1A18W / RF-HSWM1A18-C / RF-HSWM1A18W-C Where is " or "with all faults" • Consumables, including but not limited to batteries (i.e. This warranty is valid only in the United States and Canada at Best Buy...
User Guide
Page 20
.... Contact Rocketfish: For customer service please call 1-800-620-2790 (U.S. THIS WARRANTY GIVES YOU SPECIFIC LEGAL RIGHTS, AND YOU MAY ALSO HAVE OTHER RIGHTS, WHICH VARY FROM STATE TO STATE OR PROVINCE TO PROVINCE. Made in China P 20 Need help? REPAIR OR REPLACEMENT AS PROVIDED... UNDER THIS WARRANTY IS YOUR EXCLUSIVE REMEDY FOR BREACH OF WARRANTY. ROCKETFISH SHALL NOT BE LIABLE FOR ANY INCIDENTAL OR CONSEQUENTIAL DAMAGES FOR THE BREACH OF ANY EXPRESS OR IMPLIED WARRANTY ON THIS PRODUCT, INCLUDING, BUT NOT LIMITED TO, LOST DATA, LOSS OF USE...
.... Contact Rocketfish: For customer service please call 1-800-620-2790 (U.S. THIS WARRANTY GIVES YOU SPECIFIC LEGAL RIGHTS, AND YOU MAY ALSO HAVE OTHER RIGHTS, WHICH VARY FROM STATE TO STATE OR PROVINCE TO PROVINCE. Made in China P 20 Need help? REPAIR OR REPLACEMENT AS PROVIDED... UNDER THIS WARRANTY IS YOUR EXCLUSIVE REMEDY FOR BREACH OF WARRANTY. ROCKETFISH SHALL NOT BE LIABLE FOR ANY INCIDENTAL OR CONSEQUENTIAL DAMAGES FOR THE BREACH OF ANY EXPRESS OR IMPLIED WARRANTY ON THIS PRODUCT, INCLUDING, BUT NOT LIMITED TO, LOST DATA, LOSS OF USE...

User Guide
Page 21
Registered in China V3 ENGLISH 17-0678 Made in some countries. Distributed by Best Buy Purchasing, LLC 7601 Penn Ave South, Richfield, MN 55423 U.S.A. ©2017 Best Buy. Part # 6907-302006 www.rocketfishproducts.com (800) 620-2790 (U.S. and Canada) or 01-800-926-3010 (México) ROCKETFISH is a trademark of Best Buy and its affiliated companies. All rights reserved.
Registered in China V3 ENGLISH 17-0678 Made in some countries. Distributed by Best Buy Purchasing, LLC 7601 Penn Ave South, Richfield, MN 55423 U.S.A. ©2017 Best Buy. Part # 6907-302006 www.rocketfishproducts.com (800) 620-2790 (U.S. and Canada) or 01-800-926-3010 (México) ROCKETFISH is a trademark of Best Buy and its affiliated companies. All rights reserved.

