
Operation Manual
Page 2
ii Consulter l'encart à volets afin d'examiner toutes les figures mentionnées dans le manuel d'utilisation. Consulte esta sección desplegable para ver todas las figuras a las que se hace referencia en el manual del operador. See this fold-out section for all of the figures referenced in the operator's manual.
ii Consulter l'encart à volets afin d'examiner toutes les figures mentionnées dans le manuel d'utilisation. Consulte esta sección desplegable para ver todas las figuras a las que se hace referencia en el manual del operador. See this fold-out section for all of the figures referenced in the operator's manual.

Operation Manual
Page 6
... times. Follow the maintenance instructions specified in the cord connecting the pressure washer to the extension cord. Do not touch plug with the words "DOUBLE INSULATION" or "DOUBLE INSULATED." Do not abuse extension cord and do not yank on the product. 2 - To avoid the possibility of the tool plug getting wet when using this manual. This product is needed, use damaged extension cords. Replacement parts...
... times. Follow the maintenance instructions specified in the cord connecting the pressure washer to the extension cord. Do not touch plug with the words "DOUBLE INSULATION" or "DOUBLE INSULATED." Do not abuse extension cord and do not yank on the product. 2 - To avoid the possibility of the tool plug getting wet when using this manual. This product is needed, use damaged extension cords. Replacement parts...
Operation Manual
Page 7
... with side shields marked to use . Always use of a polarized wall outlet. Have switch replaced by an authorized service center to clean product. Check the work area well lit. Do not abuse the cord. Don't expose to disconnect the plug from the motor could create a hazard. 3 - Never use product if switch does not turn it for use one blade is wider than the...
... with side shields marked to use . Always use of a polarized wall outlet. Have switch replaced by an authorized service center to clean product. Check the work area well lit. Do not abuse the cord. Don't expose to disconnect the plug from the motor could create a hazard. 3 - Never use product if switch does not turn it for use one blade is wider than the...
Operation Manual
Page 8
... product, loan them to instruct other users. These products can cause physical injuries to the operator and irreversible damage to the machine. WARNING: High pressure jets can damage the surface. After stopping the motor, always pull the trigger on the trigger handle to relieve stored pressure in any other hazardous materials. Check bolts and nuts for looseness before using the product. ...
... product, loan them to instruct other users. These products can cause physical injuries to the operator and irreversible damage to the machine. WARNING: High pressure jets can damage the surface. After stopping the motor, always pull the trigger on the trigger handle to relieve stored pressure in any other hazardous materials. Check bolts and nuts for looseness before using the product. ...
Operation Manual
Page 9
...user must read and understand operator's manual before using this product. messages relating to a potential injury (e.g. Leaking hoses and fittings are intended to operate... the levels of injury...use near electric power lines or receptacle outlets. ...USE ACIDS, ALKALINES, BLEACHES, SOLVENTS, FLAMMABLE MATERIAL, OR INDUSTRIAL GRADE SOLUTIONS in minor or moderate injury. CAUTION: Indicates a hazardous situation, that, if not avoided, may be used on . Electric Shock Chemical Burns Do not use in damp locations, and never direct a water stream toward any body part...
...user must read and understand operator's manual before using this product. messages relating to a potential injury (e.g. Leaking hoses and fittings are intended to operate... the levels of injury...use near electric power lines or receptacle outlets. ...USE ACIDS, ALKALINES, BLEACHES, SOLVENTS, FLAMMABLE MATERIAL, OR INDUSTRIAL GRADE SOLUTIONS in minor or moderate injury. CAUTION: Indicates a hazardous situation, that, if not avoided, may be used on . Electric Shock Chemical Burns Do not use in damp locations, and never direct a water stream toward any body part...
Operation Manual
Page 10
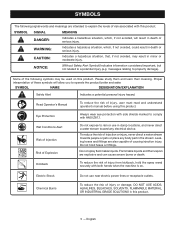
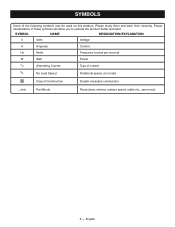
English SYMBOLS Some of current no No Load Speed Rotational speed, at no load Class II Construction Double-insulated construction .../min Per Minute Revolutions, strokes, surface speed, orbits etc., per minute 6 - SYMBOL NAME DESIGNATION/EXPLANATION V Volts Voltage A Amperes Current Hz Hertz Frequency (cycles per second) W Watt Power Alternating Current Type of the following symbols may be used on this product. Proper interpretation of these symbols will allow you to operate the product better and safer. Please study them and learn their meaning.
English SYMBOLS Some of current no No Load Speed Rotational speed, at no load Class II Construction Double-insulated construction .../min Per Minute Revolutions, strokes, surface speed, orbits etc., per minute 6 - SYMBOL NAME DESIGNATION/EXPLANATION V Volts Voltage A Amperes Current Hz Hertz Frequency (cycles per second) W Watt Power Alternating Current Type of the following symbols may be used on this product. Proper interpretation of these symbols will allow you to operate the product better and safer. Please study them and learn their meaning.
Operation Manual
Page 11
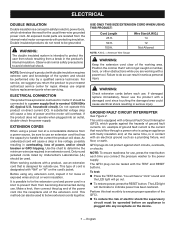
... circuit). EXTENSION CORDS When using an appliance with an electrical ground such as a plumbing fixture, wet floor, or earth. Position the cord so that would flow through a person who is using a power tool at the same time, is nominal 120V/60Hz AC (typical U.S. Never use . English If the product does not operate when plugged into an outlet, double-check the power supply. Wire Size (A.W.G.) 14 12...
... circuit). EXTENSION CORDS When using an appliance with an electrical ground such as a plumbing fixture, wet floor, or earth. Position the cord so that would flow through a person who is using a power tool at the same time, is nominal 120V/60Hz AC (typical U.S. Never use . English If the product does not operate when plugged into an outlet, double-check the power supply. Wire Size (A.W.G.) 14 12...
Operation Manual
Page 12
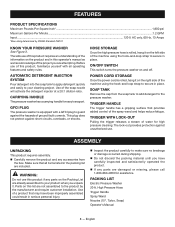
.... WARNING: Do not use . SOAP TANK Remove the cap from the box. TRIGGER HANDLE The trigger handle has a gripping surface that all operating features and safety rules. ASSEMBLY UNPACKING This product requires assembly. Make sure that provides added control of water for easy transport. GFCI PLUG The pressure washer is rolled, hang it . CARRYING HANDLE The pressure washer has a carrying handle for high pressure cleaning. TRIGGER WITH LOCK-OUT Pulling the trigger releases a stream...
.... WARNING: Do not use . SOAP TANK Remove the cap from the box. TRIGGER HANDLE The trigger handle has a gripping surface that all operating features and safety rules. ASSEMBLY UNPACKING This product requires assembly. Make sure that provides added control of water for easy transport. GFCI PLUG The pressure washer is rolled, hang it . CARRYING HANDLE The pressure washer has a carrying handle for high pressure cleaning. TRIGGER WITH LOCK-OUT Pulling the trigger releases a stream...
Operation Manual
Page 13
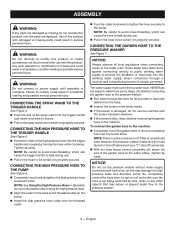
... objects that may damage the high pressure seals and decrease pump life. CONNECTING THE HIGH PRESSURE HOSE TO THE TRIGGER HANDLE See Figure 5. n Screw the collar on , as a "Y" shut off connector). n With the hose faucet turned completely off valve (such as this product with this product until the screen has been replaced. n If the screen is properly secured. CONNECTING...
... objects that may damage the high pressure seals and decrease pump life. CONNECTING THE HIGH PRESSURE HOSE TO THE TRIGGER HANDLE See Figure 5. n Screw the collar on , as a "Y" shut off connector). n With the hose faucet turned completely off valve (such as this product with this product until the screen has been replaced. n If the screen is properly secured. CONNECTING...
Operation Manual
Page 14
... structures, and outdoor equipment and tools.* You can result in the on position (I) to start the motor: With the on fully and that may be heard running. Always use any attachments or accessories not recommended by tires, rocks, or any electrical device. WARNING: Do not use caution around the house for cleaning most small to the power supply. WARNING: Never direct...
... structures, and outdoor equipment and tools.* You can result in the on position (I) to start the motor: With the on fully and that may be heard running. Always use any attachments or accessories not recommended by tires, rocks, or any electrical device. WARNING: Do not use caution around the house for cleaning most small to the power supply. WARNING: Never direct...
Operation Manual
Page 15
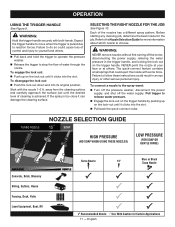
.... To engage the lock out: n Push up on the trigger handle. Each of water through the nozzle. The quick-connect feature contains small springs that could cause loss of cleaning is achieved. NOZZLE SELECTION GUIDE HIGH PRESSURE (NO SOAP WHEN USING THESE NOZZLES) LOW PRESSURE (FOR SOAP OR GENTLE RINSE) Concrete, Brick, Masonry Siding, Gutters, House Fencing, Deck, Patio Lawn Equipment, Boat...
.... To engage the lock out: n Push up on the trigger handle. Each of water through the nozzle. The quick-connect feature contains small springs that could cause loss of cleaning is achieved. NOZZLE SELECTION GUIDE HIGH PRESSURE (NO SOAP WHEN USING THESE NOZZLES) LOW PRESSURE (FOR SOAP OR GENTLE RINSE) Concrete, Brick, Masonry Siding, Gutters, House Fencing, Deck, Patio Lawn Equipment, Boat...
Operation Manual
Page 16
.... n Squeeze the trigger and wait approximately 5 seconds for use with a second tank of clean water. Shut off the motor will not relieve pressure in the system. n Remove the soap nozzle by high pressure hose. n Pour detergent in the nozzle storage area on a dry surface using the hose and replace it to power supply and turn the pressure washer on. Use a funnel, if needed, to appear...
.... n Squeeze the trigger and wait approximately 5 seconds for use with a second tank of clean water. Shut off the motor will not relieve pressure in the system. n Remove the soap nozzle by high pressure hose. n Pour detergent in the nozzle storage area on a dry surface using the hose and replace it to power supply and turn the pressure washer on. Use a funnel, if needed, to appear...
Operation Manual
Page 17
... do not operate this must be damaged by the manufacturer of high grade lubricant for repair. Please call customer service or contact an authorized service center for damaged, missing, or loose parts such as screws, nuts, bolts, caps, etc. Use clean cloths to replace before reinstalling the top. Therefore, no user serviceable parts to pressure washer pump water intake. Pull trigger to comply with plastic parts. n Disconnect garden hose and high pressure hose...
... do not operate this must be damaged by the manufacturer of high grade lubricant for repair. Please call customer service or contact an authorized service center for damaged, missing, or loose parts such as screws, nuts, bolts, caps, etc. Use clean cloths to replace before reinstalling the top. Therefore, no user serviceable parts to pressure washer pump water intake. Pull trigger to comply with plastic parts. n Disconnect garden hose and high pressure hose...
Operation Manual
Page 18
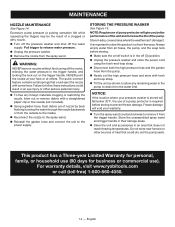
... and trigger handle in a dry, covered area where the weather can't damage it from the outside to the inside). n Remove the nozzle from the pump. n Reconnect the nozzle to drain from all hoses, the pump, and the soap tank before storing to store this product in the pump to ... the on the trigger handle. Freeze damage will give you better performance of the unit and increase the life of pump protector will void your warranty. NOTE: Regular use ). n Unplug the pressure washer and store the power cord using the hook-and-loop strap. NOTICE: If the location where your face ...
... and trigger handle in a dry, covered area where the weather can't damage it from the outside to the inside). n Remove the nozzle from the pump. n Reconnect the nozzle to drain from all hoses, the pump, and the soap tank before storing to store this product in the pump to ... the on the trigger handle. Freeze damage will give you better performance of the unit and increase the life of pump protector will void your warranty. NOTE: Regular use ). n Unplug the pressure washer and store the power cord using the hook-and-loop strap. NOTICE: If the location where your face ...
Operation Manual
Page 19
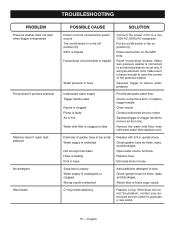
... on position (I). If this does not correct the problem, contact your authorized service center to remove air from line. Reset house/shop breaker. Diameter of the pressure washer. Check garden hose for kinks, leaks and blockages. garden hose. Inadequate water supply Trigger handle leaks Nozzle is clogged Pump is faulty Air in unit. Squeeze trigger on trigger handle to purchase a new wand. 15 - If using an extension cord, make...
... on position (I). If this does not correct the problem, contact your authorized service center to remove air from line. Reset house/shop breaker. Diameter of the pressure washer. Check garden hose for kinks, leaks and blockages. garden hose. Inadequate water supply Trigger handle leaks Nozzle is clogged Pump is faulty Air in unit. Squeeze trigger on trigger handle to purchase a new wand. 15 - If using an extension cord, make...
Quick Reference Guide
Page 1
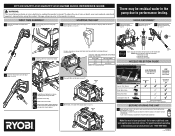
..., user must read and understand operator's manual before storing. FIRST TIME ASSEMBLY STARTING THE UNIT 1 Connect the spray wand to the trigger handle (see page 9). 3 Connect the high pressure hose to the pump (see page 9). USING DETERGENT 1 Pour pressure washer detergent in the pump due to performance testing. Make sure there are no nozzle installed, squeeze the trigger to relieve air pressure. Never use and before using an extension cord...
..., user must read and understand operator's manual before storing. FIRST TIME ASSEMBLY STARTING THE UNIT 1 Connect the spray wand to the trigger handle (see page 9). 3 Connect the high pressure hose to the pump (see page 9). USING DETERGENT 1 Pour pressure washer detergent in the pump due to performance testing. Make sure there are no nozzle installed, squeeze the trigger to relieve air pressure. Never use and before using an extension cord...
Parts Diagram
Page 2
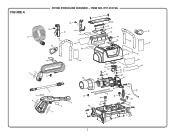
FIGURE A 11 9 8 5 4 RYOBI PRESSURE WASHER − ITEM NO. RY141812G 13 12 13 14 19 14 21 16 54 10 20 7 40 13 15 18 22 12 23 24 25 26 27 29 32 33 34 37 38 34 36 35 37 38 39 41 28 30 31 6 1 2 3 53 49 48 39 17 46 52 51 50 18 42 43 45 44 47 48 2
FIGURE A 11 9 8 5 4 RYOBI PRESSURE WASHER − ITEM NO. RY141812G 13 12 13 14 19 14 21 16 54 10 20 7 40 13 15 18 22 12 23 24 25 26 27 29 32 33 34 37 38 34 36 35 37 38 39 41 28 30 31 6 1 2 3 53 49 48 39 17 46 52 51 50 18 42 43 45 44 47 48 2
Parts Diagram
Page 3
... 3 Screw (M5.5 x 35 mm, Phillips Hd 4 Lower Housing 1 Housing Rubber Grommet 1 Cord Clamp 1 Screw (M3.5 x 20 mm 2 Wire Nut 1 Inquiries Label 1 Operator's Manual Quick Refernce Guide NOTE A: Techtronic Industries Power Equipment, Inc. will be found on a plate attached to pump housing. Always mention the model number in all correspondence regarding your PRESSURE WASHER or when ordering replacement parts. Contact our service department for assistance. 3 RY141812G The model number will not provide a complete motor/pump as a replacement part.
... 3 Screw (M5.5 x 35 mm, Phillips Hd 4 Lower Housing 1 Housing Rubber Grommet 1 Cord Clamp 1 Screw (M3.5 x 20 mm 2 Wire Nut 1 Inquiries Label 1 Operator's Manual Quick Refernce Guide NOTE A: Techtronic Industries Power Equipment, Inc. will be found on a plate attached to pump housing. Always mention the model number in all correspondence regarding your PRESSURE WASHER or when ordering replacement parts. Contact our service department for assistance. 3 RY141812G The model number will not provide a complete motor/pump as a replacement part.
Parts Diagram
Page 4
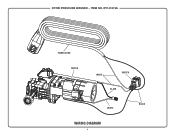
RY141812G POWER CORD MOTOR WHITE SWITCH BLACK WHITE BLACK WIRING DIAGRAM 4 RYOBI PRESSURE WASHER − ITEM NO.
RY141812G POWER CORD MOTOR WHITE SWITCH BLACK WHITE BLACK WIRING DIAGRAM 4 RYOBI PRESSURE WASHER − ITEM NO.


