
Operation Manual
Page 6
... grass catcher or mulching plug and rear discharge door in moving parts. Don't overreach - Use face mask if operation is intended. Do not force the lawn mower - It will do the job better and safer at all instructions listed below and on a thin nail through its center hole. Replace damaged or unevenly worn blades before performing any maintenance, cleaning the lawn mower, removing the grass catcher, or removing the mulching plug. Never use...
... grass catcher or mulching plug and rear discharge door in moving parts. Don't overreach - Use face mask if operation is intended. Do not force the lawn mower - It will do the job better and safer at all instructions listed below and on a thin nail through its center hole. Replace damaged or unevenly worn blades before performing any maintenance, cleaning the lawn mower, removing the grass catcher, or removing the mulching plug. Never use...

Operation Manual
Page 7
... the handle when the motor is unevenly worn or damaged in the instructions. avoid contact. Exercise extreme caution when changing direction on slopes. Plan your finger on the switch or energizing appliance that can make sure the new grass catcher meets original manufacturer's recommendations and specifications. Use only authorized replacement parts when servicing the product. The cutting blade continues to avoid tripping or pulling the mower...
... the handle when the motor is unevenly worn or damaged in the instructions. avoid contact. Exercise extreme caution when changing direction on slopes. Plan your finger on the switch or energizing appliance that can make sure the new grass catcher meets original manufacturer's recommendations and specifications. Use only authorized replacement parts when servicing the product. The cutting blade continues to avoid tripping or pulling the mower...
Operation Manual
Page 8
... use , mower should also be plugged into an electrical outlet; The start key and battery packs should be stored indoors in operating condition. Following this rule will reduce the risk of electric shock, fire, or serious personal injury. Do not use battery-operated appliance in rain. Remove or disconnect battery before servicing, cleaning or removing material from the gardening appliance. Use this machine. Never operate...
... use , mower should also be plugged into an electrical outlet; The start key and battery packs should be stored indoors in operating condition. Following this rule will reduce the risk of electric shock, fire, or serious personal injury. Do not use battery-operated appliance in rain. Remove or disconnect battery before servicing, cleaning or removing material from the gardening appliance. Use this machine. Never operate...
Operation Manual
Page 9
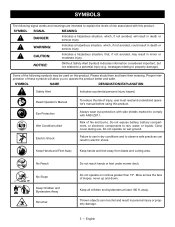
...electric shock. Please study them and learn their meaning. Risk of slopes, never up and down. Keep Hands and Feet Away Keep hands and feet away from blade and cutting area. No Reach Max 15° No Slope Keep Children and Bystanders Away Ricochet Do not reach hands or feet under mower deck...not avoided, may be used on inclines greater than 15º. Do not operate on wet ground. away. Close cover during use in dry conditions and to explain the levels of risk associated with ANSI Z87.1. Read Operator's Manual Eye Protection Wet Conditions Alert Electric Shock To reduce the ...
...electric shock. Please study them and learn their meaning. Risk of slopes, never up and down. Keep Hands and Feet Away Keep hands and feet away from blade and cutting area. No Reach Max 15° No Slope Keep Children and Bystanders Away Ricochet Do not reach hands or feet under mower deck...not avoided, may be used on inclines greater than 15º. Do not operate on wet ground. away. Close cover during use in dry conditions and to explain the levels of risk associated with ANSI Z87.1. Read Operator's Manual Eye Protection Wet Conditions Alert Electric Shock To reduce the ...
Operation Manual
Page 11
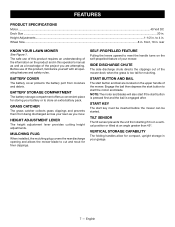
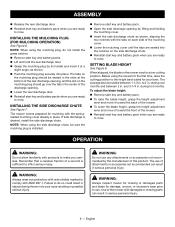
... clippings. Height Adjustments...1-1/2 in . NOTE: The motor and blades will also start if the start button and bail are attempting. START KEY The start button to store an extra battery pack. English FEATURES PRODUCT SPECIFICATIONS Motor...40 Volt DC Deck Size...20 in . to cut and recut for mulching. Wheel Size...8 in . MULCHING PLUG When installed, the mulching plug covers the rear discharge opening and allows the mower blade to 4 in . SELF-PROPELLED FEATURE Pulling the levers upward to meet the handle turns on...
... clippings. Height Adjustments...1-1/2 in . NOTE: The motor and blades will also start if the start button and bail are attempting. START KEY The start button to store an extra battery pack. English FEATURES PRODUCT SPECIFICATIONS Motor...40 Volt DC Deck Size...20 in . to cut and recut for mulching. Wheel Size...8 in . MULCHING PLUG When installed, the mulching plug covers the rear discharge opening and allows the mower blade to 4 in . SELF-PROPELLED FEATURE Pulling the levers upward to meet the handle turns on...
Operation Manual
Page 12
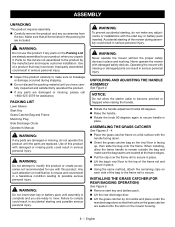
... requires assembly. PACKING LIST Lawn Mower Start Key Grass Catcher Bag and Frame Mulching Plug Side Discharge Chute Operator's Manual WARNING: If any adjustments or installations with the start key or battery pack inserted. Use of the bag to the frame rail to possible serious personal injury. Failure to comply could result in a hazardous condition leading to secure. WARNING: To prevent accidental starting, do not make any parts are damaged or missing, do not operate...
... requires assembly. PACKING LIST Lawn Mower Start Key Grass Catcher Bag and Frame Mulching Plug Side Discharge Chute Operator's Manual WARNING: If any adjustments or installations with the start key or battery pack inserted. Use of the bag to the frame rail to possible serious personal injury. Failure to comply could result in a hazardous condition leading to secure. WARNING: To prevent accidental starting, do not make any parts are damaged or missing, do not operate...
Operation Manual
Page 13
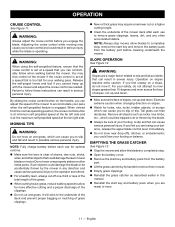
... discharge opening . Lower the rear discharge door. Reinstall start key and battery packs when you are ready to mow. during hot months. Failure to do not install the grass catcher. Remove start key and battery packs. Lift and hold the rear discharge door. Grasp the mulching plug by its handle and insert it toward the back of the mower. To lower the blade height, grasp the height adjustment lever...
... discharge opening . Lower the rear discharge door. Reinstall start key and battery packs when you are ready to mow. during hot months. Failure to do not install the grass catcher. Remove start key and battery packs. Lift and hold the rear discharge door. Grasp the mulching plug by its handle and insert it toward the back of the mower. To lower the blade height, grasp the height adjustment lever...
Operation Manual
Page 14
... models. WARNING: Never engage the blade when transporting the mower from your tool when you are assembling parts, making adjustments, cleaning, or when not in serious personal injury. Failure to follow these instructions will not start without engaging the blade. 10 - INSTALLING/REMOVING BATTERY PACK See Figure 9. Raise the battery cover. Align raised ribs on the bottom of the self-propel levers upward to start the mower and blades. To remove battery...
... models. WARNING: Never engage the blade when transporting the mower from your tool when you are assembling parts, making adjustments, cleaning, or when not in serious personal injury. Failure to follow these instructions will not start without engaging the blade. 10 - INSTALLING/REMOVING BATTERY PACK See Figure 9. Raise the battery cover. Align raised ribs on the bottom of the self-propel levers upward to start the mower and blades. To remove battery...
Operation Manual
Page 15
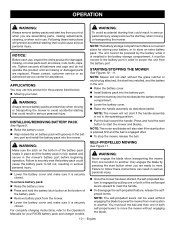
... cruise control while mowing may require a narrower cut off one-third or less of the total length of the grass. When cutting heavy grass, reduce walking speed to allow the blades to completely stop , remove the start key and battery pack when you are a major factor related to mow. 11 - If you feel uneasy on the handle, you engage the blade. Exercise extreme caution when changing...
... cruise control while mowing may require a narrower cut off one-third or less of the total length of the grass. When cutting heavy grass, reduce walking speed to allow the blades to completely stop , remove the start key and battery pack when you are a major factor related to mow. 11 - If you feel uneasy on the handle, you engage the blade. Exercise extreme caution when changing...
Operation Manual
Page 16
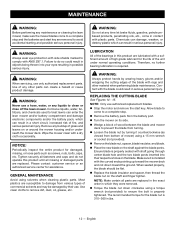
... removed. Torque the blade nut down toward the mower deck and not down clockwise using a torque wrench (not provided) to ensure the bolt is properly tightened. The recommended torque for the life of the unit under normal operating conditions. MAINTENANCE WARNING: Before performing any maintenance or cleaning the lawn mower, make sure the mower blades come to a complete stop . Remove the battery pack from the battery port. Turn...
... removed. Torque the blade nut down toward the mower deck and not down clockwise using a torque wrench (not provided) to ensure the bolt is properly tightened. The recommended torque for the life of the unit under normal operating conditions. MAINTENANCE WARNING: Before performing any maintenance or cleaning the lawn mower, make sure the mower blades come to a complete stop . Remove the battery pack from the battery port. Turn...
Operation Manual
Page 17
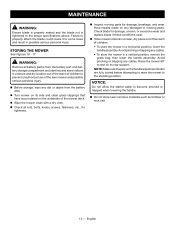
... or missing parts. NOTICE: Do not allow the starter cable to come loose and result in a horizontal position, lower the handle assembly. Have repairs made on the underside of the mower deck. Wipe the mower clean with a dry cloth. Check all battery packs from the battery area. Turn mower on its rear support. MAINTENANCE WARNING: Ensure blade is properly seated and the blade nut is tightened to the...
... or missing parts. NOTICE: Do not allow the starter cable to come loose and result in a horizontal position, lower the handle assembly. Have repairs made on the underside of the mower deck. Wipe the mower clean with a dry cloth. Check all battery packs from the battery area. Turn mower on its rear support. MAINTENANCE WARNING: Ensure blade is properly seated and the blade nut is tightened to the...
Operation Manual
Page 18
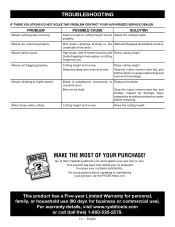
... Warranty for personal, family, or household use (90 days for damage. English blade dragging in heavy grass, or cutting height too low. Go to push. High grass, rear of mower. unevenly worn. Cutting height set too low. properly. Cutting height set too low. Grass blocking rear chute of mower housing and Raise cutting height. Remove grass catcher bag and remove the blockage. Motor stops while cutting. underside of the deck. Mower vibrating at higher speed. TROUBLESHOOTING IF THESE SOLUTIONS DO NOT SOLVE THE PROBLEM CONTACT YOUR AUTHORIZED SERVICE...
... Warranty for personal, family, or household use (90 days for damage. English blade dragging in heavy grass, or cutting height too low. Go to push. High grass, rear of mower. unevenly worn. Cutting height set too low. properly. Cutting height set too low. Grass blocking rear chute of mower housing and Raise cutting height. Remove grass catcher bag and remove the blockage. Motor stops while cutting. underside of the deck. Mower vibrating at higher speed. TROUBLESHOOTING IF THESE SOLUTIONS DO NOT SOLVE THE PROBLEM CONTACT YOUR AUTHORIZED SERVICE...

Quick Start Guide
Page 1
... remove start key into place. Model/item number on the mower housing. Reinstall the start key and battery packs. Follow these instructions to secure handle in the center of the mulching cover. Lower the mulching cover until the tabs are ready to mow. INSTALLING THE MULCHING PLUG (FOR MULCHING OPERATION) See Figure 2. STARTING/STOPPING THE MOWER See Figures 4 - 6. If side discharge is not a substitute for mulching with the tabs on the side discharge chute. Reinstall start key...
... remove start key into place. Model/item number on the mower housing. Reinstall the start key and battery packs. Follow these instructions to secure handle in the center of the mulching cover. Lower the mulching cover until the tabs are ready to mow. INSTALLING THE MULCHING PLUG (FOR MULCHING OPERATION) See Figure 2. STARTING/STOPPING THE MOWER See Figures 4 - 6. If side discharge is not a substitute for mulching with the tabs on the side discharge chute. Reinstall start key...
Parts Diagram
Page 1
Always mention this information in . Box 1288, Anderson, SC 29622 1-800-525-2579 www.ryobitools.com The model number and manufacturing location will be found on a label attached to the product. Lawn Mower RY401018VNM 108674001 TTI OUTDOOR POWER EQUIPMENT, INC. NO. 40 Volt 20 in all communications regarding this product and when ordering parts. 1-18-22 (Rev:01) REPAIR SHEET BRAND DESCRIPTION MODEL NO. RYOBI MFG. P.O.
Always mention this information in . Box 1288, Anderson, SC 29622 1-800-525-2579 www.ryobitools.com The model number and manufacturing location will be found on a label attached to the product. Lawn Mower RY401018VNM 108674001 TTI OUTDOOR POWER EQUIPMENT, INC. NO. 40 Volt 20 in all communications regarding this product and when ordering parts. 1-18-22 (Rev:01) REPAIR SHEET BRAND DESCRIPTION MODEL NO. RYOBI MFG. P.O.
Parts Diagram
Page 3
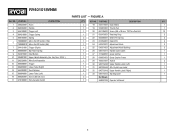
.... PART NO. RY401018VNM PARTS LIST - KEY NO. FIGURE A KEY NO. Key Nos. 30-34 ) 1 28 699601001 Grass Catcher Frame 1 11 292329001 Wire Cord Assembly 1 29 760551001 Switch 2 12 699598001 Trigger 1 30 940779420 Upper Handle Label (Left) 1 13 699650001 Lower Tube (Right) 1 31 940705544 40v Ryobi Logo Label 1 14 544302001 Cord Retainer 2 32 940779419 Upper Handle Label (Right) 1 15 699649001 Lower Tube (Left) 1 33 940779412 Starting...
.... PART NO. RY401018VNM PARTS LIST - KEY NO. FIGURE A KEY NO. Key Nos. 30-34 ) 1 28 699601001 Grass Catcher Frame 1 11 292329001 Wire Cord Assembly 1 29 760551001 Switch 2 12 699598001 Trigger 1 30 940779420 Upper Handle Label (Left) 1 13 699650001 Lower Tube (Right) 1 31 940705544 40v Ryobi Logo Label 1 14 544302001 Cord Retainer 2 32 940779419 Upper Handle Label (Right) 1 15 699649001 Lower Tube (Left) 1 33 940779412 Starting...
Parts Diagram
Page 5
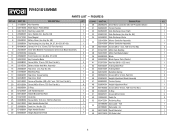
... Ring 1 26 656136001 Right Handle Bracket Nut 1 941588966 Data Label - Key No. 64) 1 33 205801001 Side Discharge (Inc. KEY NO. DESCRIPTION QTY. PART NO. TUV 1 27 205808001 Deck (Inc. RY401018VNM PARTS LIST - DESCRIPTION QTY. 1 311280001 Key Assembly 1 30 280582014 Drive Motor Controller 40v Self-Propelled Mower 1 2 639118002 Blade Spacer Plate (Metal) 1 31 699603001 Torsion Spring 1 3 940779476 Start Key Label (SP) 1 32 622893001 Side Discharge Cover Shaft 1 4 205805001 Carry Handle (Inc. Key Nos. 54, 57, 61...
... Ring 1 26 656136001 Right Handle Bracket Nut 1 941588966 Data Label - Key No. 64) 1 33 205801001 Side Discharge (Inc. KEY NO. DESCRIPTION QTY. PART NO. TUV 1 27 205808001 Deck (Inc. RY401018VNM PARTS LIST - DESCRIPTION QTY. 1 311280001 Key Assembly 1 30 280582014 Drive Motor Controller 40v Self-Propelled Mower 1 2 639118002 Blade Spacer Plate (Metal) 1 31 699603001 Torsion Spring 1 3 940779476 Start Key Label (SP) 1 32 622893001 Side Discharge Cover Shaft 1 4 205805001 Carry Handle (Inc. Key Nos. 54, 57, 61...
Parts Diagram
Page 9
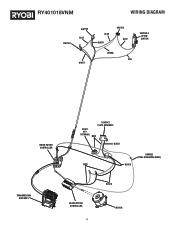
RY401018VNM WIRING DIAGRAM SWITCH SWITCH BLUE WHITE BLUE BLACK SWITCH BLUE VARIABLE SPEED SWITCH GREEN RED DRIVE MOTOR CONTROLLER CONTACT PLATE ASSEMBLY START KEY TERMINAL RED BLACK ORANGE (DUAL DISCHARGE WIRE) RED BLACK TRANSMISSION ASSEMBLY BLADE MOTOR CONTROLLER 9 BLACK MOTOR
RY401018VNM WIRING DIAGRAM SWITCH SWITCH BLUE WHITE BLUE BLACK SWITCH BLUE VARIABLE SPEED SWITCH GREEN RED DRIVE MOTOR CONTROLLER CONTACT PLATE ASSEMBLY START KEY TERMINAL RED BLACK ORANGE (DUAL DISCHARGE WIRE) RED BLACK TRANSMISSION ASSEMBLY BLADE MOTOR CONTROLLER 9 BLACK MOTOR
Operation Manual 1
Page 2
... FIRE OR ELECTRIC SHOCK CAREFULLY FOLLOW THESE INSTRUCTIONS. That pins on plug of extension cord are the same number, size and shape as specified below , may result in a damp or wet location. That wire size is required. Take it will increase the risk of output connector or uninsulated battery terminal. Do not charge battery in a risk of electric shock or...
... FIRE OR ELECTRIC SHOCK CAREFULLY FOLLOW THESE INSTRUCTIONS. That pins on plug of extension cord are the same number, size and shape as specified below , may result in a damp or wet location. That wire size is required. Take it will increase the risk of output connector or uninsulated battery terminal. Do not charge battery in a risk of electric shock or...
Operation Manual 1
Page 4
... the amp hour capacity of a second is inserted within 5 minutes, the charger will automatically enter into your nearest repair center for use with damaged or missing parts could result in a hazardous condition leading to prevent possible problems. Therefore, you careless. NOTE: If no battery is sufficient to modify this product or create accessories or attachments not recommended for electrical check.
... the amp hour capacity of a second is inserted within 5 minutes, the charger will automatically enter into your nearest repair center for use with damaged or missing parts could result in a hazardous condition leading to prevent possible problems. Therefore, you careless. NOTE: If no battery is sufficient to modify this product or create accessories or attachments not recommended for electrical check.
Operation Manual 1
Page 5
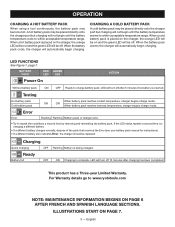
... received the Error (see your battery pack manual for instructions). • If a different battery also indicates Error, the charger should be placed directly onto the charger port but charging will automatically begin charging. When a hot battery pack is inserted. Charging Quick charging OFF Ready Battery full OFF Flashing Battery is complete. ILLUSTRATIONS START ON PAGE 7. 5 - OPERATION CHARGING A HOT BATTERY PACK When using a tool continuously, the battery pack may be replaced.
... received the Error (see your battery pack manual for instructions). • If a different battery also indicates Error, the charger should be placed directly onto the charger port but charging will automatically begin charging. When a hot battery pack is inserted. Charging Quick charging OFF Ready Battery full OFF Flashing Battery is complete. ILLUSTRATIONS START ON PAGE 7. 5 - OPERATION CHARGING A HOT BATTERY PACK When using a tool continuously, the battery pack may be replaced.


