Manual 1
Page 3
... doing when using this manual. n Keep handles dry, clean, and free of parts, mounting, and any attachments or devices not listed for alignment of moving parts, binding of moving parts, breakage of oil and grease. n Do not operate a chain saw . Chain should be drawn into the motor or catch the chain or underbrush. If the chain turns after the switch trigger has been released, have the unit serviced by an authorized service dealer unless...
... doing when using this manual. n Keep handles dry, clean, and free of parts, mounting, and any attachments or devices not listed for alignment of moving parts, binding of moving parts, breakage of oil and grease. n Do not operate a chain saw . Chain should be drawn into the motor or catch the chain or underbrush. If the chain turns after the switch trigger has been released, have the unit serviced by an authorized service dealer unless...
Manual 1
Page 4
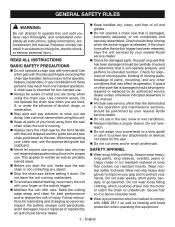
... KICKBACK PULL PUSH Fig. 1 KICKBACK DANGER ZONE Fig. 2 Fig. 3 4 - n The following precautions should take several steps to minimize kickback: 1. A firm grip together with rotational kickback. Do not let the nose of saw chain in the cut above shoulder height or overreach when cutting. Fully squeeze the switch trigger and maintain a steady cutting speed. 4. Use replacement parts such as low kickback chain and special guide bars...
... KICKBACK PULL PUSH Fig. 1 KICKBACK DANGER ZONE Fig. 2 Fig. 3 4 - n The following precautions should take several steps to minimize kickback: 1. A firm grip together with rotational kickback. Do not let the nose of saw chain in the cut above shoulder height or overreach when cutting. Fully squeeze the switch trigger and maintain a steady cutting speed. 4. Use replacement parts such as low kickback chain and special guide bars...
Manual 1
Page 5
... not use the chain saw to order one of the Ryobi bars listed for the saw in a dry and high or locked area out of the reach of ANSI B175.1 - 1991 (American National Standard for spring back so that is extremely dangerous. n When cutting a limb that you will not be stored in this is under tension, be alert for Power Tools - Never use the chain saw...
... not use the chain saw to order one of the Ryobi bars listed for the saw in a dry and high or locked area out of the reach of ANSI B175.1 - 1991 (American National Standard for spring back so that is extremely dangerous. n When cutting a limb that you will not be stored in this is under tension, be alert for Power Tools - Never use the chain saw...
Manual 1
Page 6
..., they are always in a damp or wet location. Following this tool. If liquid gets into an electrical outlet; Be aware of possible hazards even when unit is not in use any cordless product in a fire. n Remove the battery pack from the chain saw before cleaning, servicing, storing, removing material from one type of fire when used with 18V nickel-cadmium and 18 V lithium...
..., they are always in a damp or wet location. Following this tool. If liquid gets into an electrical outlet; Be aware of possible hazards even when unit is not in use any cordless product in a fire. n Remove the battery pack from the chain saw before cleaning, servicing, storing, removing material from one type of fire when used with 18V nickel-cadmium and 18 V lithium...
Manual 1
Page 9
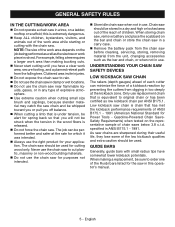
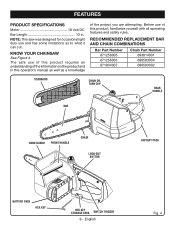
RECOMMENDED REPLACEMENT BAR AND CHAIN COMBINATIONS Bar Part Number 671256005 671256003 671834007 Chain Part Number 693814001 690583004 690583002 SCABBARD CHAIN OIL TANK CAP REAR HANDLE BAR HAND GUARD FRONT HANDLE CHAIN LOCK-OUT BUTTON BATTERY PACK BATTERY PACK HEX KEY HEX KEY STORAGE AREA SWITCH TRIGGER 9 - English Fig. 4 NOTE: This saw was designed for occasional light duty use and has some limitations as a knowledge of the project you are attempting. The safe use of the information on...
RECOMMENDED REPLACEMENT BAR AND CHAIN COMBINATIONS Bar Part Number 671256005 671256003 671834007 Chain Part Number 693814001 690583004 690583002 SCABBARD CHAIN OIL TANK CAP REAR HANDLE BAR HAND GUARD FRONT HANDLE CHAIN LOCK-OUT BUTTON BATTERY PACK BATTERY PACK HEX KEY HEX KEY STORAGE AREA SWITCH TRIGGER 9 - English Fig. 4 NOTE: This saw was designed for occasional light duty use and has some limitations as a knowledge of the project you are attempting. The safe use of the information on...
Manual 1
Page 10
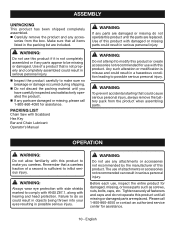
... and completely assembled could result in serious personal injury. Remember that all missing or damaged parts are replaced. WARNING: Do not use this product until the parts are replaced. OPERATION WARNING: Do not allow familiarity with Scabbard Hex Key Bar and Chain Lubricant Operator's Manual WARNING: If any parts are included. The use , inspect the entire product for assistance. 10 - PACKING LIST Chain Saw with this...
... and completely assembled could result in serious personal injury. Remember that all missing or damaged parts are replaced. WARNING: Do not use this product until the parts are replaced. OPERATION WARNING: Do not allow familiarity with Scabbard Hex Key Bar and Chain Lubricant Operator's Manual WARNING: If any parts are included. The use , inspect the entire product for assistance. 10 - PACKING LIST Chain Saw with this...
Manual 1
Page 11
... instructions, refer to the Operator's Manual for a long period of time (three months or longer) be sure raised rib on side of the battery pack snap in chain saw when not in . Fill oil tank with Ryobi Bar and Chain Lubricant before starting the chain saw . Damage may use . Removing battery pack will prevent accidental starting the saw . NOTE: To avoid serious personal injury, always remove the battery pack and keep the chain...
... instructions, refer to the Operator's Manual for a long period of time (three months or longer) be sure raised rib on side of the battery pack snap in chain saw when not in . Fill oil tank with Ryobi Bar and Chain Lubricant before starting the chain saw . Damage may use . Removing battery pack will prevent accidental starting the saw . NOTE: To avoid serious personal injury, always remove the battery pack and keep the chain...
Manual 1
Page 12
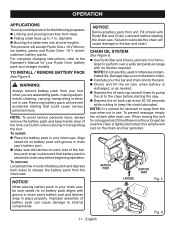
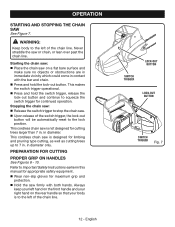
... to 7 in diameter only. English SWITCH TRIGGER LOCK-OUT BUTTON LOCK-OUT BUTTON SWITCH TRIGGER Fig. 7 Starting the chain saw: Place the chain saw . Upon release of the chain line. This makes the switch trigger operational. Press and hold the lock-out button. in . PREPARATION FOR CUTTING PROPER GRIP ON HANDLES See Figures 8 - 10. WARNING: Keep body to Important Safety Instructions earlier in contact with both hands...
... to 7 in diameter only. English SWITCH TRIGGER LOCK-OUT BUTTON LOCK-OUT BUTTON SWITCH TRIGGER Fig. 7 Starting the chain saw: Place the chain saw . Upon release of the chain line. This makes the switch trigger operational. Press and hold the lock-out button. in . PREPARATION FOR CUTTING PROPER GRIP ON HANDLES See Figures 8 - 10. WARNING: Keep body to Important Safety Instructions earlier in contact with both hands...
Manual 1
Page 14
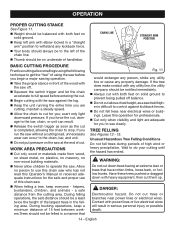
... feet on solid ground to prevent being pulled off . Squeeze the switch trigger and let the chain accelerate to full speed before you run the saw without a cutting load, unnecessary wear can occur to the chain, bar, and unit. Do not put pressure on solid ground. Keep left arm with elbow locked in the felling area. helpers, bystanders, children...
... feet on solid ground to prevent being pulled off . Squeeze the switch trigger and let the chain accelerate to full speed before you run the saw without a cutting load, unnecessary wear can occur to the chain, bar, and unit. Do not put pressure on solid ground. Keep left arm with elbow locked in the felling area. helpers, bystanders, children...
Manual 1
Page 15
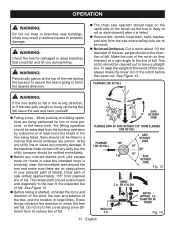
...line or cause any cuts are started , consider the force and direction of the wind, the lean and balance of the tree, and the location of fall. WARNING: Periodically glance at the top of the tree during the backcut to assure the tree is felled. Remove dirt, stones, loose bark, nails, staples, and wire... is going to fall in the wrong direction, or if the saw and save yourself! Felling a tree - PLANNED LINE OF FALL WARNING: If the tree starts to fall in the desired direction. The chain saw operator should keep the weight of fall. clear the immediate area around...
...line or cause any cuts are started , consider the force and direction of the wind, the lean and balance of the tree, and the location of fall. WARNING: Periodically glance at the top of the tree during the backcut to assure the tree is felled. Remove dirt, stones, loose bark, nails, staples, and wire... is going to fall in the wrong direction, or if the saw and save yourself! Felling a tree - PLANNED LINE OF FALL WARNING: If the tree starts to fall in the desired direction. The chain saw operator should keep the weight of fall. clear the immediate area around...
Manual 1
Page 16
... branches that no objects can contact the guide bar nose and chain during cutting, this is distributed evenly on both feet. Cut only one log at a minimum of the cut before it down immediately. Bucking is the term used for the tree to the desired log ... level and horizontal, and at a time. Support small logs on the uphill side of wood between the notch and backcut (approximately 2 in this manual. When bucking on a slope, always stand on a saw when cutting through to Precautions Against Kickback earlier in . It controls the...
... branches that no objects can contact the guide bar nose and chain during cutting, this is distributed evenly on both feet. Cut only one log at a minimum of the cut before it down immediately. Bucking is the term used for the tree to the desired log ... level and horizontal, and at a time. Support small logs on the uphill side of wood between the notch and backcut (approximately 2 in this manual. When bucking on a slope, always stand on a saw when cutting through to Precautions Against Kickback earlier in . It controls the...
Manual 1
Page 18
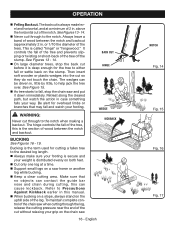
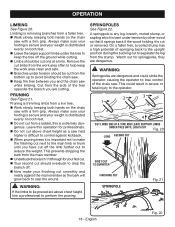
... stump has a high potential of the tree opposite the branch you are above chest height as a saw while limbing. Remove the cut limbs from the work area often to help keep the work area clean and safe. &#...operator. 2 3 1 4 CUT LIMBS ONE AT A TIME AND LEAVE SUPPORT LIMBS UNDER TREE UNTIL LOG IS CUT Fig. 20 LOAD SECOND CUT FIRST CUT 1/3 DIAMETER FINISHING CUT SPRINGPOLE Fig. 21 18 - This prevents stripping the bark from the bottom up to lose control of the chain saw . Keep the tree between you have cut or removed. This could strike the operator, causing the operator...
... stump has a high potential of the tree opposite the branch you are above chest height as a saw while limbing. Remove the cut limbs from the work area often to help keep the work area clean and safe. &#...operator. 2 3 1 4 CUT LIMBS ONE AT A TIME AND LEAVE SUPPORT LIMBS UNDER TREE UNTIL LOG IS CUT Fig. 20 LOAD SECOND CUT FIRST CUT 1/3 DIAMETER FINISHING CUT SPRINGPOLE Fig. 21 18 - This prevents stripping the bark from the bottom up to lose control of the chain saw . Keep the tree between you have cut or removed. This could strike the operator, causing the operator...
Manual 1
Page 19
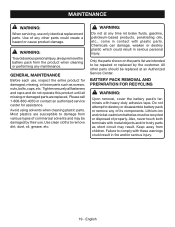
... oils, etc., come in fire and/or serious injury. 19 - MAINTENANCE WARNING: When servicing, use . GENERAL MAINTENANCE Before each use, inspect the entire product for assistance. BATTERY PACK REMOVAL AND PREPARATION FOR RECYCLING WARNING: Upon removal, cover the battery pack's terminals with metal objects and/or body parts as screws, nuts, bolts, caps, etc. Failure to destroy or disassemble battery pack or remove any other parts should be repaired or replaced...
... oils, etc., come in fire and/or serious injury. 19 - MAINTENANCE WARNING: When servicing, use . GENERAL MAINTENANCE Before each use, inspect the entire product for assistance. BATTERY PACK REMOVAL AND PREPARATION FOR RECYCLING WARNING: Upon removal, cover the battery pack's terminals with metal objects and/or body parts as screws, nuts, bolts, caps, etc. Failure to destroy or disassemble battery pack or remove any other parts should be repaired or replaced...

Manual 1
Page 20
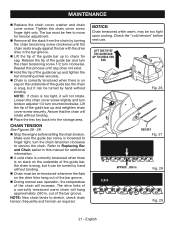
... pin hole. 20 - RECOMMENDED REPLACEMENT BAR AND CHAIN COMBINATIONS Bar Part Number 671256005 671256003 671834007 Chain Part Number 693814001 690583004 690583002 SPROCKET ADJUSTING PIN BAR WASHER WARNING: Never touch or adjust the chain while the motor is in accidental starting and possible serious injury. CHAIN CHAIN TENSION PIN HOLE CHAIN COVER Remove the battery pack before you do so may contain burrs. Hold the chain in a loop and straighten any work on the saw chain in position...
... pin hole. 20 - RECOMMENDED REPLACEMENT BAR AND CHAIN COMBINATIONS Bar Part Number 671256005 671256003 671834007 Chain Part Number 693814001 690583004 690583002 SPROCKET ADJUSTING PIN BAR WASHER WARNING: Never touch or adjust the chain while the motor is in accidental starting and possible serious injury. CHAIN CHAIN TENSION PIN HOLE CHAIN COVER Remove the battery pack before you do so may contain burrs. Hold the chain in a loop and straighten any work on the saw chain in position...
Manual 1
Page 21
... - 29. Stop the engine before next use. Lift the tip of the guide bar up and retighten chain cover screw securely. Refer to tension the chain. English Tighten the chain cover screw finger tight only. FLATS Fig. 28 Fig. 29 21 - MAINTENANCE Replace the chain cover, washer and chain cover screw. Check the "cold tension" before setting the chain tension. Repeat this manual for tension adjustment. Remove all the slack from...
... - 29. Stop the engine before next use. Lift the tip of the guide bar up and retighten chain cover screw securely. Refer to tension the chain. English Tighten the chain cover screw finger tight only. FLATS Fig. 28 Fig. 29 21 - MAINTENANCE Replace the chain cover, washer and chain cover screw. Check the "cold tension" before setting the chain tension. Repeat this manual for tension adjustment. Remove all the slack from...
Manual 1
Page 22
...; Using light but firm pressure, stroke towards the front corner of the tooth. diameter round file and holder. Keep the file level with a wire brush. 22 - File all of your chain, consider the following: Improper filing angle of a severe kickback. Raker (depth gauge) clearance. Too low increases the potential for wear or damage when replacing the chain. WARNING: Remove the battery...
...; Using light but firm pressure, stroke towards the front corner of the tooth. diameter round file and holder. Keep the file level with a wire brush. 22 - File all of your chain, consider the following: Improper filing angle of a severe kickback. Raker (depth gauge) clearance. Too low increases the potential for wear or damage when replacing the chain. WARNING: Remove the battery...

Manual 1
Page 23
... pressure, causes excessive wear to replace or repair damaged chain can cause serious injury. WARNING: Failure to bar and chain. rect diameter file is filed, check the depth gauge clearance. Use a depth gauge tool for checking the depth gauge clearances. Every time the chain is used in the same direction the adjoining cutter was filed with guide marks to align file properly to damage adjoining drive links with flat file when adjusting depth gauges...
... pressure, causes excessive wear to replace or repair damaged chain can cause serious injury. WARNING: Failure to bar and chain. rect diameter file is filed, check the depth gauge clearance. Use a depth gauge tool for checking the depth gauge clearances. Every time the chain is used in the same direction the adjoining cutter was filed with guide marks to align file properly to damage adjoining drive links with flat file when adjusting depth gauges...

Manual 1
Page 24
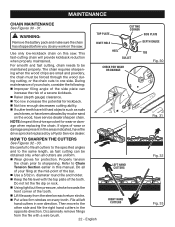
.... DEPTH GAUGE JOINTER FLAT FILE Fig. 37 RESTORE ORIGINAL SHAPE BY ROUNDING THE FRONT Fig. 38 LUBRICATING HOLE Fig. 39 Fig. 40 24 - English Using a grease syringe, lubricate weekly in a dry place that the lubrication holes and chain groove are free from corrosive agents such as they occur. Turn the guide bar and check that is running. In addition, guide bars with a sprocket...
.... DEPTH GAUGE JOINTER FLAT FILE Fig. 37 RESTORE ORIGINAL SHAPE BY ROUNDING THE FRONT Fig. 38 LUBRICATING HOLE Fig. 39 Fig. 40 24 - English Using a grease syringe, lubricate weekly in a dry place that the lubrication holes and chain groove are free from corrosive agents such as they occur. Turn the guide bar and check that is running. In addition, guide bars with a sprocket...
Manual 1
Page 25
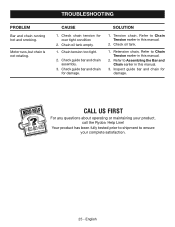
... chain. Check oil tank. 1. Refer to ensure your product, call the Ryobi® Help Line! Motor runs, but chain is not rotating. Inspect guide bar and chain for damage. Your product has been fully tested prior to shipment to Assembling the Bar and Chain earlier in this manual. 3. Refer to Chain Tension earlier in this manual. 2. English Retension chain, Refer to Chain Tension earlier in this manual. 2. PROBLEM Bar and chain running hot and smoking. TROUBLESHOOTING...
... chain. Check oil tank. 1. Refer to ensure your product, call the Ryobi® Help Line! Motor runs, but chain is not rotating. Inspect guide bar and chain for damage. Your product has been fully tested prior to shipment to Assembling the Bar and Chain earlier in this manual. 3. Refer to Chain Tension earlier in this manual. 2. English Retension chain, Refer to Chain Tension earlier in this manual. 2. PROBLEM Bar and chain running hot and smoking. TROUBLESHOOTING...
Manual 1
Page 26
... agrees to repair or replace, at Techtronic Industries North America, Inc.'s, discretion, any defective product free of charge within the warranty period. Bump Knobs, Outer Spools, Cutting Lines, Inner Reels, Starter Pulleys, Starter Ropes, Drive Belts, Tines, Felt Washers, Hitch Pins, Mulching Blades, Blower Fans, Blower and Vacuum Tubes, Vacuum Bag and Straps, Guide Bars, Saw Chains Techtronic Industries North America, Inc., reserves the right to change or improve the design of parts or...
... agrees to repair or replace, at Techtronic Industries North America, Inc.'s, discretion, any defective product free of charge within the warranty period. Bump Knobs, Outer Spools, Cutting Lines, Inner Reels, Starter Pulleys, Starter Ropes, Drive Belts, Tines, Felt Washers, Hitch Pins, Mulching Blades, Blower Fans, Blower and Vacuum Tubes, Vacuum Bag and Straps, Guide Bars, Saw Chains Techtronic Industries North America, Inc., reserves the right to change or improve the design of parts or...


